TensorFlow入门教程(27)车牌识别之文本检测模型EAST代码实现(三)
#
#作者:韦访
#博客:https://blog.csdn.net/rookie_wei
#微信:1007895847
#添加微信的备注一下是CSDN的
#欢迎大家一起学习
#
4、score map
数据增强做好以后,就来求score map和geometry map了,先来看总体的代码,如下,
'''
求score map,geo map和ignored map
'''
def map_generator(FLAGS, image, polys, ignored_labels):
    len_image = len(image)
    len_polys = len(polys)

    if len_image > 0 and len_polys < 1:
        # 没有文字的背景图
        score_map, geo_map = backgroup_maps_generateor(image, polys)
    elif len_image > 0 and len_polys > 0:
        # 有文本框的图
        score_map, geo_map = rbox_maps_generateor(FLAGS, image, polys, ignored_labels)

    return score_map, geo_map
背景图和带文本框的图的map是不一样的,先看背景图的,代码如下,
'''
求背景图的map
'''
def backgroup_maps_generateor(image, polys):
    h, w, _ = image.shape
    score_map = np.zeros((h, w), dtype=np.uint8)
    geo_map_channels = 5
    geo_map = np.zeros((h, w, geo_map_channels), dtype=np.float32)
    return score_map, geo_map
上面的代码很简单,score map和geometry map都是大小跟输入图片一样大,值都为0的张量即可。再来看带文本框的图的map,代码如下,
'''
求RBOX
'''
def rbox_maps_generateor(FLAGS, image, polys, ignored_labels):
    score_map, shrunk_poly_mask_map, ignored_labels = get_score_map(FLAGS, image, polys, ignored_labels)
    geo_map = get_rbox_geometry_map(image, polys, ignored_labels, shrunk_poly_mask_map)
    return score_map, geo_map
先来看score map怎么求,代码如下,
'''
计算score map
'''
def get_score_map(FLAGS, image, polys, ignored_labels):
    # DEBUG = True
    h, w, _ = image.shape
    score_map = np.zeros((h, w), dtype=np.uint8)
    # 用于计算geo map的
    shrunk_poly_mask_map = np.zeros((h, w), dtype=np.uint8)

    shrunk_polys = []
    for index, (poly, label) in enumerate(zip(polys, ignored_labels)):
        # 那些被标记为忽略的文本框
        if label == 1:
            continue

        # 如果文本框太小的话,也忽略掉
        poly_h = min(np.linalg.norm(poly[0] - poly[3]), np.linalg.norm(poly[1] - poly[2]))
        poly_w = min(np.linalg.norm(poly[0] - poly[1]), np.linalg.norm(poly[2] - poly[3]))
        if min(poly_h, poly_w) < FLAGS.min_text_size:
            ignored_labels[index] = 1
            continue

        # 求缩放后的文本框
        r = [None, None, None, None]
        for i in range(4):
            r[i] = min(np.linalg.norm(poly[i] - poly[(i + 1) % 4]), np.linalg.norm(poly[i] - poly[(i - 1) % 4]))

        shrunk_poly = shrink_polys(poly.copy(), r)
        # 对缩放后的文本框内所有像素点进行标记,用于后续geometry map中求文本框内的像素点到文本框的最小外接矩形的距离
        cv2.fillPoly(shrunk_poly_mask_map, shrunk_poly.astype(np.int32)[np.newaxis, :, :], index+1)
        shrunk_polys.append(shrunk_poly.astype(np.int32))

        if DEBUG:
            draw_line(image, shrunk_poly, color=(255,0,0))
            draw_line(image, poly)
    # 将score_map中,所有缩放后的文本框内的像素点的值置为1
    if len(shrunk_polys) > 0:
        cv2.fillPoly(score_map, shrunk_polys, 1)

    if DEBUG:
        score_map *= 255
        cv2.imshow("score_map", score_map)
        cv2.imshow("image", image)
        cv2.waitKey(0)
    return score_map, shrunk_poly_mask_map, ignored_labels
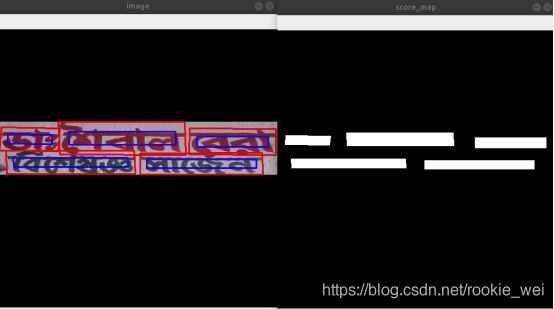
上面代码中,将太小的文本框也忽略掉,再对所有没被忽略的文本框进行缩小0.3倍(注意,不是缩放至0.3倍),然后,所有缩放后的文本框内的所有像素点的值都设为1。 shrunk_poly_mask_map是对缩放后的文本框内的所有像素进行标记,注意每个文本框的标记值都是不一样的,用于区分不同的文本框,我们后面求geometry map会用到。效果如下,
上图中,左边是原图,右边是求得的score map。其中,左图的红框表示原始的文本框,蓝框表示缩小0.3后的文本框。
5、geometry map
再来看geometry map,代码如下,
'''
计算geo map
'''
def get_rbox_geometry_map(image, polys, ignored_labels, shrunk_poly_mask_map):
    # DEBUG = True
    h, w, _ = image.shape
    geo_map_channels = 5
    geo_map = np.zeros((h, w, geo_map_channels), dtype=np.float32)

    #求文本框的最小外接矩形和角度
    for index, (poly, label) in enumerate(zip(polys, ignored_labels)):
        if label == 1:
            continue
        # 求文本框的最小外接矩形
        rect = cv2.minAreaRect(poly)
        box = cv2.boxPoints(rect)
        # 将矩形重新排序,并获得p3_p2边与x轴的夹角
        (p0, p1, p2, p3), angle = sort_poly_and_get_angle(box, image=image)

        if DEBUG:
            print("p0_rect:", p0, " p1_rect:", p1, " p2_rect:", p2, " p3_rect:", p3, " angle:", angle)
            box_int = np.int0(box)
            cv2.circle(image, tuple(box_int[0]), 2, (0,255,0), 4)
            cv2.circle(image, tuple(box_int[1]), 2, (0,0,255), 4)
            cv2.drawContours(image, [box_int], 0, (0,255,0), 1)
            cv2.imshow("shrunk_poly_mask_map", shrunk_poly_mask_map*255)
            cv2.imshow("image", image)
            cv2.waitKey(0)

        # 遍历score map中,所以缩放后的文本框内的像素点到其最小外接矩形的四边的距离
        xy_in_poly = np.argwhere(shrunk_poly_mask_map == (index + 1))
        for y, x in xy_in_poly:
            point = np.array([x, y], dtype=np.float32)
            # top
            geo_map[y, x, 0] = point_dist_to_line(p0, p1, point)
            # right
            geo_map[y, x, 1] = point_dist_to_line(p1, p2, point)
            # down
            geo_map[y, x, 2] = point_dist_to_line(p2, p3, point)
            # left
            geo_map[y, x, 3] = point_dist_to_line(p3, p0, point)
            # angle
            geo_map[y, x, 4] = angle

    if DEBUG:
        cv2.imshow("geo_map", geo_map[:,:,0]*255)
        cv2.waitKey(0)
    return geo_map
上面的代码中,先求所有未被忽略的文本框的最小外接矩形。然后,求文本框内所有像素点到其最小外接矩形四条边的距离,以及最下面的边相对x轴的夹角。如下图所示,
上图中,左图为原始图,中间为缩放后的文本框的shrunk_poly_mask_map,右图为geometry map有数据的像素点。可以看到,geometry map中有数据的像素点都是缩放后的文本框内的像素点。
6、网络模型
接下来看网络模型的设计,先来回顾一下论文中的结构图,
我们网络模型设计的跟上图差不多,只不过用ResNet代替它的PVANet,当然你也可以考虑其他的网络,主要思路一致就可以了。代码如下,
def resize_bilinear(x):
    return tf.compat.v1.image.resize_bilinear(x, size=[tf.shape(x)[1] * RESIZE_FACTOR, tf.shape(x)[2] * RESIZE_FACTOR])

class EAST_model(tf.keras.Model):
    def __init__(self, input_size):
        super(EAST_model, self).__init__()
        input_image = tf.keras.layers.Input(shape=(None, None, 3), name='input_image')
        resnet = tf.keras.applications.ResNet50(input_tensor=input_image, weights='imagenet', include_top=False, pooling=None)
        x = resnet.get_layer('conv5_block3_out').output

        x = tf.keras.layers.Lambda(resize_bilinear, name='resize_1')(x)
        x = tf.keras.layers.concatenate([x, resnet.get_layer('conv4_block6_out').output], axis=3)
        x = tf.keras.layers.Conv2D(128, (1, 1), padding='same', kernel_regularizer=tf.keras.regularizers.l2(1e-5))(x)
        x = tf.keras.layers.BatchNormalization(momentum=0.997, epsilon=1e-5, scale=True)(x)
        x = tf.keras.layers.Activation('relu')(x)
        x = tf.keras.layers.Conv2D(128, (3, 3), padding='same', kernel_regularizer=tf.keras.regularizers.l2(1e-5))(x)
        x = tf.keras.layers.BatchNormalization(momentum=0.997, epsilon=1e-5, scale=True)(x)
        x = tf.keras.layers.Activation('relu')(x)

        x = tf.keras.layers.Lambda(resize_bilinear, name='resize_2')(x)
        x = tf.keras.layers.concatenate([x, resnet.get_layer('conv3_block4_out').output], axis=3)
        x = tf.keras.layers.Conv2D(64, (1, 1), padding='same', kernel_regularizer=tf.keras.regularizers.l2(1e-5))(x)
        x = tf.keras.layers.BatchNormalization(momentum=0.997, epsilon=1e-5, scale=True)(x)
        x = tf.keras.layers.Activation('relu')(x)
        x = tf.keras.layers.Conv2D(64, (3, 3), padding='same', kernel_regularizer=tf.keras.regularizers.l2(1e-5))(x)
        x = tf.keras.layers.BatchNormalization(momentum=0.997, epsilon=1e-5, scale=True)(x)
        x = tf.keras.layers.Activation('relu')(x)

        x = tf.keras.layers.Lambda(resize_bilinear, name='resize_3')(x)
        x = tf.keras.layers.concatenate([x, resnet.get_layer('conv2_block3_out').output], axis=3)
        x = tf.keras.layers.Conv2D(32, (1, 1), padding='same', kernel_regularizer=tf.keras.regularizers.l2(1e-5))(x)
        x = tf.keras.layers.BatchNormalization(momentum=0.997, epsilon=1e-5, scale=True)(x)
        x = tf.keras.layers.Activation('relu')(x)
        x = tf.keras.layers.Conv2D(32, (3, 3), padding='same', kernel_regularizer=tf.keras.regularizers.l2(1e-5))(x)
        x = tf.keras.layers.BatchNormalization(momentum=0.997, epsilon=1e-5, scale=True)(x)
        x = tf.keras.layers.Activation('relu')(x)

        x = tf.keras.layers.Conv2D(32, (3, 3), padding='same', kernel_regularizer=tf.keras.regularizers.l2(1e-5))(x)
        x = tf.keras.layers.BatchNormalization(momentum=0.997, epsilon=1e-5, scale=True)(x)
        x = tf.keras.layers.Activation('relu')(x)

        pred_score_map = tf.keras.layers.Conv2D(1, (1, 1), activation=tf.nn.sigmoid, name='pred_score_map')(x)
        rbox_geo_map = tf.keras.layers.Conv2D(4, (1, 1), activation=tf.nn.sigmoid, name='rbox_geo_map')(x)
        rbox_geo_map = tf.keras.layers.Lambda(lambda x: x * input_size)(rbox_geo_map)
        angle_map = tf.keras.layers.Conv2D(1, (1, 1), activation=tf.nn.sigmoid, name='rbox_angle_map')(x)
        angle_map = tf.keras.layers.Lambda(lambda x: (x - 0.5) * np.pi / 2)(angle_map)
        pred_geo_map = tf.keras.layers.concatenate([rbox_geo_map, angle_map], axis=3, name='pred_geo_map')

        self.model = tf.keras.models.Model(inputs=[input_image], outputs=[pred_score_map, pred_geo_map])


    def call(self, x):
        return self.model(x)
7、损失函数
score map的损失函数用dice loss,geometry map则用IoU loss,角度则直接用cos就可以了,代码如下,
'''
这里使用dice loss,而不是用论文的交叉熵,dice loss常用于影像分割
'''
def score_dice_loss(score_map, pred_score_map):
    inter = tf.reduce_sum(score_map * pred_score_map)
    union = tf.reduce_sum(score_map) + tf.reduce_sum(pred_score_map) + 1e-5
    loss = 1. - (2 * inter / union)
    return loss

def geo_loss(geo_map, pred_geo_map, score_map, lambda_theta=10):
    d1_gt, d2_gt, d3_gt, d4_gt, angle_gt = tf.split(value=geo_map, num_or_size_splits=5, axis=3)
    d1_pred, d2_pred, d3_pred, d4_pred, angle_pred = tf.split(value=pred_geo_map, num_or_size_splits=5, axis=3)
    # 求面积,即宽x高
    area_gt = (d1_gt + d3_gt) * (d2_gt + d4_gt)
    area_pred = (d1_pred + d3_pred) * (d2_pred + d4_pred)
    # 求交集
    w_union = tf.minimum(d2_gt, d2_pred) + tf.minimum(d4_gt, d4_pred)
    h_union = tf.minimum(d1_gt, d1_pred) + tf.minimum(d3_gt, d3_pred)
    area_intersect = w_union * h_union
    # 求并集
    area_union = area_gt + area_pred - area_intersect
    # 求aabb的损失
    L_AABB = -tf.math.log((area_intersect + 1.0) / (area_union + 1.0))
    # 求角度的损失
    L_theta = 1 - tf.cos(angle_pred - angle_gt)
    # 求总得geo损失
    L_g = L_AABB + lambda_theta * L_theta
    return tf.reduce_mean(L_g * score_map)
8、训练
一些比较简单的创建tf.data、优化器等代码我就不具体说了,大家直接看代码和注释好了。训练的核心代码如下所示,
def main(_):
    score_map_loss_weight = 1.
    # 获取数据集
    icdar = ICDAR2017_Dataset(FLAGS)
    ds = icdar.create_dataset("train")

    # 创建模型
    east = EAST_model(input_size=FLAGS.input_size)
    east.model.summary()
    optimizer = east_optimizer(init_learning_rate=FLAGS.learning_rate, lr_decay_rate=FLAGS.lr_decay_rate, lr_decay_steps=FLAGS.lr_decay_steps)

    # set checkpoint manager
    ckpt = tf.train.Checkpoint(step=tf.Variable(0), model=east)
    ckpt_manager = tf.train.CheckpointManager(ckpt, directory=FLAGS.checkpoint_dir, max_to_keep=5)
    latest_ckpt = tf.train.latest_checkpoint(FLAGS.checkpoint_dir)

    # restore latest checkpoint
    if latest_ckpt:
        ckpt.restore(latest_ckpt)
        print('global_step : {}, checkpoint is restored!'.format(int(ckpt.step)))

    while int(ckpt.step) < (FLAGS.max_steps + 1):
        for images, score_maps, geo_maps in ds:
            east_train(east, optimizer, images, score_maps, geo_maps, score_map_loss_weight)
            scoreloss, _ = east_loss_print(int(ckpt.step), east, images, score_maps, geo_maps, score_map_loss_weight)

            # 刚开始训练时, score_map_loss_weight权重设得大一点,设为1,好让score map快速收敛,
            # 当score loss小于0.2时,score_map_loss_weight设得小一些,为0.01,以重点训练geo map
            if scoreloss < 0.2:
                score_map_loss_weight = 0.01

            if ckpt.step % FLAGS.save_checkpoint_steps == 0:
                ckpt_manager.save(checkpoint_number=ckpt.step)
                print('global_step : {}, checkpoint is saved!'.format(int(ckpt.step)))
            ckpt.step.assign_add(1)
            if int(ckpt.step) > (FLAGS.max_steps):
                break
运行结果,
9、验证
我上面才运行了九千多步,所以效果还并不算好,感兴趣的可以继续训练下去,效果就会好很多了。
这样,我们就完成了文本检测的任务了。接下来,我们要基于此代码,来做车牌检测的任务。
10、完整代码
https://mianbaoduo.com/o/bread/YZWcl5lt


