Android架构之LiveData组件
Jetpack组件系列文章
Android架构之LifeCycle组件
Android架构之Navigation组件(一)
Android架构之Navigation组件(二)
Android架构之Navigation组件(三)
Android架构之Navigation组件(四)
Android架构之ViewModel组件
Android架构之LiveData组件
Android架构之Room组件(一)
Android架构之Room组件(二)
Android架构之WorkManager组件
Android架构之DataBinding(一)
Android架构之DataBinding(二)
Android架构之Paging组件(一)
Android架构之Paging组件(二)
Jetpack与MVVM架构
前言
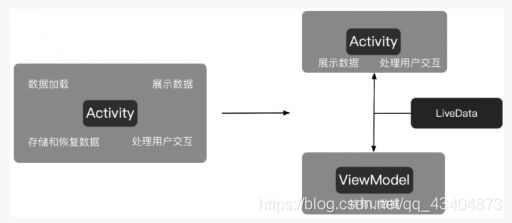
在上一节中,我们学习了ViewModel,我们使用的是接口来完成ViewModel与页面之间的通信,其实这并不是好的方案。 这篇博客,就让我们来了解LiveData与ViewModel是如何配合工作的。
LiveData介绍
LivaData是一个可被观察的数据容器类。具体来说,可以将LiveData理解为一个数据的容器,它将数据包装起来,使数据成为观察者,当该数据发生变化时,观察者能够获得通知。与常规的可观察类不同,LiveData可以感知(如Activity、Fragment或Service)的生命周期。
简单来说,LiveData具有如下优势
- LiveData 遵循观察者模式。当生命周期状态发生变化时,LiveData 会通知 Observer 对象,可以在这些Observer对象中更新界面
- 不会发送内存泄露
- 如果观察者的生周期处于非活跃状态(如返回栈中的Activity),则它不会接收任何LivaData事件,但是,当非活跃状态变成活跃状态时会立刻接收最新的数据(后台的Activity返回前台时)
- 当config导致Activity/Fragment重建时,不需要再手动的管理数据的存储与恢复。
LiveData和ViewModel的关系
ViewModel用于存放页面所需要的各种数据,对页面来说,它并不关心ViewModel中的业务逻辑,它只关心需要展示的数据是什么,并且希望再数据发送变化时,能及时得到通知并做出更新。LiveData的作用就是,在ViewModel中的数据发生变化时通知页面,用于包装ViewModel中那些需要被外界观察的数据。
LiveData基本使用
在上篇博客中的ViewModel的计时器案例的基础上,我们使用LiveData对接口进行改写
1.LiveData是一个抽象类,不能直接使用。我们通常使用的是它的直接子类MutableLiveData,代码如下
public class LiveDataViewModel extends ViewModel {

    private MutableLiveData<Integer> currentSecond;
    private Timer timer;
    private  int current;

    @Override
    protected void onCleared() {

        super.onCleared();
        //释放资源
        timer.cancel();
    }

    public LiveData<Integer> getCurrentSecond(){

        if(currentSecond == null){

            currentSecond = new MutableLiveData<>();
        }
        return  currentSecond;
    }

    //开始定时器
    public  void startTiming(){

        if(timer == null){

            current = 0;
            timer = new Timer();
            TimerTask timerTask = new TimerTask() {

                @Override
                public void run() {

                    if(currentSecond!=null){

                        currentSecond.postValue(current++);
                    }
                }
            };
            timer.schedule(timerTask,1000,1000);
        }
    }

    //关闭定时器
    public  void stopTiming(){

        timer.cancel();
    }
}
当开始定时器的时候,也就是我们数据资源发生变化的时候,我们需要调用livedata.postvalue方法,通知页面我们数据源已经发生了改变。至于为什么不用livedata.setValue方法,等下我们会说到。
2.接着我们在Activity中创建ViewModel,并监听ViewModel里面currentSecond数据的变化。
public class LiveDataActivity extends AppCompatActivity {


    @Override
    protected void onCreate(Bundle savedInstanceState) {

        super.onCreate(savedInstanceState);
        setContentView(R.layout.activity_live_data);

        iniComponent();
    }

    private void iniComponent() {

        //通过ViewModelProvider得到ViewModel
        final LiveDataViewModel viewModel = new ViewModelProvider(this).get(LiveDataViewModel.class);

        //得到ViewModel中的LiveData
        final MutableLiveData<Integer> liveData = (MutableLiveData<Integer>) viewModel.getCurrentSecond();

        //通过liveData.observer()观察ViewModel中数据的变化
        liveData.observe(this, new Observer<Integer>() {

            @Override
            public void onChanged(Integer integer) {

                //收到回调后更新UI界面
                TextView tv = findViewById(R.id.tv_texts);
                tv.setText("小鑫啊"+integer);
            }
        });

        //关闭定时器
        findViewById(R.id.btnReset).setOnClickListener(new View.OnClickListener() {

            @Override
            public void onClick(View v) {

                //通过LiveData.setValue()/LiveData.postValue()
                //完成对ViewModel中数据的更新
                liveData.setValue(0);
                //关闭定时器
                viewModel.stopTiming();
            }
        });

        //计时开始
        viewModel.startTiming();

    }
}
在页面中,通过LiveData.observe()方法对LivaData所包装的数据进行观察。当我们数据源发生变化了(也就是我们想修改LivaData所包装的数据时),就可以通过LiveData.postValue/LiveData.setValue()来完成,然后onChanged方法就会收到我们修改之后的数据,我们就可以对UI进行更改了.
需要注意的是:postValue()方法用在非UI线程中,而setValue()方法用在UI线程中,这就是为什么我们在开始定时器的时候,需要调用postVaule()发送数据了(因为定时器是运行在非UI线程的).

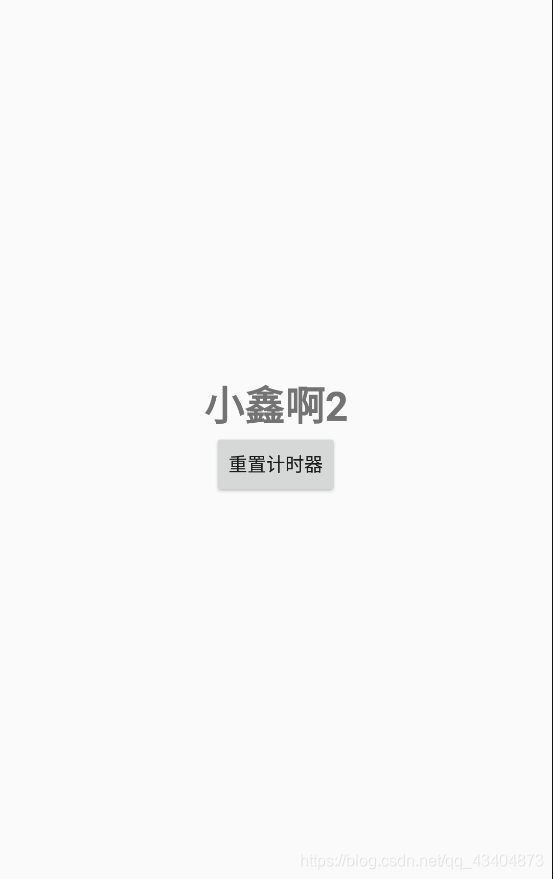
运行结果如下:

LivaData的基本使用就到这里,是不是很简单啊! 接下来,就让我们来探讨下LiveData的原理吧!!!
LiveData的原理
我们知道LiveData是通过观察者模式实现的。当数据发送改变的时候,会回调Observer的onChanged(),接下来就让我们深入Observer方法的源码一探究竟
observe源码
 @MainThread
    public void observe(@NonNull LifecycleOwner owner, @NonNull Observer<? super T> observer) {

        assertMainThread("observe");
        if (owner.getLifecycle().getCurrentState() == DESTROYED) {

            // ignore
            return;
        }
        LifecycleBoundObserver wrapper = new LifecycleBoundObserver(owner, observer);
        //判断当前wapper已经添加过,如果添加过就直接返回,否则返回null
        ObserverWrapper existing = mObservers.putIfAbsent(observer, wrapper);
        if (existing != null && !existing.isAttachedTo(owner)) {

            throw new IllegalArgumentException("Cannot add the same observer"
                    + " with different lifecycles");
        }
        //如果已经添加过,就直接返回
        if (existing != null) {

            return;
        }
        //没有添加过,则添加wrapper
        owner.getLifecycle().addObserver(wrapper);
    }
从源码可以看出,Observer()方法接收的第一个参数是一个LifecleOwner对象,我们传入的是this,因为this的祖父类实现了这个接口,也正是LifecleOwner对象,LiveData才会具体生命周期感知能力。
首先, 通过owner.getLifecycle().getCurrentState()获取当前页面的状态,如果当前页面被销毁了,就直接返回,也就是说LiveData会自动清除与页面的关联。
LifecycleBoundObserver 源码
 class LifecycleBoundObserver extends ObserverWrapper implements LifecycleEventObserver {

        @NonNull
        final LifecycleOwner mOwner;

        LifecycleBoundObserver(@NonNull LifecycleOwner owner, Observer<? super T> observer) {

            super(observer);
            mOwner = owner;
        }

        @Override
        boolean shouldBeActive() {

            return mOwner.getLifecycle().getCurrentState().isAtLeast(STARTED);
        }

        @Override
        public void onStateChanged(@NonNull LifecycleOwner source,
                @NonNull Lifecycle.Event event) {

            if (mOwner.getLifecycle().getCurrentState() == DESTROYED) {

                removeObserver(mObserver);
                return;
            }
            activeStateChanged(shouldBeActive());
        }
当调用 LifecycleBoundObserver wrapper = new LifecycleBoundObserver(owner, observer),本质是通过 ObserverWrapper将observer包装起来,得以LiveData能对生命周期状态得以进行监听,是通过onStateChanged和shouldBeActive方法
- shouldBeActive 这里调用LiftCycle的方法,表达如果当前生命周期的状态为onStart,onResume,onPause时 返回true,也就是说只有这三个状态可以接收数据更新。
- onStateChanged 是LifecycleEventObserver接口的方法,当生命周期发送变化的时候会回调它,如果当前生命周期状态是destory,就会直接移除观察者,否则就会调用activeStateChanged(shouldBeActive());方法激活观察者.
方法中的最后一行代码将observer与Activity的生命周期关联在一起。因此,LivaData能够感知页面的生命周期。
observer方法小结
- 判断是否已经销毁,如果当前页面销毁,LiveData自动清除与页面的关联
- 用LifecycleBoundObserver 对observer进行一个包装
- 判断当前observer是否已经添加过,添加过就直接返回
- 将observer方法与Activity的生命周期进行关联
setValue方法
 @MainThread
    protected void setValue(T value) {

        assertMainThread("setValue");
        mVersion++;
        mData = value;
        dispatchingValue(null);
    }
setValue()中,首先 断言是主线程,这里的关键是dispatchingValue(null)方法
void dispatchingValue(@Nullable ObserverWrapper initiator) {

        if (mDispatchingValue) {

            mDispatchInvalidated = true;
            return;
        }
        mDispatchingValue = true;
        do {

            mDispatchInvalidated = false;
            if (initiator != null) {

                considerNotify(initiator);
                initiator = null;
            } else {

                for (Iterator<Map.Entry<Observer<? super T>, ObserverWrapper>> iterator =
                        mObservers.iteratorWithAdditions(); iterator.hasNext(); ) {

                    considerNotify(iterator.next().getValue());
                    if (mDispatchInvalidated) {

                        break;
                    }
                }
            }
        } while (mDispatchInvalidated);
        mDispatchingValue = false;
    }
只有处于active(激活)状态的观察者,这个方法就会把数据发送给它们。由于每次dispathchingValue传入的null,所以会走else这一部分代码, 这时候就会遍历所有的observer,最后通过调用considerNotify()将数据进行分发给所有的observer
private void considerNotify(ObserverWrapper observer) {

        if (!observer.mActive) {

            return;
        }
        // Check latest state b4 dispatch. Maybe it changed state but we didn't get the event yet.
        //
        // we still first check observer.active to keep it as the entrance for events. So even if
        // the observer moved to an active state, if we've not received that event, we better not
        // notify for a more predictable notification order.
        //如果当前observer不是激活状态,也就是当前页面被destory,直接return.
        if (!observer.shouldBeActive()) {

            observer.activeStateChanged(false);
            return;
        }
        if (observer.mLastVersion >= mVersion) {

            return;
        }
        observer.mLastVersion = mVersion;
        observer.mObserver.onChanged((T) mData);
    }
只有出于活跃状态且数据是数据是最新的,才会去分发数据,最后回调到我们熟悉的onChanged()方法。
postValue方法
 protected void postValue(T value) {

        boolean postTask;
        synchronized (mDataLock) {

            postTask = mPendingData == NOT_SET;
            mPendingData = value;
        }
        if (!postTask) {

            return;
        }
        ArchTaskExecutor.getInstance().postToMainThread(mPostValueRunnable);
    }
postValue方法是可以在子线程(非UI线程)发送数据的,但是onChanged()方法始终是在主线程? 答案就在postToMainThread(mPostValueRunnable)方法中;
private final Runnable mPostValueRunnable = new Runnable() {

        @SuppressWarnings("unchecked")
        @Override
        public void run() {

            Object newValue;
            synchronized (mDataLock) {

                newValue = mPendingData;
                mPendingData = NOT_SET;
            }
            setValue((T) newValue);
        }
    };
创建一个Handler将子线程中的任务发送到主线程去执行,其本质还是调用了setValue()方法
LiveData.observeForever()方法
如果你想无论页面处于何种生命周期,setValue/postValue之后立刻回到数据。那么可以使用observerForever()方法,使用起来与observer()没有太大差别. 因为AlwaysActiveObserver没有实现GenericLifecycleObserver 接口,不能感应生命周期。
但是需要注意的是,在用完之后,一定要记得在onDestroy()方法中调用removeObserver()方法来停止对LiveData的观察,否则LiveData会一直处于激活状态,Activity则永远不会被系统自动回收,会造成内存泄露。
ViewModel+LiveData实现Fragment间的通信
我们已经知道,ViewModel能够将数据从Activity中剥离出来。只要Activity不被销毁,ViewModel会一直存储,并且独立于Activity的配置变化。
Fragment可以被看作Activty的子页面,即一个Activity中可以包含多个Fragment.这些Fragment彼此独立,但是又都属于同一个Activity.
基于ViewModel和Fragment组件的这些特性,我们可以利用LiveData,实现同一个Activity中的不同Fragment间的通信,因为不同的Fragment得到的都是同一个LiveData;
定义ViewModel和LiveData
public class SharedViewModel extends ViewModel {

    private MutableLiveData<String> content;

    @Override
    protected void onCleared() {

        super.onCleared();
        //释放资源
        content=  null;
    }

    public LiveData<String> getContent(){

        if(content == null){

            content = new MutableLiveData<>();
        }
        return  content;
    }
}
初始化Fragment
Fragment之间的跳转我们使用导航图来进行跳转
share_graph.xml
<?xml version="1.0" encoding="utf-8"?>
<navigation xmlns:android="http://schemas.android.com/apk/res/android"
    xmlns:app="http://schemas.android.com/apk/res-auto"
    xmlns:tools="http://schemas.android.com/tools"
    android:id="@+id/share_graph"
    app:startDestination="@id/masterFragment">

    <fragment
        android:id="@+id/masterFragment"
        android:name="com.example.jetpack.MasterFragment"
        android:label="fragment_master"
        tools:layout="@layout/fragment_master" >
        <action
            android:id="@+id/action_masterFragment_to_detailFragment"
            app:destination="@id/detailFragment" />
    </fragment>
    <fragment
        android:id="@+id/detailFragment"
        android:name="com.example.jetpack.DetailFragment"
        android:label="fragment_detail"
        tools:layout="@layout/fragment_detail" />
</navigation>
MasterFragment 布局
我们使用EditText输入框,输入内容后,点击跳转到DetailFragment后,DetailFragment获取到输入框的内容,并显示在TextView上
<?xml version="1.0" encoding="utf-8"?>
<LinearLayout xmlns:android="http://schemas.android.com/apk/res/android"
    xmlns:tools="http://schemas.android.com/tools"
    android:layout_width="match_parent"
    android:layout_height="match_parent"
    tools:context=".MasterFragment"
    android:gravity="center"
    android:orientation="vertical">

    <EditText
        android:id="@+id/edit_text"
        android:layout_width="match_parent"
        android:layout_height="wrap_content"
        android:hint="输入内容"
        android:textSize="20sp"/>
    <Button
        android:id="@+id/toDetail"
        android:layout_width="wrap_content"
        android:layout_height="wrap_content"
        android:text="toDetailFragment"/>

</LinearLayout>
MasterFragment 代码
  private SharedViewModel model;
    @Override
    public View onCreateView(LayoutInflater inflater, ViewGroup container,
                             Bundle savedInstanceState) {

        View view =  inflater.inflate(R.layout.fragment_master, container, false);
        //设置数据
        model = new ViewModelProvider(getActivity()).get(SharedViewModel.class);
        final MutableLiveData<String> mutableLiveData = (MutableLiveData<String>) model.getContent();

        final EditText editText = view.findViewById(R.id.edit_text);
        view.findViewById(R.id.toDetail).setOnClickListener(new View.OnClickListener() {

            @Override
            public void onClick(View v) {


                //获取EditText中的数据,并通知livaData进行更新
                String text = editText.getText().toString().trim();
                mutableLiveData.setValue(text);
                Navigation.findNavController(v).navigate(R.id.action_masterFragment_to_detailFragment);
            }
        });
        return view;
    }
detailFragment布局
<?xml version="1.0" encoding="utf-8"?>
<LinearLayout xmlns:android="http://schemas.android.com/apk/res/android"
    xmlns:tools="http://schemas.android.com/tools"
    android:layout_width="match_parent"
    android:layout_height="match_parent"
    tools:context=".DetailFragment"
    android:gravity="center">

    <TextView
        android:id="@+id/tv_text1"
        android:layout_width="wrap_content"
        android:layout_height="wrap_content"
        android:text="哈哈哈"
        android:textSize="30sp"
        android:textStyle="bold"/>

</LinearLayout>
detailFragment代码
@Override
    public View onCreateView(LayoutInflater inflater, ViewGroup container,
                             Bundle savedInstanceState) {

        View view =inflater.inflate(R.layout.fragment_detail, container, false);
        final TextView textView = view.findViewById(R.id.tv_text1);
        SharedViewModel model = new ViewModelProvider(getActivity()).get(SharedViewModel.class);
        MutableLiveData<String> mutableLiveData = (MutableLiveData<String>) model.getContent();
        //对LiveData进行监听
        mutableLiveData.observe(getActivity(), new Observer<String>() {

            @Override
            public void onChanged(String s) {

                //显示在UI上
                textView.setText(s);
            }
        });

        return view;
    }
Activity布局
<?xml version="1.0" encoding="utf-8"?>
<LinearLayout
    xmlns:android="http://schemas.android.com/apk/res/android"
    xmlns:tools="http://schemas.android.com/tools"
    xmlns:app="http://schemas.android.com/apk/res-auto"
    android:layout_width="match_parent"
    android:layout_height="match_parent"
    tools:context=".viewmodel.ShareActivity"
    android:gravity="center">
  <fragment
      android:id="@+id/nav_host_fragment"
      android:layout_width="match_parent"
      android:layout_height="wrap_content"
      android:name="androidx.navigation.fragment.NavHostFragment"
      app:defaultNavHost= "true"
      app:navGraph="@navigation/share_graph"/>
  </LinearLayout>
只是定义一个Fragment来显示两个Fragment而已,代码文件没有进行任何的更改
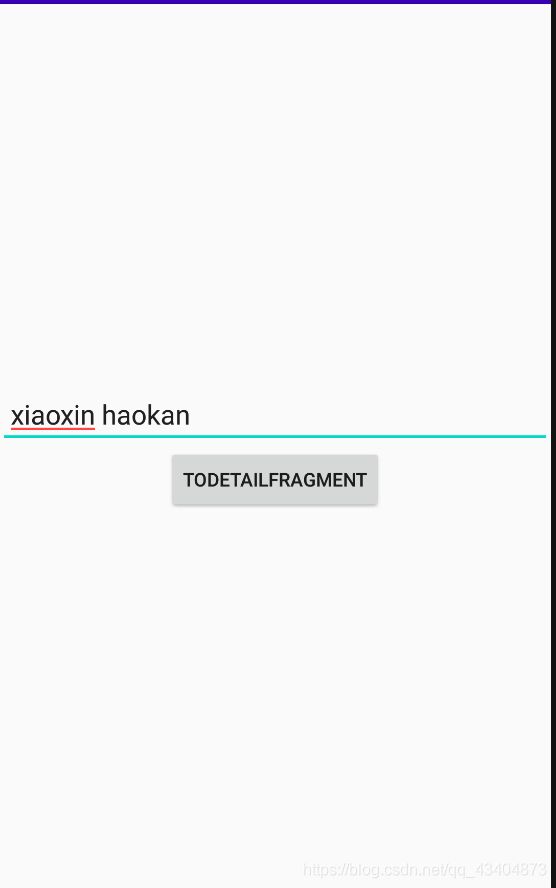
运行程序:

事实证明,两个Fragment获取到的是同一个LiveData, 在MasterFragment对LiveData数据进行更改,在DetailFragment对LiveData进行监听,并将监听到的数据显示在TextView上面。 是不是也非常简单啦
总结
- 本节中,我们学习了LiveData+ViewModel的基本使用。
- 并对LiveData源码,进行了一个大概的分析。知道了LiveData为什么能感知组件的生命周期
- LiveData的本质是观察者模式,可以感知页面的生命周期,当然你也可以使用observeForver()方法让LiveData忽略页面的生命周期,但是需要注意,用完之后要在onDestroy()方法用removeObserver()方法移除监听,否则会造成内存泄露。
- LiveData大部分是在ViewModel中使用的,但是它的作用不止于此,下节,我们就来说,LiveData如果搭配Room数据库组件进行使用.
好了,LiveData到这里就结束了,不足之处,望大家指出来,谢谢。
参考:
- LiveData解析
- LiveData源码解析
