mobilenetv2的Pytorch模型转onnx模型再转ncnn模型
一、Pytorch模型转onnx模型
1、准备一个训练好的模型
模型下载链接: https://pan.baidu.com/s/1hmQf0W8oKDCeMRQ2MgjnPQ | 提取码: xce4
2、模型转换及测试代码(详细过程见代码注释)
(1)先加载一张mnist测试图片用pytorch模型测试得出结果(判断Pytorch模型是否正确)
(2)Pytorch模型转onnx模型(模型转换)
(3)用onnx模型测试第(1)步加载的mnist图片来测试结果(用于与Pytorch模型进行比对)
(4)比对两种模型测试结果
import numpy as np
import torch
from torch.autograd import Variable
import torch.nn.functional as F
import cv2
from torch.onnx import OperatorExportTypes
from yolov3.modeling import build_backbone

from yolov3.configs.default import get_default_config
from yolov3.layers import ShapeSpec

def mobilenetv2():
    # 先加载一张mnist测试图片用pytorch模型测试得出结果(判断Pytorch模型是否正确)
    input = cv2.imread("/home/lin/mnist/train/6/13.jpg")
    input = cv2.cvtColor(input, cv2.COLOR_BGR2RGB)
    input = cv2.resize(input, (32, 32))

    # numpy image(H x W x C) to torch image(C x H x W)
    input = np.transpose(input, (2, 0, 1)).astype(np.float32)

    # normalize
    input = input/255.0

    input = Variable(torch.from_numpy(input))
    # add one dimension in 0
    input = input.unsqueeze(0)
    # print(input.shape)

    cfg = get_default_config()
    cfg.MODEL.BACKBONE.NAME = "build_mobilenetv2_backbone"
    # height = imgHeight, width = imgWeight
    input_shape = ShapeSpec(channels=3, height=32, width=32, stride=32)
    # build backbone
    net = build_backbone(cfg, input_shape)
    # load trained model
    net.load_state_dict(torch.load("../../tools/weights/build_mobilenetv2_backbone_epoch_63.pth"))
    # disable BathNormalization and Dropout
    net.eval()
    # test model
    tensor_out = net(input)
    # softmax
    model_test_out = F.softmax(tensor_out["linear"], dim=1)
    print("the model result is {}".format(model_test_out))
    # Pytorch模型转onnx模型(模型转换)
    # pytorch -> onnx
    torch.onnx.export(net, #model being run
                     input,  #model input (or a tuple for multiple inputs)
                     "./weights/mobilenetv2.onnx", # where to save the model (can be a file or file-like object)
                     operator_export_type=OperatorExportTypes.ONNX_ATEN_FALLBACK
    )

    import onnx
    import onnxruntime

    # load onnx model
    onnx_model = onnx.load("./weights/mobilenetv2.onnx")
    # 用onnx模型测试第(1)步加载的mnist图片来测试结果(用于与Pytorch模型进行比对)
    # check onnx model
    onnx.checker.check_model(onnx_model)
    ort_session = onnxruntime.InferenceSession("./weights/mobilenetv2.onnx")

    def to_numpy(tensor):
        return tensor.detach().cpu().numpy() if tensor.requires_grad else tensor.cpu().numpy()

    # compute ONNX Runtime output prediction
    ort_inputs = {ort_session.get_inputs()[0].name: to_numpy(input)}
    ort_outs = ort_session.run(None, ort_inputs)

    # softmax
    tensor_ort_out = torch.from_numpy(ort_outs[0])
    onnx_test_out = F.softmax(tensor_ort_out, dim=1)

    print("the onnx result is {}".format(onnx_test_out))

    # compare onnx Runtime and PyTorch results
    np.testing.assert_allclose(to_numpy(tensor_out["linear"]), ort_outs[0], rtol=1e-01, atol=1e-05)
    # 比对两种模型测试结果
    print("Exported model has been tested with ONNXRuntime, and the result looks good!")

if __name__ == "__main__":
    mobilenetv2()
3、测试结果
(1)Pytorch模型测试结果
(2)onnx模型测试结果
二、onnx模型转ncnn模型
1、首先是环境配置
可以参考笔者的上一个博客:Windows下ncnn环境配置(VS2019)
或者直接进入官方链接:ncnn
2、onnx模型转ncnn模型
(1)将第一步中得出的onnx模型复制到“
(2)模型转换:打开命令行进入到“
onnx2ncnn mobilenetv2.onnx mobilenetv2.param mobilenetv2.bin ![]()
结果:生成两个新文件(模型转换成功)
(3)模型加密:打开命令行进入到“
ncnn2mem ./onnx/mobilenetv2.param ./onnx/mobilenetv2.bin mobilenetv2.id.h mobilenetv2.men.h ![]()
结果:生产三个新文件(模型加密成功)
三、ncnn模型检测
1、检测代码下载
地址:https://github.com/linguanghan/ncnn_mobilenetv2_win-master
2、下载后用VS打开ex_1.sln(打开后会发现很多库引不进来=>进入下一步)
3、VS配置
(1)打开属性管理器如下图
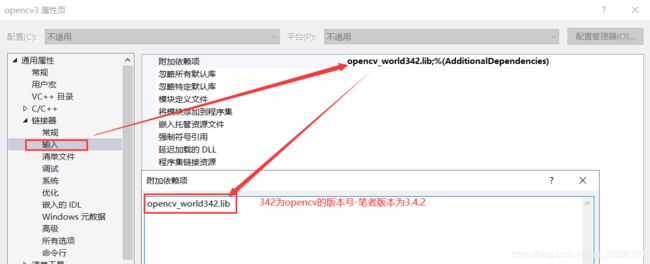
(2)双击上图的opencv3修改配置(修改VC++的包含目录、库目录 和 链接器输入中的附加依赖项)如下三图:
注意:是你自己的opencv安装路径
(3)修改cnn_release配置文件(双击第(1)步中第二个截图中的cnn_release => 修改VC++的包含目录、库目录 和 链接器输入中的附加依赖项)如下三图
注意:是你自己的ncnn安装路径
4、配置完成后就可以运行main.cpp
注意:以下红框必须选择Release、X64
5、测试结果(左侧图片在项目的images文件夹下)
附: 参考链接 https://github.com/Tencent/ncnn
https://blog.csdn.net/weixin_42184622/article/details/102593448
https://blog.csdn.net/u011961856/article/details/97372919


