Python图像处理:使用TensorFlow或Keras进行图像分类
在本节中,我们将重新讨论手写数字分类的问题(使用MNIST数据集),但这次使用的是深度神经网络,即使用两个非常流行的深度学习库TensorFlow和Keras来解决这个问题。TensorFlow(TF)是用于建立深度学习模型的著名的库,它有一个非常庞大且令人惊艳的社区。然而,TensorFlow并不容易学会使用。而Keras是一个基于TensorFlow的高级应用程序接口(API),对底层结构的控制较少,但它比TF更友好且更易于使用。底层库提供了更多的灵活性,因此TF可以相比Keras可以更多地调整,更灵活。
10.3.1 使用TensorFlow进行图像分类
从一个非常简单的深度神经网络开始,它只包含一个全连接隐含层(ReLU激活)和一个softmax(归一化指数函数)全连接层,没有卷积层。图10-6所示的是颠倒的网络。输入是一个包含28×28个输入节点、隐含层为1024个节点和10个输出节点的扁平化图像,对应于要分类的每个数字。
图10-6 简单的深度神经网络图——颠倒的网络
现在用TF实现深度学习图像分类。首先,加载mnist数据集并将训练图像分为两部分,第一部分较大(使用50000张图像),用于训练,第二部分(使用10000张图像)用于验证;接着重新格式化标签,用一个热编码的二进制向量表示图像类;然后初始化tensorflow图、变量、常量和占位符张量,小批量随机梯度下降(SGD)优化器将被用作批量大小为256的学习算法,L2正则化器将被用来在两个权重层上(具有超参数值λ1和λ2,且λ1=λ2= 1)最小化softmax互熵回归损失函数;最后,TensorFlow会话对象将以6000步(小批量)运行,并且运行前向/后向传播以更新学习的模型(权重),随后在验证数据集上评估模型。可以看出,最终批次完成后获得的准确率为96.5%。TF实现深度学习图像分类的代码如下所示:
%matplotlib inline
import numpy as np
# import data
from keras.datasets import mnist
import tensorflow as tf
# load data
(X_train, y_train), (X_test, y_test) = mnist.load_data()
np.random.seed(0)
train_indices = np.random.choice(60000, 50000, replace=False)
valid_indices = [i for i in range(60000) if i not in train_indices]
X_valid, y_valid = X_train[valid_indices,:,:], y_train[valid_indices]
X_train, y_train = X_train[train_indices,:,:], y_train[train_indices]
print(X_train.shape, X_valid.shape, X_test.shape)
# (50000, 28, 28) (10000, 28, 28) (10000, 28, 28)
image_size = 28
num_labels = 10
def reformat(dataset, labels):
dataset = dataset.reshape((-1, image_size *image_size)).astype(np.float32)
# one hot encoding: Map 1 to [0.0, 1.0, 0.0 ...], 2 to [0.0, 0.0, 1.0 ...]
labels = (np.arange(num_labels) == labels[:,None]).astype(np.float32)
return dataset, labels
X_train, y_train = reformat(X_train, y_train)
X_valid, y_valid = reformat(X_valid, y_valid)
X_test, y_test = reformat(X_test, y_test)
print('Training set', X_train.shape, X_train.shape)
print('Validation set', X_valid.shape, X_valid.shape)
print('Test set', X_test.shape, X_test.shape)
# Training set (50000, 784) (50000, 784) # Validation set (10000, 784)
(10000, 784) # Test set (10000, 784) (10000, 784)
def accuracy(predictions, labels):
return (100.0 * np.sum(np.argmax(predictions, 1) == np.argmax(labels, 1))/
predictions.shape[0])
batch_size = 256
num_hidden_units = 1024
lambda1 = 0.1
lambda2 = 0.1
graph = tf.Graph()
with graph.as_default():
# Input data. For the training data, we use a placeholder that will be fed
# at run time with a training minibatch.
tf_train_dataset = tf.placeholder(tf.float32,shape=(batch_size, image_size *
image_size))
tf_train_labels = tf.placeholder(tf.float32, shape=(batch_size,num_labels))
tf_valid_dataset = tf.constant(X_valid)
tf_test_dataset = tf.constant(X_test)
# Variables.
weights1 = tf.Variable(tf.truncated_normal([image_size * image_size,num_hidden_units]))
biases1 = tf.Variable(tf.zeros([num_hidden_units]))
# connect inputs to every hidden unit. Add bias
layer_1_outputs = tf.nn.relu(tf.matmul(tf_train_dataset, weights1) +biases1)
weights2 = tf.Variable(tf.truncated_normal([num_hidden_units,num_labels]))
biases2 = tf.Variable(tf.zeros([num_labels]))
# Training computation.
logits = tf.matmul(layer_1_outputs, weights2) + biases2
loss =tf.reduce_mean(tf.nn.softmax_cross_entropy_with_logits(labels=tf_train_labels, logits=logits) + \
lambda1*tf.nn.l2_loss(weights1) + lambda2*tf.nn.l2_loss(weights2))
# Optimizer.
optimizer = tf.train.GradientDescentOptimizer(0.008).minimize(loss)
# Predictions for the training, validation, and test data.
train_prediction = tf.nn.softmax(logits)
layer_1_outputs = tf.nn.relu(tf.matmul(tf_valid_dataset, weights1) +biases1)
valid_prediction = tf.nn.softmax(tf.matmul(layer_1_outputs, weights2) +biases2)
layer_1_outputs = tf.nn.relu(tf.matmul(tf_test_dataset, weights1) +biases1)
test_prediction = tf.nn.softmax(tf.matmul(layer_1_outputs, weights2) +biases2)
num_steps = 6001
ll = []
atr = []
av = []
import matplotlib.pylab as pylab
with tf.Session(graph=graph) as session:
#tf.global_variables_initializer().run()
session.run(tf.initialize_all_variables())
print("Initialized")
for step in range(num_steps):
# Pick an offset within the training data, which has been randomized.
# Note: we could use better randomization across epochs.
offset = (step * batch_size) % (y_train.shape[0] - batch_size)
# Generate a minibatch.
batch_data = X_train[offset:(offset + batch_size), :]
batch_labels = y_train[offset:(offset + batch_size), :]
# Prepare a dictionary telling the session where to feed the minibatch.
# The key of the dictionary is the placeholder node of the graph to be fed,
# and the value is the numpy array to feed to it.
feed_dict = {tf_train_dataset : batch_data, tf_train_labels :batch_labels}
_, l, predictions = session.run([optimizer, loss, train_prediction],
feed_dict=feed_dict)
if (step % 500 == 0):
ll.append(l)
a = accuracy(predictions, batch_labels)
atr.append(a)
print("Minibatch loss at step %d: %f" % (step, l))
print("Minibatch accuracy: %.1f%%" % a)
a = accuracy(valid_prediction.eval(), y_valid)
av.append(a)
print("Validation accuracy: %.1f%%" % a)
print("Test accuracy: %.1f%%" % accuracy(test_prediction.eval(), y_test))
# Initialized
# Minibatch loss at step 0: 92091.781250
# Minibatch accuracy: 9.0%
# Validation accuracy: 21.6%
#
# Minibatch loss at step 500: 35599.835938
# Minibatch accuracy: 50.4%
# Validation accuracy: 47.4%
#
# Minibatch loss at step 1000: 15989.455078
# Minibatch accuracy: 46.5%
# Validation accuracy: 47.5%
#
# Minibatch loss at step 1500: 7182.631836
# Minibatch accuracy: 59.0%
# Validation accuracy: 54.7%
#
# Minibatch loss at step 2000: 3226.800781
# Minibatch accuracy: 68.4%
# Validation accuracy: 66.0%
#
# Minibatch loss at step 2500: 1449.654785
# Minibatch accuracy: 79.3%
# Validation accuracy: 77.7%
#
# Minibatch loss at step 3000: 651.267456
# Minibatch accuracy: 89.8%
# Validation accuracy: 87.7%
#
# Minibatch loss at step 3500: 292.560272
# Minibatch accuracy: 94.5%
# Validation accuracy: 91.3%
#
# Minibatch loss at step 4000: 131.462219
# Minibatch accuracy: 95.3%
# Validation accuracy: 93.7%
#
# Minibatch loss at step 4500: 59.149700
# Minibatch accuracy: 95.3%
# Validation accuracy: 94.3%
#
# Minibatch loss at step 5000: 26.656094
# Minibatch accuracy: 94.9%
# Validation accuracy: 95.5%
#
# Minibatch loss at step 5500: 12.033947
# Minibatch accuracy: 97.3%
# Validation accuracy: 97.0%
#
# Minibatch loss at step 6000: 5.521026
# Minibatch accuracy: 97.3%
# Validation accuracy: 96.6%
#
# Test accuracy: 96.5%
紧接着,可视化图层1的每一步权值,如下面的代码所示:
images = weights1.eval()
pylab.figure(figsize=(18,18))
indices = np.random.choice(num_hidden_units, 225)
for j in range(225):
pylab.subplot(15,15,j+1)
pylab.imshow(np.reshape(images[:,indices[j]], (image_size,image_size)),cmap='gray')
pylab.xticks([],[]), pylab.yticks([],[])
pylab.subtitle('SGD after Step ' + str(step) + ' with lambda1=lambda2='+ str(lambda1))
pylab.show()
运行上述代码,输出结果如图10-7所示。上面的图可视化了在4000步之后,网络全连层1中225个(随机选择的)隐藏节点的学习权值。可知权重已经从模型所训练的输入图像中获得了一些特征。
图10-7 使用全连接网络TF实现深度学习图像分类
不同步骤的训练精度和验证精度如下面的代码所示:
pylab.figure(figsize=(8,12))
pylab.subplot(211)
pylab.plot(range(0,3001,500), atr, '.-', label='training accuracy')
pylab.plot(range(0,3001,500), av, '.-', label='validation accuracy')
pylab.xlabel('GD steps'), pylab.ylabel('Accuracy'), pylab.legend(loc='lower right')
pylab.subplot(212)
pylab.plot(range(0,3001,500), ll, '.-')
pylab.xlabel('GD steps'), pylab.ylabel('Softmax Loss')
pylab.show()
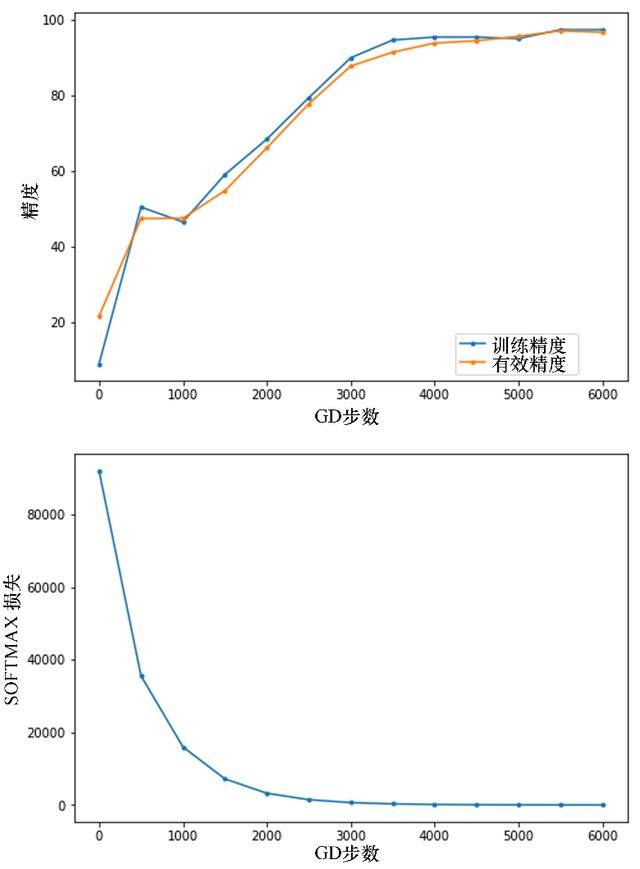
输出结果如图10-8所示。注意:一般来说,如果准确性不断提高,但最终训练精度和验证精度几乎保持不变,就意味着不再发生学习。
图10-8 深度学习过程中的训练精度、验证精度及Softmax损失
10.3.2 使用Keras对密集全连接层进行分类
使用Keras实现手写数字分类,再次仅使用密集全连接层。这次将再使用一个隐藏层和一个失活层。如下代码显示了如何使用keras.models Sequential()函数通过几行代码实现分类器。接着可以简单地将图层按顺序添加到模型中。引入了几个隐藏层,每个隐藏层有200个节点,中间有一个失活,失活率为15%。而这一次,使用Adam优化器(它使用动量来加速SGD)。用10个epochs(一次通过整个输入数据集)拟合训练数据集上的模型。可以看到,通过简单的结构变化,MNIST测试图像的准确率为98.04%。
import keras
from keras.models import Sequential
from keras.layers import Dense, Flatten, Dropout
from keras.layers.convolutional import Conv2D, MaxPooling2D
from keras.utils import to_categorical
# import data
from keras.datasets import mnist
# load data
(X_train, y_train), (X_test, y_test) = mnist.load_data()
print(X_train.shape, X_test.shape)
# (60000, 28, 28) (10000, 28, 28)
# reshape to be [samples][pixels][width][height]
X_train = X_train.reshape(X_train.shape[0], 28, 28, 1).astype('float32')
X_test = X_test.reshape(X_test.shape[0], 28, 28, 1).astype('float32')
X_train = X_train / 255 # normalize training data
X_test = X_test / 255 # normalize test data
y_train = to_categorical(y_train) # to one-hot-encoding of the labels
y_test = to_categorical(y_test)
num_classes = y_test.shape[1] # number of categories
def FC_model():
# create model
model = Sequential()
model.add(Flatten(input_shape=(28, 28, 1)))
model.add(Dense(200, activation='relu'))
model.add(Dropout(0.15))
model.add(Dense(200, activation='relu'))
model.add(Dense(num_classes, activation='softmax'))
# compile model
model.compile(optimizer='adam', loss='categorical_crossentropy',metrics=['accuracy'])
return model
# build the model
model = FC_model()
model.summary()
# fit the model
model.fit(X_train, y_train, validation_data=(X_test, y_test), epochs=10,
batch_size=200, verbose=2)
# evaluate the model
scores = model.evaluate(X_test, y_test, verbose=0)
print("Accuracy: {} \n Error: {}".format(scores[1], 100-scores[1]*100))
# _________________________________________________________________
# Layer (type) Output Shape Param #
# =================================================================
# flatten_1 (Flatten) (None, 784) 0
# _________________________________________________________________
# dense_1 (Dense) (None, 200) 157000
# ________________________________________________________________
# dropout_1 (Dropout) (None, 200) 0
# ________________________________________________________________
# dense_2 (Dense) (None, 200) 40200
# ________________________________________________________________
# dense_3 (Dense) (None, 10) 2010
# =================================================================
# Total params: 199,210
# Trainable params: 199,210
# Non-trainable params: 0
# _________________________________________________________________
# Train on 60000 samples, validate on 10000 samples
# Epoch 1/10
# - 3s - loss: 0.3487 - acc: 0.9010 - val_loss: 0.1474 - val_acc: 0.9562
# Epoch 2/10
# - 2s - loss: 0.1426 - acc: 0.9580 - val_loss: 0.0986 - val_acc: 0.9700
# Epoch 3/10
# - 2s - loss: 0.0976 - acc: 0.9697 - val_loss: 0.0892 - val_acc: 0.9721
# Epoch 4/10
# - 2s - loss: 0.0768 - acc: 0.9762 - val_loss: 0.0829 - val_acc: 0.9744
# Epoch 5/10
# - 2s - loss: 0.0624 - acc: 0.9806 - val_loss: 0.0706 - val_acc: 0.9774
# Epoch 6/10
# - 2s - loss: 0.0516 - acc: 0.9838 - val_loss: 0.0655 - val_acc: 0.9806
# Epoch 7/10
# - 2s - loss: 0.0438 - acc: 0.9861 - val_loss: 0.0692 - val_acc: 0.9788
# Epoch 8/10
# - 2s - loss: 0.0387 - acc: 0.9874 - val_loss: 0.0623 - val_acc: 0.9823
# Epoch 9/10
# - 2s - loss: 0.0341 - acc: 0.9888 - val_loss: 0.0695 - val_acc: 0.9781
# Epoch 10/10
# - 2s - loss: 0.0299 - acc: 0.9899 - val_loss: 0.0638 - val_acc: 0.9804
# Accuracy: 0.9804
# Error: 1.9599999999999937
1.可视化网络
可以通过代码可视化用Keras设计的神经网络架构。如下代码将允许将模型(网络)架构保存在一幅图像中:
# pip install pydot_ng ## install pydot_ng if not already installed
import pydot_ng as pydot
from keras.utils import plot_model
plot_model(model, to_file='../images/model.png')
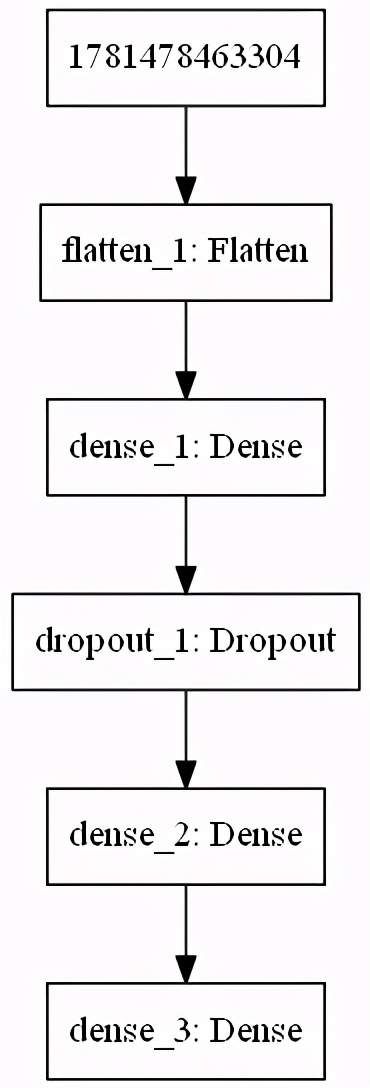
运行上述代码,输出图10-9所示的神经网络架构。
图10-9 神经网络架构
2.可视化中间层的权值
现在,利用代码可视化在中间层学到的权值。如下代码可视化了第一个密集层的前200个隐藏单元的权值:
from keras.models import Model
import matplotlib.pylab as pylab
import numpy as np
W = model.get_layer('dense_1').get_weights()
print(W[0].shape)
print(W[1].shape)
fig = pylab.figure(figsize=(20,20))
fig.subplots_adjust(left=0, right=1, bottom=0, top=0.95, hspace=0.05,wspace=0.05)
pylab.gray()
for i in range(200):
pylab.subplot(15, 14, i+1), pylab.imshow(np.reshape(W[0][:, i],(28,28))), pylab.axis('off')
pylab.suptitle('Dense_1 Weights (200 hidden units)', size=20)
pylab.show()
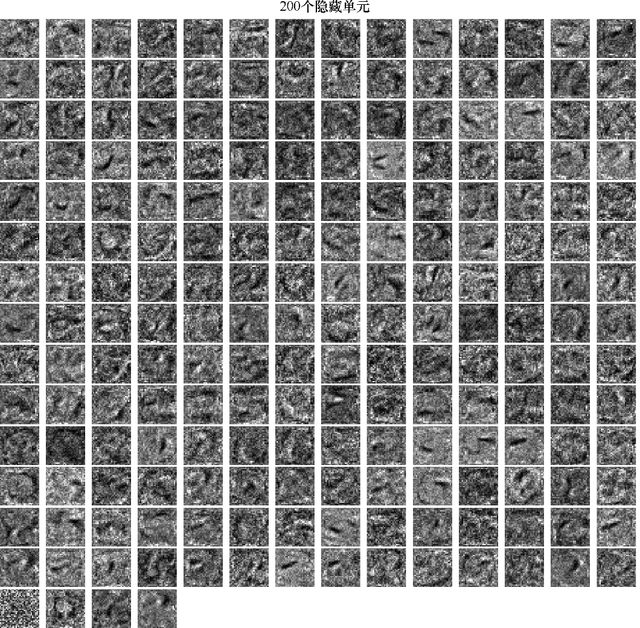
运行上述代码,输出结果如图10-10所示。
图10-10 第一个密集层的前200个隐藏单元的权值
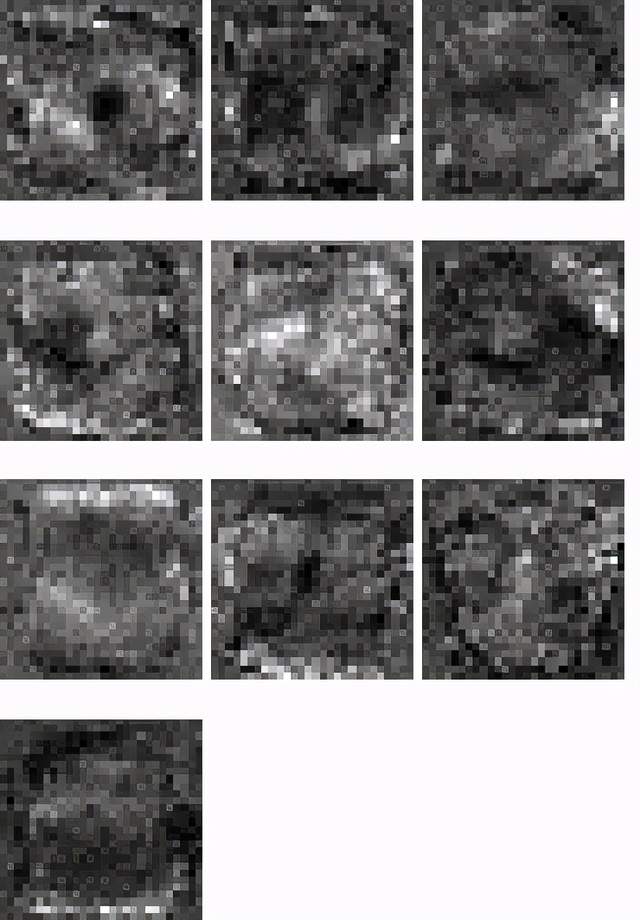
图10-11所示的是神经网络在输出层看到的东西,代码的编写留给读者作为练习。
图10-11 神经网络输出层所见
10.3.3 利用Keras的卷积神经网络分类
现在,读者可以用Keras实现一个卷积神经网络。这需要引入卷积、池化和扁平层。接下来,我们将再次展示如何实现并使用卷积神经网络对MNIST分类。正如读者将看到的,测试数据集的准确度增加了。
1.对MNIST分类
这次介绍一个带有64个滤波器的5×5卷积层,紧接着介绍步长为2的2×2极大池化层,接下来是其所需要的扁平层,然后是一个包含100个节点的隐藏密集层,随后是softmax密集层。其实现代码如下所示。运行代码,可以看到,经过10次迭代的模型训练,测试数据集的准确率提高到98.77%。
import keras
from keras.models import Sequential
from keras.layers import Dense
from keras.utils import to_categorical
from keras.layers.convolutional import Conv2D # to add convolutional layers
from keras.layers.convolutional import MaxPooling2D # to add pooling layers
from keras.layers import Flatten # to flatten data for fully connected layers
# import data
from keras.datasets import mnist
# load data
(X_train, y_train), (X_test, y_test) = mnist.load_data()
print(X_train.shape, X_test.shape)
# (60000, 28, 28) (10000, 28, 28)
# reshape to be [samples][pixels][width][height]
X_train = X_train.reshape(X_train.shape[0], 28, 28, 1).astype('float32')
X_test = X_test.reshape(X_test.shape[0], 28, 28, 1).astype('float32')
X_train = X_train / 255 # normalize training data
X_test = X_test / 255 # normalize test data
y_train = to_categorical(y_train)
y_test = to_categorical(y_test)
num_classes = y_test.shape[1] # number of categories
def convolutional_model():
# create model
model = Sequential()
model.add(Conv2D(64, (5, 5), strides=(1, 1), activation='relu',
input_shape=(28, 28, 1)))
model.add(MaxPooling2D(pool_size=(2, 2), strides=(2, 2)))
model.add(Flatten())
model.add(Dense(100, activation='relu'))
model.add(Dense(num_classes, activation='softmax'))
# compile model
model.compile(optimizer='adam', loss='categorical_crossentropy',
metrics=['accuracy'])
return model
# build the model
model = convolutional_model()
model.summary()
# _________________________________________________________________
# Layer (type) Output Shape Param #
# =================================================================
# conv2d_1 (Conv2D) (None, 24, 24, 64) 1664
# _________________________________________________________________
# max_pooling2d_1 (MaxPooling2D) (None, 12, 12, 64) 0
# _________________________________________________________________
# flatten_1 (Flatten) (None, 9216) 0
# _________________________________________________________________
# dense_1 (Dense) (None, 100) 921700
# _________________________________________________________________
# dense_2 (Dense) (None, 10) 1010
# =================================================================
# Total params: 924,374
# Trainable params: 924,374
# Non-trainable params: 0
# _________________________________________________________________
# fit the model
model.fit(X_train, y_train, validation_data=(X_test, y_test), epochs=10,
batch_size=200, verbose=2)
# evaluate the model
scores = model.evaluate(X_test, y_test, verbose=0)
print("Accuracy: {} \n Error: {}".format(scores[1], 100-scores[1]*100))
#Train on 60000 samples, validate on 10000 samples
#Epoch 1/10
# - 47s - loss: 0.2161 - acc: 0.9387 - val_loss: 0.0733 - val_acc: 0.9779
#Epoch 2/10
# - 46s - loss: 0.0611 - acc: 0.9816 - val_loss: 0.0423 - val_acc: 0.9865
#Epoch 3/10
# - 46s - loss: 0.0417 - acc: 0.9876 - val_loss: 0.0408 - val_acc: 0.9871
#Epoch 4/10
# - 41s - loss: 0.0315 - acc: 0.9904 - val_loss: 0.0497 - val_acc: 0.9824
#Epoch 5/10
# - 40s - loss: 0.0258 - acc: 0.9924 - val_loss: 0.0445 - val_acc: 0.9851
#Epoch 6/10
# - 39s - loss: 0.0188 - acc: 0.9943 - val_loss: 0.0368 - val_acc: 0.9890
#Epoch 7/10
# - 39s - loss: 0.0152 - acc: 0.9954 - val_loss: 0.0391 - val_acc: 0.9874
#Epoch 8/10
# - 42s - loss: 0.0114 - acc: 0.9965 - val_loss: 0.0408 - val_acc: 0.9884
#Epoch 9/10
# - 41s - loss: 0.0086 - acc: 0.9976 - val_loss: 0.0380 - val_acc: 0.9893
#Epoch 10/10
# - 47s - loss: 0.0070 - acc: 0.9980 - val_loss: 0.0434 - val_acc: 0.9877
# Accuracy: 0.9877
# Error: 1.230000000000004
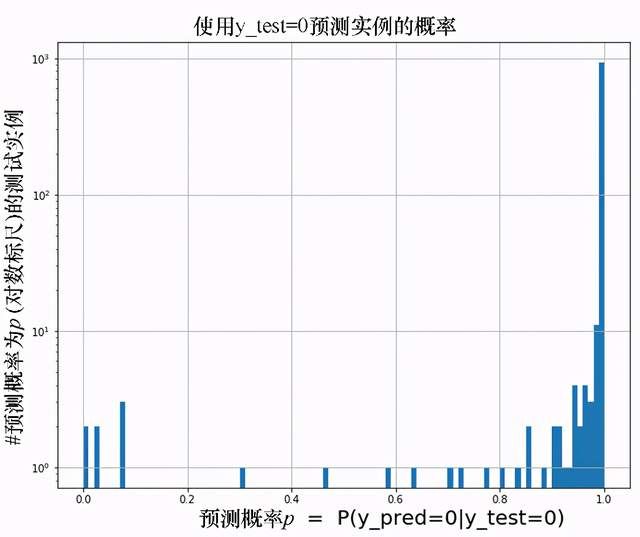
图10-12所示的是对于真相标签为0的测试实例,输出类为0的预测概率分布。其实现代码留给读者作为练习。
图10-12 真相标签为0的测试实例的预测概率
可视化中间层
现在使用卷积层来学习这几个图像的图像特征(64个特征与64个滤波器),并使之可视化,其实现如下面的代码所示:
from keras.models import Model
import matplotlib.pylab as pylab
import numpy as np
intermediate_layer_model = Model(inputs=model.input,outputs=model.get_layer('conv2d_1').output)
intermediate_output = intermediate_layer_model.predict(X_train)
print(model.input.shape, intermediate_output.shape)
fig = pylab.figure(figsize=(15,15))
fig.subplots_adjust(left=0, right=1, bottom=0, top=1, hspace=0.05,wspace=0.05)
pylab.gray()
i = 1
for c in range(64):
pylab.subplot(8, 8, c+1), pylab.imshow(intermediate_output[i,:,:,c]),pylab.axis('off')
pylab.show()
图10-13所示的是训练数据集中标签为0的手写数字图像在卷积层学习得到的特征图。
图10-13 标签为0的手写数字图像在卷积层学习得到的特征图
将训练数据集中的图像索引值修改为2,再运行之前的代码,得到如下输出结果:
i=2
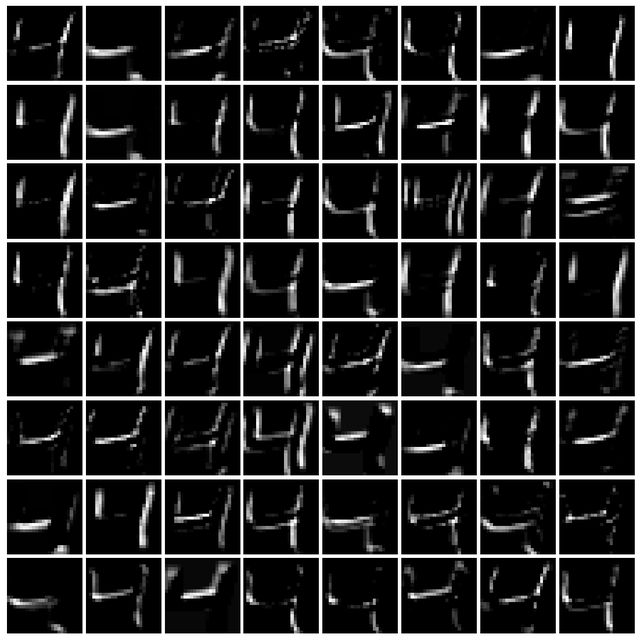
图10-14所示的是MNIST训练数据集中标签为4的手写数字图像在卷积层学习得到的特征图。
图10-14 标签为4的手写数字图像在卷积层学习得到的特征图
10.4 应用于图像分类的主流的深度卷积神经网络
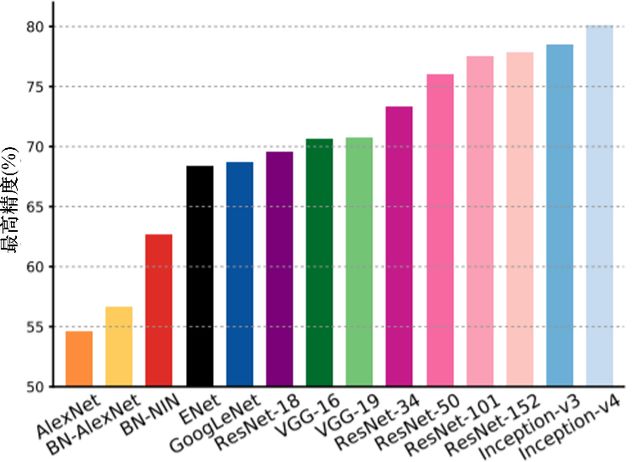
在本节中,我们将讨论一些应用于图像分类的主流的深度卷积神经网络(如VGG-18/19、ResNet和InceptionNet)。图10-15所示的是提交给ImageNet挑战的最相关条目的单季精度(top-1精度:由卷积神经网络预测为最高概率的正确标记次数),从最左端的AlexNet[亚历克斯·克里泽夫斯基(AlexKrizhevsky)等,2012]至表现最好的Inception-v4[塞格德(Szegedy)等,2016]。
图10-15 单季CNN预测的最高有效精度(top-1)
此外,还将用Keras训练VGG-16 CNN,以对狗图像和猫图像分类。
VGG-16/19
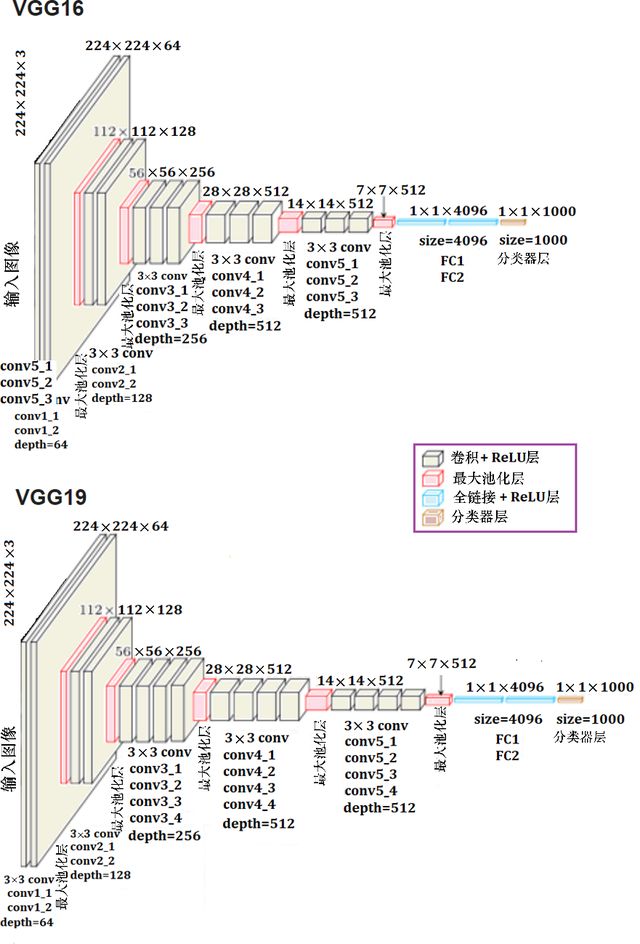
VGG-16/19的主流卷积神经网络的架构如图10-16所示。VGG-16网络有一个的显著特点:它没有那么多的超级参数,而仅提供更为简单的网络,使用者可以仅聚焦于步幅为1的3×3滤波器的卷积层,它总是使用相同的填充,并使所有2×2最大池化层的步幅为2。这是一个真正的深度网络。
图10-16 VGG-16/19深度学习网络
VGG-16/19网络共有约1.38亿个参数,如图10-15所示。
1.用Keras中的VGG-16对猫/狗图像进行分类
在本节中,我们将使用Keras中的VGG-16实现对Kaggle狗vs. 猫比赛中的猫和狗图像进行分类。请读者先下载训练图像数据集和测试图像数据集,然后在训练图像上从零开始训练VGG-16网络。
(1)训练阶段。如下代码显示了如何在训练数据集中拟合模型。使用训练数据集中的20000张图像训练VGG-16模型并将5000张图像作为验证数据集,用于在训练时对模型进行评估。weights=None参数值必须传递给VGG16()函数,以确保从头开始训练网络。注意:如果不在GPU上运行,这将花费很长时间,所以建议使用GPU。
经过20次迭代,验证数据集的精度达到78.38%。我们还可以通过调整超参数来进一步提高模型的精度,实现代码留给读者作为练习。
import os
import numpy as np
import cv2
from random import shuffle
from tqdm import tqdm # percentage bar for tasks.
# download the cats/dogs images compressed train and test datasets from
here: https://www.kaggle.com/c/dogs-vs-cats/data
# unzip the train.zip images under the train folder and test.zip images
under the test folder
train = './train'
test = './test'
lr = 1e-6 # learning rate
image_size = 50 # all the images will be resized to squaure images with
this dimension
model_name = 'cats_dogs-{}-{}.model'.format(lr, 'conv2')
def label_image(image):
word_label = image.split('.')[-3]
if word_label == 'cat': return 0
elif word_label == 'dog': return 1
def create_training_data():
training_data = []
for image in tqdm(os.listdir(train)):
path = os.path.join(train, image)
label = label_image(image)
image = cv2.imread(path)
image = cv2.resize(image, (image_size, image_size))
training_data.append([np.array(image),np.array(label)])
shuffle(training_data)
np.save('train_data.npy', training_data)
return training_data
train_data = create_training_data()
#
100%|███████████████████████████████████████████████████████
█████████████████████████████████| 1100/1100 [00:00<00:00,
1133.86it/s]
train = train_data[:-5000] # 20k images for training
valid = train_data[-5000:] # 5k images for validation
X_train = np.array([i[0] for i in train]).reshape(-1,image_size,image_size,3)
y_train = [i[1] for i in train]
y_train = to_categorical(y_train)
print(X_train.shape, y_train.shape)
X_valid = np.array([i[0] for i in valid]).reshape(-1,image_size,image_size,3)
y_valid = [i[1] for i in valid]
y_valid = to_categorical(y_valid) # to one-hot encoding
num_classes = y_valid.shape[1] # number of categories
model = VGG16(weights=None, input_shape=(image_size,image_size,3),
classes=num_classes) # train VGG16 model from scratch
model.compile(Adam(lr=lr), "categorical_crossentropy",
metrics=["accuracy"]) # "adam"
model.summary()
# fit the model, it's going take a long time if not run on GPU
model.fit(X_train, y_train, validation_data=(X_valid, y_valid), epochs=20,batch_size=256, verbose=2)
# evaluate the model
scores = model.evaluate(X_valid, y_valid, verbose=0)
print("Accuracy: {} \n Error: {}".format(scores[1], 100-scores[1]*100))
# _______________________________________________________________
#Layer (type) Output Shape Param
# =================================================================
# input_5 (InputLayer) (None, 50, 50, 3) 0
# _________________________________________________________________
# block1_conv1 (Conv2D) (None, 50, 50, 64) 1792
# _________________________________________________________________
# block1_conv2 (Conv2D) (None, 50, 50, 64) 36928
# _________________________________________________________________
# block1_pool (MaxPooling2D) (None, 25, 25, 64) 0
# _________________________________________________________________
# block2_conv1 (Conv2D) (None, 25, 25, 128) 73856
# _________________________________________________________________
# block2_conv2 (Conv2D) (None, 25, 25, 128) 147584
# _________________________________________________________________
# block2_pool (MaxPooling2D) (None, 12, 12, 128) 0
# _________________________________________________________________
# block3_conv1 (Conv2D) (None, 12, 12, 256) 295168
# _________________________________________________________________
# block3_conv2 (Conv2D) (None, 12, 12, 256) 590080
# _________________________________________________________________
# block3_conv3 (Conv2D) (None, 12, 12, 256) 590080
# _________________________________________________________________
# block3_pool (MaxPooling2D) (None, 6, 6, 256) 0
# _________________________________________________________________
# block4_conv1 (Conv2D) (None, 6, 6, 512) 1180160
# _________________________________________________________________
# block4_conv2 (Conv2D) (None, 6, 6, 512) 2359808
# _________________________________________________________________
# block4_conv3 (Conv2D) (None, 6, 6, 512) 2359808
# _________________________________________________________________
# block4_pool (MaxPooling2D) (None, 3, 3, 512) 0
# _________________________________________________________________
# block5_conv1 (Conv2D) (None, 3, 3, 512) 2359808
# _________________________________________________________________
# block5_conv2 (Conv2D) (None, 3, 3, 512) 2359808
# _________________________________________________________________
# block5_conv3 (Conv2D) (None, 3, 3, 512) 2359808
# _________________________________________________________________
# block5_pool (MaxPooling2D) (None, 1, 1, 512) 0
# _________________________________________________________________
# flatten (Flatten) (None, 512) 0
# ________________________________________________________________
# fc1 (Dense) (None, 4096) 2101248
# _______________________________________________________________
# fc2 (Dense) (None, 4096) 16781312
# ________________________________________________________________
# predictions (Dense) (None, 2) 8194
# =================================================================
# Total params: 33,605,442
# Trainable params: 33,605,442
# Non-trainable params: 0
# _________________________________________________________________
# Train on 20000 samples, validate on 5000 samples
# Epoch 1/10
# - 92s - loss: 0.6878 - acc: 0.5472 - val_loss: 0.6744 - val_acc: 0.5750
# Epoch 2/20
# - 51s - loss: 0.6529 - acc: 0.6291 - val_loss: 0.6324 - val_acc: 0.6534
# Epoch 3/20
# - 51s - loss: 0.6123 - acc: 0.6649 - val_loss: 0.6249 - val_acc: 0.6472
# Epoch 4/20
# - 51s - loss: 0.5919 - acc: 0.6842 - val_loss: 0.5902 - val_acc: 0.6828
# Epoch 5/20
# - 51s - loss: 0.5709 - acc: 0.6992 - val_loss: 0.5687 - val_acc: 0.7054
# Epoch 6/20
# - 51s - loss: 0.5564 - acc: 0.7159 - val_loss: 0.5620 - val_acc: 0.7142
# Epoch 7/20
# - 51s - loss: 0.5539 - acc: 0.7137 - val_loss: 0.5698 - val_acc: 0.6976
# Epoch 8/20
# - 51s - loss: 0.5275 - acc: 0.7371 - val_loss: 0.5402 - val_acc: 0.7298
# Epoch 9/20
# - 51s - loss: 0.5072 - acc: 0.7536 - val_loss: 0.5240 - val_acc: 0.7444
# Epoch 10/20
# - 51s - loss: 0.4880 - acc: 0.7647 - val_loss: 0.5127 - val_acc: 0.7544
# Epoch 11/20
# - 51s - loss: 0.4659 - acc: 0.7814 - val_loss: 0.5594 - val_acc: 0.7164
# Epoch 12/20
# - 51s - loss: 0.4584 - acc: 0.7813 - val_loss: 0.5689 - val_acc: 0.7124
# Epoch 13/20
# - 51s - loss: 0.4410 - acc: 0.7952 - val_loss: 0.4863 - val_acc: 0.7704
# Epoch 14/20
# - 51s - loss: 0.4295 - acc: 0.8022 - val_loss: 0.5073 - val_acc: 0.7596
# Epoch 15/20
# - 51s - loss: 0.4175 - acc: 0.8084 - val_loss: 0.4854 - val_acc: 0.7688
# Epoch 16/20
# - 51s - loss: 0.3914 - acc: 0.8259 - val_loss: 0.4743 - val_acc: 0.7794
# Epoch 17/20
# - 51s - loss: 0.3852 - acc: 0.8286 - val_loss: 0.4721 - val_acc: 0.7810
# Epoch 18/20
# - 51s - loss: 0.3692 - acc: 0.8364 - val_loss: 0.6765 - val_acc: 0.6826
# Epoch 19/20
# - 51s - loss: 0.3752 - acc: 0.8332 - val_loss: 0.4805 - val_acc: 0.7760
# Epoch 20/20
# - 51s - loss: 0.3360 - acc: 0.8586 - val_loss: 0.4711 - val_acc: 0.7838
# Accuracy: 0.7838
# Error: 21.61999999999999
如下代码使用前面代码的第二个卷积层中的前64个滤波器来可视化狗图像的特征:
intermediate_layer_model = Model(inputs=model.input,
outputs=model.get_layer('block1_conv2').output)
intermediate_output = intermediate_layer_model.predict(X_train)
fig = pylab.figure(figsize=(10,10))
fig.subplots_adjust(left=0, right=1, bottom=0, top=1, hspace=0.05,
wspace=0.05)
pylab.gray()
i = 3
for c in range(64):
pylab.subplot(8, 8, c+1), pylab.imshow(intermediate_output[i,:,:,c]),pylab.axis('off')
pylab.show()
运行上述代码,输出用模型学习得到的狗图像的特征图,如图10-17所示。
图10-17 利用VGG-16深度学习模型学习得到的狗图像,特征
通过改变上述代码中的一行,读者可以使用第二个块的第二个卷积层中的前64个滤波器可视化学习到的同一幅狗图像特征:
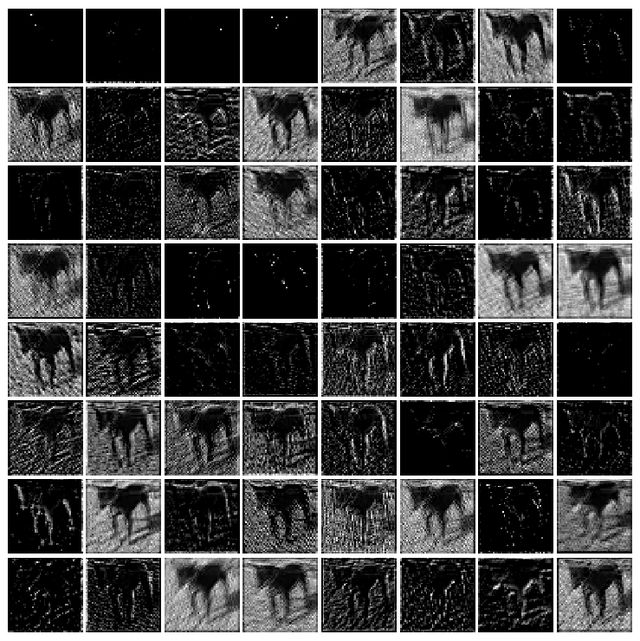
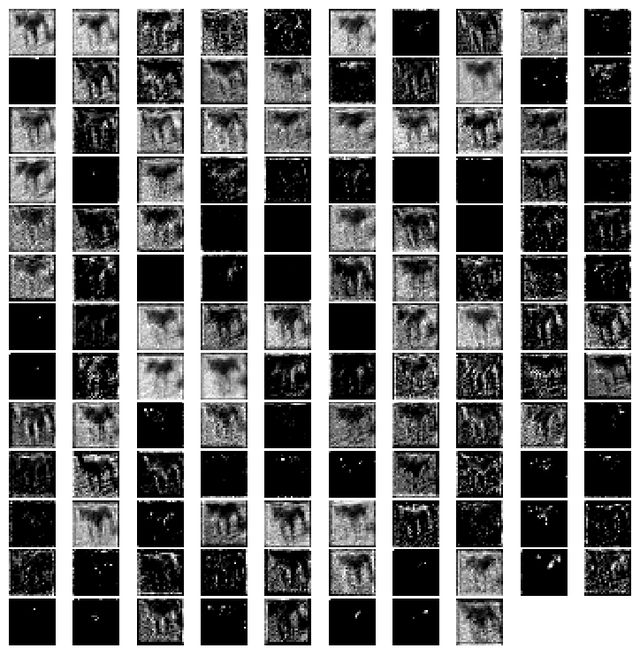
intermediate_layer_model = Model(inputs=model.input,outputs=model.get_layer('block2_conv2').output)图10-18所示的是前述代码更改第一行后运行得到的输出结果,即用模型学习得到的同样的小狗图像特征图。
图10-18 利用VGG-16深度学习模型的第二个卷积层学习所得到的狗图像特征
2.测试(预测)阶段
如下代码展示了如何使用学习到的VGG-16模型从测试图像数据集中预测图像是狗或是猫的概率:
test_data = process_test_data()
len(test_data)
X_test = np.array([i for i in test_data]).reshape(-1,IMG_SIZE,IMG_SIZE,3)
probs = model.predict(X_test)
probs = np.round(probs,2)
pylab.figure(figsize=(20,20))
for i in range(100):
pylab.subplot(10,10,i+1), pylab.imshow(X_test[i,:,:,::-1]),pylab.axis('off')
pylab.title("{}, prob={:0.2f}".format('cat' if probs[i][1] < 0.5 else
'dog', max(probs[i][0],probs[i][1])))
pylab.show()
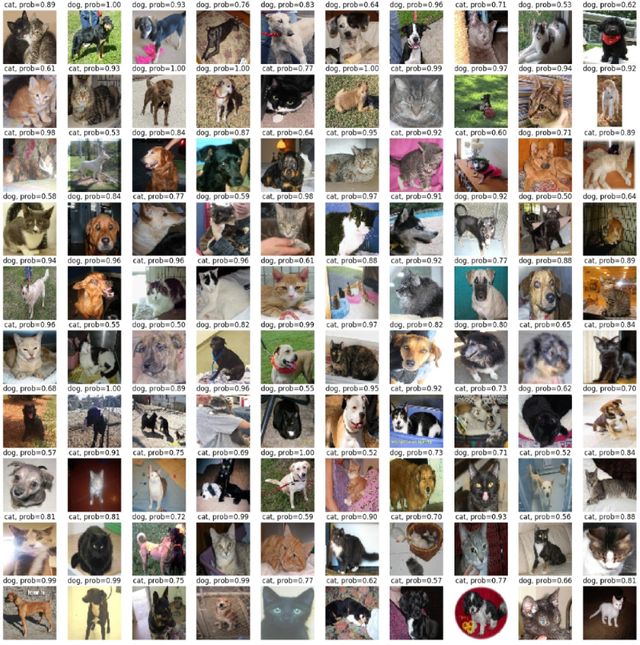
图10-19所示的是类预测了前100个测试图像以及预测概率。可以看到,虽然学习到的VGG-16模型也存在不少错误的预测,但大部分图像的标签预测都是正确的。
图10-19 学习后的VGG-16模型预测了前100个测试图像及其预测概率
3.InceptionNet
在卷积神经网络分类器的发展过程中,是一个非常重要的里程碑。在InceptionNet出现之前,卷积神经网络过去只是将卷积层叠加到最深处,以获得更好的性能。InceptionNet则使用复杂的技术和技巧来满足速度和准确性方面的性能。
InceptionNet不断发展,并带来网络的多个新版本的诞生。一些流行的版本包括Inception-v1、Inception-v2、Inception-v3、Inception-v4和Inception-ResNet。由于突出部分和图像中信息的位置可能存在巨大差异,因此针对卷积操作选择正确的内核大小变得十分困难。对于分布得更加全局的信息,首选更大的内核;而对于分布得更加局部的信息,则优选较小的内核。深度神经网络遭受过拟合和梯度消失问题。单纯叠加大型卷积运算将会产生大量的开销。
InceptionNet通过添加在相同级别上操作的多个不同大小的滤波器来解决前面的所有问题,这导致网络变得更广,而不是更深。图10-20所示的是一个维度缩减的Inception模块,它使用3种不同大小的滤波器(1×1、3×3和5×5)和一个附加的最大池化层对输入执行卷积。输出被串接起来并发送到下一个Inception模块。为了使它更便宜,输入通道的数量受到限制,在3×3和5×5卷积之前添加额外的1×1卷积。利用降维的Inception模块,建立了神经网络体系结构。这就是众所周知的GoogleNet(Inception v1),其架构如图10-19所示。GoogleNet有9个这样的Inception模块线性堆叠,有22层深(27层,包括池化层),并在最后一个Inception模块的末尾使用全局平均池
图10-20 Inception深度学习网络架构
在编写本文时,已经介绍了Inception的几个版本(v2、v3和v4),它们都是对以前体系结构的扩展。Keras提供了Inception-v3模型,可以从头开始训练,也可以使用预训练版本(使用在ImageNet上训练获得的权重)。
4.ResNet
简单地叠加这些层并不一定会增加网络的深度。由于消失梯度问题(vanishing gradient problem),它们的训练也比较困难。这是梯度被反向传播到以前的图层的问题,而且如果这种情况重复发生,梯度可能会变得无穷小。因此,随着研究的深入,性能会受到严重影响。
ResNet代表残差网络(Residual Network),它在网络中引入了快捷方式,我们称之为标识快捷连接。快捷连接遵循它们的名称,并执行跳过一个或多个层的任务,从而防止堆叠层降低性能。堆叠的标识层除了在当前网络上简单地堆叠标识映射,什么也不做。然后,其他体系结构可以按照预期的水平执行,这意味着较深的模型不会产生比较浅的模型更高的训练错误率。
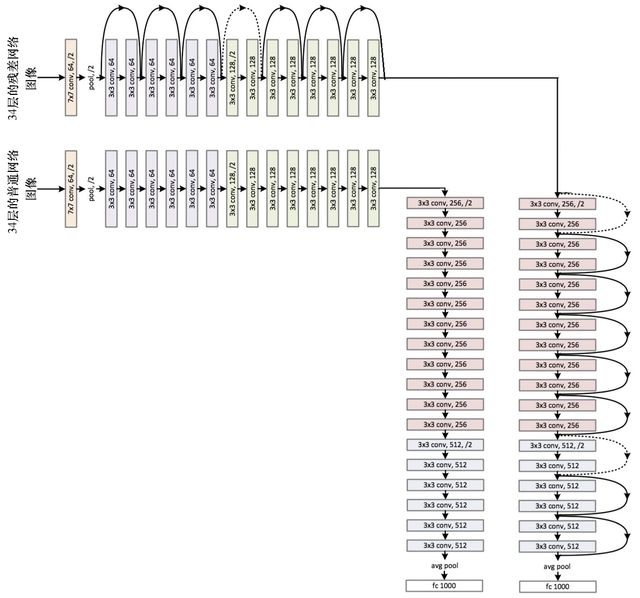
图10-21所示的是一个34层的普通网络和残差网络的例子。
图10-21 普通网络与残差网络
Keras提供了ResNet50模型,可以从零开始进行训练,也可以加载预训练的网络。还有一些架构,如AlexNet和MobileNet,鼓励读者去探索。
小结
在本章中,我们介绍了利用深度学习模型进行图像处理的最新进展。首先,讨论深度学习的基本概念,它与传统机器学习的不同之处,以及为什么需要它;其次,引入卷积神经网络作为深度神经网络,专门用于解决复杂的图像处理问题和完成计算和视觉任务,并讨论具有卷积层、池化层和全连接层的卷积神经网络体系结构;再次,介绍TensorFlow和Keras这两个流行于Python中的深度学习库,并向读者展示如何使用卷积神经网络提高MNIST数据集对手写数字分类的测试精度;最后,讨论了一些流行的网络,如VGG-16/19、GoogleNet和ResNet。Kera的VGG-16模型是在Kaggle比赛的狗和猫图像上训练的,向读者展示了它如何在验证图像数据集上以相当准确的方式执行。
本文摘自《Python图像处理实战》
- 图像处理,计算机视觉人脸识别图像修复
- 编程入门教程书籍零基础,深度学习爬虫
- 用流行的Python图像处理库、机器学习库和深度学习库解决图像处理问题。
本书介绍如何用流行的Python 图像处理库、机器学习库和深度学习库解决图像处理问题。先介绍经典的图像处理技术,然后探索图像处理算法的演变历程,始终紧扣图像处理以及计算机视觉与深度学习方面的**进展。全书共12 章,涵盖图像处理入门基础知识、应用导数方法实现图像增强、形态学图像处理、图像特征提取与描述符、图像分割,以及图像处理中的经典机器学习方法等内容。
本书适合Python 工程师和相关研究人员阅读,也适合对计算机视觉、图像处理、机器学习和深度学习感兴趣的软件工程师参考。


