Cocos2dx游戏开发系列笔记18:《跑酷》游戏源码解析
懒骨头(http://blog.csdn.net/iamlazybone QQ:124774397 )
再来看一个比较常见的跑酷游戏
其实吧
我觉得就是有人用《萝莉快跑》的例子改的
不过肯定有新东西学习
![]()
这是骨头见过最好的demo,不用修改一点直接能运行。
先报环境 vs2012 和 cocos2dx 2.2 和 win8.1
我知道出新版本了
好多人整天盼着新版本但。。。
1 用python脚本新建一个demo
2点此下载跑酷游戏源码 (感谢 blog.csdn.net/haomengzhu 的demo)
3 拷贝 Classes 和 Resources 到新demo里
4 vs打开新的demo,导入现有项,编译,一次ok
===================================================
===========================================================
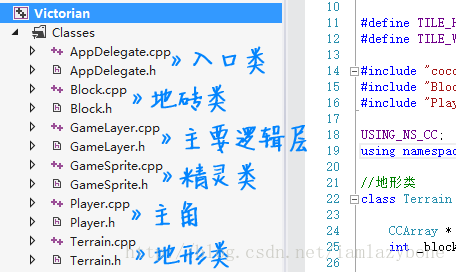
主角类:Player
在H文件里定义了玩家状态的枚举:移动降落死亡
typedef enum
{
	kPlayerMoving,//主角在移动
	kPlayerFalling,//主角在降落
	kPlayerDying//主角死亡

} PlayerState;骑行动画,漂浮动画,漂浮时间,速度等等。
还有很多的 inline 方法 和inline虚方法
关于inline引用百科的介绍:
inline关键字用来定义一个类的内联函数,引入它的主要原因是用它替代C中表达式形式的宏定义。表达式形式的宏定义
#define ExpressionName(Var1,Var2) ((Var1)+(Var2))*((Var1)-(Var2))
1. C中使用这种形式宏定义的原因,C语言是一个效率很高的语言,这种宏定义在形式及使用上像一个函数,但它使用预处理器实现,没有了参数压栈,代码生成等一系列的操作,因此,效率很高
2. 形式上类似函数,但在使用它时,仅仅只是做预处理器符号表中的简单替换,因此它不能进行参数有效性的检测,也就不能享受C++编译器严格类型检查的好处,另外它的返回值也不能被强制转换为可转换的合适的类型,这样,它的使用就存在着一系列的隐患和局限性。
3. 在C++中引入了类及类的访问控制,这样,如果一个操作或者说一个表达式涉及到类的保护成员或私有成员,你就不可能使用这种宏定义来实现(因为无法将this指针放在合适的位置)。
4. inline 推出的目的,也正是为了取代这种表达式形式的宏定义,它消除了宏定义的缺点,同时又很好地继承了宏定义的优点。
inline int left() {
return this->getPositionX() - _width * 0.5f;
}
1. inline 定义的类的内联函数,函数的代码被放入符号表中,在使用时直接进行替换,(像宏一样展开),没有了调用的开销,效率也很高。
2. 很明显,类的内联函数也是一个真正的函数,编译器在调用一个内联函数时,会首先检查它的参数的类型,保证调用正确。然后进行一系列的相关检查,就像对待任何一个真正的函数一样。这样就消除了它的隐患和局限性。
3. inline 可以作为某个类的成员函数,当然就可以在其中使用所在类的保护成员及私有成员。
在何时使用inline函数:
首先,你可以使用inline函数完全取代表达式形式的宏定义。
另外要注意,内联函数一般只会用在函数内容非常简单的时候,这是因为,内联函数的代码会在任何调用它的地方展开,如果函数太复杂,代码膨胀带来的恶果很可能会大于效率的提高带来的益处。内联函数最重要的使用地方是用于类的存取函数。骨头稍微明白一点了,以后慢慢理解吧。
在Player.CPP里,有构造方法,create方法。
构造方法主要初始化一些值
create方法主要是创建CCSprite这个主要对象,一些动画和参数的设置在 init 方法里。
主角滑翔方法,也是简单的播放滑翔动画和修改速度。
//设置下降动作
void Player::setFloating (bool value) {
	if (_floating == value)
		return;
	if (value && _hasFloated)
		return;
	_floating = value;
    this->stopAllActions();
	if (value) {
		_hasFloated = true;
        this->setDisplayFrame(CCSpriteFrameCache::sharedSpriteFrameCache()->spriteFrameByName("player_float.png"));
        this->runAction(_floatAnimation);
		_vector.y += PLAYER_JUMP * 0.5f;
    } else {
        this->runAction(_rideAnimation);
	}
}
还有void Player::update (float dt) 更新方法:
这里会慢慢的加速到速度最大值,然后匀速。
然后根据玩家的状态,来调整速度,是掉落、前进或者跳跃等等。
速度相关的,很好理解,但是很乱。
void Player::update (float dt) {
	//加速度到最大,然后匀速
	if (_speed + ACCELERATION <= _maxSpeed) {
		_speed += ACCELERATION;
	} else {
		_speed = _maxSpeed;
	}
	_vector.x = _speed;
	//CCLog("play state:%d",_state);
	switch (_state) {
	case kPlayerMoving:
		_vector.y -= GRAVITY;
		if (_hasFloated)
			_hasFloated = false;
		break;
	case kPlayerFalling:
		if (_floating ) {
			_vector.y -= FLOATNG_GRAVITY;
			_vector.x *= FLOATING_FRICTION;
		} else {
			_vector.y -= GRAVITY;
			_vector.x *= AIR_FRICTION;
			_floatingTimer = 0;
		}
		break;
	case kPlayerDying:
		_vector.y -= GRAVITY;
		_vector.x = -_speed;
		this->setPositionX(this->getPositionX() + _vector.x);
		break;
	}
	if (_jumping) {
		_state = kPlayerFalling;
		_vector.y += PLAYER_JUMP * 0.25f;
		if (_vector.y > PLAYER_JUMP )
			_jumping = false;
	}
	if (_vector.y < -TERMINAL_VELOCITY)
		_vector.y = -TERMINAL_VELOCITY;
	_nextPosition.y = this->getPositionY() + _vector.y;
	if (_vector.x * _vector.x < 0.01)
		_vector.x = 0;
	if (_vector.y * _vector.y < 0.01)
		_vector.y = 0;
	if (_floating) {
		_floatingTimer += dt;
		if (_floatingTimer > _floatingTimerMax) {
			_floatingTimer = 0;
			this->setFloating(false);
		}
	}
}
=======================================================================
地图贴砖类:Block
就是左边这种方块,根据一定的顺序,拼成了游戏中的地图。
一般使用地图编辑器,编辑好了导入到游戏中。
以前笔记遇到过,骨头还没学到那,暂时一放。
Block.h 中,有类型枚举、间隔(?)枚举。
定义了贴砖的宽度,高度,贴砖图片,和一些基本的动画,如移动,小时,缩放等。
	CC_SYNTHESIZE(int, _type, Type);

	//声明一个成员变量_puffing以及getfunName函数,没有set函数。getfunName函数的实现要自己做
	CC_SYNTHESIZE_READONLY(bool, _puffing, Puffing);

	//声明成员变量数组:烟囱
	CC_SYNTHESIZE(CCArray *, _chimneys, Chimneys);
关于这种用法,骨头不是很熟悉,
首先看看 CC_SYNTHESIZE(int, _type, Type); 的源码
#define CC_SYNTHESIZE(varType, varName, funName)\
protected: varType varName;\
public: virtual varType get##funName(void) const { return varName; }\
public: virtual void set##funName(varType var){ varName = var; }第二个CC_SYNTHESIZE_READONLY(bool, _puffing, Puffing); 方法
应该也是自动生成 get 方法的宏方法。
这样肯定是会减少代码量,但对于骨头这种新手来说,比较乱容易弄混。使用时必须小心。
然后 h文件里还剩下几个 inline 内联方法。
inline virtual int left() {
		return this->getPositionX();
	}

	inline virtual int right() {
		return this->getPositionX() + _width;
	}
再来看下 Block.cpp 文件:
Block::~Block () {
	//安全释放
    CC_SAFE_RELEASE(_chimneys);
    CC_SAFE_RELEASE(_wallTiles);
    CC_SAFE_RELEASE(_roofTiles);
    CC_SAFE_RELEASE(_puffAnimation);
    CC_SAFE_RELEASE(_puffSpawn);
    CC_SAFE_RELEASE(_puffMove);
    CC_SAFE_RELEASE(_puffFade);
    CC_SAFE_RELEASE(_puffScale);
}#define CC_SAFE_DELETE(p) do { if(p) { delete (p); (p) = 0; } } while(0)
#define CC_SAFE_DELETE_ARRAY(p) do { if(p) { delete[] (p); (p) = 0; } } while(0)
#define CC_SAFE_FREE(p) do { if(p) { free(p); (p) = 0; } } while(0)
#define CC_SAFE_RELEASE(p) do { if(p) { (p)->release(); } } while(0)
#define CC_SAFE_RELEASE_NULL(p) do { if(p) { (p)->release(); (p) = 0; } } while(0)
#define CC_SAFE_RETAIN(p) do { if(p) { (p)->retain(); } } while(0)
#define CC_BREAK_IF(cond) if(cond) break关于 表达式的宏定义里使用 do{...}while(0),好像还有讲头:等骨头学习一阵在研究。
同样的,构造方法里是初始化一些值,create方法里是实例化 Blocl这个CCSprite对象。
初始化街区配置信息 void Block::initBlock()
先初始化不同类型的贴砖CCsprite:
	_tile1 = CCSpriteFrameCache::sharedSpriteFrameCache()->spriteFrameByName ("building_1.png");
	_tile2 = CCSpriteFrameCache::sharedSpriteFrameCache()->spriteFrameByName ("building_2.png");
	_tile3 = CCSpriteFrameCache::sharedSpriteFrameCache()->spriteFrameByName ("building_3.png");
	_tile4 = CCSpriteFrameCache::sharedSpriteFrameCache()->spriteFrameByName ("building_4.png");

	_roof1 = CCSpriteFrameCache::sharedSpriteFrameCache()->spriteFrameByName ("roof_1.png");
_roof2 = CCSpriteFrameCache::sharedSpriteFrameCache()->spriteFrameByName ("roof_2.png");int i;
_wallTiles = CCArray::createWithCapacity(20);
_wallTiles->retain();
_roofTiles = CCArray::createWithCapacity(5);
_roofTiles->retain();
CCSprite * tile;
for (i = 0; i < 5; i++) {
tile = CCSprite::createWithSpriteFrameName("roof_1.png");
tile->setAnchorPoint(ccp(0, 1));
tile->setPosition(ccp(i * _tileWidth, 0));
tile->setVisible(false);
this->addChild(tile, kMiddleground, kRoofTile);
_roofTiles->addObject(tile);
for (int j = 0; j < 4; j++) {
tile = CCSprite::createWithSpriteFrameName("building_1.png");
tile->setAnchorPoint(ccp(0, 1));
tile->setPosition(ccp(i * _tileWidth, -1 * (_tileHeight * 0.47f + j * _tileHeight)));
tile->setVisible(false);
this->addChild(tile, kBackground, kWallTile);
_wallTiles->addObject(tile);
}
}接下来是初始化冒烟动画:
	CCAnimation* animation;
	animation = CCAnimation::create();
	CCSpriteFrame * frame;
	for(i = 1; i <= 4; i++) {
		char szName[100] = {0};
		sprintf(szName, "puff_%i.png", i);
		frame = CCSpriteFrameCache::sharedSpriteFrameCache()->spriteFrameByName(szName);
		animation->addSpriteFrame(frame);
	}
	animation->setDelayPerUnit(0.75f / 4.0f);
	animation->setRestoreOriginalFrame(false);
	animation->setLoops(-1);
	_puffAnimation = CCAnimate::create(animation);
	_puffAnimation->retain();
最后,创建冒烟动画:
void Block::createPuff () {
	int count = _chimneys->count();
	CCSprite * chimney;
	CCSprite * puff;
	for (int i = 0; i < count; i++) {
		chimney = (CCSprite * ) _chimneys->objectAtIndex(i);
		if (chimney->isVisible()) {
			puff = (CCSprite *) chimney->getChildByTag(_puffIndex);
			puff->setVisible(true);
			puff->stopAllActions();
			puff->setScale(1.0);
			puff->setOpacity(255);
			puff->setPosition(ccp(0,0));
			puff->runAction((CCAction *) _puffAnimation->copy()->autorelease());
			puff->runAction((CCAction *) _puffMove->copy()->autorelease());
			//puff->runAction((CCAction *) _puffFade->copy()->autorelease());
			puff->runAction((CCAction *) _puffScale->copy()->autorelease());
		}
	}
	_puffIndex++;
	if (_puffIndex == TOTAL_PUFFS)
		_puffIndex = 0;
}
=======================================================================
游戏逻辑类 GameLayer.cpp
主要有以下方法:
1 //创建游戏界面
把所有的元素加到界面中
包括 主角 地图 云彩 帽子 积分 各种按钮 等等。
//创建游戏界面
createGameScreen();

// 显示教程
void GameLayer::showTutorial (CCObject* pSender)

//重新开始游戏
resetGame();

// 开始游戏方法
void GameLayer::startGame (CCObject* pSender)

//主循环
this->schedule(schedule_selector(GameLayer::update));

// 处理按键
void GameLayer::ccTouchesBegan(CCSet* pTouches, CCEvent* event)
在update里,前景、背景等都是按照主角的速度的一定比例来进行向左移动:
   if (_player->getVector().x > 0) {
    //一直往左移
        _background->setPositionX(_background->getPosition().x - _player->getVector().x * 0.25f);
        float diffx;
        //移完一个宽度时,重新把位置设置为接近0的位置
        if (_background->getPositionX() < -_background->getContentSize().width) {
            diffx = fabs(_background->getPositionX()) - _background->getContentSize().width;
            _background->setPositionX(-diffx);
        }

        _foreground->setPositionX(_foreground->getPosition().x - _player->getVector().x * 4);

        if (_foreground->getPositionX() < -_foreground->getContentSize().width * 4) {
            diffx = fabs(_foreground->getPositionX()) - _foreground->getContentSize().width * 4;
            _foreground->setPositionX(-diffx);
        }

        int count = _clouds->count();
        CCSprite * cloud;
        for (int i = 0; i < count; i++) {
            cloud = (CCSprite *) _clouds->objectAtIndex(i);
            cloud->setPositionX(cloud->getPositionX() - _player->getVector().x * 0.15f);
            if (cloud->getPositionX() + cloud->boundingBox().size.width * 0.5f < 0 )
                cloud->setPositionX(_screenSize.width + cloud->boundingBox().size.width * 0.5f);
        }
    }
update了里。整体流程使用状态机,如果是教程,则隐藏部分元素,停止游戏,显示提示,
    if (_state > kGameTutorial) {
        if (_state == kGameTutorialJump) {
            if (_player->getState() == kPlayerFalling && _player->getVector().y < 0) {
                _player->stopAllActions();
                _jam->setVisible(false);
                _jam->stopAllActions();
                _running = false;
                _tutorialLabel->setString("While in the air, tap the screen to float.");
                _state = kGameTutorialFloat;
            }
        } else if (_state == kGameTutorialFloat) {
            if (_player->getPositionY() < _screenSize.height * 0.95f) {
                _player->stopAllActions();
                _running = false;
                _tutorialLabel->setString("While floating, tap the screen again to drop.");
                _state = kGameTutorialDrop;
            }
        } else {
            _tutorialLabel->setString("That's it. Tap the screen to play.");
            _state = kGameTutorial;
        }
    }
触摸方法里ccTouchesBegan,也是一系列的状态机判断。
包括整体游戏状态,包括玩家游戏中状态,包括游戏引导中德下一步。
无它
这个例子看得比较艹
毕竟跟之前的几个demo大同小异
只是地图移动那块比较麻烦
单纯阅读代码效果不好
需要自己敲敲改改加深印象
最近重玩《上古卷轴5》
现在攥钱买雪漫城的房子中
差距啊
骨头比较喜欢这种高自由度的游戏
努力把
------------------- 飞船起飞--------------------
Cocos2dx游戏开发系列笔记17:《喵汪大战》之cocos2dx版本移植问题二
Cocos2dx游戏开发系列笔记16:来个Demo:《喵汪大战》之cocos2dx版本移植问题
Cocos2dx游戏开发系列笔记15.1:添加虚拟摇杆SneakyInput
Cocos2dx游戏开发系列笔记14:一个横版拳击游戏Demo-下(让游戏跑在手机上)
Cocos2dx游戏开发系列笔记13:一个横版拳击游戏Demo-中
Cocos2dx游戏开发系列笔记12:一个横版拳击游戏Demo-上
Cocos2dx游戏开发系列笔记11:解 刨《战神传说》完结篇
Cocos2dx游戏开发系列笔记10:解刨《战神传说》
Cocos2dx游戏开发系列笔记9:android手机上运行《战神传说》,并解决横竖屏即分辨率自适应问题
Cocos2dx游戏开发系列笔记8:开搞一个射击游戏《战神传说》//就个打飞机的
Cocos2dx游戏开发系列笔记7:一个简单的跑酷游戏《萝莉快跑》的消化(附下载)
Cocos2dx游戏开发系列笔记6:怎样让《萝莉快跑》的例子运行在vs和手机上
Cocos2dx游戏开发系列笔记5:继续润色《忍者飞镖射幽灵》
Cocos2dx游戏开发系列笔记4:怎样新加一个Scene类?
Cocos2dx游戏开发系列笔记3:牛刀小试->忍者飞镖射幽灵的Demo
Cocos2dx游戏开发系列笔记2:一个刚创建的cocos2dx中的demo里都有什么
Cocos2dx游戏开发系列笔记1:一个崭新的开始,cocos2dx2.2+ndkr9+Cygwin+vs2012游戏开发环境搭建
-------------------- 飞船降落--------------------
最后,骨头介绍一下陪在身边的哲哲(右边就是低调的哲哲)
哲哲,小名 YIYI ,手工爱好者,文艺范,手艺人,《YiYiの妙舍》创始人,很有自己想法。
![]()


