nginx
一、nginx介绍
Nginx (engine x) 是一个高性能的HTTP和反向代理web服务器,同时也提供了IMAP/POP3/SMTP服务。Nginx是由伊戈尔·赛索耶夫为俄罗斯访问量第二的Rambler.ru站点(俄文:Рамблер)开发的,第一个公开版本0.1.0发布于2004年10月4日。
其将源代码以类BSD许可证的形式发布,因它的稳定性、丰富的功能集、示例配置文件和低系统资源的消耗而闻名。2011年6月1日,nginx 1.0.4发布。
Nginx是一款轻量级的Web 服务器/反向代理服务器及电子邮件(IMAP/POP3)代理服务器,在BSD-like 协议下发行。其特点是占有内存少,并发能力强,事实上nginx的并发能力在同类型的网页服务器中表现较好,中国大陆使用nginx网站用户有:百度、京东、新浪、网易、腾讯、淘宝等。
二、源码编译及配置
[root@server1 ~]# tar zfx nginx-1.18.0.tar.gz
[root@server1 ~]# cd nginx-1.18.0/
[root@server1 nginx-1.18.0]# yum install gcc
[root@server1 nginx-1.18.0]# yum install pcre-devel -y
[root@server1 nginx-1.18.0]# yum install openssl-devel -y
[root@server1 nginx-1.18.0]# ./configure --prefix=/usr/local/nginx --with-http_ssl_module --with-http_stub_status_module --with-file-aio
[root@server1 nginx-1.18.0]# vim auto/cc/gcc
##注释debug下面行##
[root@server1 nginx-1.18.0]# make
[root@server1 nginx-1.18.0]# make install[root@server1 nginx]# vim ~/.bash_profile
[root@server1 nginx]# source ~/.bash_profile[root@server1 nginx]# nginx -t
##语法检测##
[root@server1 nginx]# nginx
##启动服务##测试:
[root@server1 nginx]# vim /etc/security/limits.conf
##修改nginx用户进程可打开的文件数限制##
[root@server1 nginx]# useradd -M -d /usr/local/nginx/ -s /sbin/nologin nginx
##创建用户方便执行操作##[root@server1 nginx-1.18.0]# cd /usr/local/nginx/
[root@server1 nginx]# vim conf/nginx.conf
[root@server1 nginx]# nginx -s reload
##重启服务##测试:
当后端的两台服务器的httpd都关闭的话,他就会使用自己做为后端
权重: weight=2
注意:server2server3测试服务器需要开启httpd服务才能实现上面操作,且在真机测试www.westos.org时需要写本地hosts
三、nginx 并发优化
| worker_processes | 工作进程数 |
| worker_connections | 单个工作进程并发连接数 |
worker_processes     2;		//最多开启8个
worker_cpu_affinity 01 10;	//cpu有多少个核,就有几位数,1代表内核开启,0代表内核关闭
multi_accept on; 	//告诉nginx收到一个新连接通知后接受尽可能多的连接
开启文件高效传输模式,同时设置tcp_nopush 和tcp_nodelay 为on,可以防止网路和磁盘IO阻塞。
sendfile on;
tcp_nopush on;
tcp_nodelay on;
测试:加快访问速度
四、nginx的平滑升级
下载nginx新版本软件,正常执行./configure和make但不执行make install (注意:此处用到的版本为nginx-1.18.0和nginx-1.19.1)
同样需要解压
编译过程和之前相同,但不需要make install
[root@server1 ~]# cd nginx-1.19.1/
[root@server1 nginx-1.19.1]# ./configure --prefix=/usr/local/nginx --with-http_ssl_module --with-http_stub_status_module --with-file-aio
[root@server1 nginx-1.19.1]# make
备份原程序:
[root@server1 ~]# cd /usr/local/nginx/sbin
[root@server1 sbin]# cp nginx nginx.old
拷贝新程序:
[root@server1 sbin]# cd nginx-1.19.1/objs
[root@server1 objs]# \cp -f nginx /usr/local/nginx/sbin
获取当前nginx主进程pid:
[root@server1 sbin]# ps ax|grep nginx
升级新程序:
[root@server1 sbin]# kill -USR2 7410
[root@server1 sbin]# ps ax|grep nginx
关闭原worker进程但保留主进程:为了回退
[root@server1 sbin]# kill -WINCH 7410
# p[root@server1 sbin]s ax|grep nginx
成功平滑升级为1.19.1版本(全程不影响nginx的用户体验)
版本回退:
还原nginx程序:
[root@server1 sbin]# \cp -f nginx.old nginx
唤醒原进程:
[root@server1 sbin]# kill -HUP 7410
回收新版本的worker进程:
[root@server1 sbin]# kill -WINCH 7484
关闭新版本主进程:
[root@server1 sbin]# kill -QUIT 7484
版本查看
注意\cp是为了转译 因为cp 默认是cp -i
五、用脚本启动
[Unit]
Description=The NGINX HTTP and reverse proxy server
After=syslog.target network.target remote-fs.target nss-lookup.target

[Service]
Type=forking
PIDFile=/usr/local/nginx/logs/nginx.pid
ExecStartPre=/usr/local/nginx/sbin/nginx -t
ExecStart=/usr/local/nginx/sbin/nginx
ExecReload=/usr/local/nginx/sbin/nginx -s reload
ExecStop=/bin/kill -s QUIT $MAINPID
PrivateTmp=true

[Install]
WantedBy=multi-user.target
[root@server1 ~]# cd /etc/systemd/system/
##将写好的启动脚本放到这个目录下##
[root@server1 system]# systemctl daemon-reload
cookies
[root@server1 system]# yum install unzip
[root@server1 ~]# unzip  nginx-goodies-nginx-sticky-module-ng-08a395c66e42.zip
[root@server1 ~]# systemctl stop nginx.service
[root@server1 ~]# cd nginx-1.18.0/
[root@server1 nginx-1.18.0]# ./configure --prefix=/usr/local/nginx --with-http_ssl_module --with-http_stub_status_module --with-file-aio --add-module=/root/nginx-goodies-nginx-sticky-module-ng-08a395c66e42
make
make install
[root@server1 objs]# cp nginx  /usr/local/nginx/sbin/nginx
[root@server1 objs]# systemctl start nginx.service
[root@server1 objs]# vim /usr/local/nginx/conf/nginx.conf
[root@server1 objs]# nginx -s reload
测试:
六、nginx 的限流
https://docs.nginx.com/
控制单IP并发连接数:
http {
limit_conn_zone $binary_remote_addr zone=addr:10m;
//$binary_remote_addr 表示通过remote_addr这个标识来做限制
//zone=addr:10m 表示生成一个大小为10M,名字为addr的内存区域
...
server {
location /download/ {
    limit_conn addr 1;		#限制并发数
    limit_rate 50k;			#限制带宽
   }
}
限制单位时间内的请求数目,以及速度限制:
http {
limit_req_zone $binary_remote_addr zone=one:10m rate=1r/s;
//rate=1r/s表示允许相同标识的客户端的访问频次,这里限制的是每秒1次
...
server {
location / {
       limit_req zone=one;
#	 limit_req zone=one burst=5
#	 limit_req zone=one burst=5 nodelay;
}
}
七、nginx配置管理
自动索引:下载方便
location / {
    autoindex on;
}
![]()
Nginx expire缓存配置: 缓存可以降低网站带宽,加速用户访问
location ~ .*\.(gif|jpg|png)$ {
    expires 365d;   ##到期时间
    root html;
}
测试:
八、nginx的日志轮询:
[root@server1 nginx]# cd logs/
[root@server1 logs]# wc -l access.log
220240 access.log
[root@server1 logs]# du -h access.log
22M	access.log
[root@server1 logs]# vim /opt/nginxlog.sh
[root@server1 logs]# chmod +x /opt/nginxlog.sh
[root@server1 logs]# /opt/nginxlog.sh
#!/bin/bash
cd /usr/local/nginx/logs && mv access.log access_$(date +%F -d -1day).log
kill -USR1 `cat /usr/local/nginx/logs/nginx.pid`
再加入crontab定时任务
[root@server1 logs]# crontab -e
00 00 * * * /opt/scripts/nginxlog.sh &> /dev/null
为了安全,日志目录不需要给你nginx用户访问权限
# chmod -R 700 /usr/local/nginx/logs
禁用不必要的日志记录,以节省磁盘IO的消耗
location  /status {
	access_log off;
}
站点目录和文件的限制
location ~ ^/images/.*\.(sh|php)$ {
                deny all;
        }
中文乱码
charset utf-8;
![]()
限制IP
location / {
	deny 172.25.1.2;
	allow 127.0.0.1;
	deny all;
}

if ($remote_addr = 172.25.1.250) {
	return 403;
}
测试:
九、nginx 重定向
防止域名恶意解析到服务器IP:
server {
listen 80;
server_name localhost;
return 500;
}
也可以重定向:
server {
        listen       80;
        server_name  localhost;
        #return 500;
        rewrite ^(.*) http://www.baidu.com permanent;
}
##当访问本页面时自动跳转到百度##
测试:
加密网站或重定向加密网站,提高网站安全.
server {
	listen 80;
	server_name www.westos.org;
	rewrite ^/(.*)$ https://www.westos.org/$1 permanent;
}
生成安全证书过程:
[root@server1 download]# cd /etc/pki/tls/certs/
[root@server1 certs]# make cert.pem
umask 77 ; \
PEM1=`/bin/mktemp /tmp/openssl.XXXXXX` ; \
PEM2=`/bin/mktemp /tmp/openssl.XXXXXX` ; \
/usr/bin/openssl req -utf8 -newkey rsa:2048 -keyout $PEM1 -nodes -x509 -days 365 -out $PEM2  ; \
cat $PEM1 >  cert.pem ; \
echo ""    >> cert.pem ; \
cat $PEM2 >> cert.pem ; \
rm -f $PEM1 $PEM2
Generating a 2048 bit RSA private key
......................+++
.................+++
writing new private key to '/tmp/openssl.D8xxDc'
-----
You are about to be asked to enter information that will be incorporated
into your certificate request.
What you are about to enter is what is called a Distinguished Name or a DN.
There are quite a few fields but you can leave some blank
For some fields there will be a default value,
If you enter '.', the field will be left blank.
-----
Country Name (2 letter code) [XX]:cn
State or Province Name (full name) []:shaanxi
Locality Name (eg, city) [Default City]:xi'an
Organization Name (eg, company) [Default Company Ltd]:westos
Organizational Unit Name (eg, section) []:linux
Common Name (eg, your name or your server's hostname) []:server1
Email Address []:[email protected]
[root@server1 certs]# mv cert.pem /usr/local/nginx/conf/
##将生成的密钥放置/usr/local/nginx/conf/里
[root@server1 conf]# nginx -s reload
十、子网页的重定向
##www.westos.org/bbs 重定向bbs.westos.org:
rewrite ^/bbs$ http://bbs.westos.org permanent;
rewrite ^/bbs/(.*)$ http://bbs.westos.org/$1 permanent;
mkdir /bbs
echo bbs.westos.org > /bbs/index.html
测试:
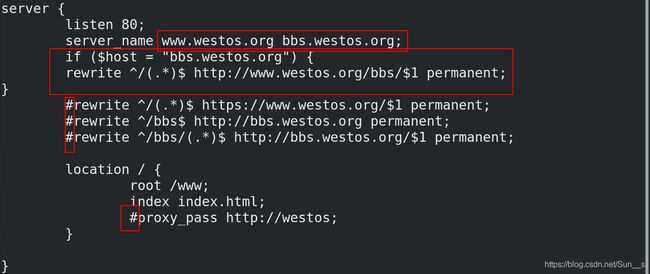
##bbs.westos.org 重定向www.westos.org/bbs:
if ($host = "bbs.westos.org"){
    rewrite ^/(.*)$ http://www.westos.org/bbs/$1 permanent;
}
[root@server1 /]# cd www/
[root@server1 www]# mkdir  bbs
[root@server1 bbs]# echo bbs.westos.org-2> index.html
测试:
十一、nginx 防盗链
[root@server2 ~]# cd /var/www/html/
[root@server2 html]# vim index.html

确保httpd开启状态
测试:
location ~ \.(jpg|png)$ {
                valid_referers none blocked www.westos.org;
                if ($invalid_referer) {
                        return 403;
                        #rewrite ^/ http://www3.westos.org/daolian.jpg;
                }
        }
        location ~ \.(jpg|png)$ {
                valid_referers none blocked www.westos.org;
                if ($invalid_referer) {
                        #return 403;
                        rewrite ^/ http://www3.westos.org/daolian.jpg;
                }
}


