Tutorial: WPF User Control for AX2012
原作者: https://community.dynamics.com/ax/b/goshoom/archive/2011/10/06/tutorial-wpf-user-control-for-ax2012.aspx
Tutorial: WPF User Control for AX2012
RATE THIS
6 OCT 2011 11:27 AM
One of many new features in Dynamics AX 2012 which bring fantastic new possibilities is the ability to host managed UI controls, both from Windows Forms and WPF. Microsoft made a great effort to integrate the .NET environment and AX, not only from a run-time perspective but also for developers, easy event handling and so on.
让我们看一个简短的教程,学习如何创建一个新的WPF User Control,和一个AX form,来演示AX和WPF之间的双向交流.
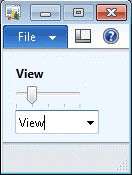
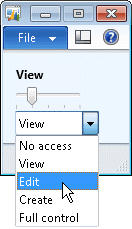
Specifically, we'll create the following control:
 It's a simple WPF User Control, composed of Label and Slider controls.然而,slider的值用AX的enum来定义,并且被选择的枚举值会在label上显示. 该控件允许设置枚举名称,和选中的值.并且在值改变时,会引发事件.
We'll also create a form to demonstrate how to use properties and events:
It contains the WPF control described above and a native AXComboBox. If value is updated in any of these controls, the other control is updated automatically.
The form accepts enum type and a value in an Args object, so you can use various enums just by setting properties of a menu item.
This tutorial is quite brief, but you can find complete source codes at the end of the post. It was created in Visual Studio 2010 SP1 and Dynamics AX 2012 RTM.
Create Visual Studio project
Go to Visual Studio 2010, click File > New > Project and choose WPF User Control Librarytemplate (Visual C#). Change project and solution names as appropriate. In the rest of the tutorial, I expect that both (and the assembly too) are named AxUserControls.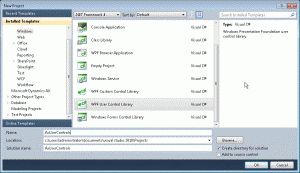
Confirm the dialog, open the newly created project in Solution Explorer and rename the automatically created UserControl1 toEnumSlider (both files and the class).
You also need to change project's Target Framework from .NET Framework 4 Client Profile to .NET Framework 4. (Right-click your project and choose Properties; Target Framework is on the first tab.)
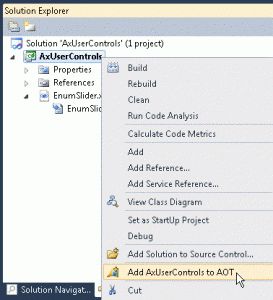
Then right-click the project again and click Add AxUserControls to AOT.
Implement WPF control
First of all, define user interface in XAML. Just replace the Grid in the generated XAML withStackPanel and add Label and Slider as follows:
<UserControl x:Class="AxUserControls.EnumSlider" xmlns="http://schemas.microsoft.com/winfx/2006/xaml/presentation" xmlns:x="http://schemas.microsoft.com/winfx/2006/xaml" xmlns:mc="http://schemas.openxmlformats.org/markup-compatibility/2006" xmlns:d="http://schemas.microsoft.com/expression/blend/2008" mc:Ignorable="d" d:DesignHeight="300" d:DesignWidth="300"> <StackPanel> <Label Name="ValueLabel" FontWeight="Bold" /> <Slider Name="Slider" IsSnapToTickEnabled="True" TickPlacement="BottomRight" TickFrequency="1" ValueChanged="Slider_ValueChanged" /> </StackPanel> </UserControl> |
Both Label and Slider controls have a name assigned, the slider also defines an event handler for the ValueChanged event and few properties adjusting its behavior.
Now, let's add some code to EnumSlider.xaml.cs.
First, add two properties – EnumName and Value. EnumName is used to generate possible values and obtain element labels. Value can be used to set or get the selected enum value. Note that element value can be set in AOT properties and doesn't have to correspond to an element index (for example, EPCTagType enum uses values {2,48,49,50}). Use the following C# code to define both normal properties and dependency properties:
public string EnumName { get { return (string)GetValue(EnumNameProperty); } set { SetValue(EnumNameProperty, value); } } public static DependencyProperty EnumNameProperty = DependencyProperty.Register( "EnumName", typeof(string), typeof(EnumSlider), new FrameworkPropertyMetadata(new PropertyChangedCallback(OnEnumNameChanged)), new ValidateValueCallback(ValidateEnumName));
public int Value { get { return (int)GetValue(ValueProperty); } set { SetValue(ValueProperty, value); } } public static readonly DependencyProperty ValueProperty = DependencyProperty.Register( "Value", typeof(int), typeof(EnumSlider), new FrameworkPropertyMetadata(new PropertyChangedCallback(OnValueChanged), new CoerceValueCallback(CoerceValue))); |
If you are not familiar with dependency properties, consider them just as "smarter" properties supporting change notifications, validations and so on.
Both dependency properties in the code above define some callback methods to be called when the property is changed (OnEnumNameChanged, OnValueChanged), to validate a value (ValidateEnumName) or to fix an invalid value (CoerceValue).
Note: When defining dependency properties, you can use propdp code snippet. Just writepropdp in code editor and press Tab key – most of code will be generated for you.
Then we need an event to be raised when value is changed:
public static readonly RoutedEvent ValueChangedEvent = EventManager.RegisterRoutedEvent( "ValueChanged", RoutingStrategy.Bubble, typeof(RoutedEventHandler), typeof(EnumSlider));
public event RoutedEventHandler ValueChanged { add { AddHandler(ValueChangedEvent, value); } remove { RemoveHandler(ValueChangedEvent, value); } }
|
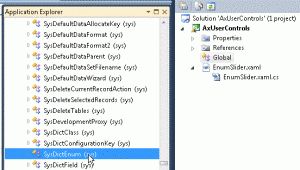
We also need a private field for storing a SysDictEnum instance. Create a proxy class by dragging SysDictEnum class from Application Explorer to AxUserControls project
and then declare a class field in code:
private SysDictEnum dictEnum;
Now we just have to implement some methods. Let's take a look at the essential ones (please refer to the source code for the rest).
When enum name is changed, OnEnumNameChanged method is called automatically by the dependency property. A new instance of SysDictEnum (AX class) is created and slider values, size etc. are updated accordingly:
private static void OnEnumNameChanged(DependencyObject d, DependencyPropertyChangedEventArgs e) { EnumSlider control = (EnumSlider)d; control.dictEnum = SysDictEnum.newName((string)e.NewValue); control.OnDictEnumChanged(); } private void OnDictEnumChanged() { this.Slider.Maximum = this.dictEnum.values() - 1; this.UpdatePreferedLabelWidth(); this.UpdateLabel(); } |
When Value property of EnumSlider is changed, GUI is updated and an event is raised (and can be subsequently consumed by AX):
private static void OnValueChanged(DependencyObject d, DependencyPropertyChangedEventArgs e) { EnumSlider control = (EnumSlider)d; int elementIndex = control.dictEnum.value2Index((int)e.NewValue); control.Slider.Value = elementIndex; control.UpdateLabel(elementIndex); control.RaiseEvent(new RoutedEventArgs(ValueChangedEvent)); } |
If Slider value is changed, Value property of EnumSlider is updated (and it raises the event etc.).
private void Slider_ValueChanged(object sender, RoutedPropertyChangedEventArgs e) { int sliderValue = (int)e.NewValue; this.Value = dictEnum.index2Value(sliderValue); } |
Deploy WPF control
When the control is finished, build the project, right-click it and choose Open Folder in Windows Explorer. Go to \bin\Debug folder and copy AxUserControl.dll to the Bin directory of AX client (e.g. c:\Program Files (x86)\Microsoft Dynamics AX\60\Client\Bin).
(In reality you should use Release configuration and sign the assembly, but let's keep it simple.)
Implement AX form
The last step is to create an AX form which will be using the new WPF control. It will contain two controls – WPF EnumSlider and AX ComboBox – and their values will be kept synchronized.
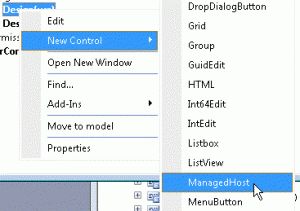
Create a form and a menu item as usual and call them EnumSlider. In form's design node, add a new ManagedHost control:
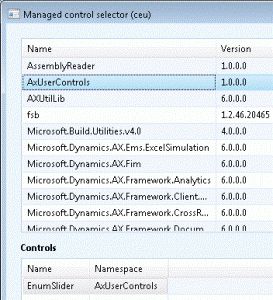
Another form called Managed control selector is automatically opened. You have to choose an assembly containing managed controls and a specific control to be used by the managed host.
Because we haven't created a reference to the assembly yet, click Add reference, in Add reference form click Browse, find AxUserControls.dll and confirm the reference creation.
Back in Managed control selector, select AxUserControls assembly and EnumSlider control:
Confirm the selection by OK, rename ManagedHostcontrol to SliderHost and set it's Sizing property to SizeToContent.
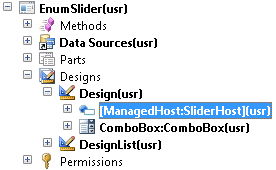
Next, add an AX ComboBox control and set it as auto-declared. The form structure should look like this:
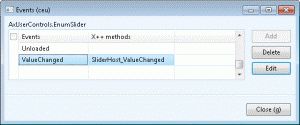
Then add an event handler to be called when slider value is changed. Right-click SliderHostcontrol, click Events to open Events form, find ValueChanged event in the grid and press Addbutton. X++ method SliderHost_ValueChanged is created and assigned as a handler of theValueChanged event we defined on the WPF control.
You can open form's init() method to see how the event handler subscription is implemented:
_SliderHost_Control = SliderHost.control(); _SliderHost_Control.add_ValueChanged(new ManagedEventHandler(this, 'SliderHost_ValueChanged')); |
In SliderHost_ValueChanged(), simply set the same value to ComboBox control:
void SliderHost_ValueChanged(System.Object sender, System.Windows.RoutedEventArgs e) { AxUserControls.EnumSlider slider = sender; int newValue = slider.get_Value(); comboBox.selection(newValue); } |
Synchronization in the opposite direction is also simple – modifyComboBox.selectionChange() to call
_SliderHost_Control.set_Value(this.selection()) |
The last step is to use enum type and enum value defined on a menu item callingEnumSlider form. Just modify init() to set these values to both AX and WPF controls:
comboBox.enumType(element.args().parmEnumType()); _SliderHost_Control.set_EnumName(enumId2Name(element.args().parmEnumType())); _SliderHost_Control.set_Value(enum2int(element.args().parmEnum())); |
Set EnumTypeParameter and (optionally) EnumParameter properties of the EnumSlidermenu item (my example uses SysAccessRights enum), open the menu item and verify that everything works as expected, including two-way synchronization.
Conclusion
In this tutorial, we created a WPF user control, used AX metadata about enums to define control's values, we read and wrote values of CLR properties from AX and consumed a custom routed event in X++.
The integration of Dynamics AX 2012 and Windows Forms/WPF is almost seamless and it allows to easily reuse existing managed UI controls, build various custom controls, to easily use animations, drag & drop and many other concepts supported by Windows Forms and WPF. It offers completely new possibilities for Dynamics AX user experience design.
Source code
Download (zipped .xpo)

