【深度学习】经典网络-(InceptionV3)GoogLeNet网络复现(使用Tensorflow实现)
论文地址:(V3)https://arxiv.org/abs/1512.00567
本文所包含代码GitHub地址:https://github.com/shankezh/DL_HotNet_Tensorflow
如果对机器学习有兴趣,不仅仅满足将深度学习模型当黑盒模型使用的,想了解为何机器学习可以训练拟合最佳模型,可以看我过往的博客,使用数学知识推导了机器学习中比较经典的案例,并且使用了python撸了一套简单的神经网络的代码框架用来加深理解:https://blog.csdn.net/shankezh/article/category/7279585
项目帮忙或工作机会请邮件联系:[email protected]
数据集下载地址:https://www.kaggle.com/c/cifar-10 or http://www.cs.toronto.edu/~kriz/cifar.html
---------------------
本文对论文进行了代码复现;
论文阅读
关键信息提取
1.AlexNet对于提升卷积网络性能的选项基本是没有竞争力的,参数太大;
2.VGG的结构简单特性非常吸引人,也非常有价值;
3.Inception结构的GoogLeNet可以很好的执行在内存和计算资源有限的机器上;GoogLeNet只有500w个参数,是具有6000w参数的AlexNet的1/12,更不用说VGG是AlexNet的3倍参数;
4.提出了一些在搭建高质量模型的指导规则:a)避免表征瓶颈,尤其在网络初期(个人释义:一些从输出量剪开的输入量,一方面会有近乎大量的信息被剪掉,另一方面也应该避免瓶颈和过度压缩); b)在网络中,更高维度的代表者更容易处理本地信息(个人理解:增加网络宽度,训练将会更快);c)空间聚合可以在低维嵌入上进行,而不会造成很大的或任何的表现力损失;d)平衡网络深度和宽度;
5.GoogLeNet网络的直接收益的提升大多是因为慷慨的使用了维度减少方法;也可以看作是一种分解卷积的计算手段;例如1x1卷积后面接个3x3;
6.研究了其他对于分解卷积的一系列方法;
7.分解成更小的卷积,5x5是3x3的2.78倍计算量,研究邻近激活单元的相关性后,讨论5x5是否已可被分解使用多重层组织代替,因此结果是5x5可分解成两个3x3,这种方式可让计算代价变为(9+9)/25,减少了近乎28%;
8.那么可不可以使用更小的卷积拆分来替代呢?也许可以,如2x2;但是,发现使用n x 1的效果也很棒,例如3x1接一个1x3,这样和3x3卷及效果一样,但是却可以比后者省掉33%的性能,而通过压缩网络,3x3使用两个2x2的替代,也仅仅可以省下11%的性能;
9.理论上,可以使用这样的方法将nxn的卷积通过1xn和nx1来进行代替;实践过程中,发现这样的分解方式,在网络的前部分的层上表现不佳,但却在中等网格尺寸表现不错(格子尺寸指的是图的分辨率,在mxm的特征图上,m的的尺寸是12到20);
10.使用辅助训练器的网络在训练尾部阶段比不适用辅助训练器的网络会效果更好,正确率更高;
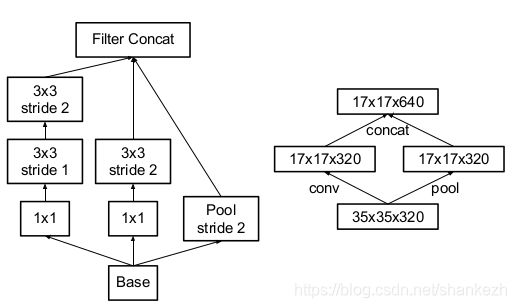
11.传统做法中,卷积网络需要使用池化操作来减少特征图的网格尺寸;为了避免表征瓶颈,在网络滤波器使用最大或者均值池化前是展开;使用两个并列stride2的块:P和C,P是池化层,所有都是stride为2的滤波团;
网络结构
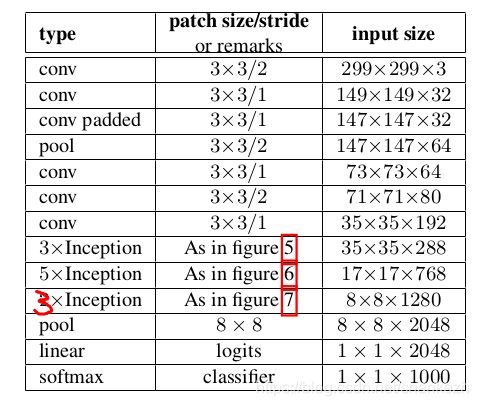
1.给出新的网络结构,见Figure1;
2.将以前的7x7分解后,使用了两个3x3代替(section3.1有说明);
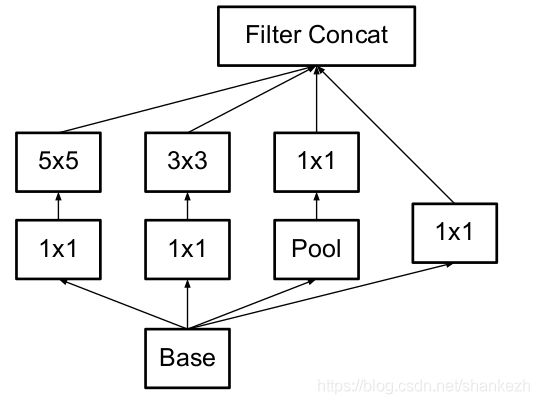
3.在35x35和288个滤波器的地方,使用了3个传统的inception模块;
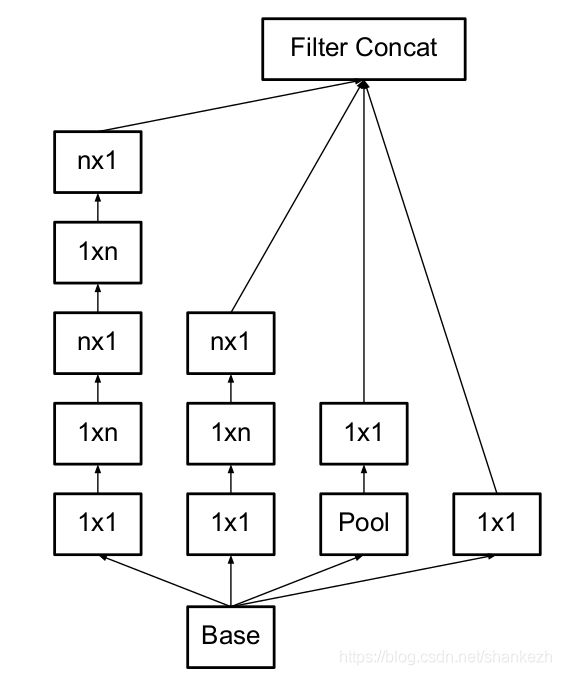
4.在17x17和768滤波器的地方,使用了使用了网格减少技巧(Section5有说明),这里使用了5个分解后的Inception模块(其实就是InceptionV2的模块,但是这篇论文把这个模块叫V2,其实叫V3),图见Figure2;
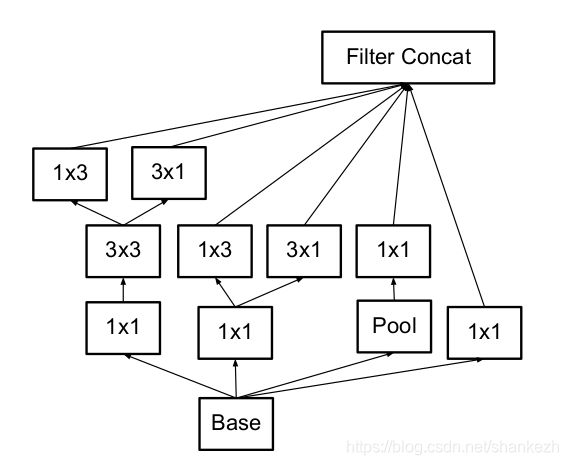
5.在8x8和1280滤波器的地方,使用了如Figure3.1的技巧,使用了两个如Figure3.2图的Inception结构;
6.虽然网络深度为42,但计算代价仅仅是2.5倍的GoogLeNet(应该指的是V1),并且比VGGNet有效;
训练方法:
1.使用了TensorFlow的随机梯度进行训练,使用了分布式机器学习系统,在50台NVidia kepler架构的GPU上训练;
2.BatchSize为32,运行了100个批次;
3.早期的经验都是使用Momentum方法,deacy设为0.9,后来使用了RMSProp,将decay设置为0.9,E设置为1.0,学习速率设置为0.045,每两个批次衰减一次,衰减率为0.94;
其他细节:
1.使用更高分辨率的感受野对于提高性能十分识别显著;
2.如果仅仅改变输入的分辨率而不去更进一步的调节模型,那么就会使用计算能力更弱的模型去处理更难得任务;
3.多大分辨率的输入才可以让计算效果保持稳定?团队给出了三个经验观点(Figure4.):
a)299x299 感受野为Stride=2,使用最大池化在第一层后;
b)151x151 感受野为Stride=1,使用最大池化在第一层后;
c)79x79 感受野为Stride=1,第一层后不使用池化;
Figure1.GoogLeNet使用InceptionV3打建,红色为修正数字,因为源码中这里是三层,而论文中只有两层;
Figure2,即Figure1中的3xInception
Figure3.1 论文中提到对于减少分辨率的模块,即将需要减少分辨率的第一个Inception模块替换即可
Figure3.2,对应Figure1中的5xInception
Fiugre3.3,对应Figure1中的2xInception
Figure4. 提高输入图像分辨率后的正确率
Tensorflow代码实现
说明
使用Tensorflow搭建论文网络,搭建过程遵循论文原意,并且确认google官方给出的IncetpionV3的代码与我的区别,论文的结构和谷歌官方给出的结构存在一定的差异性,因此我在搭建的时候,最大限度的按照了论文复现,除了论文中最后的2 x incepion 被我变成了3 x inception,同时没有使用辅助分类器进行训练,其他的基本都是按照论文进行复现,不遵循官方源码,但大同小异,没多大区别;
代码
模型
#!/usr/bin/env python
# -*- coding: utf-8 -*-
# Created by InceptionV3 on 19-4-4

import tensorflow as tf
import tensorflow.contrib.slim as slim


"""
论文中提到的第一种模块结构,stride都是1,等效于三层
但目前google源码可以看到和这里是不一样的,而是用了inceptionv1的结构
但论文的图表中则明确指出了是拆分了5x5的卷积为两个3x3,网上基本上全部抄的google源码
我这里就按照论文复现,这里体现了原则3
"""
def inception_module_v3_1(net, scope, filter_num, stride=1):
    with tf.variable_scope(scope):
        with tf.variable_scope('bh1'):
            bh1 = slim.conv2d(net, filter_num[0], [1, 1], stride=stride, scope="bh1_conv1_1x1")
        with tf.variable_scope('bh2'):
            bh2 = slim.avg_pool2d(net, [3, 3], stride=stride, scope="bh2_avg_3x3")
            bh2 = slim.conv2d(bh2, filter_num[1], [1, 1], stride=stride, scope="bh2_conv_1x1")
        with tf.variable_scope('bh3'):
            bh3 = slim.conv2d(net, filter_num[2], [1, 1], stride=stride, scope="bh3_conv1_1x1")
            bh3 = slim.conv2d(bh3, filter_num[3], [3, 3], stride=stride, scope="bh3_conv2_3x3")
        with tf.variable_scope('bh4'):
            bh4 = slim.conv2d(net, filter_num[4], [1, 1], stride=stride, scope="bh4_conv1_1x1")
            bh4 = slim.conv2d(bh4, filter_num[5], [3, 3], stride=stride, scope="bh4_conv2_3x3")
            bh4 = slim.conv2d(bh4, filter_num[6], [3, 3], stride=stride, scope="bh4_conv3_3x3")
        net = tf.concat([bh1, bh2, bh3, bh4], axis=3)
    return net


'''
论文中提到的第二种结构,使用了1xn和nx1,论文中将n=7用来处理17x17的grid,五层
这里体现了原则3
'''
def inception_moudle_v3_2(net, scope, filter_num, stride=1):
    with tf.variable_scope(scope):
        with tf.variable_scope("bh1"):
            bh1 = slim.conv2d(net, filter_num[0], [1, 1], stride=stride, scope="bh1_conv_1x1")
        with tf.variable_scope("bh2"):
            bh2 = slim.avg_pool2d(net, [3, 3], stride=stride, scope='bh2_avg_3x3')
            bh2 = slim.conv2d(bh2, filter_num[1], [1, 1], stride=stride, scope='bh2_conv_1x1')
        with tf.variable_scope("bh3"):
            bh3 = slim.conv2d(net, filter_num[2], [1, 1], stride=stride, scope='bh3_conv1_1x1')
            bh3 = slim.conv2d(bh3, filter_num[3], [1, 7], stride=stride, scope='bh3_conv2_1x7')
            bh3 = slim.conv2d(bh3, filter_num[4], [7, 1], stride=stride, scope='bh3_conv3_7x1')
        with tf.variable_scope("bh4"):
            bh4 = slim.conv2d(net, filter_num[5], [1, 1], stride=stride, scope='bh4_conv1_1x1')
            bh4 = slim.conv2d(bh4, filter_num[6], [1, 7], stride=stride, scope='bh4_conv2_1x7')
            bh4 = slim.conv2d(bh4, filter_num[7], [7, 1], stride=stride, scope='bh4_conv3_7x1')
            bh4 = slim.conv2d(bh4, filter_num[8], [1, 7], stride=stride, scope='bh4_conv4_1x7')
            bh4 = slim.conv2d(bh4, filter_num[9], [7, 1], stride=stride, scope='bh4_conv5_7x1')
        net = tf.concat([bh1, bh2, bh3, bh4], axis=3)
    return net


'''
论文提到的第三种结构,增加了宽度,三层
体现了原则2
'''
def inception_moudle_v3_3(net, scope, filter_num, stride=1):
    with tf.variable_scope(scope):
        with tf.variable_scope("bh1"):
            bh1 = slim.conv2d(net, filter_num[0], [1, 1], stride=stride, scope='bh1_conv_1x1')
        with tf.variable_scope("bh2"):
            bh2 = slim.avg_pool2d(net, [3, 3], stride=stride, scope='bh2_avg_3x3')
            bh2 = slim.conv2d(bh2, filter_num[1], [1, 1], stride=stride, scope='bh2_conv_1x1')
        with tf.variable_scope("bh3"):
            bh3 = slim.conv2d(net, filter_num[2], [1, 1], stride=stride, scope='bh3_conv1_1x1')
            bh3_1 = slim.conv2d(bh3, filter_num[3], [3, 1], stride=stride, scope='bh3_conv2_3x1')
            bh3_2 = slim.conv2d(bh3, filter_num[4], [1, 3], stride=stride, scope='bh3_conv2_1x3')
        with tf.variable_scope("bh4"):
            bh4 = slim.conv2d(net, filter_num[5], [1, 1], stride=stride, scope='bh4_conv1_1x1')
            bh4 = slim.conv2d(bh4, filter_num[6], [3, 3], stride=stride, scope='bh4_conv2_3x3')
            bh4_1 = slim.conv2d(bh4, filter_num[7], [3, 1], stride=stride, scope='bh4_conv3_3x1')
            bh4_2 = slim.conv2d(bh4, filter_num[8], [1, 3], stride=stride, scope='bh4_conv3_1x3')
        net = tf.concat([bh1, bh2, bh3_1, bh3_2, bh4_1, bh4_2], axis=3)
    return net


'''
论文中提到用来减少grid-size的inception模块
等效三层,pad为VALID
体现了原则1
'''
def inception_moudle_v3_reduce(net, scope, filter_num):
    with tf.variable_scope(scope):
        with tf.variable_scope("bh1"):
            bh1 = slim.max_pool2d(net, [3, 3], stride=2, padding='VALID',scope="bh1_max_3x3")
        with tf.variable_scope("bh2"):
            bh2 = slim.conv2d(net, filter_num[0], [1, 1], stride=1, scope='bh2_conv1_1x1')
            bh2 = slim.conv2d(bh2, filter_num[1], [3, 3], stride=2, padding='VALID', scope='bh2_conv2_3x3')
        with tf.variable_scope("bh3"):
            bh3 = slim.conv2d(net, filter_num[2], [1, 1], stride=1, scope='bh3_conv1_1x1')
            bh3 = slim.conv2d(bh3, filter_num[3], [3, 3], stride=1, scope='bh3_conv2_3x3')
            bh3 = slim.conv2d(bh3, filter_num[4], [3, 3], stride=2, padding='VALID', scope='bh3_conv3_3x3')
        net = tf.concat([bh1, bh2, bh3], axis=3)
    return net


def V3_slim(inputs, num_cls, keep_prob=0.8, is_training=True, spatital_squeeze=True):
    batch_norm_params = {
        'decay': 0.998,
        'epsilon': 0.001,
        'scale': False,
        'updates_collections': tf.GraphKeys.UPDATE_OPS,
    }

    net = inputs
    with tf.name_scope('reshape'):
        net = tf.reshape(net, [-1, 299, 299, 3])

    with tf.variable_scope('GoogLeNet_V3'):
        with slim.arg_scope(
                [slim.conv2d, slim.fully_connected],
                weights_regularizer=slim.l2_regularizer(0.00004)):
            with slim.arg_scope(
                    [slim.conv2d],
                    weights_initializer=slim.xavier_initializer(),
                    normalizer_fn=slim.batch_norm,
                    normalizer_params=batch_norm_params):
                with slim.arg_scope(
                        [slim.batch_norm, slim.dropout], is_training=is_training):
                    with slim.arg_scope([slim.conv2d, slim.max_pool2d, slim.avg_pool2d], stride=1, padding='VALID'):
                        net = slim.conv2d(net,32,[3,3], stride=2,scope="layer1")             #149x149
                        net = slim.conv2d(net,32,[3,3], scope='layer2')                      #147x147
                        net = slim.conv2d(net,64,[3,3], padding='SAME',scope='layer3')       #147x147
                        net = slim.max_pool2d(net,[3,3], stride=2,scope='layer4')            #73x73
                        net = slim.conv2d(net,80,[3,3], scope='layer5')                      #71x71
                        net = slim.conv2d(net,192,[3,3], stride=2,scope='layer6')            #35x35

                    with slim.arg_scope([slim.conv2d, slim.max_pool2d, slim.avg_pool2d], stride=1, padding='SAME'):
                        net = slim.conv2d(net, 288, [3,3], scope='layer7')
                        # 3 x inception
                        net = inception_module_v3_1(net, scope='layer8',filter_num=[64,32,48,64,64,96,96])       #35x35
                        net = inception_module_v3_1(net, scope='layer11',filter_num=[64,64,48,64,64,96,96])
                        net = inception_module_v3_1(net, scope='layer14',filter_num=[64,64,48,64,64,96,96])
                        print(net)
                        # 5 x inception
                        net = inception_moudle_v3_reduce(net, scope='layer17',filter_num=[192,384,64,96,96])  #17x17
                        net = inception_moudle_v3_2(net, scope='layer20',filter_num=[192,192,128,128,192,128,128,128,128,192])
                        net = inception_moudle_v3_2(net, scope='layer25',filter_num=[192,192,160,160,192,160,160,160,160,192])
                        net = inception_moudle_v3_2(net, scope='layer30',filter_num=[192,192,160,160,192,160,160,160,160,192])
                        net = inception_moudle_v3_2(net, scope='layer35',filter_num=[192,192,160,160,192,160,160,160,160,192])
                        print(net)
                        # 3 x inception
                        net = inception_moudle_v3_reduce(net, scope='layer40',filter_num=[192,320,192,192,192])  #8x8
                        net = inception_moudle_v3_3(net,scope='layer43',filter_num=[320,192,384,384,384,448,384,384,384])
                        net = inception_moudle_v3_3(net,scope='layer46',filter_num=[320,192,384,384,384,448,384,384,384])
                        print(net)
                        net = slim.avg_pool2d(net,[8,8],padding='VALID',scope='layer49')
                        net = slim.dropout(net)
                        net = slim.conv2d(net,num_cls,[1,1],activation_fn=None,normalizer_fn=None,scope='layer50')
                        print(net)
                        if spatital_squeeze:
                            net = tf.squeeze(net,[1,2],name='squeeze')

                        net = slim.softmax(net,scope='softmax')
                    return net


class testInceptionV3(tf.test.TestCase):
    def testBuildClassifyNetwork(self):
        inputs = tf.random_uniform((5,299,299,3))
        logits = V3_slim(inputs,10)
        print(logits)

if __name__ == '__main__':
    tf.test.main()
为了减少篇幅,训练代码我就不粘贴了,请参考之前的文章,或者直接去我的github拉取,接下来我们来看训练过程;
训练结果
训练误差如下图
测试数据集正确率如下图:
结果说明,本次训练正确率为84%,对于使用cifar10的数据集来说,已经算是很不错的结果了;
测试结果
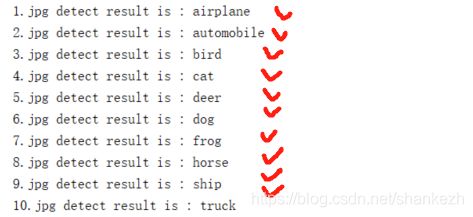
本次使用了十张从百度下载的照片,且分辨率都是远远大于训练数据集的32x32:
检测结果如下:
本次测试结果为10个结果全对,同时需要额外说明的是,本次检测,没有对图片进行resize32x32后再resize成299x299,而是直接resize299x299,但是检测结果意外的好,这和我们再InceptionV2的结论是相悖的,按理应该是需要进行二次转换的,其实道理也很简单,inceptionv3使用了1xn,nx1这样的卷积,这是横竖条纹,对于特征提取是方向性的,而不是之前的,利用卷积模板,提取的是区域性特征,因此在检测结果上才可以达到如下的效果;
至此,InceptionV3论文复现完成;
训练模型已经上传至百度网盘,GitHub可以下到我的源码,地址在最上部分,感兴趣的可以下载学习,或者试用;
权重文件,百度云地址为链接:https://pan.baidu.com/s/1BdMZYvkiYT9Fts0dLIgrog
提取码:0rmi
