采用web service传输超大数据
因为以前也没有做过相关的web service开发,对于Xfire也只是知道有这么一个框架。当然现在它已经变成apache基金会旗下的一个开源项目CXF。不过,现在依旧有很多公司还在用Xfire作web service 的开发,这说明它在业界一向是口碑不错的啊。
在学习一个框架时,我强烈建议将其自带的例子部置运行几次,这样对于理解以及搭建运行环境都有很大的帮助,也不容易出错。
在这里,我主要讲解一下用Xfire开发文件上传下载的web service应用。对于文件的传输Xfire主要有两种方式。一种是将文件编码为字符串的样式进行传输,但文件大小有一定的限制且效率较低;另一种是基于MTOM协议以附件字节流的形式进行传输,基本满足现有的文件传输大小并且效率较高。
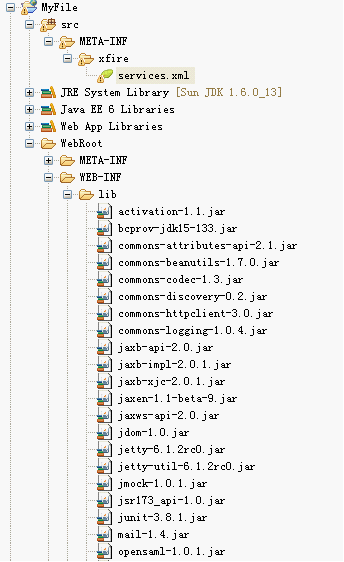
首先,我们先把开发环境搭建好。在myeclipse新建一个web应用程序,将Xfire所需jar包复制到lib目录下,并在src目录下按照META-INF/xfire/services.xml些目录结构新建一个services.xml文件,如下图
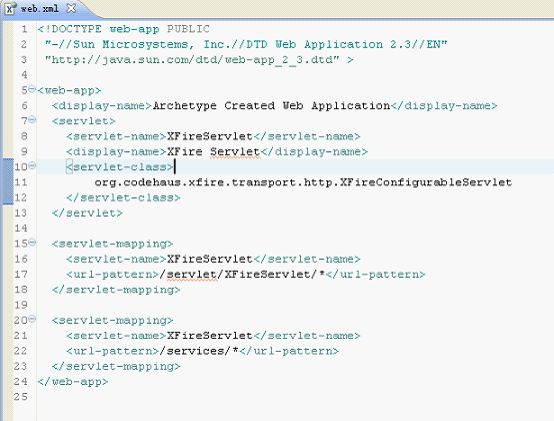
接下来就是真正的环境配置了,打开WebRoot/WEB-INF/web.xml进行如下配置,如图
至此,Xfire框架已经整合到我们的web应用程序中了,这样我们就可以开发我们的web service 应用了。
对于第一种小文件传输方式开发如下:
1.首先我们先定义一个接口,因为我们暴露给客户端的就是这个接口,定义如下:
2.主要是定义文件上传与下载的两个方法,下面我们编写接口的实现类。
- package org.carrot.file1;
- import java.io.ByteArrayInputStream;
- import java.io.File;
- import java.io.FileInputStream;
- import java.io.FileNotFoundException;
- import java.io.FileOutputStream;
- import java.io.IOException;
- import java.io.InputStream;
- import org.codehaus.xfire.util.Base64;
- public class File1Impl implements File1
- {
- @Override
- public String downFile(String fileName)
- {
- File file = new File("F:/", fileName);
- System.out.println(file.length());
- StringBuffer buffer = new StringBuffer();
- InputStream in;
- try
- {
- in = new FileInputStream(file);
- byte[] buff = new byte[1024 * 1024];
- int len = 0;
- while (-1 != (len = in.read(buff, 0, 1024)))
- {
- buffer.append(Base64.encode(buff, 0, len));
- }
- in.close();
- }
- catch (FileNotFoundException e1)
- {
- e1.printStackTrace();
- }
- catch (IOException e)
- {
- e.printStackTrace();
- }
- String fileString = buffer.toString();
- System.out.println(fileString.length());
- System.out.println("running");
- return fileString;
- }
- @Override
- public String uploadFile(String file, String fileName)
- {
- File loadFile = new File("F:/", fileName);
- InputStream in = new ByteArrayInputStream(Base64.decode(file));
- byte[] buffer = new byte[1024 * 1024];
- int len = -1;
- try
- {
- FileOutputStream out = new FileOutputStream(loadFile);
- while (-1 != (len = in.read(buffer, 0, buffer.length)))
- {
- out.write(buffer, 0, len);
- }
- in.close();
- out.close();
- }
- catch (FileNotFoundException e)
- {
- e.printStackTrace();
- return "file not found";
- }
- catch (IOException e)
- {
- e.printStackTrace();
- return "error";
- }
- return "success";
- }
- }
3.接下来就是我们对外发布服务信息的配置了,打开services.xml文件进行如下配置
这里的name指发布的服务名,namespace指命名空间用于区别,serviceClass指发布的接口,implementationClass指实现类,具体还有很多元素可以当阅相关文档,这里只列出几个我们常用的。
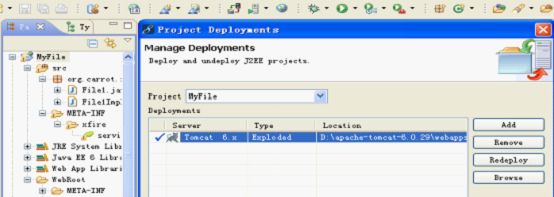
4.最后我们只要将这个应用部署到服务器上发布,这里我用的是Tomcat6.x进行部署,如下
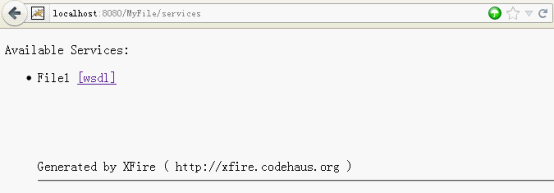
5.这时我们就可以启动Tomcat服务器进行一下访问测试了,在浏览器中输入网址:http://localhost:8080/MyFile/services
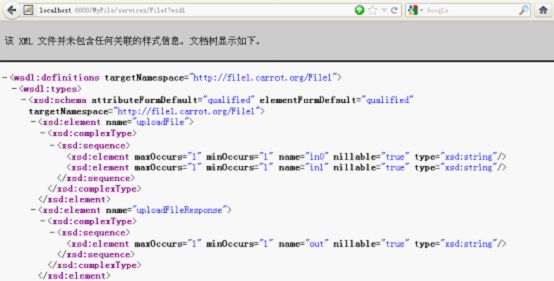
6.点击进入wsdl就可以看到我们发布的服务信息了
7.这样我们的服务就发布成功了,接下来就是编写客户端进行服务的调用看是否成功。在这里客户端既可以是java web应用,也可以是java一般应用,为了jar包好导入以下皆采用java web应用作为客户端调用。客户端调用我们的服务也有三种方式:动态方式(反射)、代理方式、客户端桩方式。
注意:这里的三种方式是在java的环境下笔者所知的开发方式,在其它语言环境下开发并不是很了解,只知道C#也是采用客户端桩方式。
动态方式:客户端采用动态方式要加入Xfire相关jar包就能调用服务的方法,类似java反射
为了简单,调用服务我都写在一个main方法中,如下
- package org.carrot.client2;
- import java.io.File;
- import java.io.FileInputStream;
- import java.io.FileNotFoundException;
- import java.io.FileOutputStream;
- import java.io.IOException;
- import java.io.InputStream;
- import java.net.URL;
- import org.codehaus.xfire.client.Client;
- import org.codehaus.xfire.transport.http.HttpTransport;
- import org.codehaus.xfire.util.Base64;
- public class Client2
- {
- public static void main(String[] args)
- {
- try
- {
- URL myURL = new URL(
- "http://localhost:8080/MyFile/services/File1?wsdl");
- Client client = new Client(myURL);
- // 文件下载
- Object[] result = client.invoke("downFile", new Object[]
- { "java6webservice.doc" });
- String fileName = "java6webservice.doc";
- File file = new File(fileName);
- byte[] bytes = Base64.decode((String) result[0]);
- System.out.println(bytes.length);
- file.createNewFile();
- FileOutputStream out = new FileOutputStream(file);
- out.write(bytes);
- out.flush();
- out.close();
- // 文件上传
- // String fileName2 = "java6webservice.doc";
- // File file2 = new File("E:/", fileName2);
- // System.out.println(file2.length());
- // StringBuffer sb = new StringBuffer();
- // InputStream is = new FileInputStream(file2);
- // byte[] buff = new byte[1024 * 1024];
- // int len = -1;
- // while (-1 != (len = is.read(buff, 0, buff.length)))
- // {
- // sb.append(Base64.encode(buff, 0, len));
- // }
- // is.close();
- // String fileString = sb.toString();
- // System.out.println(fileString.length());
- // Object[] result = client.invoke("uploadFile", new Object[]
- // { fileString, fileName2});
- // System.out.println(result[0]);
- }
- catch (FileNotFoundException e)
- {
- e.printStackTrace();
- }
- catch (IOException e)
- {
- e.printStackTrace();
- }
- catch (Exception e)
- {
- e.printStackTrace();
- }
- }
- }
代理方式:需要加入Xfire相关jar包,并且客户端必须提供与服务端一样的接口,即我们的服务暴露给客户端的接口,包名也最好与服务端的一样。服务调用如下
- package org.carrot.client3;
- import java.io.ByteArrayInputStream;
- import java.io.File;
- import java.io.FileInputStream;
- import java.io.FileNotFoundException;
- import java.io.FileOutputStream;
- import java.io.IOException;
- import java.io.InputStream;
- import java.net.MalformedURLException;
- import org.codehaus.xfire.client.Client;
- import org.codehaus.xfire.client.XFireProxyFactory;
- import org.codehaus.xfire.service.Service;
- import org.codehaus.xfire.service.binding.ObjectServiceFactory;
- import org.codehaus.xfire.util.Base64;
- public class Client3
- {
- public static void main(String[] args)
- {
- Service serviceModel = new ObjectServiceFactory().create(File1.class,
- "File1", "http://file1.carrot.org/File1", null);
- File1 service = null;
- try
- {
- service = (File1) new XFireProxyFactory().create(serviceModel,
- "http://localhost:8080/MyFile/services/File1");
- }
- catch (MalformedURLException e)
- {
- // TODO Auto-generated catch block
- e.printStackTrace();
- }
- //文件下载
- // String fileName1 = "java6webservice.doc";
- // File file1 = new File("E:/", fileName1);
- // InputStream in = new ByteArrayInputStream(Base64
- // .decode(service
- // .downFile(fileName1)));
- // byte[] buffer = new byte[1024*1024];
- // try
- // {
- // int len1 = -1;
- // file1.createNewFile();
- // FileOutputStream out = new FileOutputStream(file1);
- // while(-1 != (len1 = in.read(buffer, 0, buffer.length)))
- // {
- // out.write(buffer, 0 , len1);
- // }
- // out.flush();
- // out.close();
- // }
- // catch (FileNotFoundException e)
- // {
- // e.printStackTrace();
- // }
- // catch (IOException e)
- // {
- // e.printStackTrace();
- // }
- // System.out.println(file1.length());
- //文件 上传
- String fileName2 = "java6webservice.doc";
- File file2 = new File("E:/", fileName2);
- System.out.println(file2.length());
- StringBuffer sb = new StringBuffer();
- InputStream is;
- try
- {
- is = new FileInputStream(file2);
- byte[] buff = new byte[1024 * 1024];
- int len = -1;
- while (-1 != (len = is.read(buff, 0, buff.length)))
- {
- sb.append(Base64.encode(buff, 0, len));
- }
- is.close();
- }
- catch (FileNotFoundException e1)
- {
- e1.printStackTrace();
- }
- catch (IOException e)
- {
- e.printStackTrace();
- }
- String fileString = sb.toString();
- System.out.println(fileString.length());
- service.uploadFile(fileString, fileName2);
- }
- }
客户端桩方式:也是最容易理解的一种方式,它通过工具自动生成客户端代码,在调用服务时就好像在本地方法一样,同样需要加入Xfire相关jar包的支持。
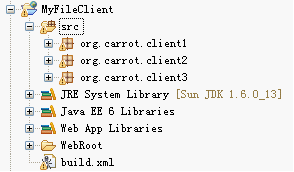
自动生成工具有很多,myeclipse自带就有。这里我采用的是官方给出的例子,用Ant工具来进行生成。我们要在客户端根路径下新建一个build.xml文件,如图
打开build.xml文件,配置我们要生成的信息,如下
- <?xml version="1.0" encoding="UTF-8"?>
- <project default="genfiles" basedir=".">
- <property name="lib" value="WebRoot/WEB-INF/lib" />
- <path id="myclasspath">
- <fileset dir="${lib}">
- <include name="*.jar" />
- </fileset>
- <pathelement location="${genfiles}" />
- </path>
- <property name="code_path" value="src" />
- <propertynamepropertyname="wsdl_path" value="http://localhost:8080/MyFile/services/File1?wsdl" />
- <property name="code_package" value="org.carrot.client1" />
- <target name="genfiles" description="Generate the files">
- <taskdef name="wsgen" classname="org.codehaus.xfire.gen.WsGenTask" classpathref="myclasspath" />
- <wsgen outputDirectory="${code_path}" wsdl="${wsdl_path}" package="${code_package}" binding="xmlbeans" overwrite="true" />
- </target>
- </project>
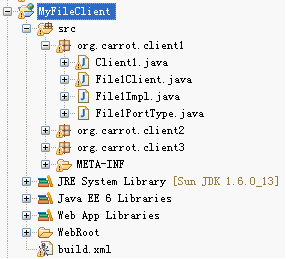
我们运行此文件就会在src目录下生成一堆称之为桩的文件,如下图
大家可以看到在包org.carrot.client1下生成了三个文件File1Client.java、File1Impl.java、File1PortType.java。这里的Client1.java是我接下来要讲的我写的调用服务的测试类。有了这几个文件我们与服务端打交道就轻松多了,不信你看
- package org.carrot.client1;
- import java.io.ByteArrayInputStream;
- import java.io.File;
- import java.io.FileInputStream;
- import java.io.FileNotFoundException;
- import java.io.FileOutputStream;
- import java.io.IOException;
- import java.io.InputStream;
- import org.codehaus.xfire.util.Base64;
- public class Client1
- {
- public static void main(String[] args)
- {
- File1Client client = new File1Client();
- File1PortType service = client.getFile1HttpPort();
- //文件下载
- // String fileName1 = "java6webservice.doc";
- // File file1 = new File("E:/", fileName1);
- // InputStream in = new ByteArrayInputStream(Base64
- // .decode(service
- // .downFile(fileName1)));
- // byte[] buffer = new byte[1024*1024];
- // try
- // {
- // int len1 = -1;
- // file1.createNewFile();
- // FileOutputStream out = new FileOutputStream(file1);
- // while(-1 != (len1 = in.read(buffer, 0, buffer.length)))
- // {
- // out.write(buffer, 0 , len1);
- // }
- // out.flush();
- // out.close();
- // }
- // catch (FileNotFoundException e)
- // {
- // e.printStackTrace();
- // }
- // catch (IOException e)
- // {
- // e.printStackTrace();
- // }
- // System.out.println(file1.length());
- //文件 上传
- String fileName2 = "java6webservice.doc";
- File file2 = new File("E:/", fileName2);
- System.out.println(file2.length());
- StringBuffer sb = new StringBuffer();
- InputStream is;
- try
- {
- is = new FileInputStream(file2);
- byte[] buff = new byte[1024 * 1024];
- int len = -1;
- while (-1 != (len = is.read(buff, 0, buff.length)))
- {
- sb.append(Base64.encode(buff, 0, len));
- }
- is.close();
- }
- catch (FileNotFoundException e1)
- {
- e1.printStackTrace();
- }
- catch (IOException e)
- {
- e.printStackTrace();
- }
- String fileString = sb.toString();
- System.out.println(fileString.length());
- service.uploadFile(fileString, fileName2);
- }
- }
上面的测试类调用服务,我们只写了两行代码就搞定了是不是比前面两种方式简单多了。经本人测试这三种方式都能够成功的运行。但是我们从代码上可以分析出,这三种方式的文件传输本质上都是一样的。就是将文件编码为字符串的形式再传出去,再深入一点也就是将文件整个读入内存中然后一并发出去。如果文件太大就会报内存溢出的问题,并且对于字符串编码的转换也是非常耗时的。所以这种方式只能传一些小文件,大文件就不行了。下面我就要讲的是Xfire支持的一种优化的支持大数据二进制流方式传输文件的技术MTOM,在Xfire自带的例子中已有很详细的介绍了。
对于第二种大文件传输方式开发如下:
注意:用MTOM时建议大家用java ee6的库,因数java ee5库中有个mail包冲突错误。
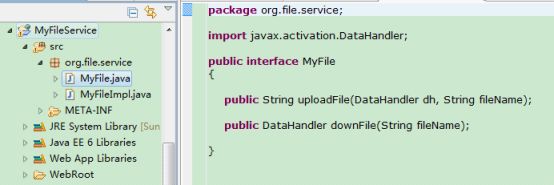
1.第二种方式,主要针对大数据以二进制流进行文件的传输,主要支持byte[]、DataSource、DataHandler三种数据类型。这里我选用DataHandler进行讲解,同样我们要定义一个接口以及实现类,如下:
接口:
实现类:
- package org.file.service;
- import java.io.File;
- import java.io.FileOutputStream;
- import java.io.IOException;
- import java.io.InputStream;
- import javax.activation.DataHandler;
- import javax.activation.FileDataSource;
- public class MyFileImpl implements MyFile
- {
- @Override
- public String uploadFile(DataHandler dh, String fileName)
- {
- long startTime = System.currentTimeMillis();
- File file = new File("E://", fileName);
- try
- {
- file.createNewFile();
- InputStream in = dh.getInputStream();
- FileOutputStream out = new FileOutputStream(file);
- byte[] buff = new byte[1024 * 1024];
- int len = -1;
- while (-1 != (len = in.read(buff, 0, buff.length)))
- {
- out.write(buff, 0, len);
- }
- in.close();
- out.flush();
- out.close();
- }
- catch (IOException e)
- {
- e.printStackTrace();
- return "error";
- }
- long endTime = System.currentTimeMillis();
- System.out.println((endTime - startTime)/1000 + " s");
- return "success";
- }
- @Override
- public DataHandler downFile(String fileName)
- {
- File file = new File("F://", fileName);
- System.out.println(file.length());
- DataHandler dh = new DataHandler(new FileDataSource(file));
- return dh;
- }
- }
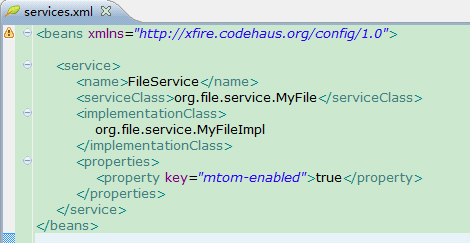
2.基本的配置方式与第一种方式差不多,但是要用到MTOM技术,所以我们要在services.xml中增加一个元素,如下
3.接下来在Tomcat上部署发布都与方式一是一样的,这里就不多说了。
4.好了这里重点讲的是如何开发客户端调用基于MTOM的应用。也许你会问是否也有三种方式,我想说官方的例子只给出了用代理方式,本人也经过大量测式另外两种方式都会出现一些莫名的问题。比如MTOM支持的数据类型,生成的客户端代码都会变成DataHandler类型。
所以,我推荐大家还是用代理方式进行客户端的开发,客户端必须提供与服务端一样的接口(即我们的服务暴露给客户端的接口),包名也最好与服务端的一样,不然会出现问题。这里的客户端写法也与第一种方式有些差别,代码如下
- package org.file.service;
- import java.io.File;
- import java.io.FileOutputStream;
- import java.io.IOException;
- import java.io.InputStream;
- import java.net.MalformedURLException;
- import javax.activation.DataHandler;
- import javax.activation.FileDataSource;
- import org.codehaus.xfire.client.Client;
- import org.codehaus.xfire.client.XFireProxyFactory;
- import org.codehaus.xfire.service.Service;
- import org.codehaus.xfire.service.binding.ObjectServiceFactory;
- import org.codehaus.xfire.transport.http.HttpTransport;
- public class MyTest
- {
- public static void main(String[] args) throws MalformedURLException
- {
- Service serviceModel = new ObjectServiceFactory().create(MyFile.class,
- "FileService", "http://service.file.org/FileService", null);
- MyFile service = (MyFile) new XFireProxyFactory().create(serviceModel,
- "http://localhost:8080/MyFileService/services/FileService");
- // 增加的代码,表示采用MTOM方式处理
- Client client = Client.getInstance(service);
- client.setProperty("mtom-enabled", "true");
- client.setProperty(HttpTransport.CHUNKING_ENABLED, "true");
- long startTime = System.currentTimeMillis();
- //文件上传
- String fileName = "ZGC_CD_2011V4.1.iso";
- File file = new File("F:/", fileName);
- DataHandler dh = new DataHandler(new FileDataSource(file));
- System.out.println(service.uploadFile(dh, fileName));
- //文件下载
- // File file1 = new File("E://", fileName);
- //
- // DataHandler dh = service.downFile(fileName);
- //
- // try
- // {
- // file1.createNewFile();
- // InputStream in = dh.getInputStream();
- // FileOutputStream out = new FileOutputStream(file1);
- // byte[] buff = new byte[1024 * 1024];
- // int len = -1;
- // while (-1 != (len = in.read(buff, 0, buff.length)))
- // {
- // out.write(buff, 0, len);
- // }
- // in.close();
- // out.flush();
- // out.close();
- // System.out.println("down over");
- // }
- // catch (IOException e)
- // {
- // e.printStackTrace();
- // }
- long endTime = System.currentTimeMillis();
- System.out.println("time: " + (endTime - startTime) / 1000 + " s");
- }
- }
上面的代码与第一种方式写法大同小异,只是多了三行代码表示客户端采用MTOM方式处理数据类型。
- Client client = Client.getInstance(service);
- client.setProperty("mtom-enabled", "true");
- client.setProperty(HttpTransport.CHUNKING_ENABLED, "true");
至此,客户端也就写完了,经测试1G的文件没有问题。
希望对大家有帮助。
