手写数字识别-KNN与CNN
手写数字识别-KNN与CNN
文章目录
- KNN算法
-
- 1.KNN算法步骤
- 2.KNN的实现-手写数字识别
- CNN神经网络
-
- 1.网络结构
- 2.CNN的实现-手写数字识别
KNN算法
1.KNN算法步骤
step1:计算已知类别数据集中的所有样本与当前样本之间的距离
step2:按距离递增次序对所有样本排序
step3:选取与当前当前样本距离最小的前K个样本
step4:统计这K个样本所在的类别出现的频率
step5:把这K个点出现频率最高的类别作为当前点的预测分类
2.KNN的实现-手写数字识别
MNIST数据集由60000个训练样本和10000个测试样本组成,每个样本都是一张28 * 28像素的灰度手写数字图片。

KNN算法实现代码如下。
def my_knn_classify(img, train_imgs, train_labels, k):
    img = np.tile(img.reshape(1, 784), (60000, 1))
    distance = np.sqrt(np.sum(np.square(img - train_imgs), axis=1))
    sortedindex = np.argsort(distance)
    sortedlabel = train_labels[sortedindex]
    return Counter(sortedlabel[0:k]).most_common(1)[0][0]
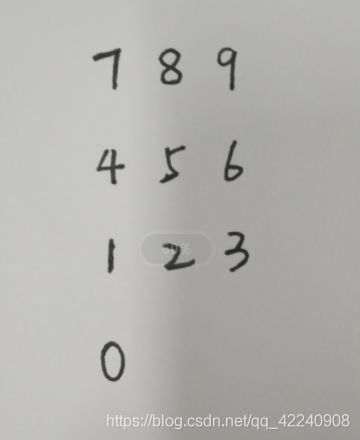
下面是一副手写数字,我们要对这副图像进行手写数字识别。

首先要对图片进行预处理,包括滤波,二值化,反色等,然后进行字符定位,使用边界提取方法,提取字符边框。然后进行字符分割,将字符分成一个个28*28的小图片。最后在使用我们的KNN算法进行识别。处理代码如下:
def pre_processing(raw_image):
    # 高斯去噪
    image = cv2.GaussianBlur(raw_image, (3, 3), 0)
    # 灰度处理并二值化
    image = cv2.cvtColor(image, cv2.COLOR_RGB2GRAY)
    image[image < 130] = 0
    image[image >= 130] = 255
    # 颜色倒转
    image = 255 - image
    return image


def Character_segmentation(image):
    contours, hierarchy = cv2.findContours(image, cv2.RETR_EXTERNAL, cv2.CHAIN_APPROX_SIMPLE)
    # img_vector = 255 - img_vector
    expanding = 20
    coordinates = dict()
    images = []
    for index, item in enumerate(contours):
        rect = cv2.boundingRect(item)
        x = rect[0]
        y = rect[1]
        weight = rect[2]
        height = rect[3]
        image_tmp = image[y-expanding:y + height+expanding, x-expanding:x + weight+expanding]
        # filename = 'segmentation/num-' + str(index + 1) + '.png'
        # cv2.imwrite(filename, image_tmp)
        image_tmp = cv2.resize(image_tmp, (28, 28))
        images.append(image_tmp)
        coordinates[index] = [x, y, weight, height]
    return images,coordinates
为加快计算以及准确度,我们需要将MINIST数据集也进行二值化,将我们的手写图片经过上述处理以后,可以直接使用KNN算法进行预测,将结果展示到原图上。代码如下:
    raw_image = cv2.imread('test_pic.png')
    image = pre_processing(raw_image)
    images, coordinates = Character_segmentation(image)
    draw_image = raw_image.copy()
    for index,image in enumerate(images):
        # cv_show(image)
        image[image < 130] = 0
        image[image >= 130] = 1
        img_vector = np.reshape(image, (784, 1))
        y = my_knn_classify(img_vector, train_imgs, train_labels, k=5)
        # print(y)
        cv2.rectangle(draw_image, (coordinates[index][0], coordinates[index][1]), (coordinates[index][0]+coordinates[index][2], coordinates[index][1]+ coordinates[index][3]), (255, 0, 0), 2)
        cv2.putText(draw_image,str(y),((2*coordinates[index][0]+coordinates[index][2])//2,coordinates[index][1]+ coordinates[index][3]+30),cv2.FONT_HERSHEY_PLAIN,2.0, (0, 0, 255), 2)
    cv_show(draw_image)
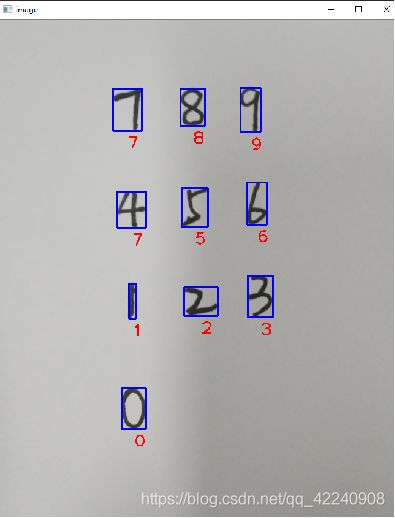
最后的识别结果如下图,这里手写数字4被错误地识别成了7。KNN算法对于手写数字识别的准确率还是很高的,但是深度学习的方法准确率更高一些。

CNN神经网络
1.网络结构
conv - relu - pool - affine - relu - affine - softmax
2.CNN的实现-手写数字识别
用视频文件做一个动态识别,效果如下图。

CNN识别的代码如下,这里做了个非常简易的GUI,网络需要自己训练哦~。
from tkinter import *
from tkinter import messagebox
from tkinter.filedialog import *
import numpy as np
from simple_convnet import SimpleConvNet
import cv2


def cv_video(img, name='video'):
    cv2.imshow(name, img)
    cv2.waitKey(100)


def cv_picture(img, name='image'):
    cv2.imshow(name, img)
    cv2.waitKey(0)


def pre_processing(raw_image):
    # 高斯去噪
    image = cv2.GaussianBlur(raw_image, (3, 3), 0)
    # 灰度处理并二值化
    image = cv2.cvtColor(image, cv2.COLOR_RGB2GRAY)
    image[image < 130] = 0
    image[image >= 130] = 255
    # 颜色倒转
    image = 255 - image
    return image


def Character_segmentation(image):
    contours, hierarchy = cv2.findContours(image, cv2.RETR_EXTERNAL, cv2.CHAIN_APPROX_SIMPLE)
    # img_vector = 255 - img_vector
    expanding = 20
    coordinates = dict()
    images = []
    index = 0
    for item in contours:
        rect = cv2.boundingRect(item)
        x = rect[0]
        y = rect[1]
        weight = rect[2]
        height = rect[3]
        image_tmp = image[y-expanding:y + height+expanding, x-expanding:x + weight+expanding]
        if image_tmp.shape[0] !=0 and image_tmp.shape[1]!=0:
            image_tmp = cv2.resize(image_tmp, (28, 28))
            image_tmp = np.expand_dims(np.expand_dims(image_tmp, 0), 0)
            images.append(image_tmp)
            coordinates[index] = [x, y, weight, height]
            index += 1
    return images,coordinates


class Application(Frame):
    def __init__(self, master=None):
        super().__init__(master)  # super() 代表的是父类的定义,而不是父类对象
        self.master = master
        self.pack()
        self.createWidget()

    def createWidget(self):
        Button(self,text="打开视频文件",command=self.open_video).pack()
        Button(self, text="打开图片文件", command=self.open_picture).pack()
        Button(self, text="打开摄像头", command=self.open_camera).pack()

    def open_video(self):
        filename = askopenfilename(title="打开视频或者图片文件",initialdir="C:",filetypes=[("视频文件",".mp4")])
        if filename:
            videoCapture = cv2.VideoCapture(filename)
            while True:
                ret, raw_image = videoCapture.read()
                if ret:
                    image = pre_processing(raw_image)
                    images, coordinates = Character_segmentation(image)
                    draw_image = raw_image.copy()
                    if images:
                        for index, image in enumerate(images):
                            y = network.predict(image)
                            y = np.argmax(y, axis=1)
                            cv2.rectangle(draw_image, (coordinates[index][0], coordinates[index][1]), (
                            coordinates[index][0] + coordinates[index][2], coordinates[index][1] + coordinates[index][3]),
                                          (255, 0, 0), 2)
                            cv2.putText(draw_image, str(y[0]), ((2 * coordinates[index][0] + coordinates[index][2]) // 2,
                                                                coordinates[index][1] + coordinates[index][3] + 30),
                                        cv2.FONT_HERSHEY_PLAIN, 2.0, (0, 0, 255), 2)
                            # print(y)
                    cv_video(draw_image)
                else:
                    break

            videoCapture.release()
            cv2.destroyAllWindows()

    def open_picture(self):
        filename = askopenfilename(title="打开视频或者图片文件", initialdir="C:", filetypes=[("图片文件", ".jpg", ".png")])
        if filename:
            raw_image = cv2.imread(filename)
            raw_image = cv2.resize(raw_image, (640, 480))
            image = pre_processing(raw_image)
            images, coordinates = Character_segmentation(image)
            draw_image = raw_image.copy()
            for index, image in enumerate(images):
                y = network.predict(image)
                y = np.argmax(y, axis=1)
                cv2.rectangle(draw_image, (coordinates[index][0], coordinates[index][1]), (
                coordinates[index][0] + coordinates[index][2], coordinates[index][1] + coordinates[index][3]), (255, 0, 0),
                              2)
                cv2.putText(draw_image, str(y[0]), ((2 * coordinates[index][0] + coordinates[index][2]) // 2,
                                                    coordinates[index][1] + coordinates[index][3] + 30),
                            cv2.FONT_HERSHEY_PLAIN, 2.0, (0, 0, 255), 2)
                #print(y)
            cv_picture(draw_image)

    def open_camera(self):
        videoCapture = cv2.VideoCapture(0)
        while True:
            ret, raw_image = videoCapture.read()
            if ret:
                image = pre_processing(raw_image)
                images, coordinates = Character_segmentation(image)
                draw_image = raw_image.copy()
                if images:
                    for index, image in enumerate(images):
                        y = network.predict(image)
                        y = np.argmax(y, axis=1)
                        cv2.rectangle(draw_image, (coordinates[index][0], coordinates[index][1]), (
                            coordinates[index][0] + coordinates[index][2],
                            coordinates[index][1] + coordinates[index][3]),
                                      (255, 0, 0), 2)
                        cv2.putText(draw_image, str(y[0]),
                                    ((2 * coordinates[index][0] + coordinates[index][2]) // 2,
                                     coordinates[index][1] + coordinates[index][3] + 30),
                                    cv2.FONT_HERSHEY_PLAIN, 2.0, (0, 0, 255), 2)
                        # print(y)
                cv_video(draw_image)
            else:
                break
            if cv2.waitKey(1) == ord('q'):
                break
        videoCapture.release()
        cv2.destroyAllWindows()


if __name__ == '__main__':
    network = SimpleConvNet(input_dim=(1, 28, 28),
                            conv_param={
     'filter_num': 30, 'filter_size': 5, 'pad': 0, 'stride': 1},
                            hidden_size=100, output_size=10, weight_init_std=0.01)
    network.load_params()
    root = Tk()
    root.title("手写数字识别系统")
    root.geometry("1000x800+500+100")
    app = Application(master=root)
    root.mainloop()