前言
虽然现在已经有很多实用的 ESLint 插件了,但随着项目不断迭代发展,你可能会遇到已有 ESLint 插件不能满足现在团队开发的情况。这时候,你需要自己来创建一个 ESLint 插件。
本文我将带你了解各种Lint工具的大致历史,然后一步一步地创建一个属于你自己的 ESLint 插件,以及教你如何利用AST抽象语法树来制定这个插件的规则。
以此来带你了解 ESLint 的实现原理。
目标&涉及知识点
本文 ESLint 插件目标是在项目开发中禁用:console.time()。
- [x] AST 抽象语法树
- [x] ESLint
- [x] Npm 发布
- [x] 单元测试
插件脚手架构建
这里我们利用 yeoman 和 generator-eslint 来构建插件的脚手架代码。安装:
npm install -g yo generator-eslint本地新建文件夹eslint-plugin-demofortutorial:
mkdir eslint-plugin-demofortutorial
cd eslint-plugin-demofortutorial
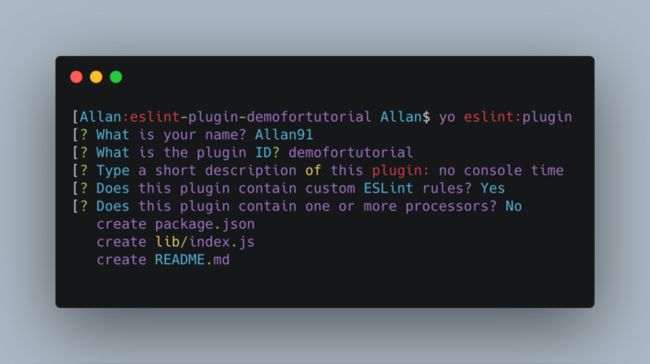
初始化 ESLint 插件的项目结构:
yo eslint:plugin // 搭建一个初始化的目录结构此时文件的目录结构为:
.
├── README.md
├── lib
│   ├── index.js
│   └── rules
├── package.json
└── tests
    └── lib
        └── rules
安装依赖:
npm install至此,环境搭建完毕。
创建规则
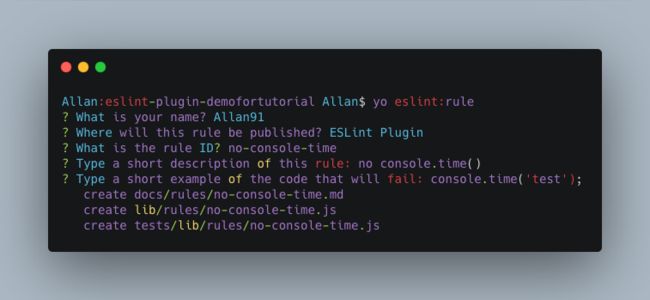
终端执行:
yo eslint:rule // 生成默认 eslint rule 模版文件.
├── README.md
├── docs // 使用文档
│ └── rules
│ └── no-console-time.md
├── lib // eslint 规则开发
│ ├── index.js
│ └── rules // 此目录下可以构建多个规则,本文只拿一个规则来讲解
│ └── no-console-time.js
├── package.json
└── tests // 单元测试
└── lib
└── rules
└── no-console-time.js上面结构中,我们需要在 ./lib/ 目录下去开发 Eslint 插件,这里是定义它的规则的位置。
AST 在 ESLint 中的运用
在正式写 ESLint 插件前,你需要了解下 ESLint 的工作原理。其中 ESLint 使用方法大家应该都比较熟悉,这里不做讲解,不了解的可以点击官方文档如何在项目中配置 ESLint。
在公司团队项目开发中,不同开发者书写的源码是各不相同的,那么在 ESLint 中,如何去分析每个人写的源码呢?
作为开发者,面对这类问题,我们必须懂得要使用 抽象的手段 !那么 Javascript 的抽象性如何体现呢?
没错,就是 AST
(Abstract Syntax Tree(抽象语法树)),再祭上那张看了几百遍的图。
在 ESLint 中,默认使用 esprima 来解析我们书写的 Javascript 语句,让其生成抽象语法树,然后去 拦截 检测是否符合我们规定的书写方式,最后让其展示报错、警告或正常通过。 ESLint 的核心就是规则(rules),而定义规则的核心就是利用 AST 来做校验。每条规则相互独立,可以设置禁用off、警告warn⚠️和报错error❌,当然还有正常通过不用给任何提示。
规则创建
上面讲完了 ESLint 和 AST 的关系之后,我们可以正式进入开发具体规则。先来看之前生成的 lib/rules/no-console-time.js:
/**
 * @fileoverview no console.time()
 * @author Allan91
 */
"use strict";

//------------------------------------------------------------------------------
// Rule Definition
//------------------------------------------------------------------------------

module.exports = {
    meta: {
        docs: {
            description: "no console.time()",
            category: "Fill me in",
            recommended: false
        },
        fixable: null,  // or "code" or "whitespace"
        schema: [
            // fill in your schema
        ]
    },

    create: function(context) {

        // variables should be defined here

        //----------------------------------------------------------------------
        // Helpers
        //----------------------------------------------------------------------

        // any helper functions should go here or else delete this section

        //----------------------------------------------------------------------
        // Public
        //----------------------------------------------------------------------

        return {

            // give me methods

        };
    }
};
这个文件给出了书写规则的模版,一个规则对应一个可导出的 node 模块,它由 meta 和 create 两部分组成。
- meta 代表了这条规则的元数据,如其类别,文档,可接收的参数的 schema 等等。
- create:如果说 meta 表达了我们想做什么,那么 create 则用表达了这条 rule 具体会怎么分析代码;
Create 返回一个对象,其中最常见的键名是AST抽象语法树中的选择器,在该选择器中,我们可以获取对应选中的内容,随后我们可以针对选中的内容作一定的判断,看是否满足我们的规则。如果不满足,可用 context.report 抛出问题,ESLint 会利用我们的配置对抛出的内容做不同的展示。
具体参数配置详情见官方文档
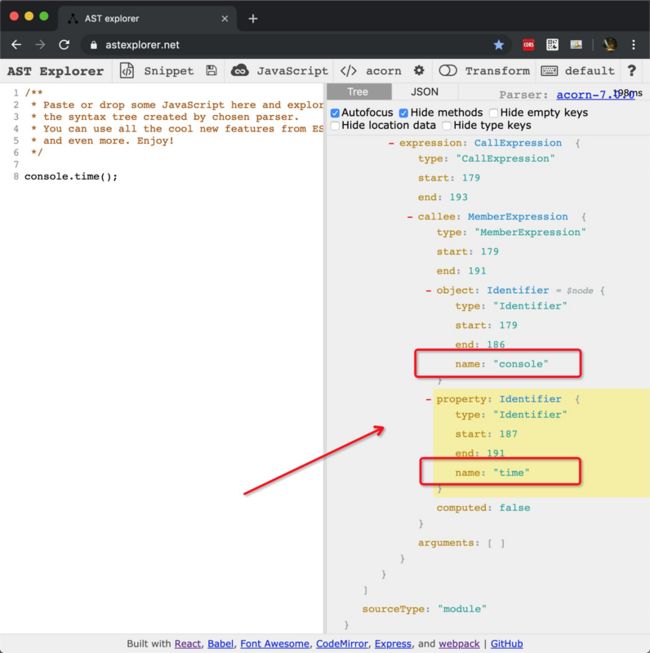
本文创建的 ESLint 插件是为了不让开发者在项目中使用 console.time(),先看看这段代码在抽象语法树中的展现:
其中,我们将会利用以下内容作为判断代码中是否含有 console.time:
那么我们根据上面的AST(抽象语法书)在 lib/rules/no-console-time.js 中这样书写规则:
/**
 * @fileoverview no console.time()
 * @author Allan91
 */
"use strict";

//------------------------------------------------------------------------------
// Rule Definition
//------------------------------------------------------------------------------

module.exports = {
    meta: {
        docs: {
            description: "no console.time()",
            category: "Fill me in",
            recommended: false
        },
        fixable: null,  // or "code" or "whitespace"
        schema: [
            // fill in your schema
        ],
        // 报错信息描述
        messages: {
            avoidMethod: "console method '{{name}}' is forbidden.",
        },
    },

    create: function(context) {
        return {
            // 键名为ast中选择器名
            'CallExpression MemberExpression': (node) => {
                // 如果在ast中满足以下条件,就用 context.report() 进行对外警告⚠️
                if (node.property.name === 'time' && node.object.name === 'console') {
                    context.report({
                        node,
                        messageId: 'avoidMethod',
                        data: {
                            name: 'time',
                        },
                    });
                }
            },
        };
    }
};
再修改 lib/index.js:
"use strict";

module.exports = {
    rules: {
        'no-console-time': require('./rules/no-console-time'),
    },
    configs: {
        recommended: {
            rules: {
                'demofortutorial/no-console-time': 2, // 可以省略 eslint-plugin 前缀
            },
        },
    },
};至此,Eslint 插件创建完成。接下去你需要做的就是将此项目发布到 npm平台。
根目录执行:
npm publish打开npm平台,可以搜索到上面发布的 eslint-plugin-demofortutorial 这个 Node 包。
如何使用
发布完之后在你需要的项目中安装这个包:
npm install eslint-plugin-demofortutorial -D然后在 .eslintrc.js 中配置:
"extends": [
    "eslint:recommended",
    "plugin:eslint-plugin-demofortutorial/recommended",
],
"plugins": [
    'demofortutorial'
],如果之前没有.eslintrc.js 文件,可以执行下面命令生成:
npm install -g eslint
eslint --init
此时,如果在当前项目的 JS 文件中书写 console.time,会出现如下效果:
单元测试(完善)
对于完整的 npm 包来说,上面还只算是个“半成品”,我们需要写单元测试来保证它的完整性和安全性。
下面来完成单元测试,在 ./tests/lib/rules/no-console-time.js 中编写如下代码:
'use strict';

// ------------------------------------------------------------------------------
// Requirements
// ------------------------------------------------------------------------------

let rule = require('../../../lib/rules/no-console-time');

let RuleTester = require('eslint').RuleTester;

// ------------------------------------------------------------------------------
// Tests
// ------------------------------------------------------------------------------

let ruleTester = new RuleTester({
    parserOptions: {
        ecmaVersion: 10,
    },
});

ruleTester.run('no-console-time', rule, {

    valid: [ // 合法示例
        '_.time({a:1});',
        "_.time('abc');",
        "_.time(['a', 'b', 'c']);",
        "lodash.time('abc');",
        'lodash.time({a:1});',
        'abc.time',
        "lodash.time(['a', 'b', 'c']);",
    ],

    invalid: [ // 不合法示例
        {
            code: 'console.time()',
            errors: [
                {
                    messageId: 'avoidMethod',
                },
            ],
        },
        {
            code: "console.time.call({}, 'hello')",
            errors: [
                {
                    messageId: 'avoidMethod',
                },
            ],
        },
        {
            code: "console.time.apply({}, ['hello'])",
            errors: [
                {
                    messageId: 'avoidMethod',
                },
            ],
        },
        {
            code: 'console.time.call(new Int32Array([1, 2, 3, 4, 5]));',
            errors: 1,
        },
    ],
});
上面测试代码详细介绍见官方文档。
根目录执行:
npm run test至此,这个包的开发完成。其它规则开发也是类似,比如您可以继续制定其它规范,比如 ️console.log()
、debugger警告等等。
其它
由于自动生成ESLint的项目中依赖的 eslint 版本还在 3.x 阶段,会对单元测试语法解析造成如下报错:
'Parsing error: Invalid ecmaVersion.'建议将该包升级到 "eslint": "^5.16.0" 。
以上。
查看Npm上发布的包


