Ray Tracing 的c++简单实现
计算机图形学实验,实现ray tracing算法并与opengl渲染效果对比。
原文及code参见:我的Github
Ray Tracing
In this assignment,I implemented the Ray-Tracing algorithm in c++.I didn’t use any library but the CImg library,only use to read and display pixel values.
Creating the scene:
The scene is defined in an xml file.The entire scene encompassed by the label:
... Lights:
The lights are defined in label
<light>
            <position x="0" y="9" z="-15.0"/>
            <color r="1.0" g="1.0" b="1.0"/>
light>
Planes:
We need three elements to define a plane:a point in the plane、the plane’s normal vector and its color.Of course,we need to define its material.
    <plane>
                <point x="0.0" y="-10.0" z="0.0"/>
                <normal x="0.0" y="10.0" z="0.0"/>
                <color r="1.0" g="1.0" b="1.0" />
                <specs ref="0" diff="0.8" ambi="0.1" spec="0.2"/>
    plane>
Spheres:
We need there elements to define a sphere:radius、position of the center and its color.The normal can be calculated when we know the intersection of any rays toward the sphere.
    <sphere radius="2.0">
                <center x="-9.0" y="-8.0" z="-20.0"/>
                <color r="0.5" g="0.2" b="0.8" />
                <specs ref="0" diff="0.8" ambi="0.1" spec="0.2"/>
    sphere>
Triangles:
To define a triangle,we just need three points and its color.The normal can be calculated through the crossproduct of two vectors.
    <triangle>
                <point x="2" y="0" z="-25.0"/>
                <point x="7" y="-10" z="-25.0"/>
                <point x="2" y="-10" z="-20.0"/>
                <color r="0.94" g="0.75" b="0.31"/>
                <specs ref="0" diff="0.8" ambi="0.1" spec="0.2"/>
    triangle>
Details:
First we need to specify the eye position,the for every pixel in the Width*Height screen,emit a ray from the eye through the pixel into the scene.Find the closest intersection and return the intersection、the object and its normal.
traceRay:
    if (rayDepth > MAX_DEPTH) return backgroundColor;
    for (Object* obj : objectList) {
        if (obj->isHit(rayVec, eye)) {
            tempPoint = &obj->intersectPoints(rayVec, eye);
            tempDist = tempPoint->Distance(eye);
            if (tempDist < traceClose) {
                hitObject = obj;
                hitPoint = *tempPoint;
                hitNormal = hitObject->normalPoint(hitPoint);
                traceClose = tempDist;
            }
        }
    }
    if (traceClose < INFINITY) {
        localColor = shade(hitObject, hitPoint, hitNormal, rayVec);
        if (hitObject->reflective > 0) {
            Vector offsetPoint = hitPoint + hitNormal * 1e-3;
            Vector reflectionVector = (rayVec)-hitNormal*(2 * ((hitNormal).dotProduct(rayVec)));
            reflectColor = traceRay(reflectionVector, offsetPoint, ++rayDepth);
            localColor =  localColor + (reflectColor * hitObject->reflective);
        }
        return localColor;
    }
    else return backgroundColor;
If the reflectivity is set nonzero,calculate the reflection ray vector and recurring the above process until reach the MAX_DEPTH.
When knows the intersection and object as well as its normal,we first need to determine whether the intersection is inside the shadow or not.If the intersection is inside shadow,we simplely return background color(set to (0,0,0)),otherwise we need to calculate the color and highlight at that intersection accroding to the Phong Model.Don’t forget,we need to initialize a 3d array to store every pixel RGB values:CImg.Finally,just display it:CImgDisplay main_display(image);
Main:
    CImg<float> image(width, height, 1, 3, 1);
    Camera eye(width, height, fov, angle, Vector(0, 0, 0));

    for (int i = 0; i < height; i++) {
        for (int j = 0; j < width; j++) {
            float x = eye.worldX(j);
            float y = eye.worldY(i);
            Vector camVector(x, y, -1);
            Vector rayVector = eye.camToWorld.matmul(camVector);
            rayVector.normalize();

            Vector color = traceRay(rayVector, eye.origin, 0);

            image(j, i, 0) = color.x;
            image(j, i, 1) = color.y;
            image(j, i, 2) = color.z;
        }
    }
    CImgDisplay main_display(image);
Ray Tracing Display:
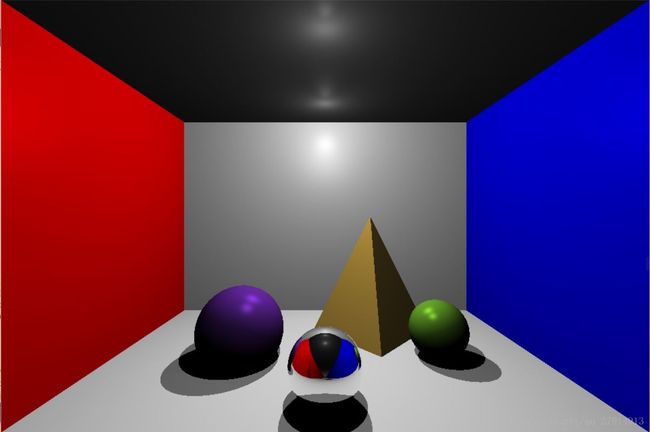
Set the center sphere’s reflectivity to 1(two lights):
ray-tracing VS opengl
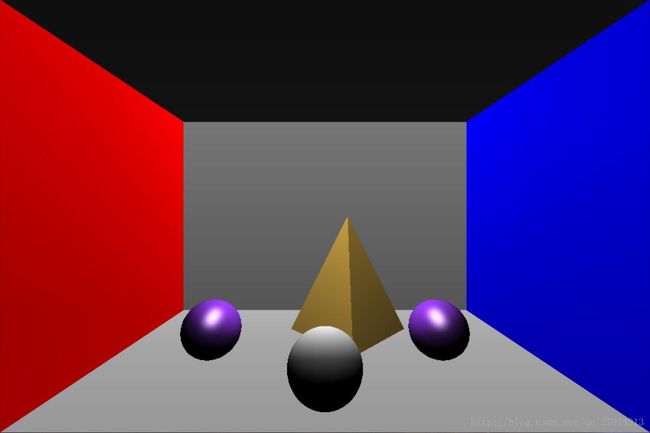
We now compare the ray-tracing and opengl result in a simple scene for the sake of convinience.In opengl,we simply set up these objects then define two lights,the result is :
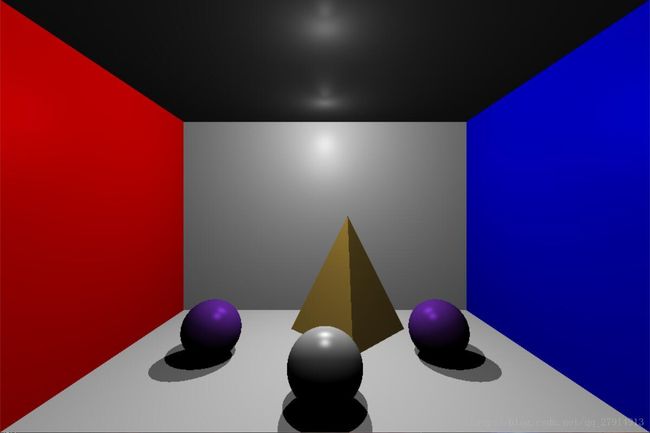
In ray tracing,I disable the reflectivity but still enable the shadow,so the result is:
Key Points:
In order to stitch the two results perfectly,we need to guarantee their view point position the same(the origin).And we need to make sure they share the same camera parameters.In opengl,we use gluPerspective() to set camera:
    glMatrixMode(GL_PROJECTION);
    glLoadIdentity();
    gluPerspective(75, (GLfloat)Width / (GLfloat)Height, 0.1f, 100.0f);
In ray tracing,we also set the FOV(feild of view) 75,
Last,we need to set their resolution the same.
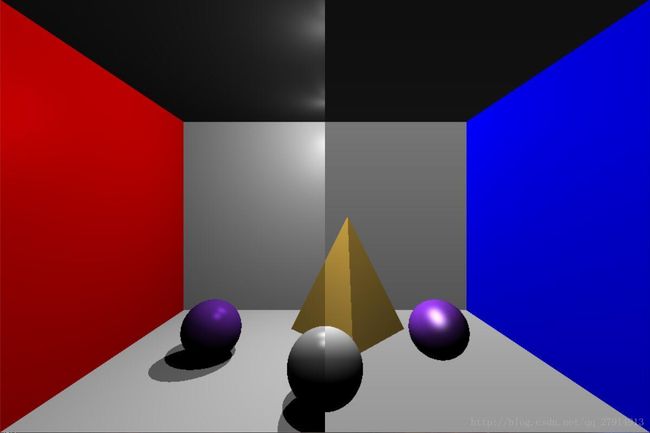
The final stitched picture is here(left part is raytracing, right part is opengl result):
Comparing:
As shown in the above picture,opengl result seems more bright(maybe I need to adjust the lighting parameters) and objects’ highlight points seems different.But the left part has lifelike shadows(two lights so the shadow overlap),so I think the left part seem more real.
By the way,I stitched the two picture in matlab,here are the code:
    I=imread('ray-tracing.JPG');
    J=imread('openglrender.JPG');
    [rows,cols,channels]=size(I);
    I(:,cols/2+1:cols,:)=J(:,cols/2+1:cols,:);
    figure(1),imshow(I);
    imwrite(I,'stitching.JPG');


