smartcar仿真学习记录
操作系统:ubuntu 18.04
ROS版本:melodic
本记录是跟随古月居的smartcar教程进行学习的
终端/文件夹下的操作
- 首先创建目录(也就是catkin_ws/src)
$ mkdir -p smartcar_ws/src
cd跳到工作空间的src目录下(我的目录如下)
![]()
- 创建包(硬件描述包)
格式 catkin_create_pkg
[deps]
$ catkin_create_pkg smartcar_description std_msgs rospy roscpp urdf
smartcar_description为包名,包含了std_msgs、rospy、roscpp、urdf这几个依赖包
可以利用tree这一工具查看创建好的包的结构(树状图)
若仅想查看一级目录,输入:tree -L 1即可
注:如果没有装tree这一工具,在终端输入 sudo apt install tree 进行下载安装;
-
然后在smartcar_description下建立 config、launch、urdf 这三个文件夹

-
在urdf下创建几个文件
- smartcar_body.urdf.xacro,也就是车体的模型文件

在文件中输入以下代码
- gazebo.urdf.xacro,gazebo的相关文件

在文件中输入以下代码
        Gazebo/Blue


        Gazebo/FlatBlack


        Gazebo/FlatBlack


        Gazebo/FlatBlack


        Gazebo/FlatBlack


        Gazebo/White
- smartcar.urdf.xacro,小车的主文件

在文件中输入以下代码
这里可能会用到 sudo apt-get install ros-melodic-joint-state-publisher-gui
port: /dev/ttyUSB0
baud: 115200
rate: 20
sync_write: True
sync_read: True
read_rate: 20
write_rate: 20

controllers: {
   #  Pololu motors: 1856 cpr = 0.3888105m travel = 4773 ticks per meter (empirical: 4100)
   base_controller: {type: diff_controller, base_frame_id: base_link, base_width: 0.26, ticks_meter: 4100, Kp: 12, Kd: 12, Ki: 0, Ko: 50, accel_limit: 1.0 }
}
Panels:
  - Class: rviz/Displays
    Help Height: 78
    Name: Displays
    Property Tree Widget:
      Expanded:
        - /Global Options1
        - /Status1
      Splitter Ratio: 0.5
    Tree Height: 565
  - Class: rviz/Selection
    Name: Selection
  - Class: rviz/Tool Properties
    Expanded:
      - /2D Pose Estimate1
      - /2D Nav Goal1
      - /Publish Point1
    Name: Tool Properties
    Splitter Ratio: 0.588679
  - Class: rviz/Views
    Expanded:
      - /Current View1
    Name: Views
    Splitter Ratio: 0.5
  - Class: rviz/Time
    Experimental: false
    Name: Time
    SyncMode: 0
    SyncSource: ""
Visualization Manager:
  Class: ""
  Displays:
    - Alpha: 0.5
      Cell Size: 1
      Class: rviz/Grid
      Color: 160; 160; 164
      Enabled: true
      Line Style:
        Line Width: 0.03
        Value: Lines
      Name: Grid
      Normal Cell Count: 0
      Offset:
        X: 0
        Y: 0
        Z: 0
      Plane: XY
      Plane Cell Count: 10
      Reference Frame:
      Value: true
    - Alpha: 1
      Class: rviz/RobotModel
      Collision Enabled: false
      Enabled: true
      Links:
        {}
      Name: RobotModel
      Robot Description: robot_description
      TF Prefix: ""
      Update Interval: 0
      Value: true
      Visual Enabled: true
    - Class: rviz/TF
      Enabled: true
      Frame Timeout: 15
      Frames:
        All Enabled: true
      Marker Scale: 1
      Name: TF
      Show Arrows: true
      Show Axes: true
      Show Names: true
      Tree:
        {}
      Update Interval: 0
      Value: true
  Enabled: true
  Global Options:
    Background Color: 48; 48; 48
    Fixed Frame: /base_link
  Name: root
  Tools:
    - Class: rviz/Interact
      Hide Inactive Objects: true
    - Class: rviz/MoveCamera
    - Class: rviz/Select
    - Class: rviz/FocusCamera
    - Class: rviz/Measure
    - Class: rviz/SetInitialPose
      Topic: /initialpose
    - Class: rviz/SetGoal
      Topic: /move_base_simple/goal
    - Class: rviz/PublishPoint
      Single click: true
      Topic: /clicked_point
  Value: true
  Views:
    Current:
      Class: rviz/Orbit
      Distance: 10
      Focal Point:
        X: 0
        Y: 0
        Z: 0
      Name: Current View
      Near Clip Distance: 0.01
      Pitch: 0.465398
      Target Frame:
      Value: Orbit (rviz)
      Yaw: 0.885398
    Saved: ~
Window Geometry:
  Displays:
    collapsed: false
  Height: 882
  Hide Left Dock: false
  Hide Right Dock: false
  QMainWindow State: 000000ff00000000fd00000004000000000000013c000002c4fc0200000008fb0000001200530065006c0065006300740069006f006e00000001e10000009b0000006400fffffffb0000001e0054006f006f006c002000500072006f007000650072007400690065007302000001ed000001df00000185000000a3fb000000120056006900650077007300200054006f006f02000001df000002110000018500000122fb000000200054006f006f006c002000500072006f0070006500720074006900650073003203000002880000011d000002210000017afb000000100044006900730070006c0061007900730100000028000002c4000000dd00fffffffb0000002000730065006c0065006300740069006f006e00200062007500660066006500720200000138000000aa0000023a00000294fb00000014005700690064006500530074006500720065006f02000000e6000000d2000003ee0000030bfb0000000c004b0069006e0065006300740200000186000001060000030c00000261000000010000010f000002c4fc0200000003fb0000001e0054006f006f006c002000500072006f00700065007200740069006500730100000041000000780000000000000000fb0000000a005600690065007700730100000028000002c4000000b000fffffffb0000001200530065006c0065006300740069006f006e010000025a000000b200000000000000000000000200000490000000a9fc0100000001fb0000000a00560069006500770073030000004e00000080000002e10000019700000003000004b00000003efc0100000002fb0000000800540069006d00650100000000000004b0000002f600fffffffb0000000800540069006d0065010000000000000450000000000000000000000259000002c400000004000000040000000800000008fc0000000100000002000000010000000a0054006f006f006c00730100000000ffffffff0000000000000000
  Selection:
    collapsed: false
  Time:
    collapsed: false
  Tool Properties:
    collapsed: false
  Views:
    collapsed: false
  Width: 1216
  X: 53
  Y: 60
整个包到此差不多已完善
还需要让系统知道包的位置,在主目录下,按下:Ctrl+H,显示隐藏文件,打开.bashrc并在最后加入
export ROS_PACKAGE_PATH=$ROS_PACKAGE_PATH:~/ROS/smartcar_ws/src
然后在终端输入
$ source ~/.bashrc
或直接在终端输入上述export…代码
$ roslaunch smartcar_description smartcar_display.rviz.launch
运行期间可能会一直出现一个警告,这个目前还未解决,但不影响整体仿真
![]()
RViz中的操作
以下为运行roslaunch后rviz的界面

如果不显示小车,在左下方Add中添加

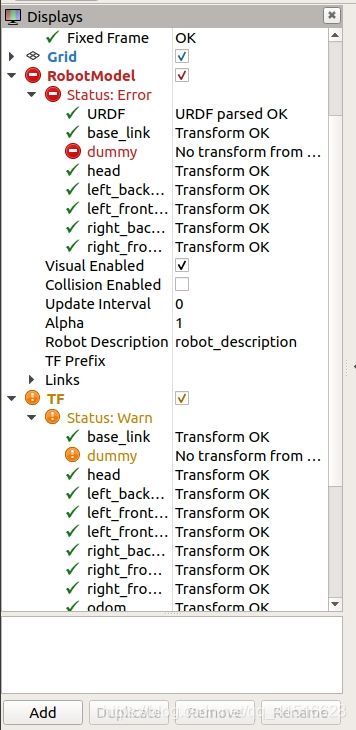
其中左边栏Displays中的两个报错如果是这两个(都是dummy)的话不用理会,不影响整体仿真

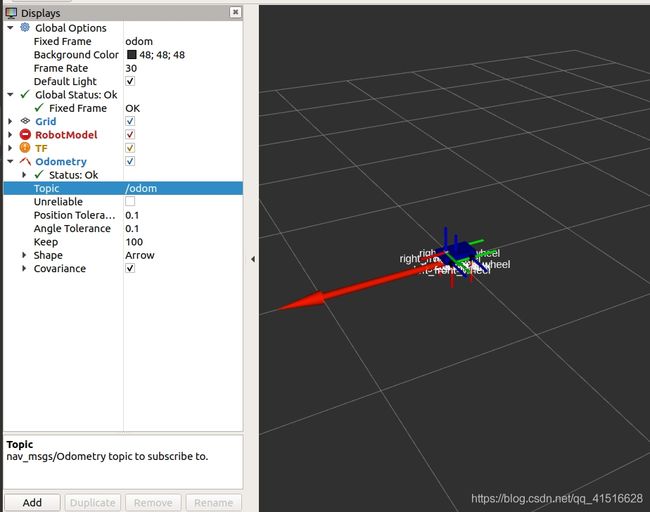
然后需要将Globle Options里的Fixed Frame改成odom
意思为将odom点固定在参考系(也就是背景的格子图)上,否则后面相对于参照系运动的就不是小车,而是那个odom点了
odom点即为最开始小车所处的位置的标记
在Add中添加odometry,从而让小车显示一个箭头(速度方向?)

不要忘了将Topic选为/odom
箭头尺寸颜色都可以在Odometry-Shape选项里面修改,这里就不多说了
Keep是每一帧显示区域显示的箭头的最大数量(动起来会比较明显)

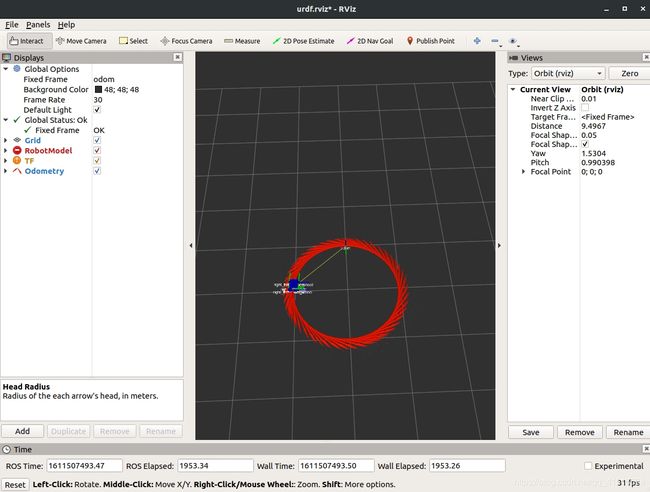
新开一个终端,发布一个消息让小车接收,使小车运动起来
$ rostopic pub -r 10 /cmd_vel geometry_msgs/Twist '{linear: {x: 0.5, y: 0, z: 0}, angular: {x: 0, y: 0, z: 0.5}}'
上述代码也可以改变linear或angular后各方向的数值,对应线速度与角速度
如果终止发布消息,小车还是不会停下来,需要将速度都设置为0再发布出去

主要参考文献:
https://blog.csdn.net/hcx25909/article/details/8951833
https://www.cnblogs.com/duijinglianxinduijingxiuxing/p/6757978.html


