四、Spring Boot Web开发二之Thymeleaf
- Spring Boot之Thymeleaf开发
- 1、Thymeleaf模板引擎
- 2、Thymeleaf基础知识
- 2.1、引入Thymeleaf
- 2.2范围model中的数据
- 2.3.引入URL
- 2.4使用运算符
- 2.5数据迭代(数据循环)
- 3、项目实战
- 3.1新建项目
- 3.2项目配置
- 3.3编写demo代码
- 4、运行结果
- 5、项目总结
Spring Boot之Thymeleaf开发
1、Thymeleaf模板引擎
Spring Boot 提供了大量的模板引擎,包括FreeMarker\Groovy\Thymeleaf\Velocity和Mustache,Spring Boot 中推荐使用Thymeleaf作为模板引擎,因为Thymeleaf提供了完美的Spring MVC的支持。
2、Thymeleaf基础知识
Thymeleaf是一个Java类库,他说一个xml/xhtml/html5的模板引擎,可以作为MVC的web应用的View层。
Thymeleaf还提供了额外的模块与Spring MVC集成,所以我们还可以使用Thymeleaf完全替代JSP。
2.1、引入Thymeleaf
在标签中添加thymeleaf命名空间,将静态页面转换为动态的视图。
通过”@{}”引用web静态资源。
<html xmlns:th="http://www.thymeleaf.org">
<head>
    <title>hellotitle>
    <meta http-equiv="Content-Type" content="text/html; charset=UTF-8" />
head>
<body>
<script th:src="@{jqeury.min.js}" type="text/javascript">script>
body>
html>
2.2范围model中的数据
通过”${}”访问model中的属性,这个jsp即为相似。
<div>
<h3>访问modelh3>
<span th:text="${singlePerson.name}">span>
div>
2.3.引入URL
Thymeleaf对于URL的处理是通过语法@{…}来处理的
<a th:href="@{https://blog.csdn.net/java_mdzy/article/category/7716138}">绝对路径a>
<a th:href="@{/}">相对路径a>
<a th:href="@{css/bootstrap.min.css}">Content路径,默认访问static下的css文件夹a>
2.4使用运算符
在表达式中可以使用各类算术运算符,例如+, -, *, /, %
th:with="isEven=(${prodStat.count} % 2 == 0)"逻辑运算符>, <, <=,>=,==,!=都可以使用,唯一需要注意的是使用<,>时需要用它的HTML转义符:
  th:if="${prodStat.count} > 1"
    th:text="'Execution mode is ' + ( (${execMode} == 'dev')? 'Development' : 'Production')"
2.5数据迭代(数据循环)
Thymeleaf的迭代和JSP的写法很相似,代码如下
<div>
    <ul>
        <li th:each="person:${people}">
            <span th:text="${person.name}">span>
            <span th:text="${person.age}">span>
        li>
    ul>
div>
3、项目实战
3.1新建项目
新建Spring Boot 项目,具体请参考 初识springboot之快速搭建
3.2项目配置
添加项目依赖,在pom.xml中添加Thymeleaf依赖
<dependency>
            <groupId>org.springframework.bootgroupId>
            <artifactId>spring-boot-starter-thymeleafartifactId>
        dependency>
配置视图解析器,在application.properties中可以配置thymeleaf模板解析器属性.就像使用springMVC的JSP解析器配置一样
#thymeleaf start
spring.thymeleaf.mode=HTML5
spring.thymeleaf.encoding=UTF-8
spring.thymeleaf.content-type=text/html
#开发时关闭缓存,不然没法看到实时页面
spring.thymeleaf.cache=false
#thymeleaf end
3.3编写demo代码
项目目录如下图所示:
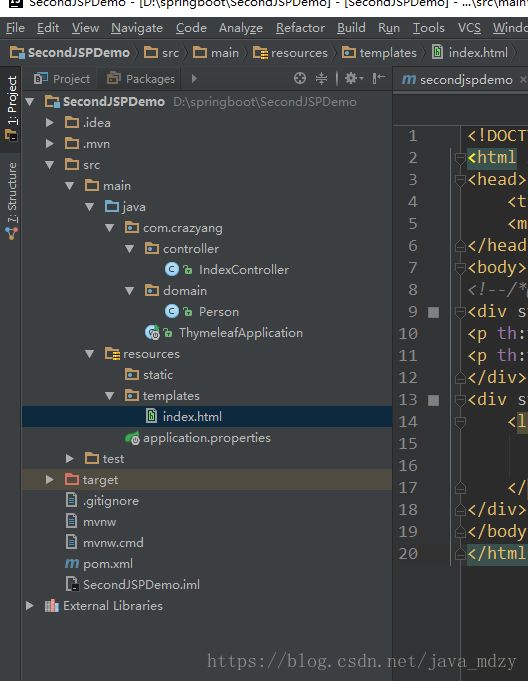
各个子类代码:
新建domain目录,用于新建实体。新建Person类,代码如下
package com.crazyang.domain;

/**
 * Created with IntelliJ IDEA.
 *
 * @Author crazyang
 * @Desciption:
 * @Date 2018-6-6 15:41
 */
public class Person {


    private String name;
    private Integer age;

    public Person() {
        super();
    }

    public Person(String name, Integer age) {
        super();
        this.name = name;
        this.age = age;
    }

    public String getName() {
        return name;
    }

    public void setName(String name) {
        this.name = name;
    }

    public Integer getAge() {
        return age;
    }

    public void setAge(Integer age) {
        this.age = age;
    }
}
新建IndexController,用于控制前段请求和页面跳转。代码如下:
package com.crazyang.controller;


import com.crazyang.domain.Person;
import org.slf4j.Logger;
import org.slf4j.LoggerFactory;
import org.springframework.stereotype.Controller;
import org.springframework.ui.Model;
import org.springframework.web.bind.annotation.RequestMapping;
import org.springframework.web.bind.annotation.RequestMethod;

import java.util.ArrayList;
import java.util.List;

/**
 * Created with IntelliJ IDEA.
 *
 * @Author crazyang
 * @Desciption:
 * @Date 2018-6-6 14:02
 */
@Controller
public class IndexController {

    private Logger logger = LoggerFactory.getLogger(IndexController.class);

    /**
     * 测试hello
     *
     * @return
     */
    @RequestMapping(value = "/index", method = RequestMethod.GET)
    public String hello(Model model) {
        //单个用户
        Person single = new Person("crazyang",66);
        //多个用户List,用于Thymeleaf中迭代
        List people = new ArrayList();
        Person p1 = new Person("zhangsan",11);
        Person p2 = new Person("lisi",16);
        Person p3 = new Person("wangwu",21);
        people.add(p1);
        people.add(p2);
        people.add(p3);

        model.addAttribute("person", single);
        model.addAttribute("people", people);
        return "index";
    }

}
index.html
<html xmlns:th="http://www.thymeleaf.org">
<head>
<title>hellotitle>
<meta http-equiv="Content-Type" content="text/html; charset=UTF-8" />
head>
<body>
<div style="border: 1px gray solid ;margin: 10px">
<p th:text="'用户名!, ' + ${single.name} + '!'" >3333p>
<p th:text="'用户年龄!, ' + ${single.age} + '!'" >3333p>
div>
<div style="border: 1px gray solid ;margin: 10px">
<li th:each="person:${people}">
<span th:text="${person.name}">span>
<span th:text="${person.age}">span>
li>
div>
body>
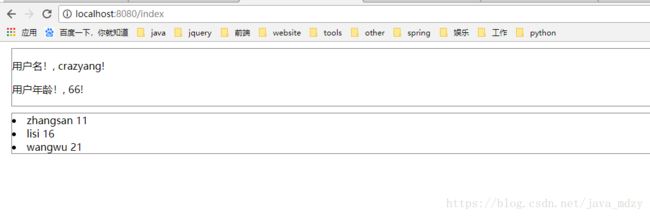
html>4、运行结果
启动项目,浏览器中输入http://localhost:8080/index,结果如下图所示:
5、项目总结
本章简要介绍了Thymeleaf和Spring Boot结合使用,通过一个例子,展示了Thymeleaf使用中的简洁方便。