搭建伪分布式集群笔记(3)
搭建Hadoop分布式集群
步骤:
1.配置时间同步服务
2.设置环境变量
3. 格式化NameNode
4.启动关闭集群
5.关闭防火墙,做映射
6.脚本,启动集群
7.hadoop配置文件一些解释
1.配置时间同步服务
(1)检查是否安装ntp,yum源
rpm -qa | grep ntp
ntpstat
mount /dev/dvd /media
 yum repolist
yum -y install ntp
(3)设置master节点为NTP服务主节点,
使用命令“vim /etc/ntp.conf”打开/etc/ntp.conf文件,注释掉以server开头的行,并添加:
restrict 192.168.0.0 mask 255.255.255.0 nomodify notrap//限制192.168开头的可以用
server 127.127.1.0  //master节点自身
fudge 127.127.1.0 stratum 10
(4)在所有slave节点中配置NTP,同样修改/etc/ntp.conf文件,注释掉server开头的行,并添加:
server master
(5)执行命令“service iptables stop & chkconfig iptables off”永久性关闭防火墙,主节点和从节点都要关闭。
service iptables stop & chkconfig iptables off
(6)启动NTP服务。
① 在master节点执行命令
service ntpd start & chkconfig ntpd on
② 在slave1、slave2、slave3上执行命令“ntpdate master”即可同步时间
ntpdate master
③ 在slave1、slave2、slave3上分别执行“service ntpd start & chkconfig ntpd on”即可启动并永久启动NTP服务。
service ntpd start & chkconfig ntpd on
2.设置环境变量
在/etc/profile添加JAVA_HOME和Hadoop路径,(各节点)
vim /etc/profile
export HADOOP_HOME=/usr/local/hadoop-2.6.0
export JAVA_HOME=/usr/java/jdk1.8.0_221-amd64
export PATH=$HADOOP_HOME/bin:$PATH:$JAVA_HOME/bin
使修改生效
source /etc/profile
3. 格式化NameNode
主节点
进入目录
cd /usr/local/hadoop-2.6.0/bin
执行格式化,不要多次格式化
./hdfs namenode -format
4.启动关闭集群
在master节点
cd /usr/local/hadoop-2.6.0/sbin
执行启动:
./start-dfs.sh
./start-yarn.sh
./mr-jobhistory-daemon.sh start historyserver
查看进程
jps
./stop-yarn.sh
./stop-dfs.sh
./mr-jobhistory-daemon.sh stop historyserver
5.关闭防火墙,做映射
(1)关闭防火墙
service iptables stop
chkconfig iptables off
service iptables status
(2)在Windows下做ip映射
C:\Windows\System32\drivers\etc
192.168.128.130 master  master.centos.com
192.168.128.131 slave1  slave1.centos.com
192.168.128.132 slave2  slave2.centos.com
192.168.128.133 slave3  slave3.centos.com
(3)启动集群
master可用实际IP代替
http://master:50070
http://master:8088
http://master:19888
6.脚本,启动集群
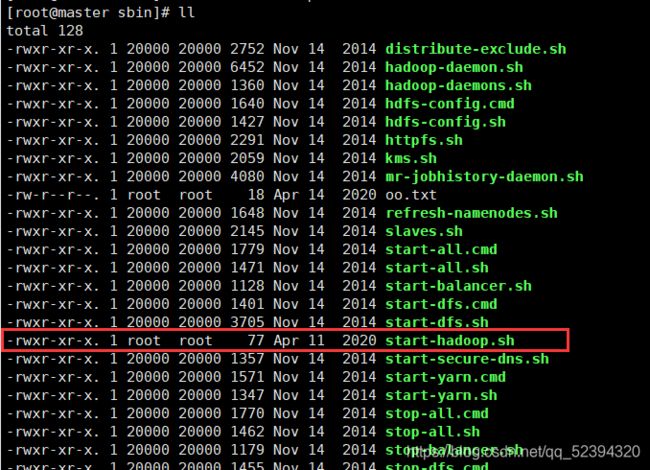
vim start-hadoop.sh
./start-dfs.sh
./start.yarn.sh
./mr-jobhistory-daemon.sh start historyserver
chmod +x start-hadoop.sh
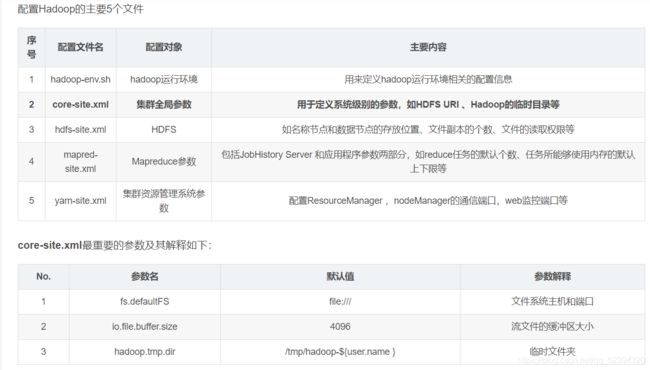
7.hadoop配置文件一些解释
参考书籍
《教材-Hadoop大数据开发基础》 ----人民邮电出版社


