springcloud alibaba 2(sentinel、小总结、Gateway )
文章目录
-
- 写在前面
-
- 1、Sentinel
-
- 1.1、五种规则
-
- 1.1.1、流控规则(根据流量大小限流)
- 1.1.2、降级规则(根据响应时间、比例限流)
- 1.1.2、热点规则(根据url中的参数限流)
- 1.1.3、授权规则(黑名单、白名单)
- 1.1.4、系统规则(判断系统环境进行限流)
- 1.2、自定义异常
-
- 1.2.1、在配置类中定义返回内容
- 1.2.2、异常处理逻辑@SentinelResource
- 1.3、sentinel规则持久化
- 1.4、feign整合sentinel
- 2、总结一下前面的知识
- 3、Gateway (客户端网关API)
-
- 3.1、Gateway模块搭建
- 3.2、Gateway与nacos结合
- 3.3、配置简写
- 3.4、执行流程
- 3.5、断言
-
- 内置断言
- 自定义断言
- 3.6、过滤器
-
- 局部过滤器
- 全局过滤器
写在前面
接上篇文章:https://blog.csdn.net/a__int__/article/details/109438417
1、Sentinel
1.1、五种规则
五种规则分别是:流控规则、降级规则、热点规则、系统规则、授权规则
1.1.1、流控规则(根据流量大小限流)

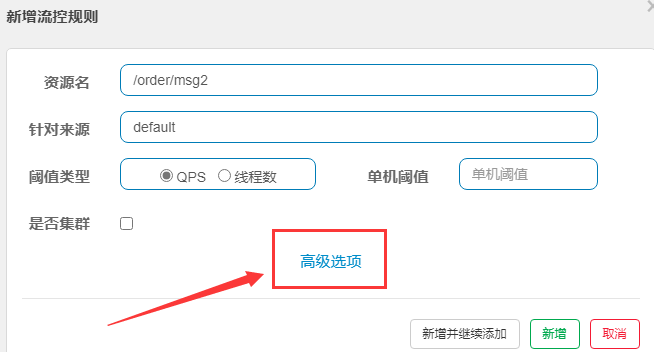
里面有几个数据需要填
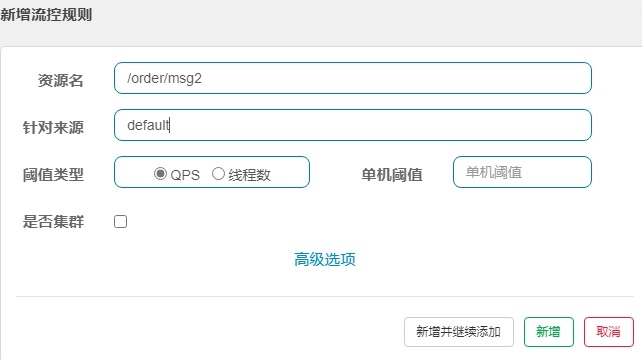
针对来源:里面填调用本微服务的微服务名字,默认的default,是对所有来源起作用
QBS:表示每秒请求进来的数量,单机阈值就是其值
线程数:表示最大并发线程,单机阈值就是其值
测试QBS直接用浏览器不断访问就可以测试,
测试多线程数用jmeter工具测试。
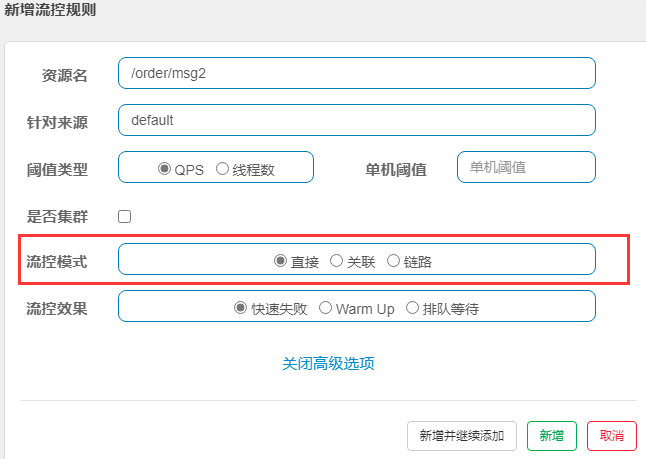
直接(默认):接口达到限流条件时,开启限流
关联:当关联的资源达到限流条件时,开启限流 [适合做应用让步]
链路:当从某个接口过来的资源达到限流条件时,开启限流
流控模式中间的关联表示,当关联的资源达到条件时,开始限流
我们用jmeter测试一下,
http://localhost:8091/order/msg1设置限流规则,http://localhost:8091/order/msg2设为关联,每秒2个

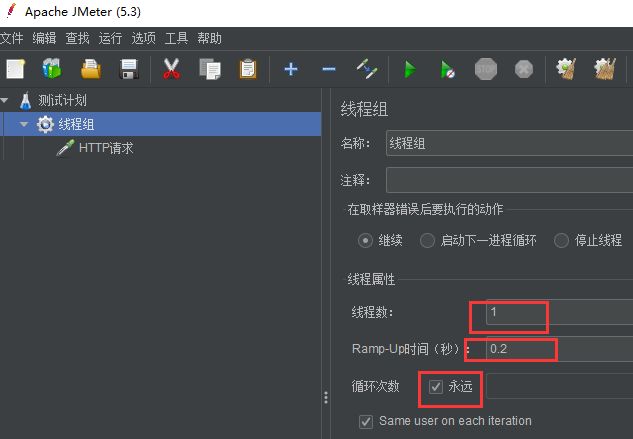
每0.2秒一个线程,也就是每秒5个同时去访问http://localhost:8091/order/msg2

接下来再访问http://localhost:8091/order/msg1
就一直是失败,因为/order/msg2每秒5个线程正在被请求

流控模式右边的链路

需要进行一些配置才能生效
从1.6.3 版本开始,Sentinel Web filter默认收敛所有URL的入口context,因此链路限流不生效。
1.7.0 版本开始(对应spring cloud alibaba的2.1.1.RELEASE),官方在CommonFilter 引入了WEB_CONTEXT_UNIFY 参数,用于控制是否收敛context。将其配置为 false 即可根据不同的URL 进行链路限流。
spring cloud alibaba 2.1.1.RELEASE之后的版本,可以通过配置spring.cloud.sentinel.web-context-unify=false即可关闭收敛
例:
1)编写一个service,在里面添加一个方法message
@Service
public class OrderServiceImpl3 {

    @SentinelResource("msg")
    public void msg() {

        System.out.println("msg");
    }
}
2)在Controller中声明两个方法,分别调用service中的方法 @RestController
@RestController
@Slf4j
public class OrderController3 {

    @Autowired
    private OrderServiceImpl3 orderServiceImpl3;

    @RequestMapping("/order/msg1")
    public String msg1() {

        orderServiceImpl3.msg();
        return "msg1";
    }

    @RequestMapping("/order/msg2")
    public String msg2() {

        orderServiceImpl3.msg();
        return "msg2";
    }
}
3)禁止收敛URL的入口 context
spring cloud alibaba 2.1.2.RELEASE之后的版本才能进行如下配置
在shop-order的配置文件中,关闭sentinel的CommonFilter实例化
spring.cloud.sentinel.web-context-unify=false
4)添加限流
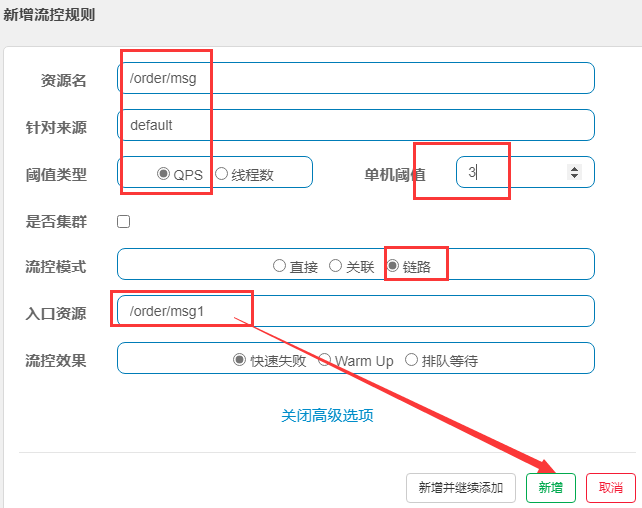
5)分别通过/order/msg1 和/order/msg2 访问, 发现2没问题, 1的被限流了
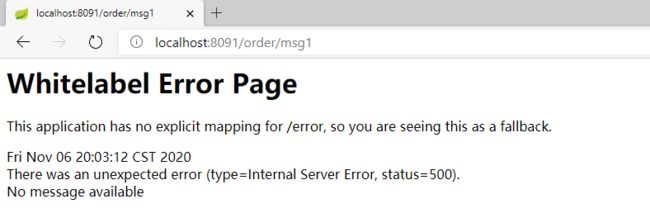
链路是针对上级接口的,上级接口被限流了,自己也会被限流。
链路和针对来源注意区别,针对来源是针对上级微服务(针对更大一些)。
接下来看看最后一个流控效果,第一个快速失败
就是以上流控起效果时,访问连接显示失败
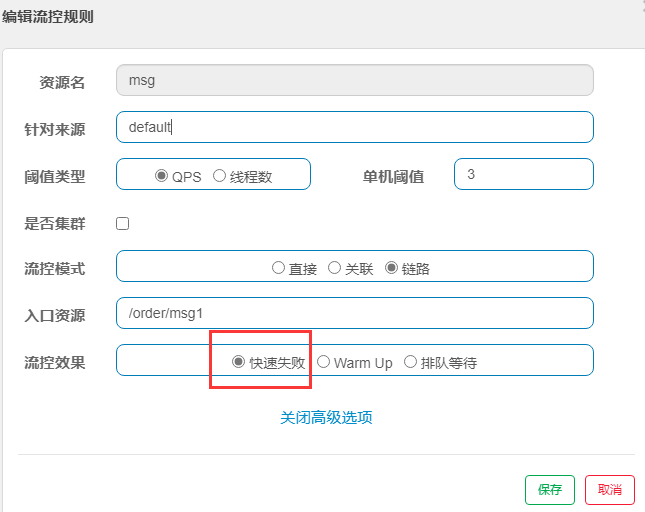
第二个warm up(预热),适用于突然增大的流量转换为缓步增长
第三个排队等待,访问被限制不会直接失败,会慢慢延迟访问
1.1.2、降级规则(根据响应时间、比例限流)
名词解释:
RT(慢调用比例 ):平均响应时间
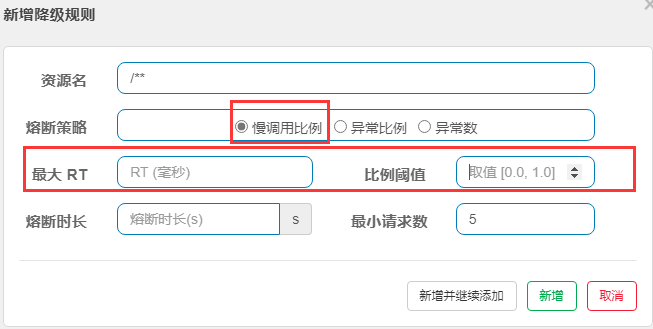
RT单位是毫秒,里面填1000,意思是访问时间超过1s,进入准降级状态,再观察接下几个访问,如果都超过1s那就降级,比例阈值就是多长时间内访问超过RT,就降级。
RT上限是4900ms,可以通过启动项配置-Dcsp.sentinel.statistic.max.rt=xxx来改这个上限
异常比例:当资源的每秒异常总数占通过量的比值超过阈值之后,资源进入降级状态
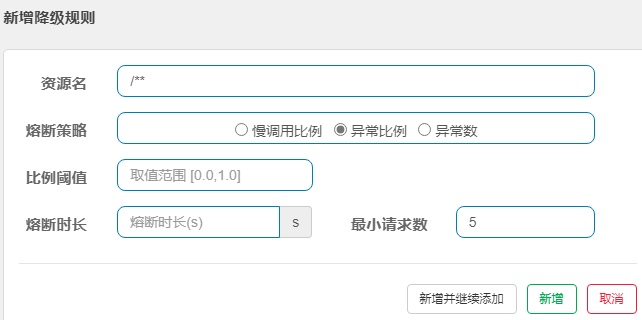
1)首先模拟一个异常
int i = 0;
@RequestMapping("/order/msg2")
public String msg2() {

      i++;
      //异常比例为0.333
       if (i % 3 == 0) {

          throw new RuntimeException();
      }
      return "msg2";
}
规则如下
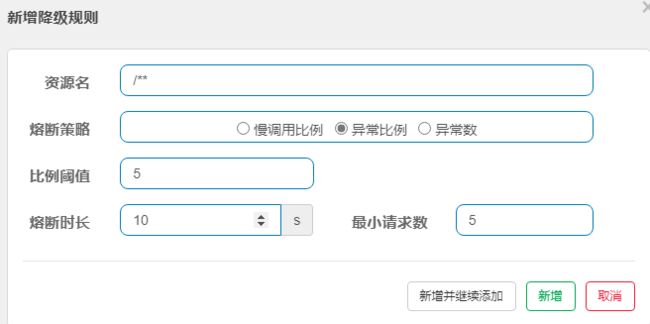
最后的异常数和异常比例差不多
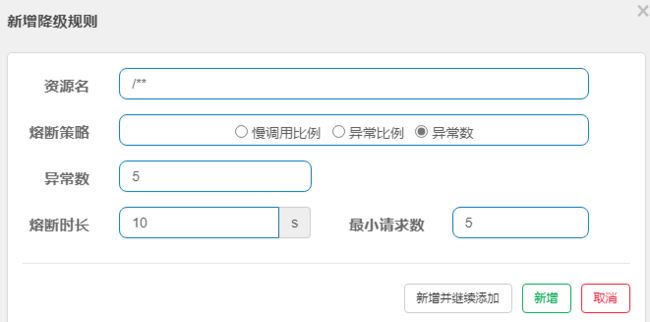
降级和流控的异常页面一样,后面我们可以自定义异常页面
1.1.2、热点规则(根据url中的参数限流)
热点规则可以对url中的参数进行限流
在orderController3里,编写代码
@RequestMapping("/order/msg3")
@SentinelResource("message3")//注意这里必须使用这个注解标识,热点规则不生效
public String msg3(String name, Integer age) {

    return name + age;
}
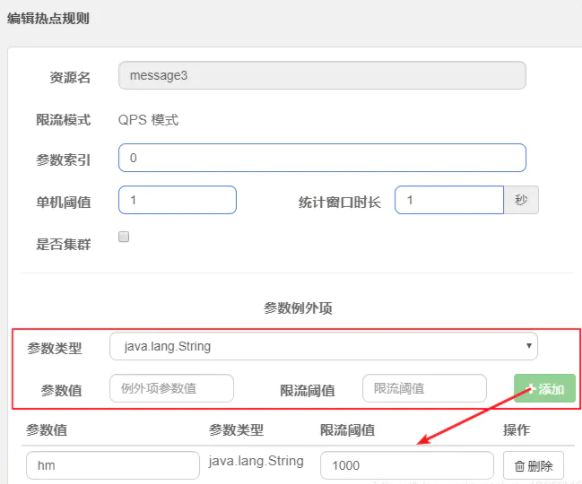
对/order/msg3中的第0个参数进行限流

除了可以这样简单的对参数限流
点开高级选项,还可以有更多的设定
1.1.3、授权规则(黑名单、白名单)
Sentinel提供了RequestOriginParser 接口来处理来源。
只要Sentinel保护的接口资源被访问,Sentinel就会调用RequestOriginParser 的实现类去解析访问来源。
1)自定义来源处理规则,新建RequestOriginParserDefinition.java
@Component
public class RequestOriginParserDefinition implements RequestOriginParser {

    @Override
    public String parseOrigin(HttpServletRequest request) {

          String serviceName = request.getParameter("serviceName");
          return serviceName;
    }
}
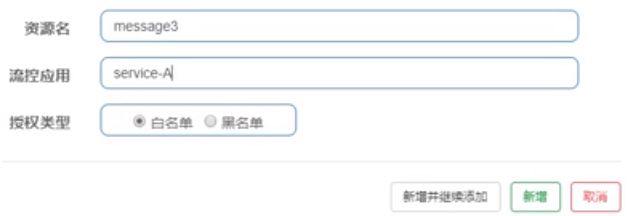
2)授权规则配置
这个配置的意思是只有 参数serviceName=pc 不能访问(黑名单)
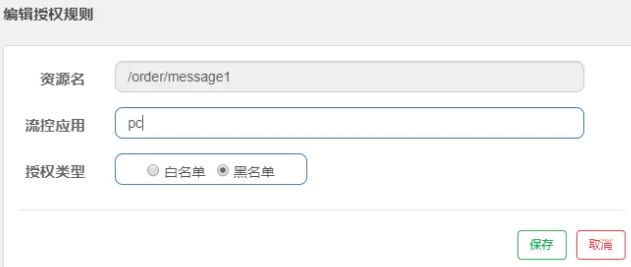
3)访问 http://localhost:8091/order/msg1 ?serviceName=pc观察结果

1.1.4、系统规则(判断系统环境进行限流)
系统规则一般是运维层的东西,这里只介绍,不操作
系统规则是从应用级别的入口流量进行控制,从单台机器总体的Load、RT、入口QPS、CPU使用和线程数五个维度监控应用数据,让系统尽可能在最大吞吐量的同时保证系统稳定性。针对应用整体维度,不针对资源维度,且仅对入口流量生效。
- Load(仅对 Linux/Unix-like 机器生效):当系统 load1 超过阈值,且系统当前的并发线程数超过系统容量时才会触发系统保护。系统容量由系统的 maxQps * minRt 计算得出。设定参考值一般是 CPU cores * 2.5。
- RT:当单台机器上所有入口流量的平均 RT 达到阈值即触发系统保护,单位是毫秒。
- 线程数:当单台机器上所有入口流量的并发线程数达到阈值即触发系统保护。
- 入口 QPS:当单台机器上所有入口流量的 QPS 达到阈值即触发系统保护。
- CPU使用率:当单台机器上所有入口流量的 CPU使用率达到阈值即触发系统保护。
1.2、自定义异常
1.2.1、在配置类中定义返回内容
首先我们要拿到所有规则产生的异常,新建一个类实现接口BlockExceptionHandler中的handle方法
sentinel 1.8版本以下是实现接口UrlBlockHandler中的blocked方法
@Component
public class ExceptionHandlerPage implements BlockExceptionHandler {

    @Override
    public void handle(HttpServletRequest httpServletRequest, HttpServletResponse response, BlockException ex) throws Exception {

        String msg = null;
        if (ex instanceof FlowException) {

            msg = "接口被限流了";
        } else if (ex instanceof DegradeException) {

            msg = "降级了";
        } else if (ex instanceof ParamFlowException) {

            msg = "热点参数限流";
        } else if (ex instanceof SystemBlockException) {

            msg = "系统规则(负载/...不满足要求)";
        } else if (ex instanceof AuthorityException) {

            msg = "授权规则不通过";
        }
        // http状态码
        response.setStatus(500);
        response.setCharacterEncoding("utf-8");
        response.setHeader("Content-Type", "application/json;charset=utf-8");
        response.setContentType("application/json;charset=utf-8");

        response.getWriter().write(JSON.toJSONString(msg));

    }
}
也可以定义一个封装类,封装多个参数进去
@Component
public class ExceptionHandlerPage implements BlockExceptionHandler {

    @Override
    public void handle(HttpServletRequest httpServletRequest, HttpServletResponse response, BlockException ex) throws Exception {


        ResponseData m = null;
        if (ex instanceof FlowException) {

            m = new ResponseData(-1,"接口被限流了");
        } else if (ex instanceof DegradeException) {

            m = new ResponseData(-2,"降级了");
        } else if (ex instanceof ParamFlowException) {

            m = new ResponseData(-3,"热点参数限流了");
        } else if (ex instanceof SystemBlockException) {

            m = new ResponseData(-4,"系统规则限流了");
        } else if (ex instanceof AuthorityException) {

            m = new ResponseData(-5,"授权规则不通过");
        }

        response.setCharacterEncoding("utf-8");
        response.setHeader("Content-Type", "application/json;charset=utf-8");
        response.setContentType("application/json;charset=utf-8");

        response.getWriter().write(JSON.toJSONString(m));

    }
}

@Data
@AllArgsConstructor   //全参数构造函数
@NoArgsConstructor    //无参构造
class ResponseData{

    private int code;
    private String msg;
}
1.2.2、异常处理逻辑@SentinelResource
在定义了资源点之后,我们可以通过Dashboard来设置限流和降级策略来对资源点进行保护。同时还能通过@SentinelResource来指定出现异常时的处理策略。
修改OrderServiceImpl3.java
import com.alibaba.csp.sentinel.annotation.SentinelResource;
import com.alibaba.csp.sentinel.slots.block.BlockException;
import lombok.extern.slf4j.Slf4j;
import org.springframework.stereotype.Service;

@Service
@Slf4j
public class OrderServiceImpl3 {

    @SentinelResource(
            value = "msg",
            blockHandler = "blockHandler",
            fallback = "fallback"
    )
    public String msg(String name) {

        System.out.println("msg");
        return name;
    }

    // 这里的blockHandler的返回值和参数,必须和原方法一致
    // 允许在参数列表的最后加一个参数 BlockException,用来接收在原方法中发生的异常。
    public String blockHandler(String name, BlockException e){

        log.error("触发了BlockException : {}",e);
        return "BlockException";
    }

    public String fallback(String name, Throwable e){

        log.error("触发了Throwable : {}",e);
        return "Throwable";
    }
}
blockHandler用于接收sentinel报的异常
fallback用于接收其他异常

修改OrderController3.java
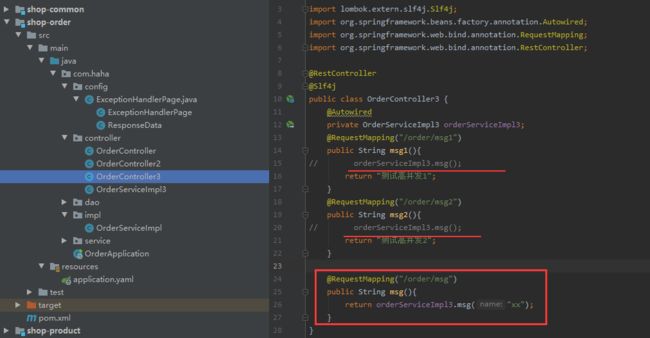
然后重启项目
访问

然后写一个限流
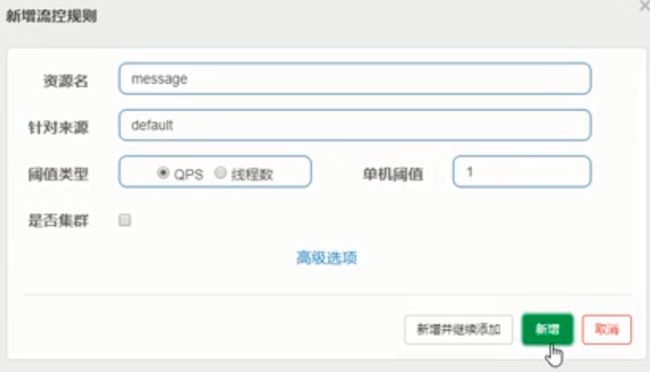
再访问就是走的blockHandler

如果我们把blockHandler注释掉
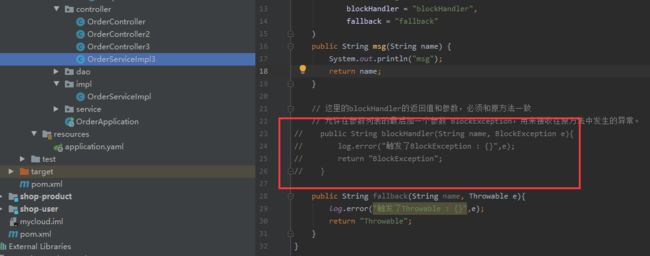
还是同样的限流,这次访问出来是

所以我们发现BlockException是包含在Throwable中的,Throwable范围更广。
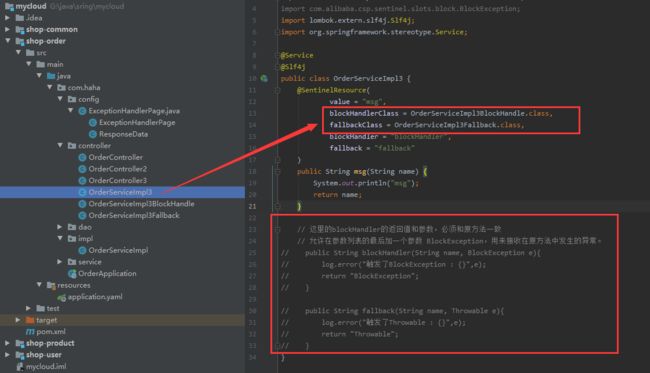
这里blockHandler、Throwable都被我们写成了方法,其实还可写出类
我们先新建一个OrderServiceImpl3BlockHandle.java,内容如下
这里面的方法必须是静态的
import com.alibaba.csp.sentinel.slots.block.BlockException;
import lombok.extern.slf4j.Slf4j;

@Slf4j
public class OrderServiceImpl3BlockHandle {

    public static String blockHandler(String name, BlockException e){

        log.error("触发了BlockException : {}",e);
        return "BlockException";
    }
}
再建一个OrderServiceImpl3Fallback.java
这里面的方法必须是静态的
import lombok.extern.slf4j.Slf4j;

@Slf4j
public class OrderServiceImpl3Fallback {

    public static String fallback(String name, Throwable e){

        log.error("触发了Throwable : {}",e);
        return "Throwable";
    }
}
修改OrderServiceImpl3如下
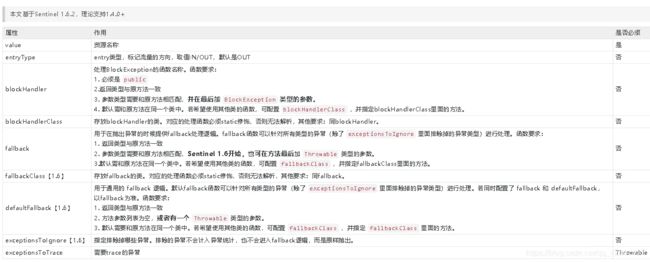
@SentinelResource 用于定义资源,并提供可选的异常处理和 fallback 配置项。其主要参数如下:
1.3、sentinel规则持久化
现在我们仅仅通过web界面设置的规则是保存在内存中的,一旦重新启动就会丢失
 1) shop-order下的config里,新建一个处理类FilePersistence
package com.haha.config;

import com.alibaba.csp.sentinel.command.handler.ModifyParamFlowRulesCommandHandler;
import com.alibaba.csp.sentinel.datasource.*;
import com.alibaba.csp.sentinel.init.InitFunc;
import com.alibaba.csp.sentinel.slots.block.authority.AuthorityRule;
import com.alibaba.csp.sentinel.slots.block.authority.AuthorityRuleManager;
import com.alibaba.csp.sentinel.slots.block.degrade.DegradeRule;
import com.alibaba.csp.sentinel.slots.block.degrade.DegradeRuleManager;
import com.alibaba.csp.sentinel.slots.block.flow.FlowRule;
import com.alibaba.csp.sentinel.slots.block.flow.FlowRuleManager;
import com.alibaba.csp.sentinel.slots.block.flow.param.ParamFlowRule;
import com.alibaba.csp.sentinel.slots.block.flow.param.ParamFlowRuleManager;
import com.alibaba.csp.sentinel.slots.system.SystemRule;
import com.alibaba.csp.sentinel.slots.system.SystemRuleManager;
import com.alibaba.csp.sentinel.transport.util.WritableDataSourceRegistry;
import com.alibaba.fastjson.JSON;
import com.alibaba.fastjson.TypeReference;
import org.springframework.beans.factory.annotation.Value;

import java.io.File;
import java.io.IOException;
import java.util.List;

public class FilePersistence implements InitFunc {


    @Value("spring.application.name")
    private String appcationName;

    @Override
    public void init() throws Exception {

        String ruleDir = System.getProperty("user.home") + "/sentinel-rules/" + appcationName;
        String flowRulePath = ruleDir + "/flow-rule.json";
        String degradeRulePath = ruleDir + "/degrade-rule.json";
        String systemRulePath = ruleDir + "/system-rule.json";
        String authorityRulePath = ruleDir + "/authority-rule.json";
        String paramFlowRulePath = ruleDir + "/param-flow-rule.json";

        this.mkdirIfNotExits(ruleDir);
        this.createFileIfNotExits(flowRulePath);
        this.createFileIfNotExits(degradeRulePath);
        this.createFileIfNotExits(systemRulePath);
        this.createFileIfNotExits(authorityRulePath);
        this.createFileIfNotExits(paramFlowRulePath);

        // 流控规则
        ReadableDataSource<String, List<FlowRule>> flowRuleRDS = new FileRefreshableDataSource<>(
                flowRulePath,
                flowRuleListParser
        );
        FlowRuleManager.register2Property(flowRuleRDS.getProperty());
        WritableDataSource<List<FlowRule>> flowRuleWDS = new FileWritableDataSource<>(
                flowRulePath,
                this::encodeJson
        );
        WritableDataSourceRegistry.registerFlowDataSource(flowRuleWDS);

        // 降级规则
        ReadableDataSource<String, List<DegradeRule>> degradeRuleRDS = new FileRefreshableDataSource<>(
                degradeRulePath,
                degradeRuleListParser
        );
        DegradeRuleManager.register2Property(degradeRuleRDS.getProperty());
        WritableDataSource<List<DegradeRule>> degradeRuleWDS = new FileWritableDataSource<>(
                degradeRulePath,
                this::encodeJson
        );
        WritableDataSourceRegistry.registerDegradeDataSource(degradeRuleWDS);

        // 系统规则
        ReadableDataSource<String, List<SystemRule>> systemRuleRDS = new FileRefreshableDataSource<>(
                systemRulePath,
                systemRuleListParser
        );
        SystemRuleManager.register2Property(systemRuleRDS.getProperty());
        WritableDataSource<List<SystemRule>> systemRuleWDS = new FileWritableDataSource<>(
                systemRulePath,
                this::encodeJson
        );
        WritableDataSourceRegistry.registerSystemDataSource(systemRuleWDS);

        // 授权规则
        ReadableDataSource<String, List<AuthorityRule>> authorityRuleRDS = new FileRefreshableDataSource<>(
                authorityRulePath,
                authorityRuleListParser
        );
        AuthorityRuleManager.register2Property(authorityRuleRDS.getProperty());
        WritableDataSource<List<AuthorityRule>> authorityRuleWDS = new FileWritableDataSource<>(
                authorityRulePath,
                this::encodeJson
        );
        WritableDataSourceRegistry.registerAuthorityDataSource(authorityRuleWDS);

        // 热点参数规则
        ReadableDataSource<String, List<ParamFlowRule>> paramFlowRuleRDS = new FileRefreshableDataSource<>(
                paramFlowRulePath,
                paramFlowRuleListParser
        );
        ParamFlowRuleManager.register2Property(paramFlowRuleRDS.getProperty());
        WritableDataSource<List<ParamFlowRule>> paramFlowRuleWDS = new FileWritableDataSource<>(
                paramFlowRulePath,
                this::encodeJson
        );
        ModifyParamFlowRulesCommandHandler.setWritableDataSource(paramFlowRuleWDS);
    }

    private Converter<String, List<FlowRule>> flowRuleListParser = source -> JSON.parseObject(
            source,
            new TypeReference<List<FlowRule>>() {

            }
    );
    private Converter<String, List<DegradeRule>> degradeRuleListParser = source -> JSON.parseObject(
            source,
            new TypeReference<List<DegradeRule>>() {

            }
    );
    private Converter<String, List<SystemRule>> systemRuleListParser = source -> JSON.parseObject(
            source,
            new TypeReference<List<SystemRule>>() {

            }
    );

    private Converter<String, List<AuthorityRule>> authorityRuleListParser = source -> JSON.parseObject(
            source,
            new TypeReference<List<AuthorityRule>>() {

            }
    );

    private Converter<String, List<ParamFlowRule>> paramFlowRuleListParser = source -> JSON.parseObject(
            source,
            new TypeReference<List<ParamFlowRule>>() {

            }
    );

    private void mkdirIfNotExits(String filePath) throws IOException {

        File file = new File(filePath);
        if (!file.exists()) {

            file.mkdirs();
        }
    }

    private void createFileIfNotExits(String filePath) throws IOException {

        File file = new File(filePath);
        if (!file.exists()) {

            file.createNewFile();
        }
    }

    private <T> String encodeJson(T t) {

        return JSON.toJSONString(t);
    }
}
2)添加配置
在resources下创建配置目录META-INF/services,
然后在该文件夹下创建文件com.alibaba.csp.sentinel.init.InitFunc
里面的内容是FilePersistence的全路径:com.haha.config.FilePersistence
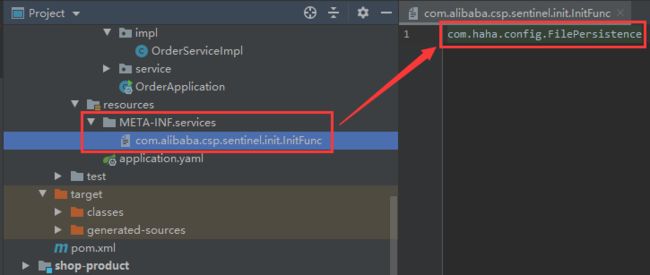
注意com.alibaba.csp.sentinel.init.InitFunc这个文件名前后不能有空格,不然可能会提示你No service provider…
然后启动项目,看看是不是能够持久化
先添加一个规则
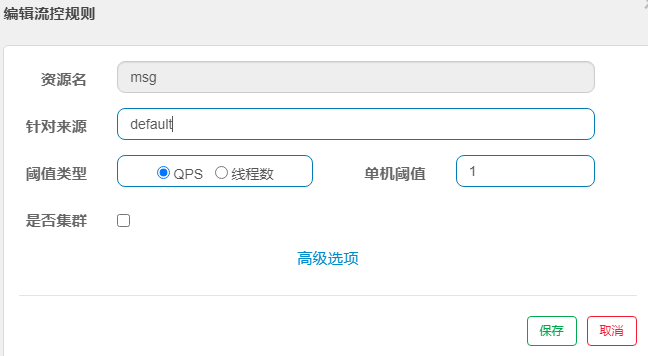
访问发现规则起效

重启项目,再访问,规则如果继续起效,那就是持久化成功了
1.4、feign整合sentinel
第一步,为shop-order添加sentinel的依赖(之前我们已经添加了)

第二步,在配置文件中开启Feign对Sentinel的支持
feign:
  sentinel:
    enabled: true
第三步,在service目录下新建fallback目录,创建容错类ProductServiceFallBack
//容错类要求必须实现被容错的接口,并为每个方法实现容错方案
import com.haha.domain.Product;
import com.haha.service.ProductFeignService;
import org.springframework.stereotype.Service;


//这是一个容错类  需要实现fegin所在的接口,并去实现接口中的所有方法
//一旦fegin远程调用出现问题,就会进入当前类中同名方法,执行容错逻辑

@Service
public class ProductServiceFallback implements ProductFeignService {

    @Override
    public Product findByPid(Integer pid) {

        // 容错逻辑
        Product product = new Product();
        product.setPid(-100);
        product.setPname("远程调用商品微服务出现异常了,进入了容错逻辑");
        return product;
    }
}
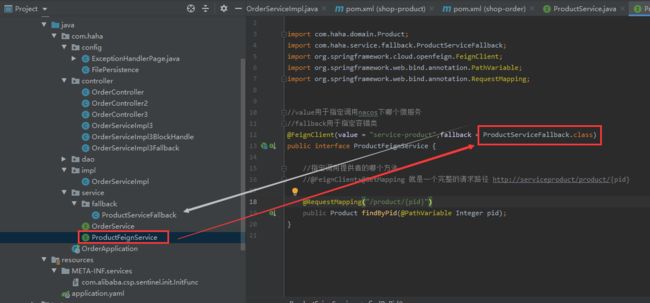
第四步,为 FeignClient 所在的接口指定容错类
//value用于指定调用nacos下哪个微服务
//fallback用于指定容错类
@FeignClient(value = "service-product", fallback = ProductServiceFallBack.class)//声明调用的提供者的name
public interface ProductFeignService{

    //指定调用提供者的哪个方法
    //@FeignClient+@GetMapping 就是一个完整的请求路径 http://serviceproduct/product/{pid}
    @GetMapping(value = "/product/{pid}")
    Product findByPid (@PathVariable("pid") Integer pid);
}
当fegin进行远程调用的过程中,如果出现问题,就进入这个容错类中的方法
第五步,接下来在OrderController.java中判断,如果调用到容错逻辑返回的内容,就返回一个“下单失败”的order
首先打开之前注释掉的@RestController

打开后idea会报这个错误,不用理会

写代码

然后重启shop-order
访问http://localhost:8091/order/prod/1

虽然我们现在进入了容错类的逻辑,但是我们并不知道出错原因是什么,
接下我们新建一个类ProductServiceFallBackFactory.java,把报错原因打出来
import com.haha.domain.Product;
import com.haha.service.ProductService;
import feign.hystrix.FallbackFactory;
import lombok.extern.slf4j.Slf4j;
import org.springframework.stereotype.Service;

// FallbackFactory 这个接口用来抛出容错类的异常
@Slf4j
@Service
public class ProductServiceFallBackFactory implements FallbackFactory<ProductService> {

    @Override
    public ProductService create(Throwable throwable) {


        return new ProductService() {

            @Override
            public Product findByPid(Integer pid) {

                log.error("fegin容错类抛出的异常:{}",throwable);

                // 容错逻辑
                Product product = new Product();
                product.setPid(-100);
                product.setPname("远程调用商品微服务出现异常了,进入了容错逻辑");
                return product;
            }
        };
    }
}
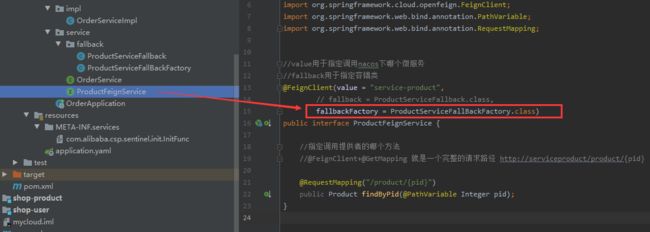
然后ProductFeignService中加入fallbackFactory
接下来把两个shop-product停掉,观察容错效果
重启shop-order
再访问

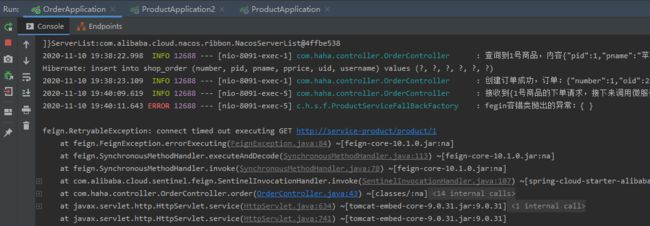
后台就会出现对应的异常信息
2、总结一下前面的知识
1、nacos 注册中心 :作为springcloud的服务治理、注册中心,使用它首先要下载一个nocos-server服务端。然后在微服务里面使用nocos-client 。
- nocos-server下载后解压,进入bin目录,服务端启动指令startup.cmd -m standalone
后台访问地址:http://127.0.0.1:8848/nacos/index.html(账号密码都是nacos)
- nocos-client在各个微服务里,先导入依赖,再向其启动类加入@EnableDiscoveryClient注解。
- 在各个微服务配置文件配置nacos服务地址。
- 最后在控制类里就可以使用nacos调用微服务了。
2、Ribbon 负载均衡 (接口选择工具):Ribbon有助于控制HTTP和TCP的客户端的行为。为Ribbon配置服务提供者地址后,Ribbon就可基于某种负载均衡算法,自动地帮助服务消费者去请求。
做接口选择(接口选择时就是在做负载均衡),使用Ribbon不需要额外加入依赖
- 启动类里,在restTemplate()上添加注解@LoadBalanced
- 接下来我们就可以把微服务的 “ IP+端口 ” 改为 “微服务名称”
- 如果要更改接口选择策略(负载均衡策略),在配置里面写service-product.ribbon.NFLoadBalancerRuleClassName: com.netflix.loadbalancer.策略类
3、Fegin http客户端(接口调用工具):Nacos很好的兼容了fegin,fegin内部集成了Ribbon。
feign 和 ribbon 是两个实现软负载均衡的组件,Feign 是在 Ribbon 的基础上进行了一次改进,采用接口的方式,将需要调用的其他服务的方法定义成抽象方法即可,不需要自己构建 http 请求。
- 导入依赖,往启动类添加 @EnableFeignClients 注解
- 然后添加一个需要调用的服务的“服务类”,在该类上添加
@FeignClient(value = “服务名”)注解,就可以直接通过该类调用服务
4、Sentinel 服务容错(解决高并发问题):以流量为切入点,从限流、流量整形、熔断降级、系统负载保护、热点防护等多个维度来帮助开发者保障微服务的稳定性。
- 下载sentinel 控制台,启动指令:java -Dserver.port=8080 -Dcsp.sentinel.dashboard.server=localhost:8080 -Dproject.name=sentinel-dashboard -jar sentinel-dashboard-1.8.jar
后台访问地址:http://localhost:8080/(账号密码都是sentinel )
- 在微服务中配置Sentinel的交流端口、控制台地址
3、Gateway (客户端网关API)
Spring Cloud Gateway旨在为微服务架构提供一种简单而有效的统一的API路由管理方式。
Gateway优点:
1、性能好:时Zuul的1.6倍
2、内置了很多功能:转发、监控、限流
3、设计优雅:容易扩展
缺点:
1、其实现依赖Netty与WebFlux,不是传统的servlet模型,学习成本高
2、不能将其部署在Tomcat、Jetty等servlet容器里,只能打包成jar包执行
3、需要spring boot 2.0以上
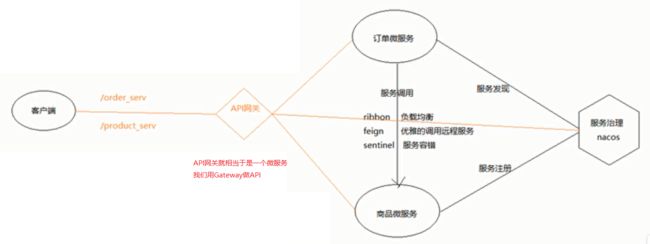
3.1、Gateway模块搭建
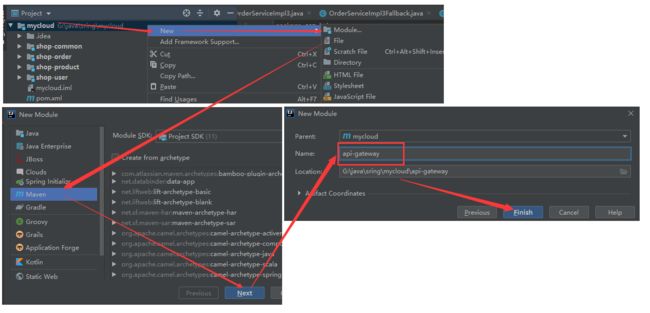
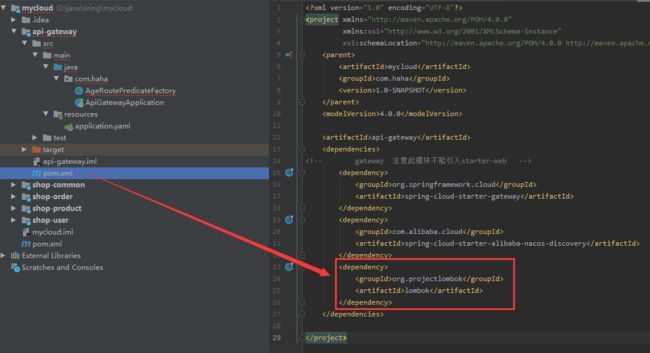
搭建 Gateway模块 需要注意的是不要导入web
第一步:创建模块api-gateway
    <dependencies>

        <dependency>
            <groupId>org.springframework.cloudgroupId>
            <artifactId>spring-cloud-starter-gatewayartifactId>
        dependency>
    dependencies>
第三步:新建启动类ApiGatewayApplication.java
import org.springframework.boot.SpringApplication;
import org.springframework.boot.autoconfigure.SpringBootApplication;

@SpringBootApplication
public class ApiGatewayApplication {

    public static void main(String[] args) {

        SpringApplication.run(ApiGatewayApplication.class,args);
    }
}
第四步:新建配置文件application.yaml
routes: 路由,其下的值是一个列表,有四个值id、uri、order、predicates。
id:当前路由发的标识,要求唯。
uri:请求最终要求被发送到的地址。
order:路由优先级级,数字越小优先级越高。
predicates:断言,请求要满足的条件。
filters:过滤器,可以删掉url中的某一段
predicates下面也是一个列表
-Path=/product-serv/** #当请求路径满足path指定的规则时,此路径信息才会正常转发
filters:
- StripPrefix=1 #在请求转发之前去掉一层路径
![]()
server:
  port: 7000
spring:
  application:
    name: api-gateway
  cloud:
    gateway:
      routes:
        - id: product_route
          uri: http://localhost:8081
          order: 1
          predicates:
            - Path=/product-serv/**
          filters:
            - StripPrefix=1
然后开始测试,先把product 跑起来,再把ApiGateway跑起来

跑起来后先不通过网关,直接访问试试

再通过网关试试:http://localhost:7000/product-serv/product/1
3.2、Gateway与nacos结合
在上面的配置中,我们把uri写死了的,并未通过nacos去管理,接下来我们使用nacos去管理。
第一步,在ApiGateway中加入依赖
        <dependency>
            <groupId>com.alibaba.cloudgroupId>
            <artifactId>spring-cloud-starter-alibaba-nacos-discoveryartifactId>
        dependency>
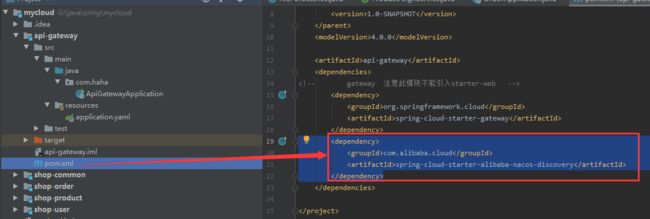
第二步,在ApiGatewayApplication上添加注解@EnableDiscoveryClient

第三步,修改配置
server:
  port: 7000
spring:
  application:
    name: api-gateway
  cloud:
    nacos:
      discovery:
        server-addr: localhost:8848
    gateway:
      discovery:
        locator:
          enabled: true
      routes:
        - id: product_route
#          uri: http://localhost:8081
          uri: lb://service-product
          order: 1
          predicates:
            - Path=/product-serv/**
          filters:
            - StripPrefix=1
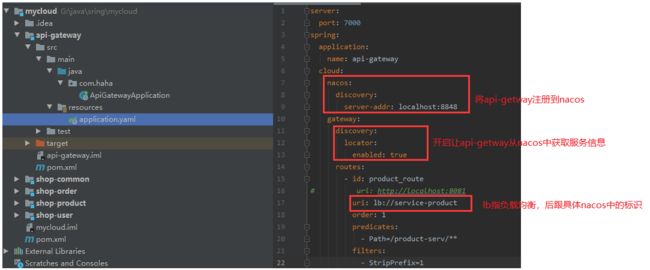
然后重启ApiGatewayApplication,再访问

相当于把手动填写的服务地址,换成了由nacos提供的服务

还可以为predicates添加一个Method
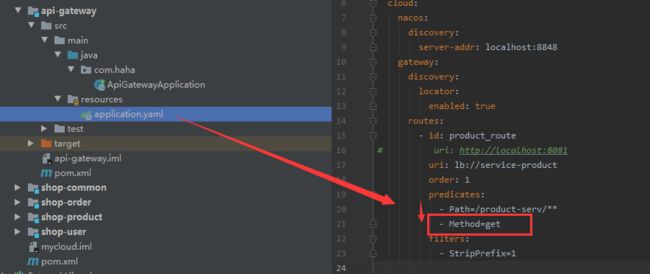
3.3、配置简写
就是不写路由,它有默认的路由实现
server:
  port: 7000
spring:
  application:
    name: api-gateway
  cloud:
    nacos:
      discovery:
        server-addr: localhost:8848
    gateway:
      discovery:
        locator:
          enabled: true
重启,访问:

它的默认uri就是service-“nacos中微服务名”

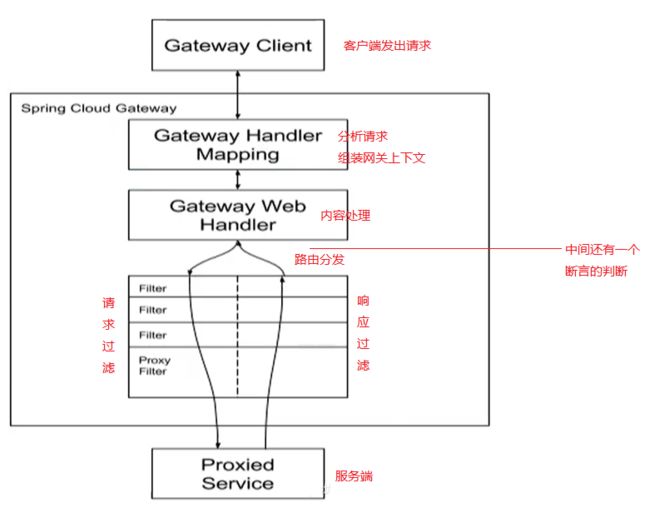
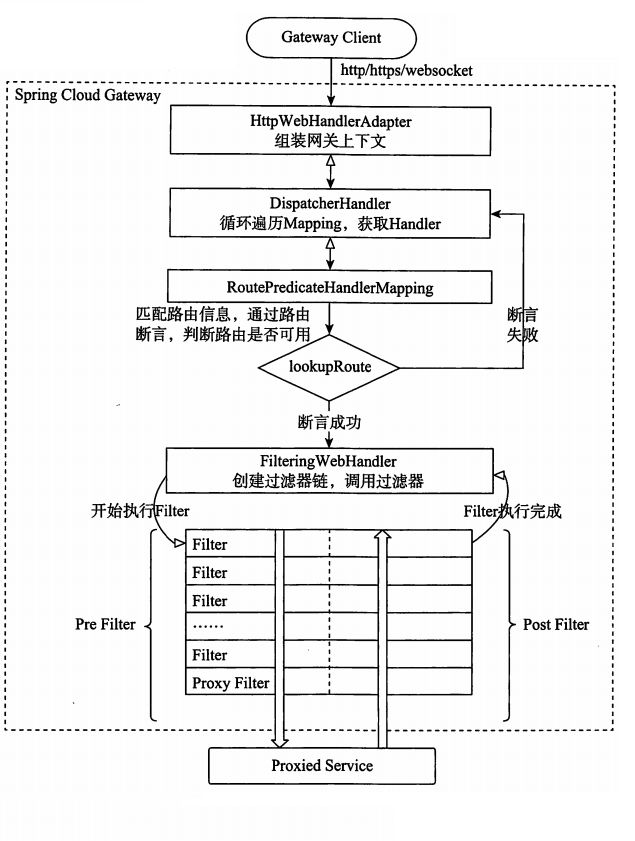
3.4、执行流程
3.5、断言
Predicate(谓语、断言):路由转发的判断条件,目前SpringCloud Gateway支持多种方式,常见如:Path、Query、Method、Header等。
只有predicates断言下的条件为true时,才会执行路由
内置断言
根据path断言
spring:
  cloud:
    gateway:
      routes:
      - id: product_route
        uri: lb://service-product
        predicates:
        - Path=/foo/{
     segment},/bar/{
     segment}
断言的类型除了Path还有9种:
第一大类:基于DateTime
-
1.After 在时间之后 才能路由
-
2.Before 在时间之前 才能路由
-
3.Between 在时间区间内才能路由
#After,在该日期以后请求才被匹配
spring.cloud.gateway.routes[0].predicates[1]=After=2019-09-12T17:42:47.789-07:00
#Before,在该日期之前才被匹配
spring.cloud.gateway.routes[0].predicates[1]=Before=2019-09-12T17:42:47.789-07:00
#Between,在两个时间范围内的请求才被匹配
spring.cloud.gateway.routes[0].predicates[1]=Between=2019-09-12T17:42:47.789-07:00,2019-10-12T17:42:47.789-07:00
yaml这么配置
spring:
  cloud:
    gateway:
      routes:
      - id: product_route
        uri: lb://service-product
        predicates:
        - After=2017-01-20T17:42:47.789-07:00[America/Denver]
        - Before=2017-01-20T17:42:47.789-07:00[America/Denver]
        - Between=2017-01-20T17:42:47.789-07:00[America/Denver], 2017-01-21T17:42:47.789-07:00[America/Denver]
这里时间类是ZonedDateTime,如果想使用其它的时间格式,得需要自己实现一个单独的转化类了。
第二大类:基于Cookie
- 4.Cookie 路由断言工厂会取两个参数 - cookie 名称对应的的key 和value,当cookie 和 Cookied 断言工厂配置的cookie 一致则匹配成功
spring:
  cloud:
    gateway:
      routes:
      - id: product_route
        uri: lb://service-product
        predicates:
        - Cookie=username, wgslcuky
第三大类:基于Header
- 5.Header 根据header 配置 ,如果携带的header 和 断言工厂的一致则匹配成功,否则匹配失败
spring:
  cloud:
    gateway:
      routes:
      - id: product_route
        uri: lb://service-product
        predicates:
        - Header=X-Request-Id, \d+
上面的配置示例表示Header中必须有X-Request-Id,且它的值必须是数字。
如果没有配置正则表达式的值,断言也是返回true(断方只检测带正则表达式的配置)
第四大类:基于Host
- 6.Host 对请求中Host 进行断言,如果成功则 路由
spring:
  cloud:
    gateway:
      routes:
      - id: product_route
        uri: lb://service-product
        predicates:
        - Host=**.somehost.org,**.anotherhost.org,{
     sub}.myhost.org
Host对应的URI模板变量同样也支持{sub}.myhost.org格式的配置,
如果请求的Header中的Host的值是www.sonmehost.org,abc.somehost.org,api.anotherhost.org,这个断言就会返回true,将请求路由到//service-product
注意,在配置Host的时候,如果Host不是80端口,在配置的时候也需要添加上端口。如:localhost:8080
第五大类:基于请求类型
- 7.Mehod 对请求的方法 进行配置,如果成功则路由。如 Post,Get
spring:
  cloud:
    gateway:
      routes:
      - id: product_route
        uri: lb://service-product
        predicates:
        - Method=GET
如果请求方法是GET才能正确返回
- 8.Query 对请求参数进行断言,如果成功则路由。如 localhost:80/id?foo:bb
它有两个参数,一个是参数(param),这个是必须的,另一个是可选参数,是一个正则表达式。
spring:
  cloud:
    gateway:
      routes:
      - id: product_route
        uri: lb://service-product
        predicates:
        - Query=baz
如果请求的参数中包含baz参数,断言将返回true,
spring:
  cloud:
    gateway:
      routes:
      - id: product_route
        uri: lb://service-product
        predicates:
        - Query=foo, ba.
如果请求的参数中包含foo,且它的值匹配ba.,断言将返回true
- 9.RemoteAddr 对网段字符串或者ip进行断言 ,成功则路由。
spring:
  cloud:
    gateway:
      routes:
      - id: product_route
        uri: lb://service-product
        predicates:
        - RemoteAddr=192.168.1.1/24
如果请求的客户端的ip地址是192.168.1.1到192.168.1.24的范围,此断言返回true
自定义断言
首先设定一个场景:假设我们的应用仅仅让age在(min,max)之间的人来访问。
第一步,在配置文件中添加一个Age断言
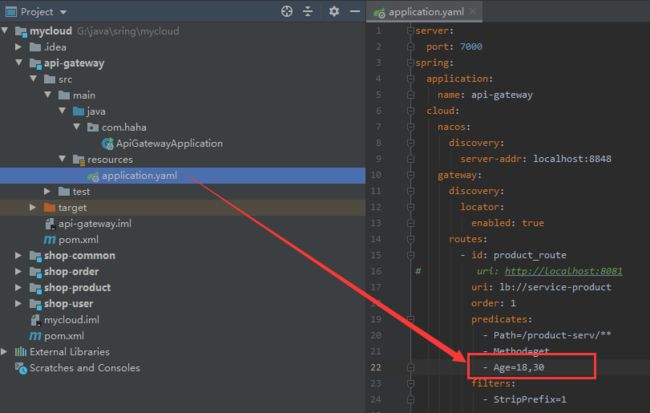
第二步,自定义配置类AgeRoutePredicateFactory
注意:这个配置类名不能随便起,开头必须是Age,后面必须是RoutePredicateFactory
必须继承AbstractRoutePredicateFactory
Config是一个内部类
AgeRoutePredicateFactory.java
import lombok.Data;
import lombok.NoArgsConstructor;
import org.apache.commons.lang.StringUtils;
import org.springframework.cloud.gateway.handler.predicate.AbstractRoutePredicateFactory;
import org.springframework.stereotype.Component;
import org.springframework.web.server.ServerWebExchange;
import java.util.Arrays;
import java.util.List;
import java.util.function.Predicate;
// 自定义的路由断言
// 1\名字必须是Age + RoutePredicateFactory
// 2\必须继承自 AbstractRoutePredicateFactory启动ApiGatewayApplication、ProductApplication

3.6、过滤器
过滤器作用:在请求传递过程中,对请求和响应做一些手脚
生命周期:Pre 、 Post
pre: 这种过滤器在请求被路由之前调用。利用它做身份验证、在集群中选择微服务、记录调试信息等。
Post:这种过滤器在被路由之后执行,利用它为响应添加标准的HTTP Header、收集信息或指标、将响应从微服务发给客户端
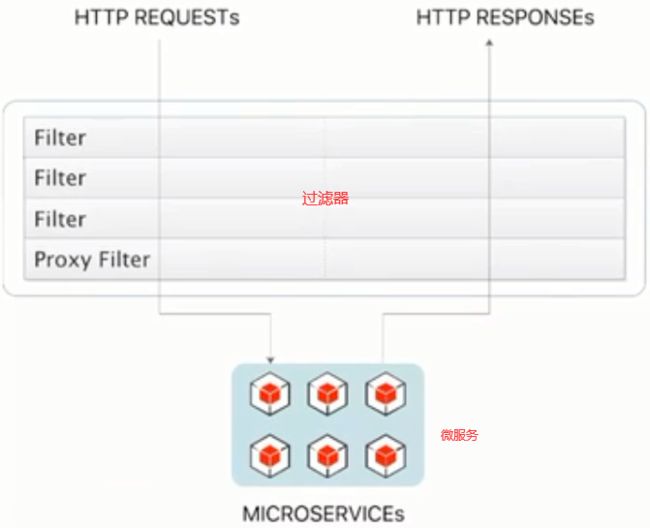
分类:局部过滤器(作用在某一个路由上)、全局路由器(作用在全部路由上)
局部过滤器
局部过滤器:针对单个路由起作用。
下面是Spring Cloud Gateway内置的过滤器工厂:
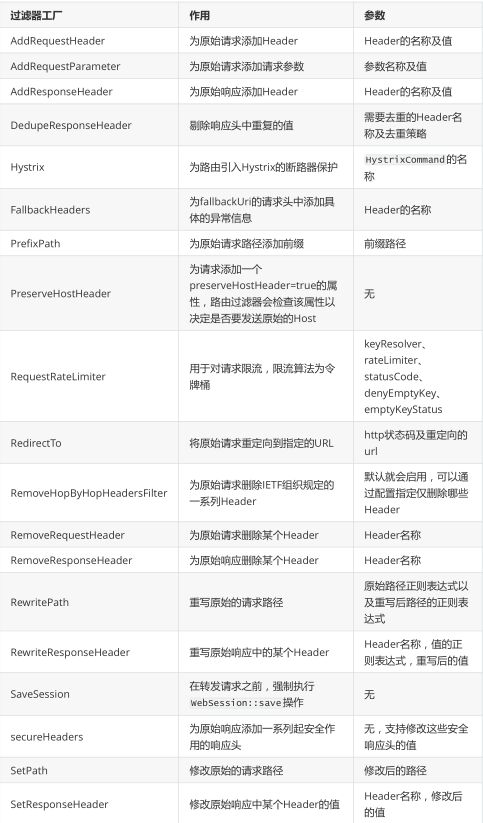
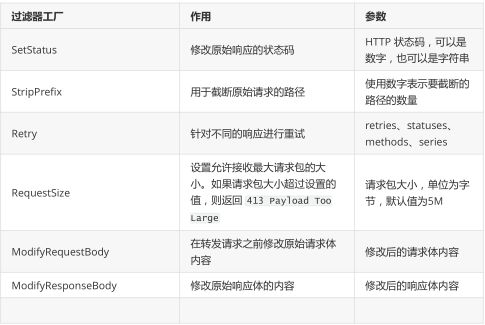
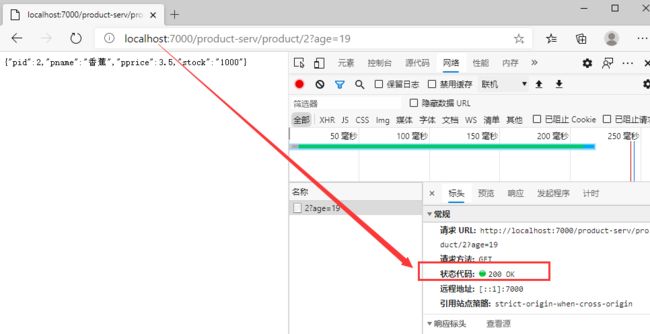
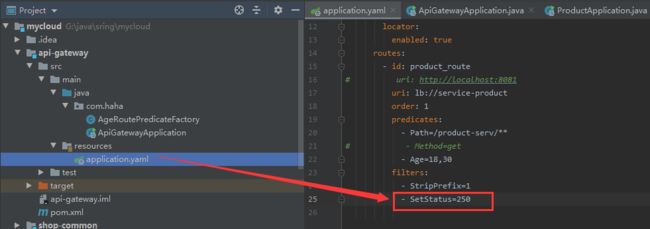
接下来使用SetStatus修改网页的状态码演示
首先修改之前,我们看看状态码
修改配置文件
然后重启ApiGatewayApplication
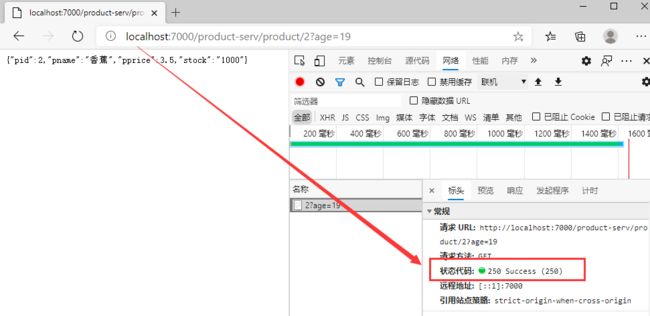
除了它内置的这些工厂外,还可以自定义局部过滤器
例,我们实现控制log开启或关闭
第一步修改配置文件,添加Log
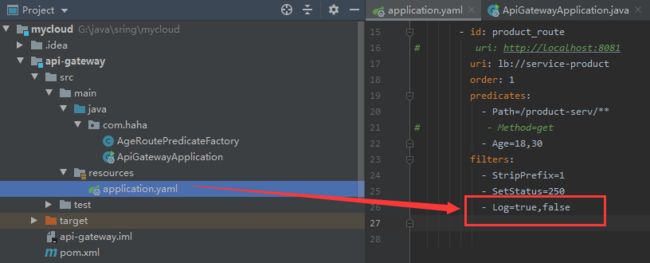
第二步自定义配置类LogGatewayFilterFactory
注意:这个配置类名不能随便起,开头必须是Log,后面必须是GatewayFilterFactory
必须继承AbstractGatewayFilterFactory
Config是一个内部类
import lombok.Data;
import lombok.NoArgsConstructor;
import org.springframework.cloud.gateway.filter.GatewayFilter;
import org.springframework.cloud.gateway.filter.GatewayFilterChain;
import org.springframework.cloud.gateway.filter.factory.AbstractGatewayFilterFactory;
import org.springframework.stereotype.Component;
import org.springframework.web.server.ServerWebExchange;
import reactor.core.publisher.Mono;

import java.util.Arrays;
import java.util.List;

@Component
public class LogGatewayFilterFactory extends AbstractGatewayFilterFactory<LogGatewayFilterFactory.Config> {

    // 构造函数
    public LogGatewayFilterFactory(){

        super(LogGatewayFilterFactory.Config.class);
    }
    // 读取配置文件中的参数,赋值到配置中
    public List<String> shortcutFieldOrder(){

        return Arrays.asList("consoleLog","cacheLog");
    }
    // 过滤逻辑
    @Override
    public GatewayFilter apply(LogGatewayFilterFactory.Config config){

        return new GatewayFilter(){


            @Override
            public Mono<Void> filter(ServerWebExchange exchange, GatewayFilterChain chain) {

                if(config.isCacheLog()){

                    System.out.println("cache日志开启");
                }
                if (config.isConsoleLog()){

                    System.out.println("Console日志开启");
                }
                return chain.filter(exchange);
            }
        };
    }
    // 配置类
    @Data
    @NoArgsConstructor
    public static class Config{

        private boolean consoleLog;
        private boolean cacheLog;
    }
}
然后重启ApiGatewayApplication、ProductApplication

全局过滤器
全局过滤器针对所有路由。
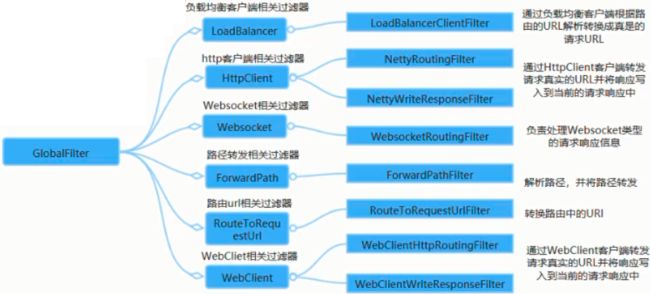
上面是内置全局过滤器,接下来我们自定义全局过滤器
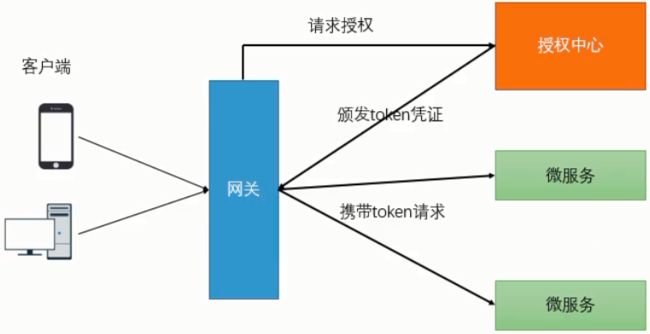
首先,客户端请求服务时进过网关,
网关向授权中心请求授权,授权完成给网关颁发token凭证
以后客户端每次请求都会携带token
接下来我们自定义一个全局过滤器AuthGlobalFilter
必须实现 GlobalFilter, Ordered两个接口
import lombok.extern.slf4j.Slf4j;
import org.apache.commons.lang.StringUtils;
import org.springframework.cloud.gateway.filter.GatewayFilterChain;
import org.springframework.cloud.gateway.filter.GlobalFilter;
import org.springframework.core.Ordered;
import org.springframework.http.HttpStatus;
import org.springframework.stereotype.Component;
import org.springframework.web.server.ServerWebExchange;
import reactor.core.publisher.Mono;

// 自定义全局过滤器(作用:统一鉴权)
@Slf4j
@Component
public class AuthGlobalFilter implements GlobalFilter, Ordered {

    // 过滤器逻辑
    @Override
    public Mono<Void> filter(ServerWebExchange exchange, GatewayFilterChain chain) {

        // 统一鉴权
        String token = exchange.getRequest().getQueryParams().getFirst("token");
        if(!StringUtils.equals("admin",token)){

            // 认证失败
            log.info("全局过滤器:token,认证失败");
            // 设置错误信息状态码
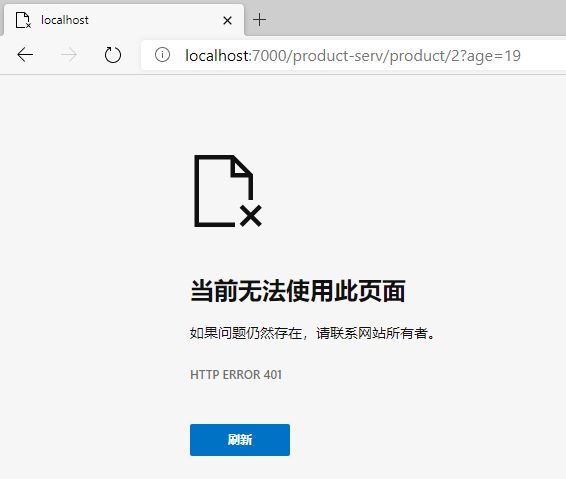
            exchange.getResponse().setStatusCode(HttpStatus.UNAUTHORIZED);
            return exchange.getResponse().setComplete();
        }
        // 放行
        return chain.filter(exchange);
    }
    // 标识当前过滤器的优先级,返回值越小 优先级越高
    @Override
    public int getOrder() {

        return 0;
    }
}
