svm rbf人脸识别 yale_实操课——机器学习之人脸识别
实验原理:
支持向量机(support vector machine)是一种分类算法,通过寻求结构化风险最小来提高学习机泛化能力,实现经验风险和置信范围的最小化,从而达到在统计样本量较少的情况下,亦能获得良好统计规律的目的。通俗来讲,它是一种二类分类模型,其基本模型定义为特征空间上的间隔最大的线性分类器,即支持向量机的学习策略便是间隔最大化,最终可转化为一个凸二次规划问题的求解。
具体原理:
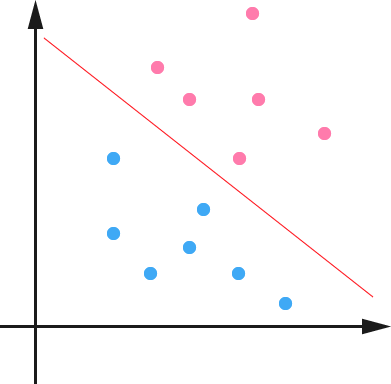
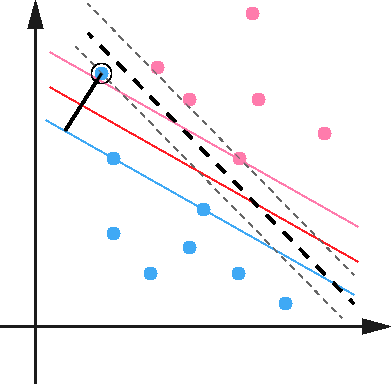
1. 在n维空间中找到一个分类超平面,将空间上的点分类。如下图是线性分类的例子。
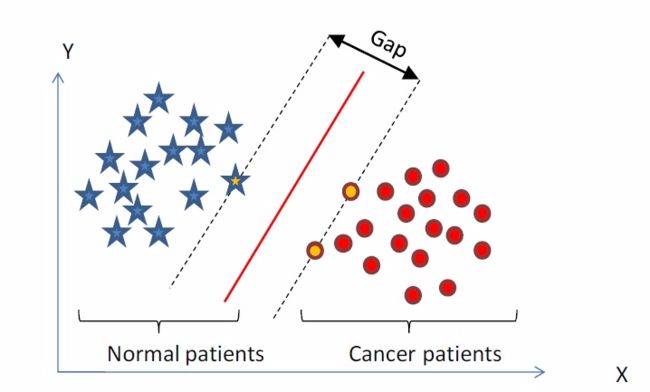
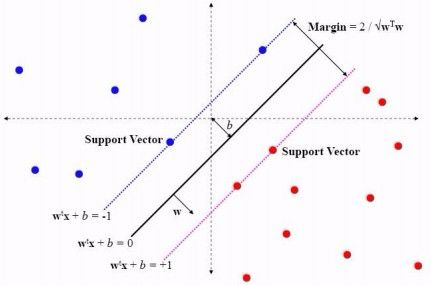
2. 一般而言,一个点距离超平面的远近可以表示为分类预测的确信或准确程度。SVM就是要最大化这个间隔值。而在虚线上的点便叫做支持向量Supprot Verctor。
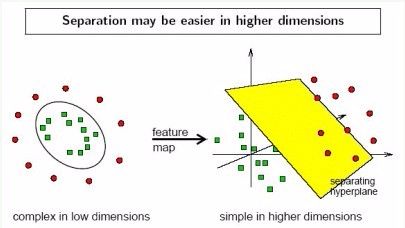
3. 实际中,我们会经常遇到线性不可分的样例,此时,我们的常用做法是把样例特征映射到高维空间中去(如下图);
3. 线性不可分映射到高维空间,可能会导致维度大小高到可怕的(19维乃至无穷维的例子),导致计算复杂。核函数的价值在于它虽然也是讲特征进行从低维到高维的转换,但核函数绝就绝在它事先在低维上进行计算,而将实质上的分类效果表现在了高维上,也就如上文所说的避免了直接在高维空间中的复杂计算。
4.使用松弛变量处理数据噪音
sklearn中SVM的结构,及各个参数说明如下
sklearn.svm.SVC :
view plain copy
sklearn.svm.SVC(C=1.0, kernel='rbf', degree=3, gamma='auto', coef0=0.0, shrinking=True, probability=False,tol=0.001, cache_size=200, class_weight=None, verbose=False, max_iter=-1, decision_function_shape=None,random_state=None)
参数说明:
view plain copy
C:C-SVC的惩罚参数C?默认值是1.0
C越大,相当于惩罚松弛变量,希望松弛变量接近0,即对误分类的惩罚增大,趋向于对训练集全分对的情况,这样对训练集测试时准确率很高,但泛化能力弱。C值小,对误分类的惩罚减小,允许容错,将他们当成噪声点,泛化能力较强。
kernel :核函数,默认是rbf,可以是‘linear’, ‘poly’, ‘rbf’, ‘sigmoid’, ‘precomputed’
0 – 线性:u'v
1 – 多项式:(gamma*u'*v + coef0)^degree
2 – RBF函数:exp(-gamma|u-v|^2)
3 –sigmoid:tanh(gamma*u'*v + coef0)
degree :多项式poly函数的维度,默认是3,选择其他核函数时会被忽略。
gamma : ‘rbf’,‘poly’ 和‘sigmoid’的核函数参数。默认是’auto’,则会选择1/n_features
coef0 :核函数的常数项。对于‘poly’和 ‘sigmoid’有用。
probability :是否采用概率估计?.默认为False
shrinking :是否采用shrinking heuristic方法,默认为true
tol :停止训练的误差值大小,默认为1e-3
cache_size :核函数cache缓存大小,默认为200
class_weight :类别的权重,字典形式传递。设置第几类的参数C为weight*C(C-SVC中的C)
verbose :允许冗余输出?
max_iter :最大迭代次数。-1为无限制。
decision_function_shape :‘ovo’, ‘ovr’ or None, default=None3
random_state :数据洗牌时的种子值,int值
主要调节的参数有:C、kernel、degree、gamma、coef0。
系统环境
Linux Ubuntu 16.04
Python3.6
任务内容
用SVM算法对fetch_lfw_people数据进行人脸识别,并将预测结果可视化。
任务步骤
1.创建目录并下载实验所需的数据。
view plain copy
mkdir -p /home/zhangyu/scikit_learn_data/lfw_home
cd /home/zhangyu/scikit_learn_data/lfw_home
wget http://192.168.1.100:60000/allfiles/ma_learn/lfwfunneled.tgz
wget http://192.168.1.100:60000/allfiles/ma_learn/pairsDevTest.txt
wget http://192.168.1.100:60000/allfiles/ma_learn/pairsDevTrain.txt
wget http://192.168.1.100:60000/allfiles/ma_learn/pairs.txt
tar xzvf lfwfunneled.tgz
2.新建Python project ,名为python15.
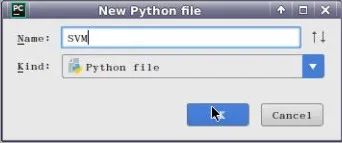
在python15项目下,新建Python file,名为SVM
3.用SVM算法对fetch_lfw_people数据进行人脸识别,并将预测结果可视化,完整代码如下:
view plain copy
from __future__ import print_function
from time import time
import logging
import matplotlib.pyplot as plt
from sklearn.model_selection import train_test_split
from sklearn.datasets import fetch_lfw_people
from sklearn.model_selection import GridSearchCV
from sklearn.metrics import classification_report
from sklearn.metrics import confusion_matrix
from sklearn.decomposition import PCA
from sklearn.svm import SVC
# Display progress logs on stdout
logging.basicConfig(level=logging.INFO, format='%(asctime)s %(message)s')
###############################################################################
# Download the data, if not already on disk and load it as numpy arrays
lfw_people = fetch_lfw_people(min_faces_per_person=70, resize=0.4)
# introspect the images arrays to find the shapes (for plotting)
n_samples, h, w = lfw_people.images.shape
# for machine learning we use the 2 data directly (as relative pixel
# positions info is ignored by this model)
X = lfw_people.data
n_features = X.shape[1]
# the label to predict is the id of the person
y = lfw_people.target
target_names = lfw_people.target_names
n_classes = target_names.shape[0]
print("Total dataset size:")
print("n_samples: %d" % n_samples)
print("n_features: %d" % n_features)
print("n_classes: %d" % n_classes)
###############################################################################
# Split into a training set and a test set using a stratified k fold
# split into a training and testing set
X_train, X_test, y_train, y_test = train_test_split(
X, y, test_size=0.25)
###############################################################################
# Compute a PCA (eigenfaces) on the face dataset (treated as unlabeled
# dataset): unsupervised feature extraction / dimensionality reduction
n_components = 150
print("Extracting the top %d eigenfaces from %d faces"
% (n_components, X_train.shape[0]))
t0 = time()
pca = PCA(svd_solver='randomized',n_components=n_components, whiten=True).fit(X_train)
print("done in %0.3fs" % (time() - t0))
eigenfaces = pca.components_.reshape((n_components, h, w))
print("Projecting the input data on the eigenfaces orthonormal basis")
t0 = time()
X_train_pca = pca.transform(X_train)
X_test_pca = pca.transform(X_test)
print("done in %0.3fs" % (time() - t0))
###############################################################################
# Train a SVM classification model
print("Fitting the classifier to the training set")
t0 = time()
param_grid = { 'C': [1e3, 5e3, 1e4, 5e4, 1e5],
'gamma': [0.0001, 0.0005, 0.001, 0.005, 0.01, 0.1], }
clf = GridSearchCV(SVC(kernel='rbf', class_weight='balanced'), param_grid)
clf = clf.fit(X_train_pca, y_train)
print("done in %0.3fs" % (time() - t0))
print("Best estimator found by grid search:")
print(clf.best_estimator_)
###############################################################################
# Quantitative evaluation of the model quality on the test set
print("Predicting people's names on the test set")
t0 = time()
y_pred = clf.predict(X_test_pca)
print("done in %0.3fs" % (time() - t0))
print(classification_report(y_test, y_pred, target_names=target_names))
print(confusion_matrix(y_test, y_pred, labels=range(n_classes)))
###############################################################################
# Qualitative evaluation of the predictions using matplotlib
def plot_gallery(images, titles, h, w, n_row=3, n_col=4):
"""Helper function to plot a gallery of portraits"""
plt.figure(figsize=(1.8 * n_col, 2.4 * n_row))
plt.subplots_adjust(bottom=0, left=.01, right=.99, top=.90, hspace=.35)
for i in range(n_row * n_col):
plt.subplot(n_row, n_col, i + 1)
plt.imshow(images[i].reshape((h, w)), cmap=plt.cm.gray)
plt.title(titles[i], size=12)
plt.xticks(())
plt.yticks(())
# plot the result of the prediction on a portion of the test set
def title(y_pred, y_test, target_names, i):
pred_name = target_names[y_pred[i]].rsplit(' ', 1)[-1]
true_name = target_names[y_test[i]].rsplit(' ', 1)[-1]
return 'predicted: %s\ntrue: %s' % (pred_name, true_name)
prediction_titles = [title(y_pred, y_test, target_names, i)
for i in range(y_pred.shape[0])]
plot_gallery(X_test, prediction_titles, h, w)
# plot the gallery of the most significative eigenfaces
eigenface_titles = ["eigenface %d" % i for i in range(eigenfaces.shape[0])]
plot_gallery(eigenfaces, eigenface_titles, h, w)
plt.show()
4.对完整代码进行分部描述,用import导入实验所用到的包
view plain copy
from __future__ import print_function
from time import time
import logging
import matplotlib.pyplot as plt
from sklearn.model_selection import train_test_split
from sklearn.datasets import fetch_lfw_people
from sklearn.model_selection import GridSearchCV
from sklearn.metrics import classification_report
from sklearn.metrics import confusion_matrix
from sklearn.decomposition import PCA
from sklearn.svm import SVC
5.提取数据
view plain copy
lfw_people = fetch_lfw_people(min_faces_per_person=70, resize=0.4)
# introspect the images arrays to find the shapes (for plotting)
n_samples, h, w = lfw_people.images.shape
# for machine learning we use the 2 data directly (as relative pixel
# positions info is ignored by this model)
X = lfw_people.data
n_features = X.shape[1]
# the label to predict is the id of the person
y = lfw_people.target
target_names = lfw_people.target_names
n_classes = target_names.shape[0]
print("Total dataset size:")
print("n_samples: %d" % n_samples)
print("n_features: %d" % n_features)
print("n_classes: %d" % n_classes)
运行结果:
6.特征提取
view plain copy
X_train, X_test, y_train, y_test = train_test_split(
X, y, test_size=0.25)
###############################################################################
# Compute a PCA (eigenfaces) on the face dataset (treated as unlabeled
# dataset): unsupervised feature extraction / dimensionality reduction
n_components = 150
print("Extracting the top %d eigenfaces from %d faces"
% (n_components, X_train.shape[0]))
t0 = time()
pca = PCA(svd_solver='randomized',n_components=n_components, whiten=True).fit(X_train)
print("done in %0.3fs" % (time() - t0))
eigenfaces = pca.components_.reshape((n_components, h, w))
print("Projecting the input data on the eigenfaces orthonormal basis")
t0 = time()
X_train_pca = pca.transform(X_train)
X_test_pca = pca.transform(X_test)
print("done in %0.3fs" % (time() - t0))
运行结果:
7.建立SVM分类模型
view plain copy
print("Fitting the classifier to the training set")
t0 = time()
param_grid = { 'C': [1e3, 5e3, 1e4, 5e4, 1e5],
'gamma': [0.0001, 0.0005, 0.001, 0.005, 0.01, 0.1], }
clf = GridSearchCV(SVC(kernel='rbf', class_weight='balanced'), param_grid)
clf = clf.fit(X_train_pca, y_train)
print("done in %0.3fs" % (time() - t0))
print("Best estimator found by grid search:")
print(clf.best_estimator_)
运行结果:
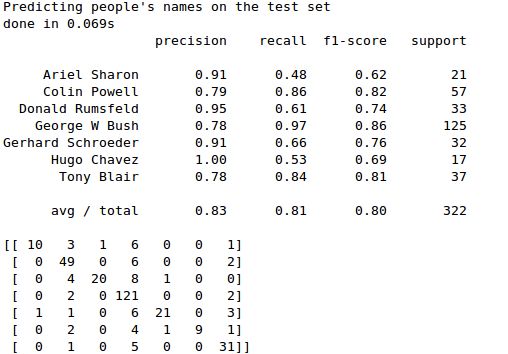
8.模型评估
view plain copy
print("Predicting people's names on the test set")
t0 = time()
y_pred = clf.predict(X_test_pca)
print("done in %0.3fs" % (time() - t0))
print(classification_report(y_test, y_pred, target_names=target_names))
print(confusion_matrix(y_test, y_pred, labels=range(n_classes)))
运行结果:
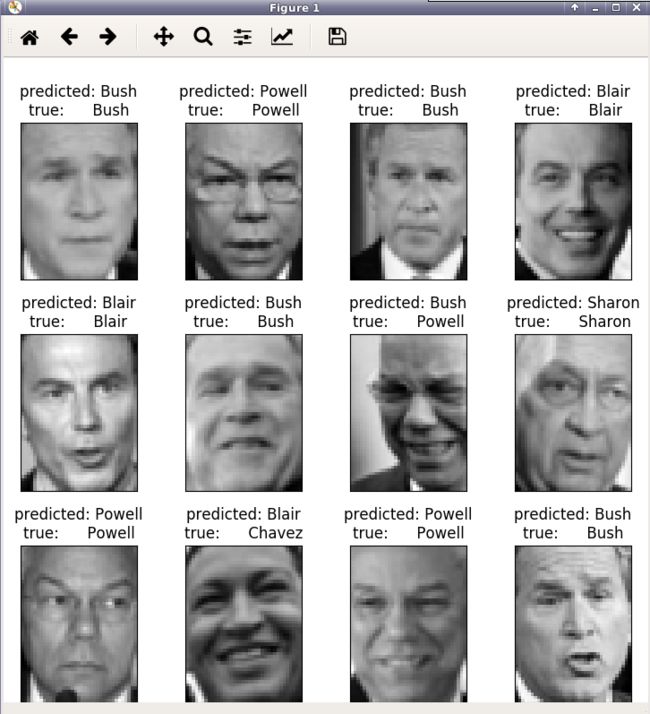
9.预测结果可视化
view plain copy
def plot_gallery(images, titles, h, w, n_row=3, n_col=4):
"""Helper function to plot a gallery of portraits"""
plt.figure(figsize=(1.8 * n_col, 2.4 * n_row))
plt.subplots_adjust(bottom=0, left=.01, right=.99, top=.90, hspace=.35)
for i in range(n_row * n_col):
plt.subplot(n_row, n_col, i + 1)
plt.imshow(images[i].reshape((h, w)), cmap=plt.cm.gray)
plt.title(titles[i], size=12)
plt.xticks(())
plt.yticks(())
# plot the result of the prediction on a portion of the test set
def title(y_pred, y_test, target_names, i):
pred_name = target_names[y_pred[i]].rsplit(' ', 1)[-1]
true_name = target_names[y_test[i]].rsplit(' ', 1)[-1]
return 'predicted: %s\ntrue: %s' % (pred_name, true_name)
prediction_titles = [title(y_pred, y_test, target_names, i)
for i in range(y_pred.shape[0])]
plot_gallery(X_test, prediction_titles, h, w)
# plot the gallery of the most significative eigenfaces
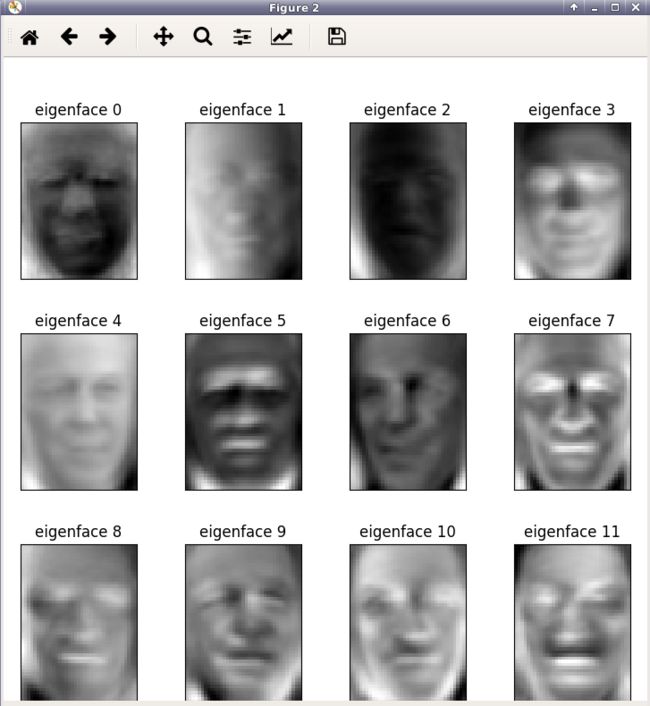
eigenface_titles = ["eigenface %d" % i for i in range(eigenfaces.shape[0])]
plot_gallery(eigenfaces, eigenface_titles, h, w)
plt.show()
运行结果:
eigenface:
