前言
React 是一个十分庞大的库,由于要同时考虑 ReactDom 和 ReactNative ,还有服务器渲染等,导致其代码抽象化程度很高,嵌套层级非常深,阅读其源码是一个非常艰辛的过程。在学习 React 源码的过程中,给我帮助最大的就是这个系列文章,于是决定基于这个系列文章谈一下自己的理解。本文会大量用到原文中的例子,想体会原汁原味的感觉,推荐阅读原文。
本系列文章基于 React 15.4.2 ,以下是本系列其它文章的传送门:
React 源码深度解读(一):首次 DOM 元素渲染 - Part 1
React 源码深度解读(二):首次 DOM 元素渲染 - Part 2
React 源码深度解读(三):首次 DOM 元素渲染 - Part 3
React 源码深度解读(四):首次自定义组件渲染 - Part 1
React 源码深度解读(五):首次自定义组件渲染 - Part 2
React 源码深度解读(六):依赖注入
React 源码深度解读(七):事务 - Part 1
React 源码深度解读(八):事务 - Part 2
React 源码深度解读(九):单个元素更新
React 源码深度解读(十):Diff 算法详解
正文
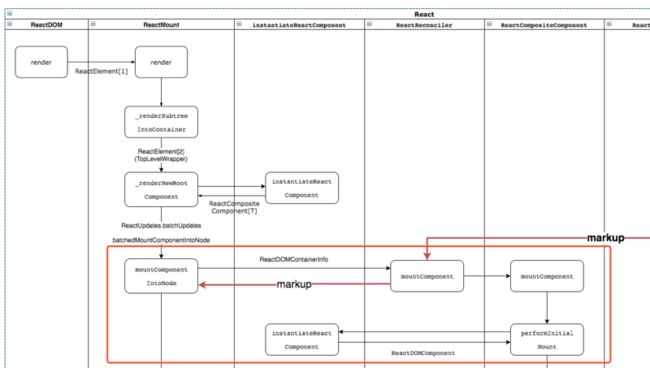
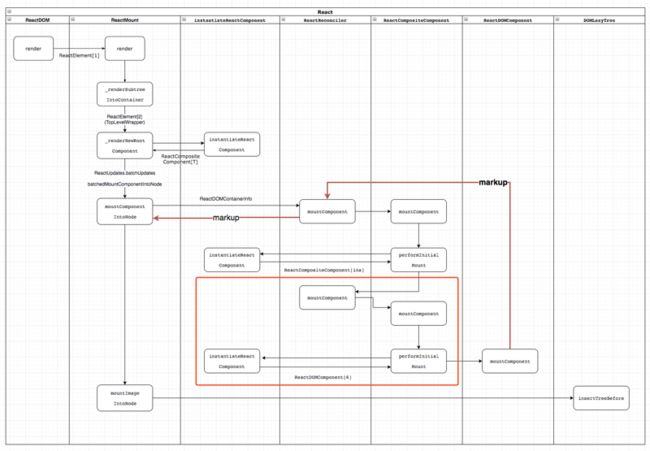
前面三篇文章介绍了 React 是怎么渲染普通DOM元素的,如下图所示。
红线部分生成的markup实际上是一层一层往回传,为了方便展示就直接跳过中间层级返回了。这张图片跳过了事务(transaction)相关的调用,后面会有专门的文章介绍。
本篇开始介绍自定义组件是如何渲染的。
App 组件
将自定义组件命名为App,结构如下:
class App extends Component {
constructor(props) {
super(props);
this.state = {
desc: 'start',
};
}
render() {
return (

"Welcom to React"
{ this.state.desc }
);
}
}
ReactDOM.render(
App 经过 Babel 编译后,生成如下代码:
class App extends Component {
  constructor(props) {
    super(props);
    this.state = {
      desc: 'start',
    };
  }

  render() {
    return React.createElement(
      'div',
      { className: 'App' },
      React.createElement(
        'div',
        { className: 'App-header' },
        React.createElement(
          'img',
          { src: "main.jpg", className: 'App-logo', alt: 'logo' }
        ),
        React.createElement(
          'h1',
          null,
          ' "Welcom to React" '
        )
      ),
      React.createElement(
        'p',
        { className: 'App-intro' },
        this.state.desc
      )
    );
  }
}

ReactDOM.render(
  React.createElement(App, null),
  document.getElementById(‘root’)
);
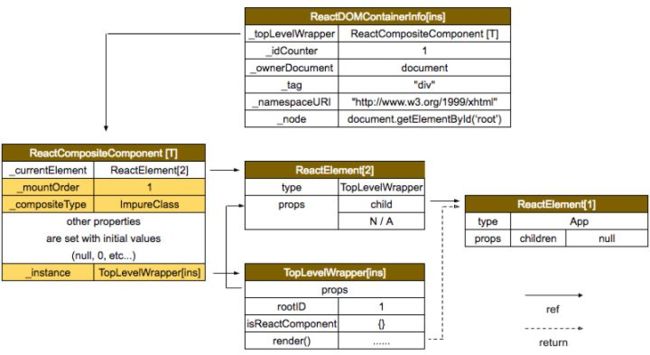
构建顶层包装组件
ReactCompositeComponent[T]
- 跟普通DOM元素渲染一样,第一步先会执行
React.createElement创建 type 为 App 的ReactElement[1]。 - 然后在
_renderSubtreeIntoContainer里面创建 type 为 TopLevelWrapper 的ReactElement[2]。 - 通过
instantiateReactComponent创建包装元素ReactCompositeComponent[T]。
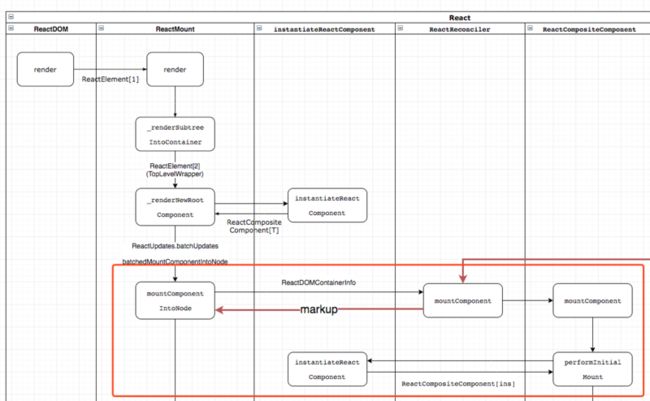
调用关系如下图所示:
初始化
ReactCompositeComponent[T]
- 在下一步
mountComponentIntoNode时,ReactDOMContainerInfo[ins]会被创建并传给ReactReconciler。 -
ReactReconciler会调用ReactCompositeComponent[T]的 mountComponent 创建 TopLevelWrapper 实例。 - 然后就是 performInitialMount 根据 ReactElement 的类型来创建不同的对象。在渲染普通 DOM 元素的时候,这部会返回 ReactDOMComponent。但渲染自定义组件的时候,就不一样了。
渲染普通 DOM 元素的调用关系如下图所示,自定义组件的渲染调用关系见下文:
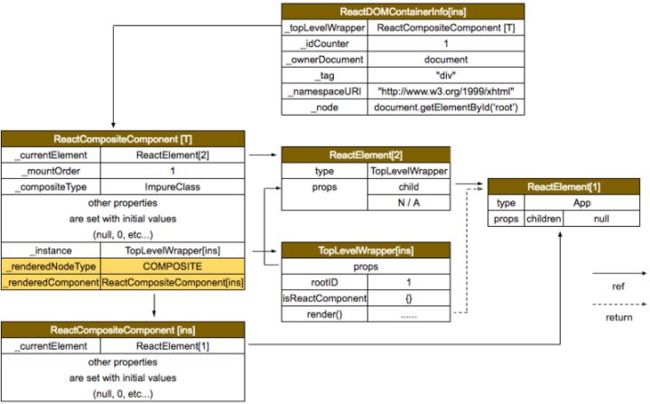
使用 App 创建
ReactCompositeComponent[ins]
在 performInitialMount 这步,renderedElement 就是 ReactElement[1]:
performInitialMount: function (renderedElement, hostParent,
    hostContainerInfo, transaction, context) {
    ...

    // 这里会调用 TopLevelWrapper 实例的 render 方法,得到 ReactElement[1]
    if (renderedElement === undefined) {
        renderedElement = this._renderValidatedComponent();
    }

    ...

    // 返回 ReactCompositeComponent[ins]
    var child = this._instantiateReactComponent(
        renderedElement,
        nodeType !== ReactNodeTypes.EMPTY /* shouldHaveDebugID */
    );

    this._renderedComponent = child;

    var markup = ReactReconciler.mountComponent(
        child,
        transaction,
        hostParent,
        hostContainerInfo,
        this._processChildContext(context),
        debugID
    );

    return markup;
},
这步与第二篇的 performInitialMount 很相似,唯一区别就是渲染普通 DOM 元素返回的是ReactDOMComponent,而渲染自定义组件返回的是包装好的自定义组件ReactCompositeComponent[ins]。
调用关系如下图所示:
初始化
ReactCompositeComponent[ins]
在 performInitialMount 的后半部分,ReactReconciler.mountComponent 实际上会调用 ReactCompositeComponent[ins] 的 mountComponent。这里的关键代码是
...

// 创建 App 组件的实例
var inst = this._constructComponent(
    doConstruct,
    publicProps,
    publicContext,
    updateQueue
);

...
经过这步后,ReactCompositeComponent[ins]._instance 等于 App[ins]。像之前一样,mountComponent 又会调用自身的 performInitialMount:
performInitialMount: function (renderedElement, hostParent,
    hostContainerInfo, transaction, context) {
    ...

    // 这里会调用 App 实例的 render 方法,而 render 的返回值是 React.createElement 的嵌套调用。
    if (renderedElement === undefined) {
        renderedElement = this._renderValidatedComponent();
    }

    ...

    // 返回 ReactDOMComponent[6]
    var child = this._instantiateReactComponent(
        renderedElement,
        nodeType !== ReactNodeTypes.EMPTY /* shouldHaveDebugID */
    );

    this._renderedComponent = child;

    var markup = ReactReconciler.mountComponent(
        child,
        transaction,
        hostParent,
        hostContainerInfo,
        this._processChildContext(context),
        debugID
    );

    return markup;
},
React.createElement 的嵌套调用是指:
render() {
    return React.createElement(           // scr: -----------> 5)
      'div',
      { className: 'App' },
      React.createElement(                // scr: -----------> 3)
        'div',
        { className: 'App-header' },
        React.createElement(              // scr: -----------> 1)
          'img',
          { src: "main.jpg", className: 'App-logo', alt: 'logo' }
        ),
        React.createElement(              // scr: -----------> 2)
          'h1',
          null,
          ' "Welcom to React" '
        )
      ),
      React.createElement(                // scr: -----------> 4)
        'p',
        { className: 'App-intro' },
        this.state.desc
      )
    );
  }
这里 React.createElement 的调用顺序是先调用作为参数的 children,再调用父级。调用顺序已在代码中注释。
接下来的 _instantiateReactComponent 会返回ReactDOMComponent,就触及到真正的 DOM 操作了。先看图,这部分内容将在下回分解~


