英伟达Jeston nano<3>使用Python实现三种方式串口通信
英伟达Jeston nano<3>使用Python实现三种方式串口通信
- 前言
- 通信配置过程
-
- 基本信息
- 配置过程
-
- 方案一:Python-40pinEXpansion Header
- 方案二:Python-serial Port Header
- 方案三:Python-USB3.0 Type A
- 其他方案
- 总结
- 参考资料
前言
近来需要把使用Jeston nano做个设备,需要使用Jeston nano跑代码,然后将代码处理的数据传给STM32,STM32做底层的控制,所以在Jeston nano和STM32之间要涉及到串口通信的内容,本博文即为了记录在调试通信的步骤和一些问题;
其实Jeston nano 本身自带的有40pin IO口,完全可以外接拓展板使用Python进行编程,这里因为项目组内熟悉Jeston nano-STM32这种所谓上位机-下位机的开发和分工方式,所以还是选择了这种,后续本人有时间会尝试直接用Jeston nano 引脚进行控制。
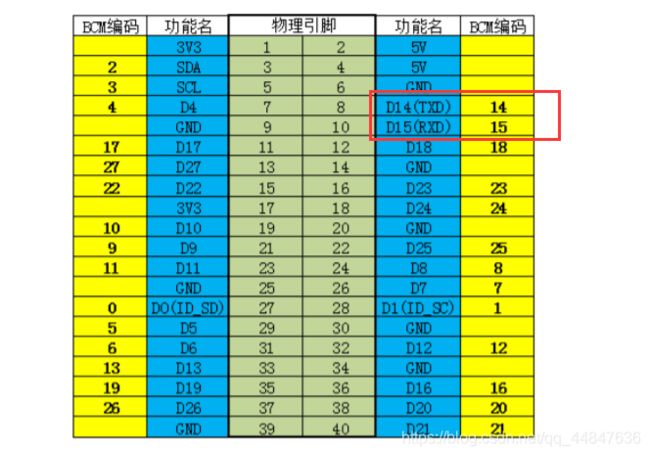
关于通信方式本身,其实有串口通信、Can总线等等方式,但是由于硬件原因,Jeston nano和STM32通信只支持串口通信的方式;对于Jeston nano串口硬件来说,可以看下述Jeston nano最新版B01硬件图,有直接串口引脚、40pin IO 引脚串口、USB串口三种硬件连接方式;从编程语言上也有Python和C++之分;
话又说回来,我那个项目代码能否使用C++和Python混合编程/编译?
通信配置过程
基本信息
使用硬件:Jeston nanoB01(Jeston nano总共有A01/A02/B01三个版本)、USB转ttl、杜邦线、USB hub;
串口硬件:独立串口模块serial Port Header(J40)、40pinEXpansion Header(J41)、USB3.0 三种硬件方式。
配置过程
以下是三种硬件配置
方案一:Python-40pinEXpansion Header
第一种方式就是40pinEXpansion Header,对应就是板载上40pin GPIO口,上面串口引脚是8和10,这个看一下板子和上面的引脚图就知道了
首先配置一下serial库:
//先安装一下python3版本的py-serial库
 sudo apt-get install python3-serial
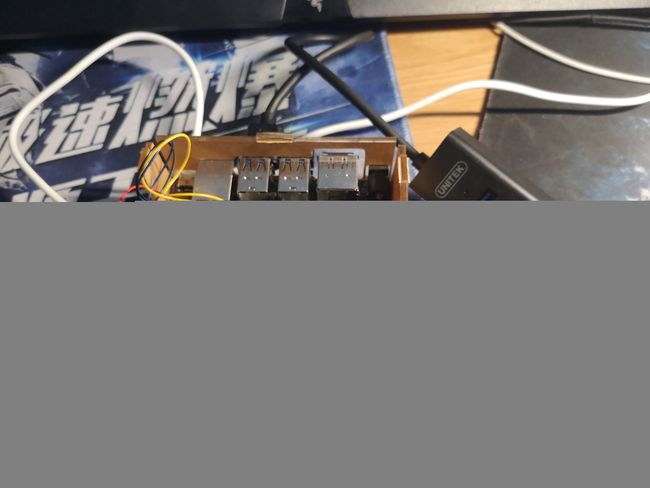
使用 USB转ttl 连接Jeston nano和电脑: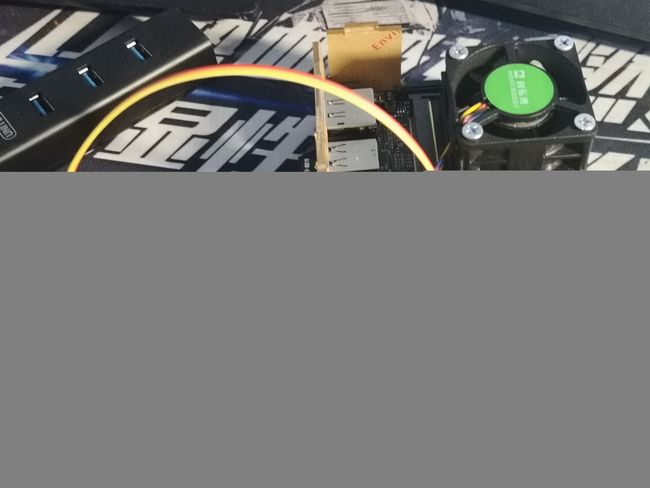
上图另一端USB连接电脑;
运行代码,记得是python3且sudo:
sudo python3 uart_example.py
uart_example.py代码内容具体如下:
#!/usr/bin/python3
import time
import serial

print("UART Demonstration Program")
print("NVIDIA Jetson Nano Developer Kit")


serial_port = serial.Serial(
    port="/dev/ttyTHS1",   #这里注意一下这个端口号
    baudrate=115200,
    bytesize=serial.EIGHTBITS,
    parity=serial.PARITY_NONE,
    stopbits=serial.STOPBITS_ONE,
)
# Wait a second to let the port initialize
time.sleep(1)

try:
    # Send a simple header
    serial_port.write("UART Demonstration Program\r\n".encode())
    serial_port.write("NVIDIA Jetson Nano Developer Kit\r\n".encode())
    while True:
        if serial_port.inWaiting() > 0:
            data = serial_port.read()
            print(data)
            serial_port.write(data)
            # if we get a carriage return, add a line feed too
            # \r is a carriage return; \n is a line feed
            # This is to help the tty program on the other end
            # Windows is \r\n for carriage return, line feed
            # Macintosh and Linux use \n
            if data == "\r".encode():
                # For Windows boxen on the other end
                serial_port.write("\n".encode())


except KeyboardInterrupt:
    print("Exiting Program")

except Exception as exception_error:
    print("Error occurred. Exiting Program")
    print("Error: " + str(exception_error))

finally:
    serial_port.close()
    pass
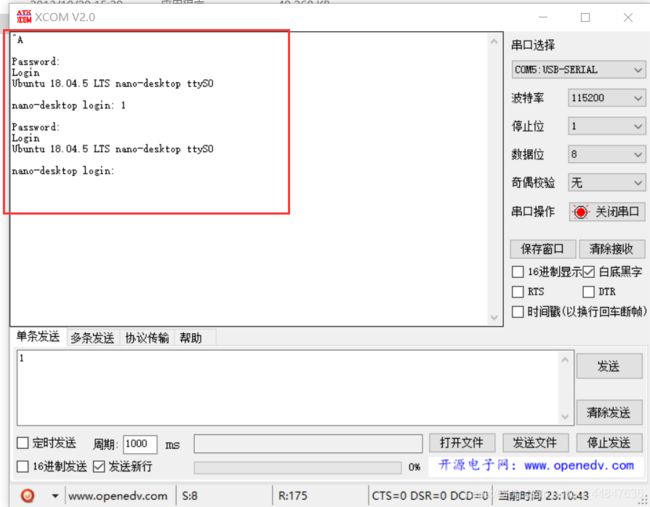
电脑端使用串口通信测试软件,选中com口,测试结果如下:
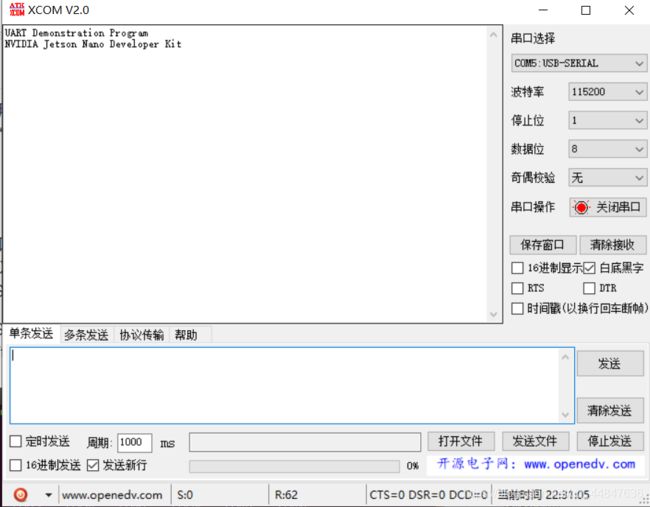
测试成功
方案二:Python-serial Port Header
这里我首先查看了一下设备端口号:
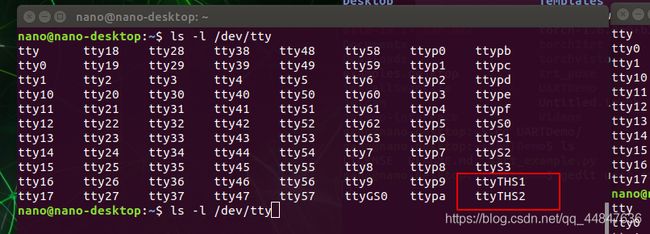
刚才那个40pin的GPIO用了ttyTHS1,这里我以为serial Port Header独立模块的串口就是ttyTHS2,
硬件连接如下:

测试了一下,结果如下:
它通信自动反馈端口号为 ttyS0,测试后确为这个,测试成功。
这个ttyTHS2猜测为其他通信方式的端口,如I2C,SPI等等。
方案三:Python-USB3.0 Type A
这里按照之前的测试方案,需要两个 USB转ttl 分别连接Jeston nano和电脑,这里我手里只有一个 USB转ttl ,所以打算直接在Jeston nano上实现测试;
硬件连接如下:
这里用了serial Port Header的串口,端口号为ttyS0;
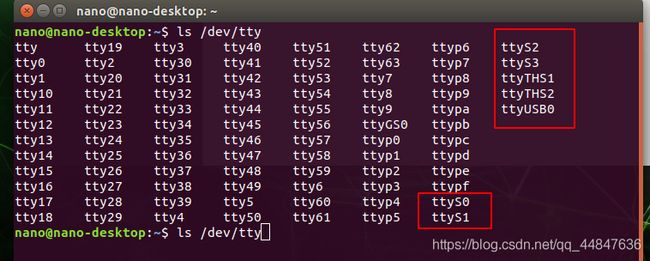
首先查看一下USB转ttl的端口号,下图为插拔效果:

所以 USB转ttl 端口号为:ttyUSB0
测试方法即在Jeston nano上开两个终端运行两个程序,实现通信;
uart_example.py代码如下:
#!/usr/bin/python3
import time
import serial

print("UART Demonstration Program")
print("NVIDIA Jetson Nano Developer Kit")


serial_port = serial.Serial(
    port="/dev/ttyS0",
    baudrate=115200,
    bytesize=serial.EIGHTBITS,
    parity=serial.PARITY_NONE,
    stopbits=serial.STOPBITS_ONE,
)
# Wait a second to let the port initialize
time.sleep(1)

try:
    # Send a simple header
    serial_port.write("UART Demonstration Program\r\n".encode())
    serial_port.write("NVIDIA Jetson Nano Developer Kit\r\n".encode())
    while True:
        if serial_port.inWaiting() > 0:
            data = serial_port.read()
            print(data)
            serial_port.write(data)
            # if we get a carriage return, add a line feed too
            # \r is a carriage return; \n is a line feed
            # This is to help the tty program on the other end
            # Windows is \r\n for carriage return, line feed
            # Macintosh and Linux use \n
            if data == "\r".encode():
                # For Windows boxen on the other end
                serial_port.write("\n".encode())


except KeyboardInterrupt:
    print("Exiting Program")

except Exception as exception_error:
    print("Error occurred. Exiting Program")
    print("Error: " + str(exception_error))

finally:
    serial_port.close()
    pass
uart_example1.py代码如下
#!/usr/bin/python3
import time
import serial

print("UART Demonstration Program")
print("NVIDIA Jetson Nano Developer Kit")


serial_port = serial.Serial(
    port="/dev/ttyUSB0",
    baudrate=115200,
    bytesize=serial.EIGHTBITS,
    parity=serial.PARITY_NONE,
    stopbits=serial.STOPBITS_ONE,
)
# Wait a second to let the port initialize
time.sleep(1)

try:
    # Send a simple header
    serial_port.write("UART Demonstration Program\r\n".encode())
    serial_port.write("NVIDIA Jetson Nano Developer Kit\r\n".encode())
    while True:
        if serial_port.inWaiting() > 0:
            data = serial_port.read()
            print(data)
            serial_port.write(data)
            # if we get a carriage return, add a line feed too
            # \r is a carriage return; \n is a line feed
            # This is to help the tty program on the other end
            # Windows is \r\n for carriage return, line feed
            # Macintosh and Linux use \n
            if data == "\r".encode():
                # For Windows boxen on the other end
                serial_port.write("\n".encode())


except KeyboardInterrupt:
    print("Exiting Program")

except Exception as exception_error:
    print("Error occurred. Exiting Program")
    print("Error: " + str(exception_error))

finally:
    serial_port.close()
    pass
测试结果如下:
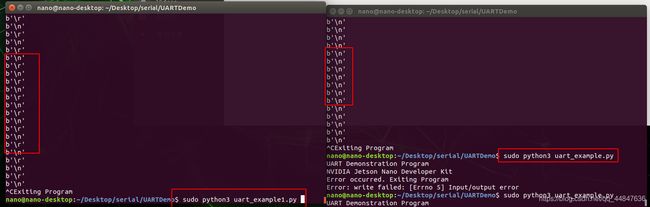
通信测试成功。
其他方案
这里利用python的serial库测试的Jeston nano上所有串口,后续会测试使用C++如何实现相应的功能…
总结
Jeston nano对应串口的端口号如下:
独立串口模块serial Port Header—/dev/ttyS0
40pinEXpansion Header串口—/dev/ttyTHS1
使用USB转ttl—ttyUSB0
一般USB转串口设备/dev/ttyUSB*,如果是普通的串口设备会是/dev/ttyS*
其他tty设备应该是USB设备,使用时随机分配。
参考资料
[1]、Jetson Nano - Serial Console from JetsonHacks : https://www.youtube.com/watch?v=Kwpxhw41W50 B01版本.
[2]、Jetson_Nano_Developer_Kit_User_Guide (这里A02版本的,暂时没找到B01的).
[3]、CSDN博客: https://blog.csdn.net/Uncle_GUO/article/details/80867169.
最后,关于Jeston nano视频教程,推荐一下这个油管光头大叔JetsonHacks