emacs python_Emacs –最好的python编辑器?
emacs python
Thus far, in our series of posts on Python development environments we’ve looked at Sublime Text and VIM:
到目前为止,在有关Python开发环境的系列文章中,我们研究了Sublime Text和VIM:
- Setting Up Sublime Text 3 for Full Stack Python Development
- VIM and Python – a Match Made in Heaven
- 为全栈Python开发设置Sublime Text 3
- VIM和Python –天生一对
In this post we’ll present another powerful editor for Python development – Emacs. While it’s an indisputable fact that Emacs is the best editor, we’ll (try to) keep an open mind and present Emacs objectively, from a fresh installation to a complete Python IDE so that you can make an informed decision when choosing your go-to Python IDE.
在本文中,我们将介绍另一个用于Python开发的强大编辑器-Emacs 。 虽然Emacs是最好的编辑器,这是不争的事实,但我们将(尝试)保持开放的态度,客观地展示Emacs,从全新安装到完整的Python IDE,以便您在选择Go-到Python IDE。

This is a guest blog post by Kyle Purdon, an Application Engineer at Bitly in Denver.
这是由Denly in Denver的应用工程师Kyle Purdon 撰写的客座博客文章。
安装和基础 (Installation and Basics)
安装 (Installation)
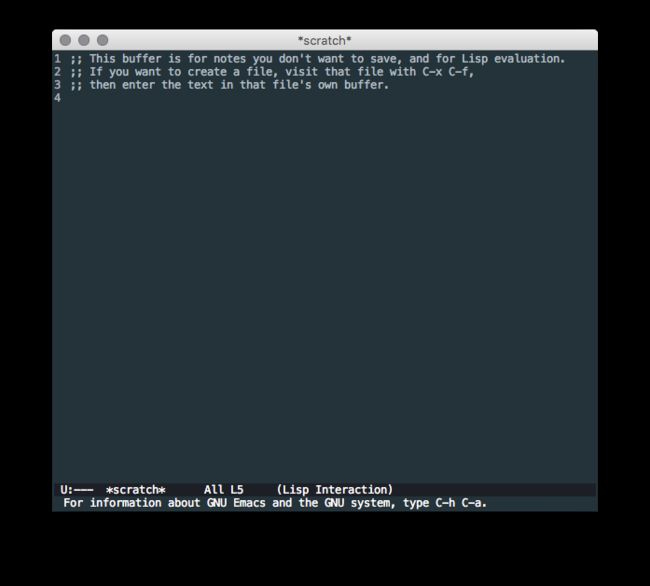
Installation of Emacs is a topic that does not need to be covered in yet another blog post. This Guide, provided by ErgoEmacs, will get you up and running with a basic Emacs installation on Linux, Mac, or Windows. Once installed, start the application and you will be greeted with the default configured Emacs:
Emacs的安装是一个主题,无需在另一篇博客文章中介绍。 由ErgoEmacs提供的本指南将指导您在Linux,Mac或Windows上进行基本的Emacs安装并使其运行。 安装后,启动应用程序,您将看到默认配置的Emacs:

基本的Emacs (Basic Emacs)
Another topic that does not need to be covered again is the basics of using Emacs. The easiest way to learn Emacs is to follow the built-in tutorial. The topics covered in this post do not require that you know how to use Emacs yet; instead, each topic highlights what you can do after learning the basics.
无需再次讨论的另一个主题是使用Emacs的基础知识。 学习Emacs的最简单方法是遵循内置教程。 本文中涉及的主题并不要求您知道如何使用Emacs。 相反,每个主题都强调您在学习基础后可以做什么。
To enter the tutorial, use your arrow keys to position the cursor over the words “Emacs Tutorial” and press Enter. You will then be greeted with the following passage:
要进入教程,请使用箭头键将光标置于“ Emacs Tutorial”字样上,然后按Enter。 然后,您会收到以下段落:
|
So, key entries/commands like C-x C-s (which is used to save) will be shown throughout the remainder of the post. This command indicates that the CONTROL and X key are pressed at the same time, and then the CONTROL and S key. This is the basic form of interacting with Emacs. Please follow the built-in tutorial as well as the Guided Tour of Emacs to learn more.
因此,诸如Cx Cs类的关键条目/命令(用于保存)将在整个文章的其余部分中显示。 该命令表示同时按下CONTROL和X键,然后按下CONTROL和S键。 这是与Emacs进行交互的基本形式。 请遵循内置教程以及Emacs导览以了解更多信息。
配置和软件包 (Configuration and Packages)
One of the great benefits of Emacs is the simplicity and power of configuration. The core of Emacs configuration is the Initialization File, init.el.
Emacs的一大优点是配置的简单性和强大功能。 Emacs配置的核心是初始化文件 init.el
In a UNIX environment this file should be placed in $HOME/.emacs.d/init.el:
在UNIX环境中,此文件应放在$ HOME / .emacs.d / init.el中:
|
Meanwhile, in Windows, if the HOME environment variable is not set, this file should reside in C:/.emacs.d/init.el. See GNU Emacs FAQ for MS Windows > Where do I put my init file? for more info.
同时,在Windows中,如果未设置HOME环境变量,则此文件应位于C:/.emacs.d/init.el 。 请参阅MS Windows的GNU Emacs常见问题解答>我的初始化文件放在哪里? 有关更多信息。
Configuration snippets will be presented throughout the post. So, create the init file now if you want to follow along. Otherwise you can find the complete file in the Conclusion.
配置片段将在整个帖子中介绍。 因此,如果您想继续,请立即创建init文件。 否则,您可以在结论中找到完整的文件。
Packages are used to customize Emacs, which are sourced from a number of repositories. The primary Emacs package repository is MELPA. All of the packages presented in this post will be installed from this repository.
软件包用于自定义Emacs,这些软件包来自许多存储库。 Emacs软件包的主要存储库是MELPA 。 这篇文章中介绍的所有软件包都将从该存储库中安装。
样式(主题及更多) (Styling (Themes & More))
To begin, the following configuration snippet provides package installation and installs a theme package:
首先,以下配置片段提供了程序包安装并安装主题程序包:
|
The first section of the configuration snippet, ;; INSTALL PACKAGES, installs two packages called better-defaults and material-theme. The better-defaults package is a collection of minor changes to the Emacs defaults that makes a great base to begin customizing from. The material-theme package provides a customized set of styles.
配置摘录的第一部分, ;; INSTALL PACKAGES ;; INSTALL PACKAGES ,安装两个名为;; INSTALL PACKAGES -defaults和material-theme的软件包。 更好的默认值软件包是对Emacs默认值的微小更改的集合,这为从其开始进行定制奠定了良好的基础。 材质主题包提供了一组定制样式。
My preferred theme is material-theme, so we’ll be using that for the rest of the post.
我首选的主题是material-theme ,因此我们将在其余文章中使用它。
The second section ;; BASIC CUSTOMIZATION:
第二部分;; BASIC CUSTOMIZATION ;; BASIC CUSTOMIZATION :
- Disables the startup message (this is the screen with all the tutorial information). You may want to leave this out until you are more comfortable with Emacs.
- Loads the material theme.
- Enables line numbers globally.
- 禁用启动消息(这是包含所有教程信息的屏幕)。 您可能要忽略它,直到对Emacs更加满意为止。
- 加载材质主题。
- 全局启用行号。
Enabling something globally means that it will apply to all buffers (open items) in Emacs. So if you open a Python, markdown, and/or text file, they will all have line numbers shown. You can also enable things per mode – e.g., python-mode, markdown-mode, text-mode. This will be shown later when setting up Python.
全局启用某项意味着它将应用于Emacs中的所有缓冲区 (未清项目)。 因此,如果您打开Python,降价和/或文本文件,它们都将显示行号。 您还可以启用每种模式的功能-例如python模式,markdown模式,文本模式。 这将在稍后设置Python时显示。
Now that we have a complete basic configuration file we can restart Emacs and see the changes. If you placed the init.el file in the correct default location it will automatically be picked up.
现在我们有了完整的基本配置文件,我们可以重新启动Emacs并查看更改。 如果您将init.el文件放置在正确的默认位置,它将自动被拾取。
As an alternative, you can start Emacs from the command-line with emacs -q --load . When loaded, our initial Emacs window looks a bit nicer:
或者,您可以使用emacs -q --load 从命令行启动Emacs。 加载后,我们的初始Emacs窗口看起来更好一些:
The following image shows some other basic features that come with Emacs out of the box – including simple file searching and split layouts:
下图显示了Emacs随附的一些其他基本功能-包括简单的文件搜索和拆分布局:
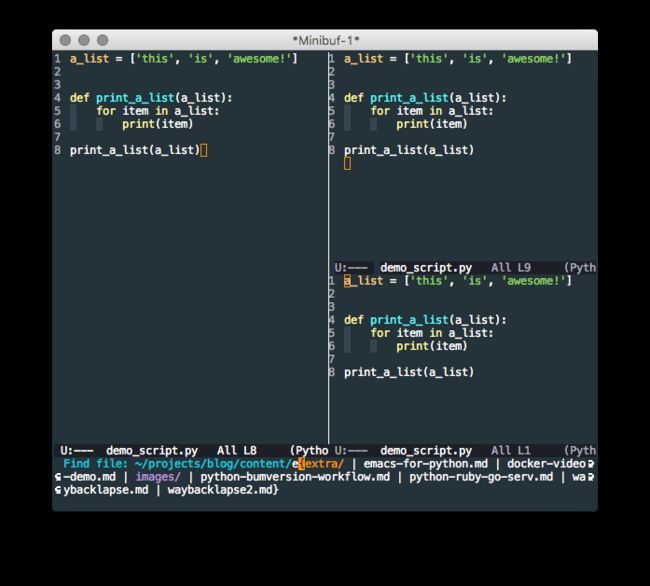
One of my favorite simple features of Emacs is being able to do a quick recursive-grep search – M-x rgrep For example, say you want to find all instances of the word python in any .md (markdown) in a given directory:
我最喜欢的Emacs简单功能之一就是能够进行快速递归grep搜索 Mx rgrep例如,假设您要在给定目录的任何.md(markdown)中找到python单词的所有实例:
With this basic configuration complete we can begin to dive into configuring the environment for Python development!
完成基本配置后,我们就可以开始深入配置Python开发环境了!
Elpy – Python开发 (Elpy – Python Development)
Emacs is distributed with a python-mode (python.el) that provides indentation and syntax highlighting. However, to compete with Python-specific IDE’s (Integrated Development Environments), we’ll certainly want more. The elpy (Emacs Lisp Python Environment) package provides us with a near complete set of Python IDE features, including:
Emacs随python模式( python.el )一起分发,该模式提供缩进和语法突出显示。 但是,要与特定于Python的IDE(集成开发环境)竞争,我们肯定会需要更多。 elpy (Emacs Lisp Python环境)软件包为我们提供了几乎完整的Python IDE功能集,包括:
- Automatic Indentation,
- Syntax Highlighting,
- Auto-Completion,
- Syntax Checking,
- Python REPL Integration,
- Virtual Environment Support, and
- Much more!
- 自动缩进
- 语法突出显示
- 自动完成
- 语法检查
- Python REPL集成,
- 虚拟环境支持,以及
- 还有更多 !
To install and enable elpy we need to add a bit of configuration and install flake8 and jedi using your preferred method for installing Python packages (pip or conda, for example).
要安装并启用elpy,我们需要添加一些配置,并使用首选的Python软件包安装方法(例如pip或flake8安装flake8和jedi 。
The following will install the elpy package:
以下将安装elpy软件包:
|
Now just enable it:
现在只需启用它:
|
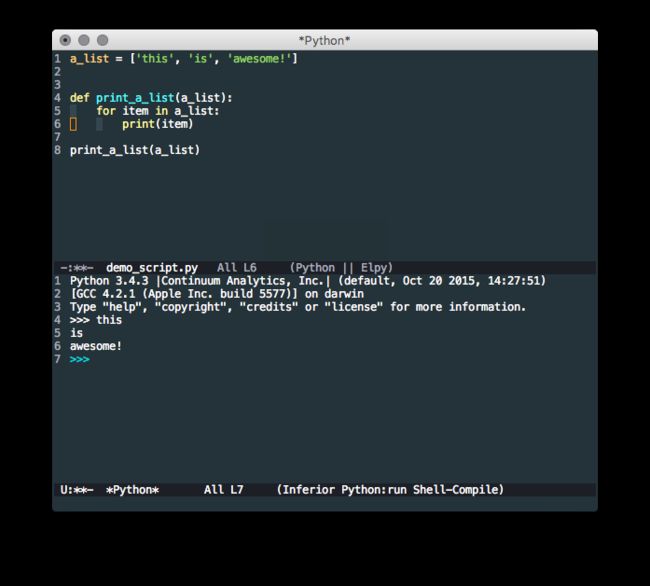
With the new configuration, we can restart Emacs and open up a Python file to see the new mode in action:
使用新配置,我们可以重新启动Emacs并打开一个Python文件以查看新模式的运行情况:

Shown in this image are the following features:
此图显示以下功能:
- Automatic Indentation (as you type and hit RET lines are auto-indented)
- Syntax Highlighting
- Syntax Checking (error indicators at line 3)
- Auto-Completion (list methods on line 9+)
- 自动缩进(当您键入和命中RET行时会自动缩进)
- 语法高亮
- 语法检查(第3行的错误指示)
- 自动完成(第9行以上列出的方法)
In addition, let’s say we want to run this script. In something like IDLE or Sublime Text you’ll have a button/command to run the current script. Emacs is no different, we just type C-c C-c in our Python buffer and…
另外,假设我们要运行此脚本。 在诸如IDLE或Sublime Text之类的文件中,您将具有一个按钮/命令来运行当前脚本。 Emacs没什么不同,我们只需要在Python缓冲区中键入Cc Cc ,然后…
Often we’ll want to be running a virtual environment and executing our code using the packages installed there. To use a virtual environment in Emacs, we type M-x pyvenv-activate and follow the prompts. You can deactivate a virtualenv with M-x pyvenv-deactivate. Elpy provides an interface for debugging the environment and any issues you may encounter with elpy itself. By typing M-x elpy-config we get the following dialog, which provides valuable debugging information:
通常,我们会希望运行一个虚拟环境并使用安装在其中的软件包执行代码。 要在Emacs中使用虚拟环境,我们输入Mx pyvenv-activate并按照提示进行操作。 您可以使用Mx pyvenv-deactivate virtualenv。 Elpy提供了用于调试环境以及elpy本身可能遇到的任何问题的界面。 通过键入Mx elpy-config我们将获得以下对话框,其中提供了有价值的调试信息:
With that, all of the basics of a Python IDE in Emacs have been covered. Now let’s put some icing on this cake!
这样,就涵盖了Emacs中Python IDE的所有基础知识。 现在,让我们为此蛋糕锦上添花!
其他Python功能 (Additional Python Features)
In addition to all the basic IDE features described above, Emacs provides some additional features for Python. While this is not an exhaustive list, PEP8 compliance (with autopep8) and integration with IPython/Jupyter will be covered. However, before that let’s cover a quick syntax checking preference.
除了上述所有基本的IDE功能外,Emacs还为Python提供了一些附加功能。 虽然这不是一个详尽的清单,但将介绍PEP8兼容性(使用autopep8)以及与IPython / Jupyter的集成。 但是,在此之前,我们将介绍一个快速的语法检查首选项。
更好的语法检查(Flycheck诉Flymake) (Better Syntax Checking (Flycheck v. Flymake))
By default Emacs+elpy comes with a package called Flymake to support syntax checking. However, another Emacs package, Flycheck, is available and supports realtime syntax checking. Luckily switching out for Flycheck is simple:
默认情况下,Emacs + elpy附带了一个名为Flymake的软件包,以支持语法检查。 但是,还有另一个Emacs软件包Flycheck ,它支持实时语法检查。 幸运的是,退出Flycheck很简单:
|
and
和
|
Now we get realtime feedback when editing Python code:
现在,我们在编辑Python代码时会得到实时反馈:
符合PEP8(Autopep8) (PEP8 Compliance (Autopep8))
Love it or hate it, PEP8 is here to stay. If you want to follow all or some of the standards, you’ll probably want an automated way to do so. The autopep8 tool is the solution. It integrates with Emacs so that when you save – C-x C-s – autopep8 will automatically format and correct any PEP8 errors (excluding any you wish to).
爱它或恨它, PEP8在这里停留。 如果要遵循全部或某些标准,则可能需要一种自动化的方法。 解决方案是autopep8工具。 它与Emacs集成在一起,因此当您保存– Cx Cs – autopep8时,它将自动格式化并更正所有PEP8错误(不包括您希望的任何错误)。
First, you will need to install the Python package autopep8 using your preferred method, then add the following Emacs configuration:
首先,您需要使用首选方法安装Python软件包autopep8,然后添加以下Emacs配置:
|
and
和
|
Now (after forcing some pep8 errors) when we save our demo Python file, the errors will automatically be corrected:
现在(在强制执行一些pep8错误之后),当我们保存演示Python文件时,这些错误将自动得到纠正:
IPython / Jupyter集成 (IPython/Jupyter Integration)
Next up is a really cool feature: Emacs integration with the IPython REPL and Jupyter Notebooks. First, let’s look at swapping the standard Python REPL integration for the IPython version:
接下来是一个非常酷的功能:Emacs与IPython REPL和Jupyter Notebooks的集成。 首先,让我们看一下将标准Python REPL集成替换为IPython版本:
|
Now when we run our Python code with C-c C-c we will be presented with the IPython REPL:
现在,当我们使用Cc Cc运行Python代码时,我们将看到IPython REPL:

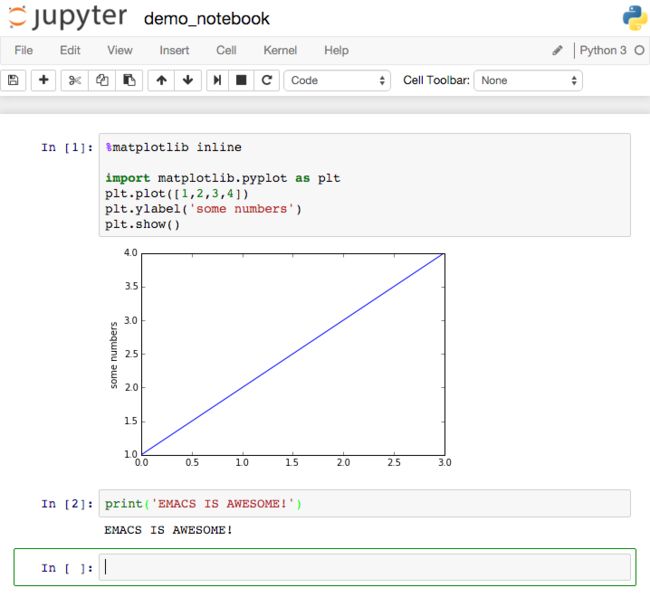
While this is pretty useful on its own, the real magic is the notebook integration. We’ll assume that you already know how to launch a Jupyter Notebook server (if not check this out). Again we just need to add a bit of configuration:
尽管这本身非常有用,但真正的魔力是笔记本集成。 我们假设您已经知道如何启动Jupyter Notebook服务器(如果不检查的话 )。 同样,我们只需要添加一些配置即可:
|
The standard Jupyter web interface for notebooks is nice but requires us to leave Emacs to use:
笔记本电脑的标准Jupyter Web界面很好,但是需要我们离开Emacs才能使用:
However, we can complete the exact same task by connecting to and interacting with the notebook server directly in Emacs.
但是,我们可以通过直接在Emacs中连接到笔记本服务器并与之交互来完成完全相同的任务。
其他Emacs功能 (Additional Emacs Features)
Now that all of the basic Python IDE features (and some really awesome extras) have been covered, there are a few other things that an IDE should be able to handle. First up is git integration…
既然已经涵盖了所有基本的Python IDE功能(以及一些非常出色的附加功能),那么IDE应该能够处理其他一些事情。 首先是git集成…
Git集成(Magit) (Git Integration (Magit))
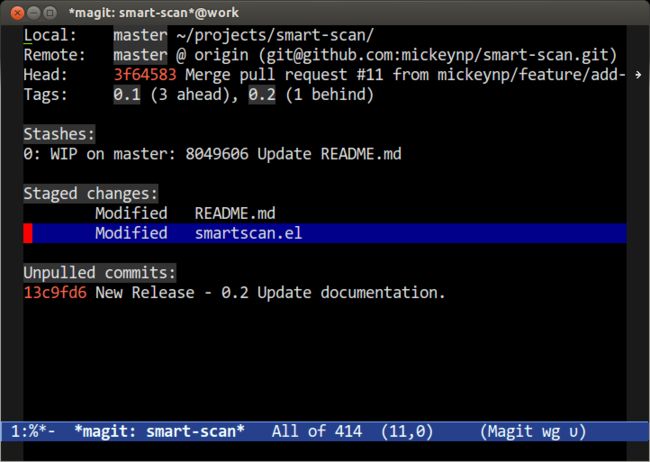
Magit is the most popular non-utility package on MELPA and is used by nearly every Emacs user who uses git. It’s incredibly powerful and far more comprehensive than we can cover in this post. Luckily Mastering Emacs has a great post covering Magit here. The following image is from the Mastering Emacs post and gives you a taste for what the git integration looks like in Emacs:
Magit是MELPA上最受欢迎的非实用程序包,几乎所有使用git的Emacs用户都使用它。 它具有强大的功能,而且比我们在本博文中介绍的范围要全面得多。 幸运的是, 掌握Emacs 在这里刊登了有关Magit的精彩文章。 下图来自Mastering Emacs帖子,使您可以了解Emacs中git集成的外观:
其他模式 (Other Modes)
One of the major benefits of using Emacs over a Python-specific IDE is that you get compatibility with much more than just Python. In a single day I often work with Python, Golang, JavaScript, Markdown, JSON, and more. Never leaving Emacs and having complex support for all of these languages in a single editor is very efficient. You can check out my personal Emacs configuration here. It includes support for:
在特定于Python的IDE上使用Emacs的主要好处之一是,您不仅可以与Python兼容,还可以兼容。 有一天,我经常使用Python,Golang,JavaScript,Markdown,JSON等。 永远不要离开Emacs并在一个编辑器中对所有这些语言提供复杂的支持是非常有效的。 您可以在此处查看我的个人Emacs配置。 它包括对以下内容的支持:
- Python
- Golang
- Ruby
- Puppet
- Markdown
- Dockerfile
- YAML
- Web (HTML/JS/CSS)
- SASS
- NginX Config
- SQL
- Python
- 高朗
- Ruby
- 木偶
- 降价促销
- Docker文件
- YAML
- 网路(HTML / JS / CSS)
- 萨斯
- NginX配置
- SQL
In addition to lots of other Emacs configuration goodies.
除了许多其他的Emacs配置好东西。
终端中的Emacs (Emacs In The Terminal)
After learning Emacs you’ll want Emacs keybindings everywhere. This is as simple as typing set -o emacs at your bash prompt. However, one of the powers of Emacs is that you can run Emacs itself in headless mode in your terminal. This is my default environment. To do so, just start Emacs by typing emacs -nw at your bash prompt and you’ll be running a headless Emacs.
学习了Emacs之后,您将到处都需要Emacs键盘绑定。 这就像在bash提示符下键入set -o emacs一样简单。 但是,Emacs的功能之一是您可以在终端中以无头模式运行Emacs本身。 这是我的默认环境。 为此,只需在bash提示符下键入emacs -nw即可启动Emacs,您将运行无头Emacs。
结论 (Conclusion)
As you can see, Emacs is clearly the best editor… To be fair, there are a lot of great options out there for Python IDEs, but I would absolutely recommend learning either Vim or Emacs as they are by far the most versatile development environments possible. I said I’d leave you with the complete Emacs configuration, so here it is:
如您所见,Emacs显然是最好的编辑器…公平地讲,Python IDE有很多不错的选择,但是我绝对建议学习Vim或Emacs,因为它们是目前为止最通用的开发环境。 我说过要给您完整的Emacs配置,所以这里是:
|
翻译自: https://www.pybloggers.com/2015/11/emacs-the-best-python-editor/
emacs python