Java框架学习:SpringBoot入门
文章目录
-
-
- SpringBoot简介
- 第一个SpringBoot程序
-
- 创建maven工程
- 导入依赖
- 运行程序
- 简单探究
-
- 启动器
- `@SpringBootApplication`
- `SpringApplication.run()`的作用
- 一些小配置
-
- 更换端口号
- 更换banner图片
- 关于配置文件
-
- 配置多环境
- 配置热部署
-
- 导入依赖
- 在``标签下配置
- 设置IDEA中的配置
- 三层架构演示
-
- 更改使用的服务器
- 自动配置再理解
-
SpringBoot简介
Spring Boot是由Pivotal团队提供的全新框架,其设计目的是用来简化新Spring应用的初始搭建以及开发过程。该框架使用了特定的方式来进行配置,从而使开发人员不再需要定义样板化的配置。
因为使用SSM框架时配置文件的配置很繁琐,Spring Boot简化了基于Spring的应用开发,只需要“run”就能创建一个独立的、生产级别的Spring应用。
第一个SpringBoot程序
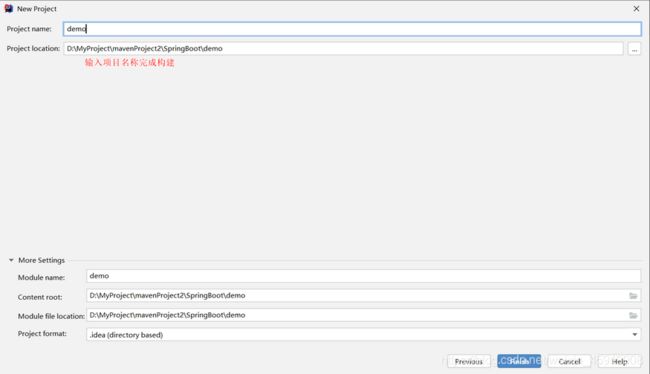
创建maven工程
需要注意:SpringBoot要求JDK版本最旧为JDK8,最新为JDK14


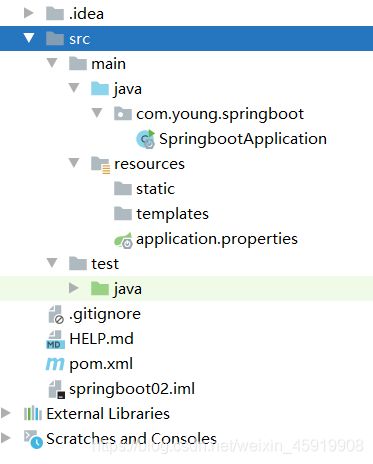
 创建好的目录结构如下图所示:

static目录用于存放、静态资源图片、js、css
templates目录用于存放页面 建议使用模版引擎Thymleaf
导入依赖
如果在之前没有勾选Spring Web选项,需要导入依赖
<dependency>
    <groupId>org.springframework.bootgroupId>


    <artifactId>spring-boot-starter-webartifactId>
dependency>
需要注意的是不需要设置版本号,因为存在父项目,如下:
<parent>
    <groupId>org.springframework.bootgroupId>
    <artifactId>spring-boot-starter-parentartifactId>
    <version>2.3.0.RELEASEversion>
    <relativePath/>
parent>
运行程序
SpringbootApplication类
import org.springframework.boot.SpringApplication;
import org.springframework.boot.autoconfigure.SpringBootApplication;

//本身就是Spring的一个组件
@SpringBootApplication
public class SpringbootApplication {

    public static void main(String[] args) {

        SpringApplication.run(SpringbootApplication.class, args);
    }
}
运行该类中的main方法就可以使项目运行,我们可以编写Controller进行测试
@RestController
public class UserController {

    @GetMapping("hello")
    public String hello(){

        System.out.println("收到请求");
        return "hello";
    }
}
启动程序,发送请求,控制台的日志信息以及输出内容如下
  .   ____          _            __ _ _
 /\\ / ___'_ __ _ _(_)_ __  __ _ \ \ \ \
( ( )\___ | '_ | '_| | '_ \/ _` | \ \ \ \
 \\/  ___)| |_)| | | | | || (_| |  ) ) ) )
  '  |____| .__|_| |_|_| |_\__, | / / / /
 =========|_|==============|___/=/_/_/_/
 :: Spring Boot ::        (v2.3.0.RELEASE)

2020-06-16 09:59:02.503  INFO 3052 --- [  restartedMain] c.y.springboot.SpringbootApplication     : Starting SpringbootApplication on LAPTOP-3IGR2R45 with PID 3052 (D:\MyProject\mavenProject2\SpringBoot\springboot02\target\classes started by Lenovo in D:\MyProject\mavenProject2\SpringBoot\springboot02)
2020-06-16 09:59:02.513  INFO 3052 --- [  restartedMain] c.y.springboot.SpringbootApplication     : No active profile set, falling back to default profiles: default
2020-06-16 09:59:02.568  INFO 3052 --- [  restartedMain] .e.DevToolsPropertyDefaultsPostProcessor : Devtools property defaults active! Set 'spring.devtools.add-properties' to 'false' to disable
2020-06-16 09:59:02.568  INFO 3052 --- [  restartedMain] .e.DevToolsPropertyDefaultsPostProcessor : For additional web related logging consider setting the 'logging.level.web' property to 'DEBUG'
2020-06-16 09:59:04.487  INFO 3052 --- [  restartedMain] o.s.b.w.embedded.tomcat.TomcatWebServer  : Tomcat initialized with port(s): 8080 (http)
2020-06-16 09:59:04.499  INFO 3052 --- [  restartedMain] o.apache.catalina.core.StandardService   : Starting service [Tomcat]
2020-06-16 09:59:04.500  INFO 3052 --- [  restartedMain] org.apache.catalina.core.StandardEngine  : Starting Servlet engine: [Apache Tomcat/9.0.35]
2020-06-16 09:59:04.635  INFO 3052 --- [  restartedMain] o.a.c.c.C.[Tomcat].[localhost].[/]       : Initializing Spring embedded WebApplicationContext
2020-06-16 09:59:04.635  INFO 3052 --- [  restartedMain] o.s.web.context.ContextLoader            : Root WebApplicationContext: initialization completed in 2067 ms
2020-06-16 09:59:04.932  INFO 3052 --- [  restartedMain] o.s.s.concurrent.ThreadPoolTaskExecutor  : Initializing ExecutorService 'applicationTaskExecutor'
2020-06-16 09:59:05.116  WARN 3052 --- [  restartedMain] ion$DefaultTemplateResolverConfiguration : Cannot find template location: classpath:/templates/ (please add some templates or check your Thymeleaf configuration)
2020-06-16 09:59:05.205  INFO 3052 --- [  restartedMain] o.s.b.d.a.OptionalLiveReloadServer       : LiveReload server is running on port 35729
2020-06-16 09:59:05.237  INFO 3052 --- [  restartedMain] o.s.b.w.embedded.tomcat.TomcatWebServer  : Tomcat started on port(s): 8080 (http) with context path ''
2020-06-16 09:59:05.254  INFO 3052 --- [  restartedMain] c.y.springboot.SpringbootApplication     : Started SpringbootApplication in 3.612 seconds (JVM running for 6.707)
2020-06-16 09:59:49.609  INFO 3052 --- [nio-8080-exec-1] o.a.c.c.C.[Tomcat].[localhost].[/]       : Initializing Spring DispatcherServlet 'dispatcherServlet'
2020-06-16 09:59:49.609  INFO 3052 --- [nio-8080-exec-1] o.s.web.servlet.DispatcherServlet        : Initializing Servlet 'dispatcherServlet'
2020-06-16 09:59:49.613  INFO 3052 --- [nio-8080-exec-1] o.s.web.servlet.DispatcherServlet        : Completed initialization in 4 ms
收到请求
页面上也会显示客户端发送的信息"hello"
简单探究
pom.xml
spring-boot-dependencies:在父工程中的核心依赖,进行了资源过滤等配置,在父工程中指定了版本,所以引入 SpringBoot依赖时,不需要指定版本。
启动器
<dependency>
    <groupId>org.springframework.bootgroupId>
    <artifactId>spring-boot-starter-webartifactId>
dependency>
启动器就是SpringBoot的依赖场景
spring-boot-starter-web会帮我们导入web环境的所有依赖
SpringBoot会将所有功能场景变成一个个启动器,需要什么功能,导入对应的启动器
spring-boot-starter:核心模块,包括自动配置支持、日志和YAML。
spring-boot-starter-test:测试模块,包括JUnit、Hamcrest、Mockito。
@SpringBootApplication
Spring Boot文档中的描述:same as @Configuration @EnableAutoConfiguration @ComponentScan
@SpringBootApplication开启了Spring的组件扫描和springboot的自动配置功能,相当于将以下三个注解组合在了一起
@SpringBootConfiguration - 该注解被@Configuration标注,表明此类为配置类。
@EnableAutoConfiguration - 开启springboot的自动配置功能。
	@AutoConfigurationPackage:自动配置包
		@Import(AutoConfigurationPackages.Registrar.class) 自动配置包.注册
	@Import({
     AutoConfigurationImportSelector.class}) 自动配置导入选择
@ComponentScan - 启用注解扫描。

//获取所有配置
List<String> configurations = getCandidateConfigurations(annotationMetadata, attributes);
getCandidateConfigurations()方法,获取候选的配置
protected List<String> getCandidateConfigurations(AnnotationMetadata metadata, AnnotationAttributes attributes) {

	List<String> configurations = SpringFactoriesLoader.loadFactoryNames(getSpringFactoriesLoaderFactoryClass(),
				getBeanClassLoader());

	Assert.notEmpty(configurations, "No auto configuration classes found in META-INF/spring.factories. If you "
				+ "are using a custom packaging, make sure that file is correct.");
	return configurations;
}

protected Class<?> getSpringFactoriesLoaderFactoryClass() {

	return EnableAutoConfiguration.class;
}
META-INF/spring.factories,自动配置的核心文件

SpringFactoriesLoader类中的部分方法
public static List<String> loadFactoryNames(Class<?> factoryType, @Nullable ClassLoader classLoader) {

    String factoryTypeName = factoryType.getName();
    //调用loadSpringFactories方法
    return loadSpringFactories(classLoader).getOrDefault(factoryTypeName, Collections.emptyList());
}

private static Map<String, List<String>> loadSpringFactories(@Nullable ClassLoader classLoader) {

    MultiValueMap<String, String> result = cache.get(classLoader);
    if (result != null) {

        return result;
    }

    try {

        //遍历url的枚举,加载资源
        Enumeration<URL> urls = (classLoader != null ?
                                 classLoader.getResources(FACTORIES_RESOURCE_LOCATION) :
                                 ClassLoader.getSystemResources(FACTORIES_RESOURCE_LOCATION));
        result = new LinkedMultiValueMap<>();
		//如果存在url
        while (urls.hasMoreElements()) {

            URL url = urls.nextElement();
            UrlResource resource = new UrlResource(url);
            //将资源加载到配置类中
            Properties properties = PropertiesLoaderUtils.loadProperties(resource);
            for (Map.Entry<?, ?> entry : properties.entrySet()) {

                String factoryTypeName = ((String) entry.getKey()).trim();
                for (String factoryImplementationName : StringUtils.commaDelimitedListToStringArray((String) entry.getValue())) {

                    result.add(factoryTypeName, factoryImplementationName.trim());
                }
            }
        }
        cache.put(classLoader, result);
        return result;
    }
SpringFactoriesLoader类中存在如下常量
public static final String FACTORIES_RESOURCE_LOCATION = "META-INF/spring.factories";
结论:SpringBoot在启动时,从META-INF/spring.factories文件下获取指定的值。但是不一定生效,要判断是否导入对应的starter,有了启动器将这些自动配置的类导入容器,自动配置就会生效,帮我们进行配置。spring.factories文件下有非常多与AutoConfiguration有关的类,比如WebMvcAutoConfiguration,这些类中存在该场景所需要的所有组件。
我们可以打开WebMvcAutoConfiguration类,发现一些@ConditionalOnXxx注解,这是用于判断某些条件是否满足。
SpringApplication.run()的作用
1、推断应用的类型是普通的项目还是Web项目
2、查找并加载所有可用初始化器 , 设置到initializers属性中
3、找出所有的应用程序监听器,设置到listeners属性中
4、推断并设置main方法的定义类,找到运行的主类
一些小配置
更换端口号
#更改端口号
server:
  port: 8081
更换banner图片
新建banner.txt文件(名称固定,可被SpringBoot识别),然后存储banner的字符
第三方banner查询和生成网址:https://www.bootschool.net/ascii-art
关于配置文件
SpringBoot推荐使用YAML配置文件,如下所示:
#YAML配置文件对空格以及节点的要求极高
#更改端口号
server:
  port: 8081
通过YAML配置文件,可以给类的成员变量赋值
配置多环境
假设现在有多个配置文件,分别用于开发环境和测试环境,我们需要在不同环境设置不同的服务器端口号
application-dev.yaml(开发环境)
server:
  port: 8081
application-test.yaml(测试环境)
server:
  port: 8082
我们需要在application.yaml配置文件中,指定运用的环境
spring:
  profiles:
    active: dev
还可以使用"—"分割多个文件,application.yaml配置文件
server:
  port: 8081
spring:
  profiles:
    active: dev

---
server:
  port: 8082
spring:
  profiles: dev

---
server:
  port: 8083
spring:
  profiles: test
配置热部署
导入依赖
<dependency>
    <groupId>org.springframework.bootgroupId>
    <artifactId>spring-boot-devtoolsartifactId>
    <scope>runtimescope>
    <optional>trueoptional>
dependency>
在
<plugin>
    <groupId>org.springframework.bootgroupId>
    <artifactId>spring-boot-maven-pluginartifactId>

    <configuration>
        <fork>
            true
        fork>
    configuration>
plugin>
设置IDEA中的配置
 快捷键:Ctrl+Shift+Alt+/,按住快捷键出现如下内容,点击Registry


三层架构演示
演示代码省略了接口
UserDao类
import org.springframework.stereotype.Repository;

@Repository
public class UserDao {

    public String query(){

        return "UserDao query";
    }
}
UserService类
import com.young.springboot.dao.UserDao;
import org.springframework.beans.factory.annotation.Autowired;
import org.springframework.stereotype.Service;

@Service
public class UserService {

    private final UserDao userDao;

    @Autowired
    public UserService(UserDao userDao) {

        this.userDao = userDao;
    }

    public String query(){

        return userDao.query();
    }
}
UserController类
@RestController
public class UserController {

    private final UserService userService;

    @Autowired
    public UserController(UserService userService) {

        this.userService = userService;
    }

    @GetMapping("hello")
    public String hello(){

        System.out.println("收到请求");
        return userService.query();
    }
}
对于自动注入的对象,如果只赋值一次,可以使用final关键字修饰
如果bean有一个构造函数,可以省略@Autowired,如下例所示:
private final UserDao userDao;

public UserService(UserDao userDao) {

    this.userDao = userDao;
}
更改使用的服务器
SpringBoot支持封装Tomcat、Jetty和Undertow三种web容器,默认使用的是Tomcat服务器。
通过如下日志可以证明以上结论
2020-06-16 18:01:56.996  INFO 11692 --- [  restartedMain] o.s.b.w.embedded.tomcat.TomcatWebServer  : Tomcat initialized with port(s): 8080 (http)
2020-06-16 18:01:56.997  INFO 11692 --- [  restartedMain] o.apache.catalina.core.StandardService   : Starting service [Tomcat]
2020-06-16 18:01:56.997  INFO 11692 --- [  restartedMain] org.apache.catalina.core.StandardEngine  : Starting Servlet engine: [Apache Tomcat/9.0.35]
如果需要更换使用的服务器,首先需要排除Tomcat服务器
<dependency>
    <groupId>org.springframework.bootgroupId>
    <artifactId>spring-boot-starter-webartifactId>
    <exclusions>
        <exclusion>
            <groupId>org.springframework.bootgroupId>
            <artifactId>spring-boot-starter-tomcatartifactId>
        exclusion>
    exclusions>
dependency>
然后需要引入其他服务器的jar包
<dependency>
    <groupId>org.springframework.bootgroupId>
    <artifactId>spring-boot-starter-jettyartifactId>
dependency>
<dependency>
    <groupId>org.springframework.bootgroupId>
    <artifactId>spring-boot-starter-undertowartifactId>
dependency>
运行程序,根据日志信息判断更换服务器成功
2020-06-16 20:12:48.633  INFO 24248 --- [  restartedMain] o.s.b.w.e.j.JettyServletWebServerFactory : Server initialized with port: 8080
2020-06-16 20:12:48.636  INFO 24248 --- [  restartedMain] org.eclipse.jetty.server.Server          : jetty-9.4.28.v20200408; built: 2020-04-08T17:49:39.557Z; git: ab228fde9e55e9164c738d7fa121f8ac5acd51c9; jvm 1.8.0_202-b08
自动配置再理解
application.yaml配置文件下可以配置哪些内容
在META-INF/spring.factories目录下,存在很多XxxAutoConfiguration的内容,点进去发现是一个类,且被@Configuration标注。
WebMvcAutoConfiguration类下的内部类WebMvcAutoConfigurationAdapter,部分代码如下:
@Configuration(proxyBeanMethods = false)
@Import(EnableWebMvcConfiguration.class)
@EnableConfigurationProperties({
      WebMvcProperties.class, ResourceProperties.class })
@Order(0)
public static class WebMvcAutoConfigurationAdapter implements WebMvcConfigurer {


    private static final Log logger = LogFactory.getLog(WebMvcConfigurer.class);

    private final ResourceProperties resourceProperties;

    private final WebMvcProperties mvcProperties;

    private final ListableBeanFactory beanFactory;

    private final ObjectProvider<HttpMessageConverters> messageConvertersProvider;

    final ResourceHandlerRegistrationCustomizer resourceHandlerRegistrationCustomizer;

    public WebMvcAutoConfigurationAdapter(ResourceProperties resourceProperties, WebMvcProperties mvcProperties,ListableBeanFactory beanFactory, ObjectProvider<HttpMessageConverters> messageConvertersProvider,
 ObjectProvider<ResourceHandlerRegistrationCustomizer> resourceHandlerRegistrationCustomizerProvider) {

        this.resourceProperties = resourceProperties;
        this.mvcProperties = mvcProperties;
        this.beanFactory = beanFactory;
        this.messageConvertersProvider = messageConvertersProvider;
        this.resourceHandlerRegistrationCustomizer = resourceHandlerRegistrationCustomizerProvider.getIfAvailable();
	}
 	......
在该类中,我们可以看到如下一些代码:
@EnableConfigurationProperties({
      WebMvcProperties.class, ResourceProperties.class })

private final WebMvcProperties mvcProperties;
这些代码中都存在WebMvcProperties、ResourceProperties,包括构造方法中,也存在这个属性
点入WebMvcProperties类
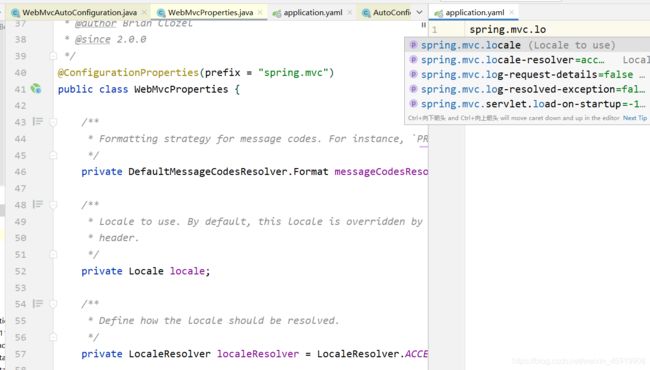
@ConfigurationProperties(prefix = "spring.mvc")
public class WebMvcProperties {
@ConfigurationProperties(prefix = "spring.mvc")中定义了前缀,我们在配置文件中输入前缀,发现可以配置的内容与WebMvcProperties类下的属性相对应
 @ConditionalOnXxx注解的作用:
//当为Web环境时,该配置类才生效
@ConditionalOnWebApplication(type = Type.SERVLET)
//当指定的类存在时,该配置类生效
@ConditionalOnClass({
      Servlet.class, DispatcherServlet.class, WebMvcConfigurer.class })
//当指定的Bean不存在时,配置类生效
@ConditionalOnMissingBean(WebMvcConfigurationSupport.class)
@Conditional注解及派生注解,当这些注解指定的条件成立时,才会给容器中添加组件,配置的内容才会生效。
自动装配原理:
1、SpringBoot启动会加载大量的自动配置类
2、我们看我们需要的功能有没有在SpringBoot默认写好的自动配置类当中;
3、我们再来看这个自动配置类中到底配置了哪些组件;(只要我们要用的组件存在在其中,我们就不需要再手动配置了)
4、给容器中自动配置类添加组件的时候,会从properties类中获取某些属性。我们只需要在配置文件中指定这些属性的值即可;
**xxxxAutoConfigurartion:自动配置类;**给容器中添加组件
xxxxProperties:封装配置文件中相关属性;