opencv3在图片上的基本画图操作
本文主要参照东南大学出版社出版的《leanring opencv3》
cv::Scalar对象能够存储四个值,除了前三个值代表 BGR 外,最后一个通道能够表示一个alpha通道,在Opencv3画图操作中经常使用。
下面列举了常用的画图函数:
| Function | Description |
|---|---|
| cv::circle() | 画一个简单的圆 |
| cv::clipLine() | 判断一条线段是否在矩形框内 |
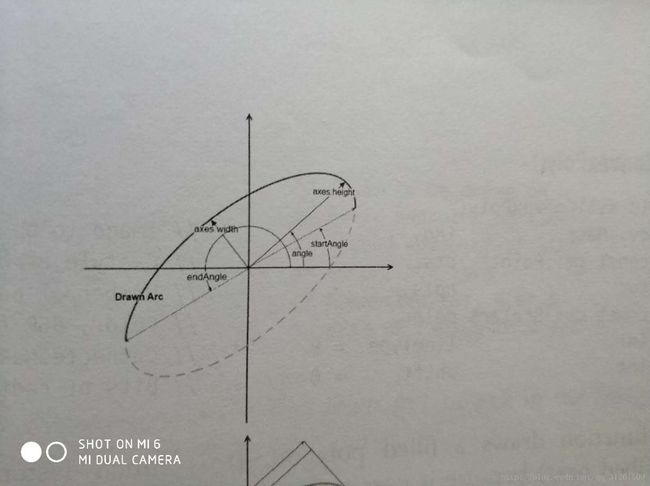
| cv::ellipse() | 画一个椭圆 |
| cv::ellipse2Poly() | |
| cv::fillConvexPoly | |
| cv::fillPoly() | |
| cv::line | 画一条线段 |
| cv::rectangle() | 画一个长方形 |
| cv::polyLines() |
cv::circle()
void circle(
    cv::Mat&           img,               // 输入的图片矩阵
    cv::Point          center,            // 定位圆心
    int                radius,            // 圆的半径
    const cv::Scalar&  color,             // 颜色, RGB
    int                thickness = 1,     // 线段的厚度
    int                lineType  = 8,     // 连接方式, 4 或者 8
    int                shift     = 0      // 半径需要被除的因子
)
代码:
//
// Created by rui on 18-3-6.
//

#include "opencv2/imgproc.hpp"
#include "opencv2/highgui.hpp"
#include "opencv2/ml.hpp"
#include "opencv2/objdetect.hpp"

int main() {
    cv::Mat image = cv::imread("/home/rui/Downloads/1684641879.jpg");
    cv::Point center = cv::Point(500,500);
    cv::Scalar color = cv::Scalar(0,255,0);
    circle(
            image,               // 输入的图片矩阵
            center,            // 定位圆心
            100,            // 圆的半径
            color,          // 颜色, RGB
            8
    );
    cv::imwrite("/home/rui/temp.png", image);
}
cv::clipLine()
cv::clipLine()
 bool clipLine(                // 返回True,如果线段在 imgRect 中
     cv::Rect      imgRect,    // 正方形区域
     cv::Point&    pt1,        // 线段起始点
     cv::Point&    pt2         // 线段终点
);


bool clipLine(
    cv::Size          imgSize,   // 默认矩形的端点是(0,0),并且对应点为imgSize,其他和之前一样
    cv::Point&      pt1,
    cv::Point&      pt2
);- 比较简单就不写例子了
cv::ellipse()
 bool ellipse(
     cv::Mat&           img,          // 输入图片
     cv::Point          center,       // 中心点
     cv::Size           axes,         // 椭圆主轴和副轴的长度
     double             angle,        // 相对主轴的倾斜角度
     double             startAngle,   // 开始的角度
     double             endAngle,     // 结束的角度
     const cv::Scalar&  color,        //
     int thickness =    1,            //
     int lineType =     8,            //
     int  shift  =      0             //
 )

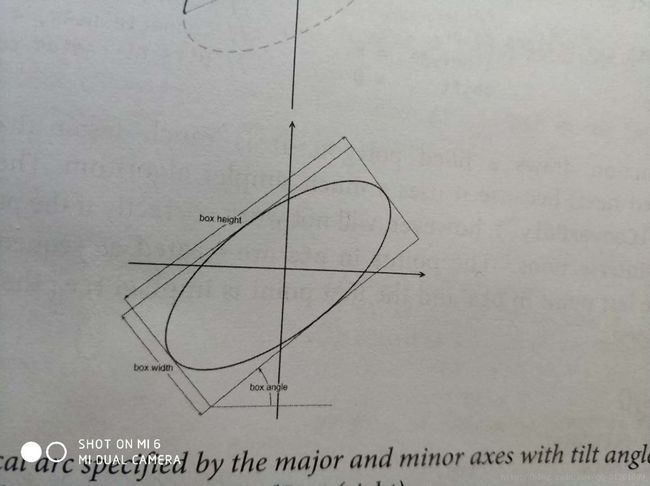
 bool ellipse(
     cv::Mat&               img,
     const cv::RotatedRect& rect,          // 外围椭圆最小的矩形
     const cv::Scalar&      color,
     int                    thckness = 1,
     int                    lineType = 8,
     int                    shift
 )
cv::ellipse2Poly
待更
cv:fillConvexPoly()
待更
cv::fillPoly()
待更
cv::line()
- 主要作用是画一个线段
void line(
cv::Mat& img,
cv::Point pt1,
cv::Point pt2,
const cv::Scalar& color,
int lineType = 8,
int shift = 0
)
cv::rectangle()
- 主要作用是画一个长方形
 void rectangle(
     cv::Mat&          img,
     cv::Point         pt1,
     cv::Point         pt2,
     const cv::Scalar& color,
     int               lineType = 8,
     int               shift = 0
 )

 void rectangle(
     cv::Mat&          img,
     cv::Rect          r,
     const cv::Scalar& color,
     int               lineType = 8,
     int               shift = 0
 )
cv::polyLines()
待更
cv::Linelterator
待更
添加文字
| Function | Description |
|---|---|
| cv::putText() | 在图片上写入一个特殊的文字 |
| cv::getTextSize() | 返回文字的长度和宽度 |
cv::puText()
 void cv::putText(
     cv::Mat&    img,
     const string&   text,   //文字内容
     cv::Point origin,       // 文字起始点
     int   fontFace,         // 设置字体
     double  fontScale,      // 设置字体规模
     cv::Scalar color,
     int thickness = 1,
     int lineType = 8,
     bool boottomLeftOrigin = false
);- 实例
//
// Created by rui on 18-3-6.
//

#include "opencv2/imgproc.hpp"
#include "opencv2/highgui.hpp"
#include "opencv2/ml.hpp"
#include "opencv2/objdetect.hpp"

int main() {
    cv::Mat image = cv::imread("/home/rui/Downloads/1684641879.jpg");
    cv::Scalar color = cv::Scalar(0,255,0);
    std::string text = "i don't know what are your saying???";
    cv::Point origin = cv::Point(300,300);

    cv::putText(
            image,
            text,
            origin,
            cv::FONT_HERSHEY_PLAIN,
            3,
            color,
            5
    );

    cv::imwrite("/home/rui/temp.png", image);
}- 效果图
cv::getTextSize()
待更


