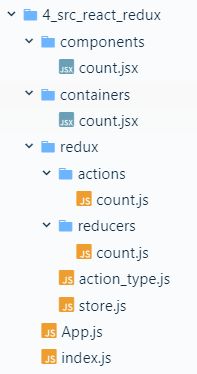
redux / react-redux / redux-thunk 详解
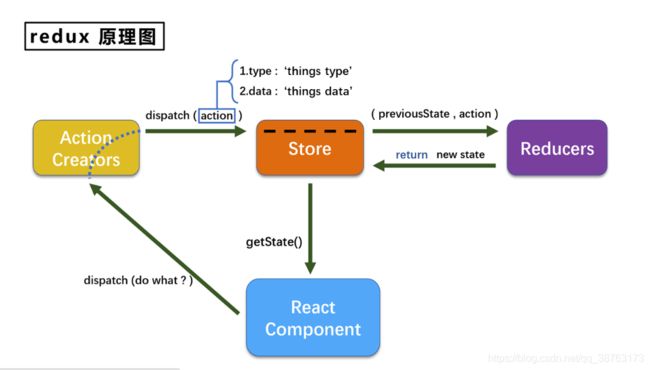
Redux
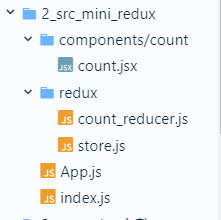
mini版本redux (没有Action Creators)
yarn add redux
基本步骤:
1、建立redux文件夹,建立store.js,引入redux,创建一个store核心对象
- 如何得到store对象:
import {
     createStore} from 'redux'
import countReducer from './count_reducer.js'

export default createStore(countReducer)
- store对象的功能:
getState(): 得到state
dispatch(action): 分发action, 触发reducer调用, 产生新的state
subscribe(listener): 注册监听, 当产生了新的state时, 自动调用
2、创建一个reducer.js(关键)
- reducer 是一个函数,该函数有两个参数,分别是:preState、action
- 该函数内部需要定义一个 newState ,并 return newState
- action 有type 和 data 这两个属性,该函数内部需要根据不同的 type ,写不同的逻辑,得到 newState ,这个 newState 用于 return 出去
- 这个 reducer 函数需要 export default
- reducer 函数是一个纯函数
let initState = 0
export default function (preState = initState , action){

  let newState;

  const {
     type , data} = action
  switch(type){

    case 'increment':
      newState = preState + data
      break;
    case 'decrement':
      newState = preState - data
      break;
		default:
      return preState

  }

  return newState
}
3、store.js中引入reducer
4、组件中引入store,组件中不同的方法,可以调用拥有不同 type 的 dispatch ,dispatch 派发 action ,会找到该 store 对应的 reducer , reducer 中定义了这个 type 类型的 action 的逻辑
import store from '../../redux/store.js'

--------------------------------------------------------------

store.dispatch({
     type:'increment',data:value*1}
store.getState()

--------------------------------------------------------------

decrement=()=>{

    const {
     value} = this.refs.user_selected
    store.dispatch({
     type:'decrement',data:value*1})
}
5、在入口文件 index.js 中,监听状态的改变,并让页面的状态改变
import React from 'react';
import ReactDOM from 'react-dom';
import App from './App';
import store from './redux/store'

ReactDOM.render(<App/>,document.getElementById('root'))
//如果redux中保存的状态发生变化,那么就调用store.subcribe所指定的回调。
store.subscribe(()=>{

	ReactDOM.render(<App/>,document.getElementById('root'))
})
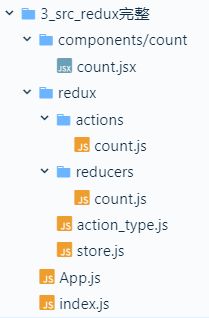
完整版本redux (有Action Creators)
基本步骤(需要在上文的mini-redux 中新增一个 Action Creators):
1、创建 actions/count.js ,专门用于创建和 count 组件相关的 action , 并分别暴露
export const createIncrementAction = value => ({
     type : 'increment' , data : value})
2、在 count 组件中,引入 actions/count.js 中定义的 action
import {
     createIncrementAction , createDecrementAction} from '../../redux/count_action_creator.js'

store.dispatch(createIncrementAction(value * 1))
3、优化:创建 action_type.js ,用于定义整个应用中的 action 对象中的 type 属性的常量,可以在使用这些变量的文件引入
export const INCREMENT = 'increment'
react-redux
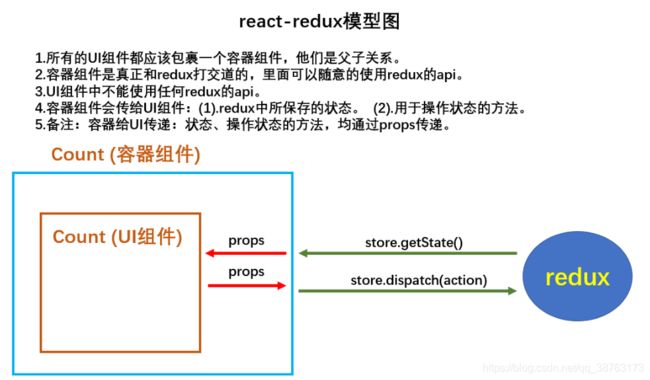
react-redux将所有组件分成两大类:
- UI组件
a.只负责 UI 的呈现,不带有任何业务逻辑
b.通过props接收数据(一般数据和函数)
c.不使用任何 Redux 的 API
d.一般保存在components文件夹下
- 容器组件
a.负责管理数据和业务逻辑,不负责UI的呈现
b.使用 Redux 的 API
c.一般保存在containers文件夹下
基本步骤:
yarn add react-redux
- 第一步 : 建立containers文件夹,里面建立count.jsx(容器组件)
- 第二步 : 容器组件里引入 count.jsx(UI组件),并在容器组件中定义传到UI组件的状态和方法
count.jsx(容器组件):

import Count from '../components/count.jsx'
import {
     connect} from 'react-redux'
import {
     increment , decrement} from '../redux/actions/count.js'

-----------------------------------------------------------------------
复杂版:

 function mapStateToProps(state){

   return {
     count:state}
 }

 function mapDispatchToProps(dispatch){

   return {

     increment:(value) => {
     dispatch(increment(value))},
     decrement:(value) => {
     dispatch(decrement(value))}
   }
 }

 export default connect(mapStateToProps,mapDispatchToProps)(Count)
-------------------------------------------------------------------------

简化版:

export default connect(
  state =>({
     count:state}),
  {
     increment,decrement}
)(Count)
- 容器组件是真正和redux打交道的,里面可以随意的使用redux的api。
- 容器组件会传给UI组件:(1).redux中所保存的状态。 (2).用于操作状态的方法。
- 容器给UI传递:状态、操作状态的方法,均通过props传递,所以UI组件通过 this.props 获取传递过去的状态和方法。
- 容器组件,肯定是组件,但是容器组件不是你亲自去定义的,是靠connect方法生成的
connect方法
1.connect()的返回值依然是一个函数。
2.connect()(UI组件)的返回值是这个UI组件的容器组件。
3.connect这样使用:connect(mapStateToProps,mapDispatchToProps)(UI组件)。
4.mapStateToProps和mapDispatchToProps都是函数
5.特别注意:mapDispatchToProps可以直接是一个对象。
6.connect函数底层有判断,若第二个参数是对象,会加工成一个函数
mapStateToProps方法
1、专门用于给UI组件传递redux中的状态,以props形式传递。
2、因为 props是key-value的形式,所以mapStateToProps方法必须返回一个Object对象
3、mapStateToProps方法所返回的那个对象的key就作为传给UI组件props的key
4、mapStateToProps方法所返回的那个对象的value就作为传给UI组件props的value
mapDispatchToProps方法
1、专门用于给UI组件传递redux中的状态,以props形式传递。
2、因为props是key-value的形式,所以mapStateToProps方法必须返回一个Object对象
3、mapStateToProps方法所返回的那个对象的key就作为传给UI组件props的key
4、mapStateToProps方法所返回的那个对象的value就作为传给UI组件props的value
-
第三步 : App中渲染的不再是UI的Count了,而是容器的Count
-
第四步 :index.js中,要引入Provider,给Provider传递store
Provider的作用是给容器组件传递state和dispatch ,并且能够将变化渲染到页面
import React from 'react';
import ReactDOM from 'react-dom';
import App from './App';
import store from './redux/store.js'
import {
     Provider} from 'react-redux'

ReactDOM.render(
  <Provider store={
     store}>
    <App />
  </Provider>,
  document.getElementById('root')
)
- 第五步 : UI组件中用this.props.xxxx 得到状态、操作状态
decrement=()=>{

    const {
     value} = this.refs.user_selected
    // store.dispatch(decrement(value * 1))
    this.props.decrement(value*1)
}
- 第六步 : 其他文件都没有变动,参考上一个版本—— 完整版redux
redux 异步编程 ———— redux-thunk
yarn add redux-thunk
基本步骤
- 在创建 store 时,应用中间件
import {
     createStore , applyMiddleware} from 'redux'
import thunk from 'redux-thunk'

export default createStore(countReducer , applyMiddleware(thunk))
- 在 ActionCreator 中进行异步处理
【注意】使用异步 ActionCreator ,必须要有一个同步的 ActionCreator
import {
     INCREMENT , DECREMENT} from '../action_type.js'

export const increment = value => ({
     type : INCREMENT , data : value})

export const incrementAsync = value => {

  return (dispatch)=>{

    setTimeout(() => {

      dispatch(increment(value))
    }, 1000);
  }
}
- 在容器组件中定义异步的方法
import {
     increment , decrement ,incrementAsync} from '../redux/actions/count.js'

export default connect(
  state =>({
     count:state}),
  {
     increment,decrement,incrementAsync}
)(Count)
- 在UI组件中接收容器组件传过来的方法
this.props.incrementAsync(value)
多个组件应用react-redux
基本步骤
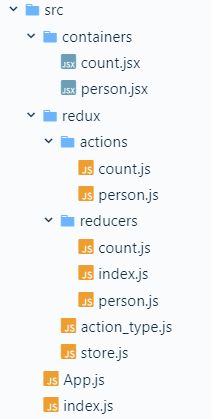
- 第一步 : 新建 reducers/index.js ,该文件是汇总一个一个的reducer,最终生成一个总的reducer
1.combineReducers是函数
2.combineReducers调用时要传入一个对象,这个对象就是redux中的总状态–state!!!
3.combineReducers的返回值是一个总reducer
import countReducer from './count.js'
import personReducer from './count.js'
import {
     combineReducers} from 'redux'

export default combineReducers({

	count:countReducer,
	persons:personReducer
})
- 第二步 : 在 store.js 中引入总的 reducer
import {
     createStore,applyMiddleware} from 'redux'
import allReducer from './reducers'
import thunk from 'redux-thunk'

export default createStore(allReducer,applyMiddleware(thunk))
- 第三步 : 将容器组件和UI组件定义到一起
import {
     connect} from 'react-redux'
import React, {
      Component } from 'react'
import {
     increment , decrement , incrementAsync} from '../redux/actions/count'

class Count extends Component {
      }

export default connect(
  state => ({

    count:state.count,
    persons:state.persons
  }),
  {
     increment , decrement ,incrementAsync }
)(Count)
- 在组件中得到state和action
this.props.count
this.props.persons
