flume的入门和进阶案例
环境准备:
1.安装flume
①下载地址
http://archive.apache.org/dist/flume/
②上传到linux并解压jar包
tar -zxf /opt/software/apache-flume-1.9.0-bin.tar.gz -C /opt/module/
③修改apache-flume-1.9.0-bin的名称为flume
mv /opt/module/apache-flume-1.9.0-bin /opt/module/flume
④解决jar包冲突:删除flume/lib中的guava-11.0.2.jar
rm -rf /opt/module/flume/lib/guava-11.0.2.jar
2.配置netcat
①安装netcat工具
sudo yum install -y nc
②判断端口是否被占用
sudo netstat -tunlp | grep 端口号
入门案例1-监听端口数据打印到控制台
①在在flume目录下创建job文件夹
mkdir job
②配置文件flume-netcat-logger.conf
[XXX@hadoop102 flume]$ vim job/flume-netcat-logger.conf
添加如下内容:
#1、定义agent、source、channel、sink的名称
#a1是agent的名称[由自己定义]
#r1是source的名称
#c1的channel的名称
#k1是sink的名称
a1.sources = r1
a1.channels = c1
a1.sinks = k1
#2、描述source
a1.sources.r1.type = netcat
a1.sources.r1.bind = 0.0.0.0
a1.sources.r1.port = 9999
#3、描述channel
a1.channels.c1.type = memory
#指定channel的容量[指定channel中最多可以存放多少个Event]
a1.channels.c1.capacity = 100
#transactionCapacity 事务容量[事务容量必须<=capacity]
a1.channels.c1.transactionCapacity = 100
#4、描述sink
a1.sinks.k1.type = logger
#5、关联source->channel->sink
a1.sources.r1.channels = c1
a1.sinks.k1.channel = c1
③开启flume监听端口
bin/flume-ng agent --conf conf/ --name a1 --conf-file job/flume-netcat-logger.conf -Dflume.root.logger=INFO,console
④使用netcat工具向本机的9999端口发送内容
需开启另一个命令行窗口
nc localhost 9999
hello
world
入门案例2-实时监听文件保存到HDFS
①创建配置文件flume-file-hdfs.conf
[XXX@hadoop102 flume]$ vim job/flume-file-hdfs.conf
添加如下内容
#1、定义agent、source、channel、sink的名称
a1.sources = r1
a1.channels = c1
a1.sinks = k1
#2、描述source
a1.sources.r1.type = exec
a1.sources.r1.command = tail -F /opt/module/a.txt
a1.sources.r1.shell = /bin/bash -c
#batchsize必须<=事务的容量
a1.sources.r1.batchSize = 100
#3、描述channel
a1.channels.c1.type = memory
#channel的容量
a1.channels.c1.capacity = 100
#事务的容量[事务容量必须<=channel的容量]
a1.channels.c1.transactionCapacity = 100
#4、描述sink
a1.sinks.k1.type = hdfs
#设置hdfs存储目录
a1.sinks.k1.hdfs.path = hdfs://hadoop102:9820/flume/%Y%m%d
#设置存储文件的前缀
a1.sinks.k1.hdfs.filePrefix = flume-
#设置滚动的时间间隔
a1.sinks.k1.hdfs.rollInterval = 3
#设置滚动的文件的大小[当文件达到指定的大小之后,会生成新文件,flume向新文件里面写入内存]
a1.sinks.k1.hdfs.rollSize = 13421000
#设置文件写入多少个Event就滚动
a1.sinks.k1.hdfs.rollCount = 0
#设置每次向HDFS写入的时候批次大小
a1.sinks.k1.hdfs.batchSize = 100
#指定写往HDFS的时候的压缩格式
#a1.sinks.k1.hdfs.codeC = 100
#指定写往HDFS的时候的文件格式[SequenceFile-序列化文件,DataStream-文本文件,CompressedStream-压缩文件]
a1.sinks.k1.hdfs.fileType = DataStream
#是否按照指定的时间间隔生成文件夹
a1.sinks.k1.hdfs.round = true
#指定生成文件夹的时间值
a1.sinks.k1.hdfs.roundValue = 24
#指定生成文件夹的时间单位[hour、second、minute]
a1.sinks.k1.hdfs.roundUnit = hour
#是否使用本地时间
a1.sinks.k1.hdfs.useLocalTimeStamp = true
#5、关联source->channel->sink
a1.sources.r1.channels = c1
a1.sinks.k1.channel = c1
②开启集群
[XXX@hadoop102 flume]$ mycluster start
mycluster脚本如下:
#!/bin/bash
if [ $# -lt 1 ]
then
        echo " args number error!!!!"
        exit
fi

case $1 in
"start")
        ssh hadoop102 /opt/module/hadoop-3.1.3/sbin/start-dfs.sh
        ssh hadoop103 /opt/module/hadoop-3.1.3/sbin/start-yarn.sh
        hdfs dfsadmin -safemode leave
        ;;
"stop")
        ssh hadoop102 /opt/module/hadoop-3.1.3/sbin/stop-dfs.sh
        ssh hadoop103 /opt/module/hadoop-3.1.3/sbin/stop-yarn.sh
        ;;
*)
        echo "args info error!!!!"
        ;;
esac
③运行Flume
[XXX@hadoop102 flume]$ bin/flume-ng agent -n a1 -c conf -f job/flume-file-hdfs.conf -Dflume.root.logger=INFO,console
④对txt文件进行修改/opt/module/a.txt
[XXX@hadoop102 flume]$ echo "aabbcc" >> /opt/module/a.txt
⑤在HDFS上查看文件
入门案例3-监听目录下新增文件保存到HDFS
①创建配置文件flume-dir-hdfs.conf
[XXX@hadoop102 flume]$ vim job/flume-dir-hdfs.conf
添加如下内容
#1、定义agent、source、channel、sink的名称
a1.channels = c1
a1.sources = r1
a1.sinks = k1
#2、描述source
a1.sources.r1.type = spooldir
#指定监控哪个目录
a1.sources.r1.spoolDir = /opt/module/logs
#设置监控目录下符合正则匹配要求的文件
a1.sources.r1.includePattern = ^.*\.log$
a1.sources.r1.batchSize = 100
#3、描述channel
a1.channels.c1.type = memory
a1.channels.c1.capacity = 100
a1.channels.c1.transactionCapacity = 100
#4、描述sink
a1.sinks.k1.type = hdfs
#设置hdfs存储目录
a1.sinks.k1.hdfs.path = hdfs://hadoop102:9820/flume1/%Y%m%d
#设置存储文件的前缀
a1.sinks.k1.hdfs.filePrefix = flume-
#设置滚动的时间间隔
a1.sinks.k1.hdfs.rollInterval = 3
#设置滚动的文件的大小[当文件达到指定的大小之后,会生成新文件,flume向新文件里面写入内存]
a1.sinks.k1.hdfs.rollSize = 13421000
#设置文件写入多少个Event就滚动
a1.sinks.k1.hdfs.rollCount = 0
#设置每次向HDFS写入的时候批次大小
a1.sinks.k1.hdfs.batchSize = 100
#指定写往HDFS的时候的压缩格式
#a1.sinks.k1.hdfs.codeC = 100
#指定写往HDFS的时候的文件格式[SequenceFile-序列化文件,DataStream-文本文件,CompressedStream-压缩文件]
a1.sinks.k1.hdfs.fileType = DataStream
#是否按照指定的时间间隔生成文件夹
a1.sinks.k1.hdfs.round = true
#指定生成文件夹的时间值
a1.sinks.k1.hdfs.roundValue = 24
#指定生成文件夹的时间单位[hour、second、minute]
a1.sinks.k1.hdfs.roundUnit = hour
#是否使用本地时间
a1.sinks.k1.hdfs.useLocalTimeStamp = true
#5、关联source->channel->sink
a1.sources.r1.channels = c1
a1.sinks.k1.channel = c1
②创建相应的文件夹
[XXX@hadoop102 flume]$ mkdir -p /opt/module/logs
③运行Flume
[XXX@hadoop102 flume]$ bin/flume-ng agent -n a1 -c conf -f job/flume-dir-hdfs.conf -Dflume.root.logger=INFO,console
④在logs文件夹内创建不同文件,并写入一些内容
[XXX@hadoop102 logs]$ vim a.txt
[XXX@hadoop102 logs]$ vim b.logs
[XXX@hadoop102 logs]$ vim c.logs
⑤在HDFS上查看
入门案例4-实时监听多个文件保存到HDFS
①创建配置文件flume-taildir-hdfs.conf
[XXX@hadoop102 flume]$ vim job/flume-taildir-hdfs.conf
添加如下内容:
#1、定义agent、source、channel、sink的名称
a1.sources = r1
a1.channels = c1
a1.sinks = k1
#2、描述source
a1.sources.r1.type = TAILDIR
#设置flume监听的组
a1.sources.r1.filegroups = f1 f2
#设置f1组监听的文件
a1.sources.r1.filegroups.f1 = /opt/module/taildir/log1/.*log
#设置f2组监听的文件
a1.sources.r1.filegroups.f2 = /opt/module/taildir/log2/.*txt
#读取的进度记录文件[通过该文件能够做到断电续传]
a1.sources.r1.positionFile = /opt/module/flume/postion.json
a1.sources.r1.batchSize = 100

#3、描述channel
a1.channels.c1.type = memory
#channel的容量
a1.channels.c1.capacity = 100
#事务的容量[事务容量必须<=channel的容量]
a1.channels.c1.transactionCapacity = 100

#4、描述sink
a1.sinks.k1.type = hdfs
#设置hdfs存储目录
a1.sinks.k1.hdfs.path = hdfs://hadoop102:9820/flume2/%Y%m%d
#设置存储文件的前缀
a1.sinks.k1.hdfs.filePrefix = flume-
#设置滚动的时间间隔
a1.sinks.k1.hdfs.rollInterval = 5
#设置滚动的文件的大小[当文件达到指定的大小之后,会生成新文件,flume向新文件里面写入内存]
a1.sinks.k1.hdfs.rollSize = 13421000
#设置文件写入多少个Event就滚动
a1.sinks.k1.hdfs.rollCount = 0
#设置每次向HDFS写入的时候批次大小
a1.sinks.k1.hdfs.batchSize = 100
#指定写往HDFS的时候的压缩格式
#a1.sinks.k1.hdfs.codeC = 100
#指定写往HDFS的时候的文件格式[SequenceFile-序列化文件,DataStream-文本文件,CompressedStream-压缩文件]
a1.sinks.k1.hdfs.fileType = DataStream
#是否按照指定的时间间隔生成文件夹
a1.sinks.k1.hdfs.round = true
#指定生成文件夹的时间值
a1.sinks.k1.hdfs.roundValue = 24
#指定生成文件夹的时间单位[hour、second、minute]
a1.sinks.k1.hdfs.roundUnit = hour
#是否使用本地时间
a1.sinks.k1.hdfs.useLocalTimeStamp = true

#5、关联source->channle->sink
a1.sources.r1.channels = c1
a1.sinks.k1.channel = c1
②运行Flume
[XXX@hadoop102 flume]$ bin/flume-ng agent -n a1 -c conf -f job/flume-taildir-hdfs.conf -Dflume.root.logger=INFO,console
③创建相应的文件夹
[XXX@hadoop102 flume]$ mkdir -p /opt/module/taildir/log1
[XXX@hadoop102 flume]$ mkdir -p /opt/module/taildir/log2
④分别向log1,log2添加一组后缀log和txt的文件,并添加内容
[XXX@hadoop102 taildir]$ vim /log1/a.txt
[XXX@hadoop102 taildir]$ vim /log1/a.log
[XXX@hadoop102 taildir]$ vim /log2/a.txt
[XXX@hadoop102 taildir]$ vim /log2/a.log
#并通过echo" " >> f 语句向这些文件追加内容
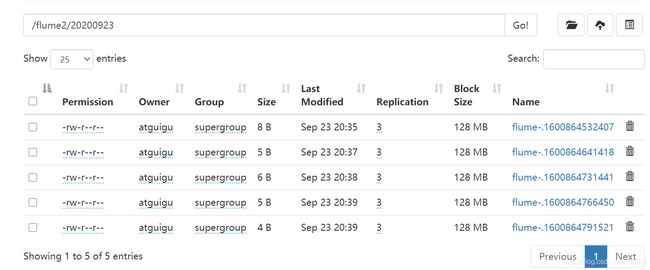
⑤在HDFS上查看
进阶案例1:复制和多路复用
①在hadoop102配置flume-file-flume.conf
[XXX@hadoop102 flume]$ vim job/flume-file-flume.conf
添加如下内容
#1、定义agent、source、channel、sink的名称
a1.sources = r1
a1.channels = c1 c2
a1.sinks = k1 k2
#1.1、定义channel selector
a1.sources.r1.selector.type = replicating
#2、描述source[exec]
a1.sources.r1.type = exec
a1.sources.r1.command = tail -F /opt/module/a.txt
#3、描述channel[memory]
a1.channels.c1.type = memory
a1.channels.c1.capacity = 100
a1.channels.c1.transactionCapacity = 100

a1.channels.c2.type = memory
a1.channels.c2.capacity = 100
a1.channels.c2.transactionCapacity = 100
#4、描述sink[avro]
a1.sinks.k1.type = avro
a1.sinks.k1.hostname = hadoop103
a1.sinks.k1.port = 4545

a1.sinks.k2.type = avro
a1.sinks.k2.hostname = hadoop104
a1.sinks.k2.port = 4545
#5、管理source->channel->sink
a1.sources.r1.channels = c1 c2
a1.sinks.k1.channel = c1
a1.sinks.k2.channel = c2
②在hadoop103配置flume-flume-hdfs.conf
[XXX@hadoop103 flume]$ vim job/flume-flume-hdfs.conf
添加如下内容
#1、定义source、channel、sink的名称
a1.sources = r1
a1.channels = c1
a1.sinks = k1
#2、描述source[avro]
a1.sources.r1.type = avro
a1.sources.r1.bind = 0.0.0.0
a1.sources.r1.port = 4545

#3、描述channel[memory]
a1.channels.c1.type = memory
a1.channels.c1.capacity = 100
a1.channels.c1.transactionCapacity = 100

#4、描述sink[hdfs]
a1.sinks.k1.type = hdfs
#设置hdfs存储目录
a1.sinks.k1.hdfs.path = hdfs://hadoop102:9820/flume-1/%Y%m%d
#设置存储文件的前缀
a1.sinks.k1.hdfs.filePrefix = flume-
#设置滚动的时间间隔
a1.sinks.k1.hdfs.rollInterval = 5
#设置滚动的文件的大小[当文件达到指定的大小之后,会生成新文件,flume向新文件里面写入内存]
a1.sinks.k1.hdfs.rollSize = 13421000
#设置文件写入多少个Event就滚动
a1.sinks.k1.hdfs.rollCount = 0
#设置每次向HDFS写入的时候批次大小
a1.sinks.k1.hdfs.batchSize = 100
#指定写往HDFS的时候的压缩格式
#a1.sinks.k1.hdfs.codeC = 100
#指定写往HDFS的时候的文件格式[SequenceFile-序列化文件,DataStream-文本文件,CompressedStream-压缩文件]
a1.sinks.k1.hdfs.fileType = DataStream
#是否按照指定的时间间隔生成文件夹
a1.sinks.k1.hdfs.round = true
#指定生成文件夹的时间值
a1.sinks.k1.hdfs.roundValue = 24
#指定生成文件夹的时间单位[hour、second、minute]
a1.sinks.k1.hdfs.roundUnit = hour
#是否使用本地时间
a1.sinks.k1.hdfs.useLocalTimeStamp = true

#5、管理source->channle->sink
a1.sources.r1.channels = c1
a1.sinks.k1.channel = c1
③在hadoop104配置flume-flume-dir.conf
[XXX@hadoop104 flume]$ vim job/flume-flume-dir.conf
添加如下内容
#1、定义source、channel、sink的名称
a1.sources = r1
a1.channels = c1
a1.sinks = k1
#2、描述source[avro]
a1.sources.r1.type = avro
a1.sources.r1.bind = 0.0.0.0
a1.sources.r1.port = 4545

#3、描述channel[memory]
a1.channels.c1.type = memory
a1.channels.c1.capacity = 100
a1.channels.c1.transactionCapacity = 100

#4、描述sink[File Roll Sink]
a1.sinks.k1.type = file_roll
a1.sinks.k1.sink.directory = /opt/module/flume/datas

#5、管理source->channle->sink
a1.sources.r1.channels = c1
a1.sinks.k1.channel = c1
④依次运行flume2,flume3,flume1
[XXX@hadoop103 flume]$ bin/flume-ng agent -n a1 -c conf -f job/flume-flume-hdfs.conf -Dflume.root.logger=INFO,console

[XXX@hadoop104 flume]$ bin/flume-ng agent -n a1 -c conf -f job/flume-flume-dir.conf -Dflume.root.logger=INFO,console

[XXX@hadoop102 flume]$ bin/flume-ng agent -n a1 -c conf -f job/flume-file-flume.conf -Dflume.root.logger=INFO,console
⑤向source文件追加内容
[XXX@hadoop102 taildir]$ echo "aaa" >> /opt/module/a.txt
[XXX@hadoop102 taildir]$ echo "bbb" >> /opt/module/a.txt
[XXX@hadoop102 taildir]$ echo "ccc" >> /opt/module/a.txt
[XXX@hadoop102 taildir]$ echo "ddd" >> /opt/module/a.txt
[XXX@hadoop102 taildir]$ echo "eee" >> /opt/module/a.txt
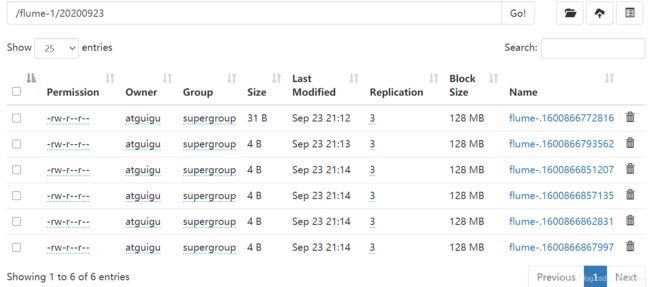
⑥在HDFS查看
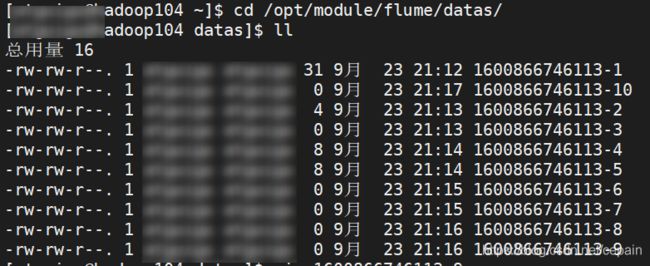
⑦查看hadoop104中的datas
进阶案例2:负载均衡和故障转移
①在hadoop102配置flume-netcat-flume.conf
[XXX@hadoop102 flume]$ vim job/flume-netcat-flume.conf
添加内容:
#1、定义source、channel、sink名称
a1.sources = r1
a1.channels = c1
a1.sinks = k1 k2
#2、描述source[netcat]
a1.sources.r1.type = netcat
a1.sources.r1.bind = 0.0.0.0
a1.sources.r1.port = 9999

#3、描述channel[memory]
a1.channels.c1.type = memory
a1.channels.c1.capacity = 100
a1.channels.c1.transactionCapacity = 100

#3.1、配置sink processor[failover processor]
#定义sink的组名
a1.sinkgroups = g1
#定义sink组中有哪些sink
a1.sinkgroups.g1.sinks = k1 k2
#指定sink processor类型
a1.sinkgroups.g1.processor.type = failover
#指定sink的优先级[优先发往优先级高的sink]
a1.sinkgroups.g1.processor.priority.k1 = 5
a1.sinkgroups.g1.processor.priority.k2 = 10

#4、描述sink[avro]
a1.sinks.k1.type = avro
a1.sinks.k1.hostname = hadoop103
a1.sinks.k1.port = 4545

a1.sinks.k2.type = avro
a1.sinks.k2.hostname = hadoop104
a1.sinks.k2.port = 4545

#5、关联source->channel->sink
a1.sources.r1.channels = c1
a1.sinks.k1.channel = c1
a1.sinks.k2.channel = c1
②在hadoop103配置flume-flume-console1.conf
[XXX@hadoop103 flume]$ vim job/flume-flume-console1.conf
添加内容
#1、定义source、channel、sink名称
a1.sources = r1
a1.channels = c1
a1.sinks = k1

#2、描述source
a1.sources.r1.type = avro
a1.sources.r1.bind = 0.0.0.0
a1.sources.r1.port = 4545

#3、描述channel
a1.channels.c1.type = memory
a1.channels.c1.capacity = 100
a1.channels.c1.transactionCapacity = 100

#4、描述sink
a1.sinks.k1.type = logger

#5、关联source->channel->sink
a1.sources.r1.channels = c1
a1.sinks.k1.channel = c1
③在hadoop104配置flume-flume-console2.conf
[XXX@hadoop104 flume]$ vim job/flume-flume-console2.conf
添加内容:
#1、定义source、channel、sink名称
a1.sources = r1
a1.channels = c1
a1.sinks = k1

#2、描述source
a1.sources.r1.type = avro
a1.sources.r1.bind = 0.0.0.0
a1.sources.r1.port = 4545

#3、描述channel
a1.channels.c1.type = memory
a1.channels.c1.capacity = 100
a1.channels.c1.transactionCapacity = 100

#4、描述sink
a1.sinks.k1.type = logger

#5、关联source->channel->sink
a1.sources.r1.channels = c1
a1.sinks.k1.channel = c1
④分别执行console2,console1,netcat
[XXX@hadoop104 flume]$ bin/flume-ng agent -n a1 -c conf -f job/flume-flume-console2.conf -Dflume.root.logger=INFO,console

[XXX@hadoop103 flume]$ bin/flume-ng agent -n a1 -c conf -f job/flume-flume-console1.conf -Dflume.root.logger=INFO,console

[XXX@hadoop102 flume]$ bin/flume-ng agent -n a1 -c conf -f job/flume-netcat-flume.conf -Dflume.root.logger=INFO,console
⑤使用netcat工具向本机的9999端口发送内容
[XXX@hadoop102 flume]$ nc localhost 9999
⑥在console2中查看
⑦将console2关掉,再次向9999端口发送内容
⑧在console1中查看
进阶案例3:聚合
①聚合-hadoop102配置flume1-logger-flume.conf
[XXX@hadoop102 flume]$ vim job/flume1-logger-flume.conf
添加内容:
#1、定义agent、source、channel、sink的名称
a1.sources = r1
a1.channels = c1
a1.sinks = k1

#2、描述source[exec]
a1.sources.r1.type = exec
a1.sources.r1.command = tail -F /opt/module/a.txt
a1.sources.r1.batchSize = 100

#3、描述channel
a1.channels.c1.type = memory
a1.channels.c1.capacity = 100
a1.channels.c1.transactionCapacity = 100

#4、描述sink[avro]
a1.sinks.k1.type = avro
a1.sinks.k1.hostname = hadoop104
a1.sinks.k1.port = 4545

#5、关联source->channel->sink
a1.sources.r1.channels = c1
a1.sinks.k1.channel = c1
②聚合-hadoop103配置flume2-netcat-flume.conf
[XXX@hadoop103 flume]$ vim job/flume2-netcat-flume.conf
添加内容
#1、定义agent、source、channel、sink的名称
a1.sources = r1
a1.channels = c1
a1.sinks = k1

#2、描述source[exec]
a1.sources.r1.type = netcat
a1.sources.r1.bind = 0.0.0.0
a1.sources.r1.port = 9999

#3、描述channel
a1.channels.c1.type = memory
a1.channels.c1.capacity = 100
a1.channels.c1.transactionCapacity = 100

#4、描述sink[avro]
a1.sinks.k1.type = avro
a1.sinks.k1.hostname = hadoop104
a1.sinks.k1.port = 4545

#5、关联source->channel->sink
a1.sources.r1.channels = c1
a1.sinks.k1.channel = c1
③在hadoop104配置flume3-flume-logger.conf
[XXX@hadoop103 flume]$ vim job/flume3-flume-logger.conf
添加内容
#1、定义agent、source、channel、sink的名称
a1.sources = r1 r2
a1.channels = c1
a1.sinks = k1

#2、描述source[exec]
a1.sources.r1.type = avro
a1.sources.r1.bind = 0.0.0.0
a1.sources.r1.port = 4545

a1.sources.r2.type = netcat
a1.sources.r2.bind = 0.0.0.0
a1.sources.r2.port = 9999

#3、描述channel
a1.channels.c1.type = memory
a1.channels.c1.capacity = 100
a1.channels.c1.transactionCapacity = 100

#4、描述sink[avro]
a1.sinks.k1.type = logger

#5、关联source->channel->sink
a1.sources.r1.channels = c1
a1.sources.r2.channels = c1
a1.sinks.k1.channel = c1
④依次运行flume3,(flume2,flume1)
[XXX@hadoop104 flume]$ bin/flume-ng agent -n a1 -c conf -f job/flume3-flume-logger.conf -Dflume.root.logger=INFO,console

[XXX@hadoop103 flume]$ bin/flume-ng agent -n a1 -c conf -f job/flume2-netcat-flume.conf -Dflume.root.logger=INFO,console

[XXX@hadoop102 flume]$ bin/flume-ng agent -n a1 -c conf -f job/flume1-logger-flume.conf  -Dflume.root.logger=INFO,console
⑤在flume1中向目标文件追加内容并在flume3中查看
[XXX@hadoop104 flume]$ echo 12345 >> /opt/module/a.txt
[XXX@hadoop104 flume]$ echo "abcdef" >> /opt/module/a.txt
⑥在flume2中向端口发送信息并在flume3中查看
[XXX@hadoop102 flume]$ nc localhost 9999
进阶案例4:自定义Interceptor
①创建一个maven项目,并引入以下依赖。
 <dependencies>
        <dependency>
            <groupId>org.apache.flumegroupId>
            <artifactId>flume-ng-coreartifactId>
            <version>1.9.0version>
        dependency>

    dependencies>
②MyInterceptor
package CustomInterceptor;

import org.apache.flume.Context;
import org.apache.flume.Event;
import org.apache.flume.interceptor.Interceptor;

import java.util.List;
import java.util.Map;

public class MyInterceptor implements Interceptor {

    /*
    初始化
     */
    public void initialize() {


    }

    /**
     * 对单条数据进行拦截操作
     * @param event
     * @return
     */
    public Event intercept(Event event) {

        //取出数据
        String data = new String(event.getBody());
        //数据格式: 日志类型:数据
        //日志类型
        String logTYPE = data.split(":")[0];
        Map<String, String> headers = event.getHeaders();
        headers.put("logType",logTYPE);
        return event;
    }

    /**
     * 对一个批次的所有数据进行拦截操作
     * @param events
     * @return
     */
    public List<Event> intercept(List<Event> events) {

        for (Event event : events) {

            intercept(event);
        }
        return events;
    }

    public void close() {


    }
    //自定义拦截对象
    public static class Builder implements Interceptor.Builder{


        public Interceptor build() {

            return new MyInterceptor();
        }

        public void configure(Context context) {


        }
    }
}
然后打成jar包导入到flume目录下的lib中
③配置flume-custome-Interceptor.conf
[XXX@hadoop102 flume]$ vim job/flume-custome-Interceptor.conf
添加内容:
#1、定义source、channel、sink的名称
a1.sources = r1
a1.channels = c1 c2
a1.sinks = k1 k2
#1.1、配置拦截器
#配置source的拦截器的名称
a1.sources.r1.interceptors = i1
#配置source指定的拦截器对应的:全类名$Builder
a1.sources.r1.interceptors.i1.type = CustomInterceptor.MyInterceptor$Builder
#1.2、配置channel selector
#指定channel selector类型
a1.sources.r1.selector.type = multiplexing
#指定使用header中的哪个key
a1.sources.r1.selector.header = logType
#指定key对应的value应该发向哪个channel
a1.sources.r1.selector.mapping.user = c1
a1.sources.r1.selector.mapping.system = c2
#2、描述source
a1.sources.r1.type = netcat
a1.sources.r1.bind = 0.0.0.0
a1.sources.r1.port = 9999

#3、描述channel
a1.channels.c1.type = memory
a1.channels.c1.capacity = 100
a1.channels.c1.transactionCapacity = 100

a1.channels.c2.type = memory
a1.channels.c2.capacity = 100
a1.channels.c2.transactionCapacity = 100

#4、描述sink
a1.sinks.k1.type = file_roll
a1.sinks.k1.sink.directory = /opt/module/flume/datas/log-1

a1.sinks.k2.type = file_roll
a1.sinks.k2.sink.directory = /opt/module/flume/datas/log-2

#5、关联source->chanel->sink
a1.sources.r1.channels = c1 c2
a1.sinks.k1.channel = c1
a1.sinks.k2.channel = c2
④运行CustomInterceptor.conf
[XXX@hadoop104 flume]$ bin/flume-ng agent -n a1 -c conf -f job/flume-custome-Interceptor.conf -Dflume.root.logger=INFO,console
⑤向端口发送信息
[XXX@hadoop102 ~]$ nc localhost 9999
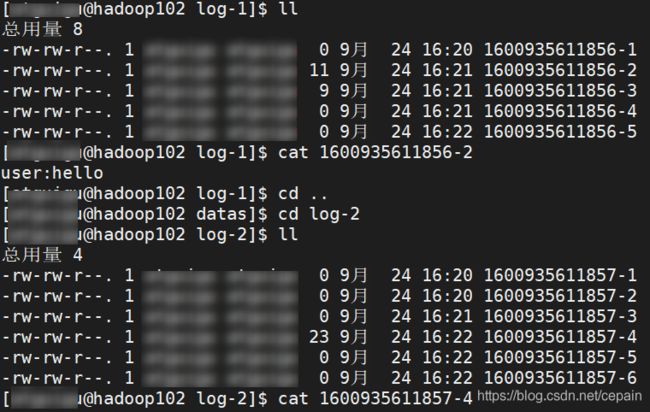
⑥在log目录下查看日志信息
进阶案例5:自定义Source
在原有的maven项目上,创建mysource类
参照官网的source案例修改
http://flume.apache.org/releases/content/1.9.0/FlumeDeveloperGuide.html
①MySource
package CustomInterceptor;

import org.apache.flume.Context;
import org.apache.flume.EventDeliveryException;
import org.apache.flume.PollableSource;
import org.apache.flume.conf.Configurable;
import org.apache.flume.event.SimpleEvent;
import org.apache.flume.source.AbstractSource;

import java.util.HashMap;

public class MySource extends AbstractSource implements Configurable, PollableSource {


    private String messagePrefix;
    private Long time;
    /**
     * 用来采集数据的方法[循环调用]
     * @return
     * @throws EventDeliveryException
     */
    public Status process() throws EventDeliveryException {


        try{


            for(int i=0;i<=5;i++){

                SimpleEvent event = new SimpleEvent();
                event.setHeaders(new HashMap<String, String>());
                event.setBody((messagePrefix+"-"+i).getBytes());
                getChannelProcessor().processEvent(event);
                Thread.sleep(time);
            }
            return  Status.READY;
        }catch (Exception e){

            return Status.BACKOFF;
        }
    }

    public long getBackOffSleepIncrement() {

        return 0;
    }

    public long getMaxBackOffSleepInterval() {

        return 0;
    }

    /**
     * 配置配置文件参数的方法
     * @param context
     */
    public void configure(Context context) {

        messagePrefix = context.getString("message.prefix","message");
        time = context.getLong("time",1000L);
    }
}
删除原先的jar,打成jar包到flume/lib
②配置flume-mysource.conf
[XXX@hadoop102 flume]$ vim job/flume-mysource.conf
添加内容:
#1、定义source、channel、sink的名称
a1.sources = r1
a1.channels = c1
a1.sinks = k1

#2、描述source[自定义source]
a1.sources.r1.type = CustomInterceptor.MySource
a1.sources.r1.message.prefix = hello
#3、描述channel
a1.channels.c1.type = memory
a1.channels.c1.capacity = 100
a1.channels.c1.transactionCapacity = 100
#4、描述sink
a1.sinks.k1.type = logger

#5、关联source->channel->sink
a1.sinks.k1.channel = c1
a1.sources.r1.channels = c1
③运行mysource.conf
[XXX@hadoop104 flume]$ bin/flume-ng agent -n a1 -c conf -f job/flume-mysource.conf -Dflume.root.logger=INFO,console
效果如下:
org.apache.flume.sink.LoggerSink.process(LoggerSink.java:95)] Event: {
      headers:{
     } body: 68 65 6C 6C 6F 2D 33                            hello-3 }
2020-09-24 19:09:06,678 (SinkRunner-PollingRunner-DefaultSinkProcessor) [INFO - org.apache.flume.sink.LoggerSink.process(LoggerSink.java:95)] Event: {
      headers:{
     } body: 68 65 6C 6C 6F 2D 34                            hello-4 }
2020-09-24 19:09:07,679 (SinkRunner-PollingRunner-DefaultSinkProcessor) [INFO - org.apache.flume.sink.LoggerSink.process(LoggerSink.java:95)] Event: {
      headers:{
     } body: 68 65 6C 6C 6F 2D 35                            hello-5 }
2020-09-24 19:09:08,680 (SinkRunner-PollingRunner-DefaultSinkProcessor) [INFO - org.apache.flume.sink.LoggerSink.process(LoggerSink.java:95)] Event: {
      headers:{
     } body: 68 65 6C 6C 6F 2D 30                            hello-0 }
进阶案例6:自定义Sink
①MySink
②配置flume-mysink.conf
[XXX@hadoop102 flume]$ vim job/flume-mysink.conf
添加内容
#1、定义source、channel、sink名称
a1.sources = r1
a1.channels = c1
a1.sinks = k1

#2、描述source
a1.sources.r1.type = netcat
a1.sources.r1.bind = 0.0.0.0
a1.sources.r1.port = 9999

#3、描述channel
a1.channels.c1.type = memory
a1.channels.c1.capacity = 100
a1.channels.c1.transactionCapacity = 100

#4、描述sink
a1.sinks.k1.type = CustomInterceptor.MySink
a1.sinks.k1.field = custom

#5、关联source->channel->sink
a1.sources.r1.channels = c1
a1.sinks.k1.channel = c1
③运行flume-mysink.conf
[XXX@hadoop102 flume]$ bin/flume-ng agent -n a1 -c conf -f job/flume-mysink.conf -Dflume.root.logger=INFO,console
④向端口发送信息
[XXX@hadoop102 ~]$ nc localhost 9999
2D 35 hello-5 }
2020-09-24 19:09:08,680 (SinkRunner-PollingRunner-DefaultSinkProcessor) [INFO - org.apache.flume.sink.LoggerSink.process(LoggerSink.java:95)] Event: { headers:{} body: 68 65 6C 6C 6F 2D 30 hello-0 }
## 进阶案例6:自定义Sink

### ①MySink

### ②配置flume-mysink.conf

~~~shell
[XXX@hadoop102 flume]$ vim job/flume-mysink.conf
添加内容
#1、定义source、channel、sink名称
a1.sources = r1
a1.channels = c1
a1.sinks = k1

#2、描述source
a1.sources.r1.type = netcat
a1.sources.r1.bind = 0.0.0.0
a1.sources.r1.port = 9999

#3、描述channel
a1.channels.c1.type = memory
a1.channels.c1.capacity = 100
a1.channels.c1.transactionCapacity = 100

#4、描述sink
a1.sinks.k1.type = CustomInterceptor.MySink
a1.sinks.k1.field = custom

#5、关联source->channel->sink
a1.sources.r1.channels = c1
a1.sinks.k1.channel = c1
③运行flume-mysink.conf
[XXX@hadoop102 flume]$ bin/flume-ng agent -n a1 -c conf -f job/flume-mysink.conf -Dflume.root.logger=INFO,console
④向端口发送信息
[XXX@hadoop102 ~]$ nc localhost 9999


