Android小游戏:Jetpack Compose 实现俄罗斯方块
本文介绍如何使用Jetpack Compose打造一个经典版的俄罗斯方块游戏。
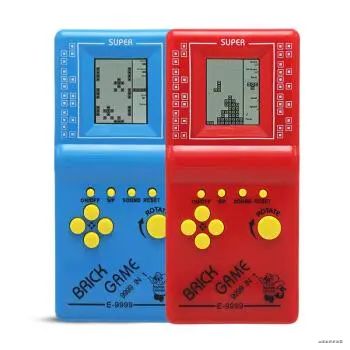
玩过上面这种游戏机的朋友应该会对本文内容感到亲切,废话不多说,先看东西:
1. 为什么Compose适合做游戏?
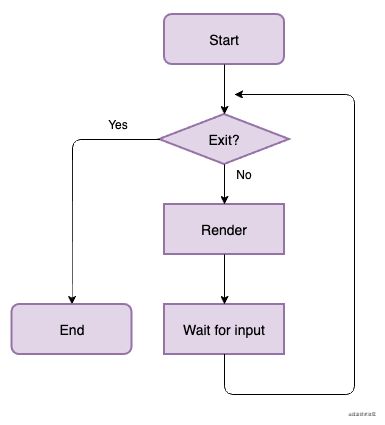
通常一个游戏程序的执行流程如下所示:
简单说就是一个不断等待输入、渲染界面的过程。
这种模型非常符合当下前端的开发思想:数据驱动UI。 因此基于各种前端框架的小游戏层出不穷。相比之下,用客户端开发同类应用成本则会高出不少。
如今有了Compose,客户端终于在开发范式上追上了前端的步伐,像前端那样开发小游戏成为可能。
2. 基于MVI的游戏架构
MVI即Model-View-Intent,它受前端框架的启发,提倡一种单向数据流的设计思想,非常适合在Compose项目中实现逻辑部分,可以彻底贯彻数据驱动UI的核心思想。
之前的文章里曾对MVI架构做过简单介绍,后续也计划对MVI与MVVM等其他架构做一个对比介绍。本文只聚焦MVI在俄罗斯方块游戏中的具体使用。
项目结构如下:
- View层:基于Compose打造,所有UI元素都由代码实现
- Model层:
ViewModel维护State的变化,游戏逻辑交由reduce处理 - V-M通信:通过
StateFlow驱动Compose刷新,用户事件由Action分发至ViewModel
ViewModel的核心代码如下:
class GameViewModel : ViewModel() {


    private val _viewState: MutableStateFlow<ViewState> = MutableStateFlow(ViewState())

    //Provide State to observed by UI layer
    val viewState = _viewState.asStateFlow()


    //dispatch Action from UI layer
    fun dispatch(action: Action) {

        viewModelScope.launch {

           _viewState.value = reduce(viewState.value, action)
        }
    }

    //update viewState according to the Action
    private fun reduce(state: ViewState, action: Action): ViewState =
        when(action) {
      //handle

            Action.Reset -> {

                //略...
                state.copy(...)
            }

            Action.Move -> {

                //略...
                state.copy(...)
            }

            //略...
        }
}
接下来我们看一下View层和Model层的具体实现。
3. View Layer:基于Compose实现
作为一个单页面的游戏没有页面跳转,界面由以下几部分构成:
- GameBody:绘制按键、处理用户输入
- GameScreen:
- BrickMatrix:绘制方块矩阵背景、下落中的方块
- Scoreboard:显示游戏得分、时钟等信息
接下来重点介绍一下方块区域(BrickMatrix)以及游戏机身(GameBody)的绘制
3.1 方块绘制(BrickMatrix)
方块区域由12 * 24 的小方块组成的矩阵构成。为了模拟液晶屏的显示效果,需要分别绘制浅色的矩阵以及深色的砖块(下落中的以及底部的),所有元素均基于Compose的Canvas绘制。
关于Canvas的基本使用,我之前的文章中有介绍:https://blog.csdn.net/vitaviva/article/details/115257165
绘制背景矩阵
首先绘制每个砖块单元的图形,形状为正方形:
![]()
drawBrick:
Canvas中绘制图形需要借助DrawScope,为了便于使用,我们定义drawBrick为DrawScope的扩展函数
private fun DrawScope.drawBrick(
    brickSize: Float,//每一个方块的size
    offset: Offset,//在矩阵中的偏移位置
    color: Color//砖块颜色
) {


    //根据Offset计算实际位置
    val actualLocation = Offset(
        offset.x * brickSize,
        offset.y * brickSize
    )

    val outerSize = brickSize * 0.8f
    val outerOffset = (brickSize - outerSize) / 2

    //绘制外部矩形边框
    drawRect(
        color,
        topLeft = actualLocation + Offset(outerOffset, outerOffset),
        size = Size(outerSize, outerSize),
        style = Stroke(outerSize / 10)
    )

    val innerSize = brickSize * 0.5f
    val innerOffset = (brickSize - innerSize) / 2

    //绘制内部矩形方块
    drawRect(
        color,
        actualLocation + Offset(innerOffset, innerOffset),
        size = Size(innerSize, innerSize)
    )

}
drawMatrix:
搞定砖块单元,绘制矩阵如下
private fun DrawScope.drawMatrix(
    brickSize: Float,
    matrix: Pair<Int, Int> //横向、纵向的数量: 12 * 24
) {

    (0 until matrix.first).forEach {
      x ->
        (0 until matrix.second).forEach {
      y ->
            //遍历调用drawBrick
            drawBrick(
                brickSize,
                Offset(x.toFloat(), y.toFloat()),
                BrickMatrix
            )
        }
    }
}
绘制下落的砖块
一个个砖块单元根据摆放位置的不同,组成不同形状(Shape)的下落砖块。
用相对top-left的Offset定义每个方块的摆放位置,每种Shape无非是一组Offset的列表。
Shape:
我们如下定义所有Shape的常量:
val SpiritType = listOf(
    listOf(Offset(1, -1), Offset(1, 0), Offset(0, 0), Offset(0, 1)),//Z
    listOf(Offset(0, -1), Offset(0, 0), Offset(1, 0), Offset(1, 1)),//S
    listOf(Offset(0, -1), Offset(0, 0), Offset(0, 1), Offset(0, 2)),//I
    listOf(Offset(0, 1), Offset(0, 0), Offset(0, -1), Offset(1, 0)),//T
    listOf(Offset(1, 0), Offset(0, 0), Offset(1, -1), Offset(0, -1)),//O
    listOf(Offset(0, -1), Offset(1, -1), Offset(1, 0), Offset(1, 1)),//L
    listOf(Offset(1, -1), Offset(0, -1), Offset(0, 0), Offset(0, 1))//J
)
Spirit:
由Shape和Offset便可以决定下落砖块在Matrix中的具体位置。定义Spirit代表下落砖块:
data class Spirit(
    val shape: List<Offset> = emptyList(),
    val offset: Offset = Offset(0, 0),
) {

    val location: List<Offset> = shape.map {
      it + offset }
}
drawSpirit
最后调用drawBrick,绘制下落砖块
fun DrawScope.drawSpirit(spirit: Spirit, brickSize: Float, matrix: Pair<Int, Int>) {

    clipRect(
        0f, 0f,
        matrix.first * brickSize,
        matrix.second * brickSize
    ) {

        spirit.location.forEach {

            drawBrick(
                brickSize,
                Offset(it.x, it.y),
                BrickSpirit
            )
        }
    }
}
3.2 游戏机身(GameBody)
GameBody的核心是按钮的绘制以及事件处理
绘制Button
button的绘制很简单, 通过RoundedCornerShape实现圆形、通过Modifier添加阴影增加立体感
GameButton:
@Composable
fun GameButton(
    modifier: Modifier = Modifier,
    size: Dp,
    content: @Composable (Modifier) -> Unit
) {

    val backgroundShape = RoundedCornerShape(size / 2)

    Box(
        modifier = modifier
            .shadow(5.dp, shape = backgroundShape)
            .size(size = size)
            .clip(backgroundShape)
            .background(
                brush = Brush.verticalGradient(
                    colors = listOf(
                        Purple200,
                        Purple500
                    ),
                    startY = 0f,
                    endY = 80f
                )
            )

    ) {

        content(Modifier.align(Alignment.Center))
    }
}
添加事件
当按下方向键不放时希望方块能持续移动。Modifier.clickable()只能设置单击事件,不满足使用需求,需要让button能处理连发事件。
Modifier.pointerIneropFilter:拦截MotionEvent:
通常需要通过处理MotionEvent实现类似需求,Compose中提供了处理MotionEvent的方法:
Modifier.pointerIneropFilter {
      //it:MotionEvent //可以获取当前MotionEvent
    when(it.action) {

        ACTION_DOWN -> {

            ...
        }

        ...
    }
}
Modifier.indication:设置click背景色
拦截MotionEvent后,默认的button按下时背景色变化的逻辑失效。此时可以借助Modifier.indication进行弥补,indication允许我们根据当前按钮的交互状态改变显示状态:
Modifier
    .indication(
        interactionSource = interactionSource, //观察交互状态
        indication = rememberRipple() //设置Ripple风格的显示效果
    )
    .pointerInteropFilter {

        when(it.action) {

            ACTION_DOWN -> {

                 val interaction = PressInteraction.Press(Offset(50f, 50f))
                 interactionSource.emit(interaction) //通知交互状态的改变、改变显示状态
            }

        ...
    }
}
ReceiveChannel发送连发事件:
添加了Modifier.pointerIneropFilter和Modifier.indication的完整代码如下:
@Composable
fun GameButton(
    modifier: Modifier = Modifier,
    size: Dp,
    onClick: () -> Unit = {
     },
    content: @Composable (Modifier) -> Unit
) {

    val backgroundShape = RoundedCornerShape(size / 2)
    lateinit var ticker: ReceiveChannel<Unit> //定时器

    val coroutineScope = rememberCoroutineScope()
    val pressedInteraction = remember {
      mutableStateOf<PressInteraction.Press?>(null) }
    val interactionSource = MutableInteractionSource()

    Box(
        modifier = modifier
            .shadow(5.dp, shape = backgroundShape)
            .size(size = size)
            .clip(backgroundShape)
            .background(
                brush = Brush.verticalGradient(
                    colors = listOf(
                        Purple200,
                        Purple500
                    ),
                    startY = 0f,
                    endY = 80f
                )
            )
            .indication(interactionSource = interactionSource, indication = rememberRipple())
            .pointerInteropFilter {

                when (it.action) {

                    ACTION_DOWN -> {

                        coroutineScope.launch {

                            // Remove any old interactions if we didn't fire stop / cancel properly
                            pressedInteraction.value?.let {
      oldValue ->
                                val interaction = PressInteraction.Cancel(oldValue)
                                interactionSource.emit(interaction)
                                pressedInteraction.value = null
                            }
                            val interaction = PressInteraction.Press(Offset(50f, 50f))
                            interactionSource.emit(interaction)
                            pressedInteraction.value = interaction
                        }


                        ticker = ticker(initialDelayMillis = 300, delayMillis = 60)
                        coroutineScope.launch {

                            //ticker发送连发事件
                            ticker
                                .receiveAsFlow()
                                .collect {
      onClick() }
                        }
                    }
                    //略...
                }
                true
            }

    ) {

        content(Modifier.align(Alignment.Center))
    }
}
使用ticker()创建连发事件源的ReceiveChannel
组装Button、发送Action
最后在GameBody中对各Button进行布局,并在OnClick中向ViewModel发送Action。
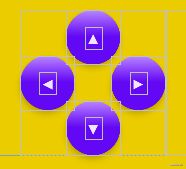
例如,四个方向键的布局:
Box(
    modifier = Modifier
        .fillMaxHeight()
        .weight(1f)
) {

    GameButton(
        Modifier.align(Alignment.TopCenter),
        onClick = {
      clickable.onMove(Direction.Up) },
        size = DirectionButtonSize
    ) {

        ButtonText(it, stringResource(id = R.string.button_up))
    }
    GameButton(
        Modifier.align(Alignment.CenterStart),
        onClick = {
      clickable.onMove(Direction.Left) },
        size = DirectionButtonSize
    ) {

        ButtonText(it, stringResource(id = R.string.button_left))
    }
    GameButton(
        Modifier.align(Alignment.CenterEnd),
        onClick = {
      clickable.onMove(Direction.Right) },
        size = DirectionButtonSize
    ) {

        ButtonText(it, stringResource(id = R.string.button_right))
    }
    GameButton(
        Modifier.align(Alignment.BottomCenter),
        onClick = {
      clickable.onMove(Direction.Down) },
        size = DirectionButtonSize
    ) {

        ButtonText(it, stringResource(id = R.string.button_down))
    }

}
Clicable:分发事件
clickable负责事件分发:
data class Clickable constructor(
    val onMove: (Direction) -> Unit,//移动
    val onRotate: () -> Unit,//旋转
    val onRestart: () -> Unit,//开始、重置游戏
    val onPause: () -> Unit,//暂停、恢复游戏
    val onMute: () -> Unit//打开、关闭游戏音乐
)
3.3 订阅游戏状态(ViewState)
GameScreen订阅viewModel的数据实现UI的刷新。ViewState是唯一的数据源,遵循Single Source Of Truth的要求。
Compose中使用ViewModel
添加viewmodel-compose的支持,方便在Composable中访问ViewModle
implementation "androidx.lifecycle:lifecycle-viewmodel-compose:1.0.0-alpha03"
@Composable
fun GameScreen(modifier: Modifier = Modifier) {


    val viewModel = viewModel<GameViewModel>() //获取ViewModel
    val viewState by viewModel.viewState.collectAsState() //订阅State

    Box() {


        Canvas(
            modifier = Modifier.fillMaxSize()
        ) {


            val brickSize = min(
                size.width / viewState.matrix.first,
                size.height / viewState.matrix.second
            )

            //仅负责绘制UI,没有任何逻辑处理
            drawMatrix(brickSize, viewState.matrix)
            drawBricks(viewState.bricks, brickSize, viewState.matrix)
            drawSpirit(viewState.spirit, brickSize, viewState.matrix)

        }

        //略...

    }

}
瞧! 有了MVI的加持,Compose无需再染指任何逻辑,仅负责drawXXX即可,逻辑全部交由ViewModel处理。
接下来,我们移步ViewModel的实现。
4. Model Layer :基于ViewModel实现
MVI中的Model层一般负责数据请求以及State的更新。俄罗斯方块中没有数据请求场景,只处理本地state更新即可。
4.1 ViewState
遵循SSOT原则,所有影响UI刷新的数据都定义在ViewState中
data class ViewState(
        val bricks: List<Brick> = emptyList(), //底部落地成盒的砖块
        val spirit: Spirit = Empty, // 下落中的砖块
        val spiritReserve: List<Spirit> = emptyList(), //后补t砖块(Next)
        val matrix: Pair<Int, Int> = MatrixWidth to MatrixHeight,//矩阵尺寸
        val gameStatus: GameStatus = GameStatus.Onboard,//游戏状态
        val score: Int = 0, //得分
        val line: Int = 0, //下了多少行
        val level: Int = 0,//当前级别(难度)
        val isMute: Boolean = false,//是否静音
    )
enum class GameStatus {

    Onboard, //游戏欢迎页
    Running, //游戏进行中
    LineClearing,// 消行动画中
    Paused,//游戏暂停
    ScreenClearing, //清屏动画中
    GameOver//游戏结束
}
如上,甚至连消行、清屏这类逻辑也统一由ViewModel负责,Compose无脑反应State即可。
4.2 Action
用户的输入通过Action通知到ViewModel,目前支持以下几种Action:
sealed class Action {

    data class Move(val direction: Direction) : Action() //点击方向键
    object Reset : Action() //点击start
    object Pause : Action() //点击pause
    object Resume : Action() //点击resume
    object Rotate : Action() //点击rotate
    object Drop : Action() //点击↑,直接掉落
    object GameTick : Action() //砖块下落通知
    object Mute : Action()//点击mute
}
4.3 reduce
ViewModel接收到Action后,分发到reduce、更新ViewState。
GameTicker:砖块下落Action
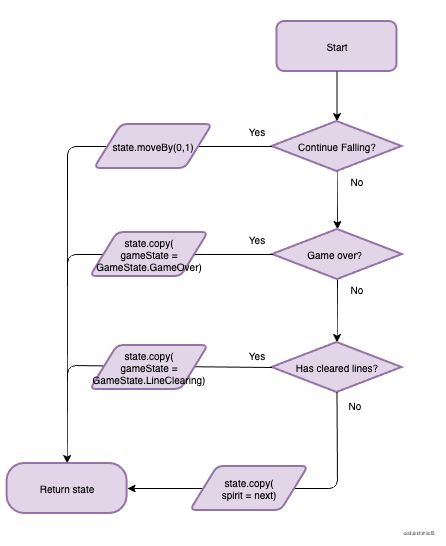
以最核心的GameTicker为例,其他所有Action都是用户触发的,唯有GameTicker是自动触发,用来保证砖块按一定速度下降。
基本流程如上图所示,根据Spirit在当前Matrix中的状态更新ViewStae:
- 没有触达底部:
- Spirit在y轴前进一步
- 触达底部,但没有成功消行:
- 更新Next Spirit
- 更新下沉到底部的bricks(吸收Spirit的brick)
- 成功消行:
- 更新Next Spirit
- 更新GameState到LineClearing
- 屏幕溢出:
- 更新GameState到GameOver
fun reduce(state: ViewState, action: Action) {

    when(action) {


        Action.GameTick -> run {


             // 没有触达底部,y轴偏移+1
             val spirit = state.spirit.moveBy(Direction.Down.toOffset())
             if (spirit.isValidInMatrix(state.bricks, state.matrix)) {

                  emit(state.copy(spirit = spirit))
             }

            // GameOver
            if (!state.spirit.isValidInMatrix(state.bricks, state.matrix)) {

                //砖块超出屏幕上界,游戏结束
            }

            // 更新底部Bricks,
            // updateBricks: 底部Bricks的状态信息
            // clearedLine:消行信息
            val (updatedBricks, clearedLines) = updateBricks(
                state.bricks,
                state.spirit,
                matrix = state.matrix
            )

            //updatedBricks返回的底部Bricks的信息由三个List组成
            val (noClear, clearing, cleared) = updatedBricks

            if (clearedLines != 0) {

                // 成功消行
                // 执行消行动画,见后文
            } else {

                //没有消行
                emit(newState.copy(
                        bricks = noClear,
                        spirit = state.spiritNext))
            }
        }//end of run
    }
}
isValidInMatrix()判断Spirit相对于Matrix是否已经出界,出界以为游戏结束。- 当
Spirit触达底部时,updatedBricks负责更新底部Bricks数据,即将Spirit的bricks吸收添加到底部Bricks中。
Brick的定义很简单,就是在Matrix中的Offset
data class Brick(val location: Offset = Offset(0, 0))
updatedBricks返回三个List,分别记录消行动画过程中Bricks的中间状态
- noClear: 未消行的bricks
- clearing: 消行中的bricks(相当于消除的空行设置为
Invisiable) - cleared: 消行后的bricks(相当于消除的空行设置为
Gone)
| noClear | clearing | cleared |
|---|---|---|
 |
 |
 |
消行动画:
基于返回的List,通过更新state,实现消行动画
launch {

    //animate the clearing lines
    repeat(5) {

        emit(
            //间隔100ms,交替显示noClear/clearing
            state.copy(
                gameStatus = GameStatus.LineClearing,
                spirit = Empty,
                bricks = if (it % 2 == 0) noClear else clearing
            )
        delay(100)
    }

    //delay emit new state
    emit(
        //动画结束,bricks更新到cleared
        state.copy(
            spirit = state.spiritNext,
            bricks = cleared,
            gameStatus = GameStatus.Running
        )
    )
}
5. 活用@Preview
文章最后再聊一聊@Preview。
由于AndroidStudio的XML预览功能很鸡肋,很多Android开发者都习惯于通过实机运行查看UI。Compose的@Preview的预览效果可以做到与真机无异,实现所见所即得开发。因此,建议为所有有调试需要的Composable配备@Preview,将大大提高你的UI开发效率。
由于@Preview不能接受业务参数,Composable的接口定义需要秉承对Preview友好的原则,尽量为其添加可预览的默认值
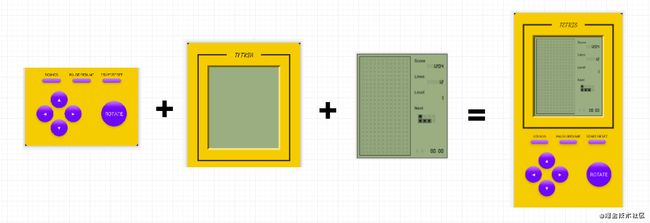
借助@Preview,我们可以方便地进行局部UI的预览,并且可以组合各个@Preview的Composalbe来预览全貌。UI开发如同装配车间那样实现流水化作业:
除了基本预览以外@Preview还提供了例如互动预览、实机预览等更多使用功能。此外,通过右击还可以将预览UI直接保存为.png。 本游戏的AppIcon就是通过这种方式创建生成的。
6. 最后
篇幅有限,本文只能以小见大地介绍游戏的基本实现过程,其他更多功能的实现欢迎查阅源码了解。
整个游戏中,包括动画在内的所有的UI刷新全是由State驱动完成的,借助于Compose Compiler强大的编译期优化,即使再频繁的Recomposition(重组)也没有任何性能问题,运行起来十分流畅。
用Compose做游戏都如此流畅,更何况普通的UI?在性能层面已无需担心,未来随着功能层面的不断完善,Compose的时代或许真的要来了,自Android诞生就存在的android.view.View体系也将迎来它的谢幕。。Game Over
项目地址
https://github.com/vitaviva/compose-tetris
