一、异步任务
- 使用@EnableAsync开启异步注解功能
@EnableAsync    // 开启异步注解功能
@SpringBootApplication
public class Springboot04TaskApplication {

    public static void main(String[] args) {
        SpringApplication.run(Springboot04TaskApplication.class, args);
    }
}
- 使用@Async标明方法为异步方法
package com.pyy.task.service;

import org.springframework.scheduling.annotation.Async;
import org.springframework.stereotype.Service;

/**
 * Created by Administrator on 2018/7/8 0008.
 */
@Service
public class AsyncService {

    /**
     * 标明该方法为异步方法:系统会单独开一个线程池执行该方法
     */
    @Async
    public void sendMsg() {
        try {
            Thread.sleep(3000);
        } catch (InterruptedException e) {
            e.printStackTrace();
        }
        System.out.println("发送短信中。。。");
    }
}
- 编写Controller调用
package com.pyy.task.controller;

import com.pyy.task.service.AsyncService;
import org.springframework.beans.factory.annotation.Autowired;
import org.springframework.web.bind.annotation.GetMapping;
import org.springframework.web.bind.annotation.RestController;

/**
 * Created by Administrator on 2018/7/8 0008.
 */
@RestController
public class AsyncController {

    @Autowired
    AsyncService asyncService;

    @GetMapping("/msg")
    public String  sendMsg() {
        // 异步调用
        asyncService.sendMsg();

        System.out.println("其它业务代码");
        return "success";
    }
}
结果:
http-nio-8080-exec-10--> 其它业务代码
SimpleAsyncTaskExecutor-1--> 发送短信中。。。
二、定时任务
后台项目开发中经常会用到定时任务,现在实现定时任务都方式也是多种多样。下面列举几种常见的定时任务实现方式:
1. Quartz:Quartz的使用相当广泛,它是一个功能强大的调度器,当然使用起来也相对麻烦;
2. java.util包里的Timer,它也可以实现定时任务但是功能过于单一所有使用很少。
3. 就是我们今天要介绍的Spring自带的定时任务Schedule,其实可以把它看作是一个简化版的,轻量级的Quartz,使用起来也相对方便很多。
- 创建定时任务
import org.springframework.boot.SpringApplication;
import org.springframework.boot.autoconfigure.SpringBootApplication;
import org.springframework.scheduling.annotation.EnableScheduling;

/**
 * Description: 启动类 官网:www.fhadmin.org
 * Designer: jack
 * Date: 2017/8/10
 * Version: 1.0.0
 */
@SpringBootApplication
@EnableScheduling
public class Application {
    public static void main(String[] args) {
        SpringApplication.run(Application.class, args);
    }
注意这里的 @EnableScheduling 注解,它的作用是发现注解@Scheduled的任务并由后台执行。没有它的话将无法执行定时任务。
引用官方文档原文:
@EnableSchedulingensures that a background task executor is created. Without it, nothing gets scheduled.
import org.slf4j.Logger;
import org.slf4j.LoggerFactory;
import org.springframework.scheduling.annotation.Scheduled;
import org.springframework.stereotype.Component;

@Component
public class ScheduledTasks {

    private Logger logger = LoggerFactory.getLogger(ScheduledTasks.class);

    private int fixedDelayCount = 1;
    private int fixedRateCount = 1;
    private int initialDelayCount = 1;
    private int cronCount = 1;

    @Scheduled(fixedDelay = 5000)        //fixedDelay = 5000表示当前方法执行完毕5000ms后,Spring scheduling会再次调用该方法
    public void testFixDelay() {
        logger.info("===fixedDelay: 第{}次执行方法", fixedDelayCount++);
    }

    @Scheduled(fixedRate = 5000)        //fixedRate = 5000表示当前方法开始执行5000ms后,Spring scheduling会再次调用该方法
    public void testFixedRate() {
        logger.info("===fixedRate: 第{}次执行方法", fixedRateCount++);
    }

    @Scheduled(initialDelay = 1000, fixedRate = 5000)   //initialDelay = 1000表示延迟1000ms执行第一次任务
    public void testInitialDelay() {
        logger.info("===initialDelay: 第{}次执行方法", initialDelayCount++);
    }

    @Scheduled(cron = "0 0/1 * * * ?")  //cron接受cron表达式,根据cron表达式确定定时规则
    public void testCron() {
        logger.info("===initialDelay: 第{}次执行方法", cronCount++);
    }

}
我们使用@Scheduled来创建定时任务 这个注解用来标注一个定时任务方法。官网:www.fhadmin.org 通过看@Scheduled源码可以看出它支持多种参数:
(1)cron:cron表达式,指定任务在特定时间执行;

(2)fixedDelay:表示上一次任务执行完成后多久再次执行,参数类型为long,单位ms;

(3)fixedDelayString:与fixedDelay含义一样,只是参数类型变为String;

(4)fixedRate:表示按一定的频率执行任务,参数类型为long,单位ms;

(5)fixedRateString: 与fixedRate的含义一样,只是将参数类型变为String;

(6)initialDelay:表示延迟多久再第一次执行任务,参数类型为long,单位ms;

(7)initialDelayString:与initialDelay的含义一样,只是将参数类型变为String;

(8)zone:时区,默认为当前时区,一般没有用到。
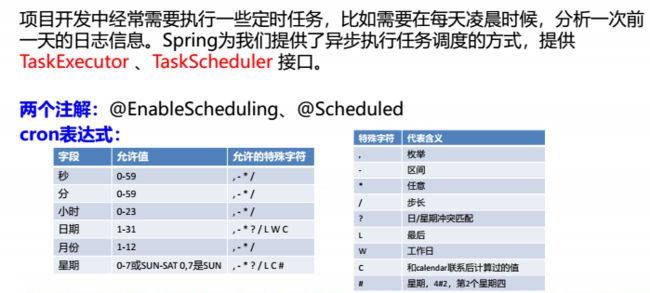
cron详解
1. cron表达式定义
Cron表达式是一个字符串,是由空格隔开的6或7个域组成,每一个域对应一个含义(秒 分 时 每月第几天 月 星期 年)其中年是可选字段。
但是,此处敲一下黑板,spring的schedule值支持6个域的表达式,也就是不能设定年,如果超过六个则会报错。
cron详解
(1)各域支持的字符类型
秒:可出现", - * /"四个字符,有效范围为0-59的整数

分:可出现", - * /"四个字符,有效范围为0-59的整数

时:可出现", - * /"四个字符,有效范围为0-23的整数

每月第几天:可出现", - * / ? L W C"八个字符,有效范围为0-31的整数

月:可出现", - * /"四个字符,有效范围为1-12的整数或JAN-DEc

星期:可出现", - * / ? L C #"四个字符,有效范围为1-7的整数或SUN-SAT两个范围。1表示星期天,2表示星期一, 依次类推
(2)特殊字符含义
* : 表示匹配该域的任意值,比如在秒*, 就表示每秒都会触发事件。;

? : 只能用在每月第几天和星期两个域。表示不指定值,当2个子表达式其中之一被指定了值以后,为了避免冲突,需要将另一个子表达式的值设为“?”;

- : 表示范围,例如在分域使用5-20,表示从5分到20分钟每分钟触发一次

/ : 表示起始时间开始触发,然后每隔固定时间触发一次,例如在分域使用5/20,则意味着5分,25分,45分,分别触发一次.

, : 表示列出枚举值。例如:在分域使用5,20,则意味着在5和20分时触发一次。

L : 表示最后,只能出现在星期和每月第几天域,如果在星期域使用1L,意味着在最后的一个星期日触发。

W : 表示有效工作日(周一到周五),只能出现在每月第几日域,系统将在离指定日期的最近的有效工作日触发事件。注意一点,W的最近寻找不会跨过月份

LW : 这两个字符可以连用,表示在某个月最后一个工作日,即最后一个星期五。

# : 用于确定每个月第几个星期几,只能出现在每月第几天域。例如在1#3,表示某月的第三个星期日。
(3)表达式例子
引用spring官方注释:
Example patterns:
- "0 0 * * * *" = the top of every hour of every day.
- "*/10 * * * * *" = every ten seconds.
- "0 0 8-10 * * *" = 8, 9 and 10 o'clock of every day.
- "0 0/30 8-10 * * *" = 8:00, 8:30, 9:00, 9:30 and 10 o'clock every day.
- "0 0 9-17 * * MON-FRI" = on the hour nine-to-five weekdays
- "0 0 0 25 12 ?" = every Christmas Day at midnight
"0 0 * * * *"                      表示每小时0分0秒执行一次

" */10 * * * * *"                 表示每10秒执行一次

"0 0 8-10 * * *"                 表示每天8,9,10点执行

"0 0/30 8-10 * * *"            表示每天8点到10点,每半小时执行

"0 0 9-17 * * MON-FRI"     表示每周一至周五,9点到17点的0分0秒执行
"0 0 0 25 12 ?"                  表示每年圣诞节(12月25日)0时0分0秒执行

