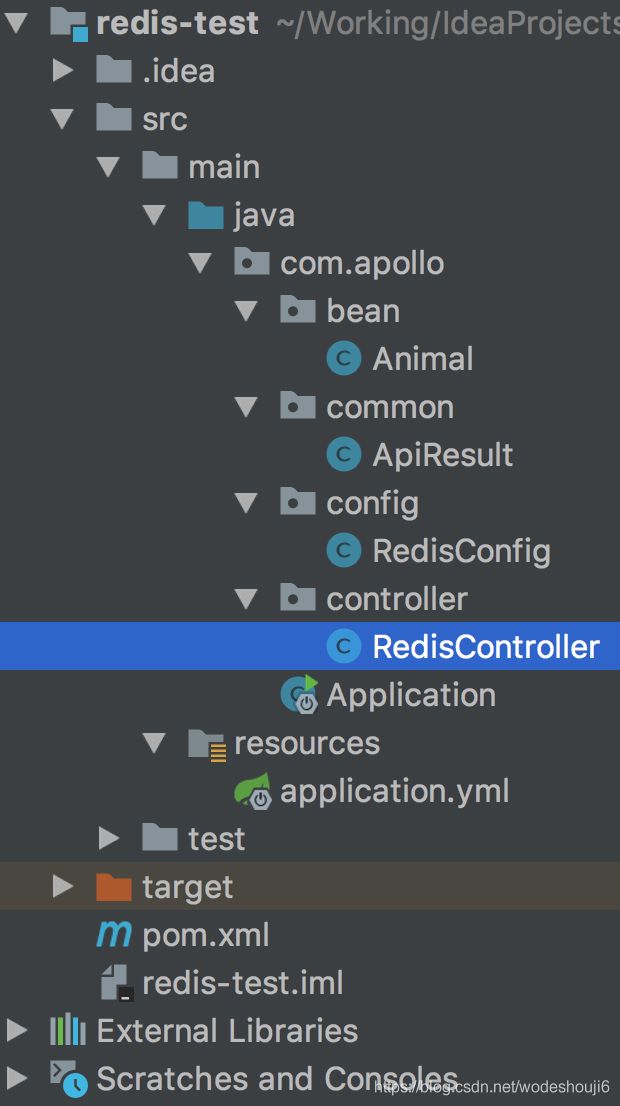
程序结构:
一、配置
1. 在pom.xml中添加依赖
pom.xml文件如下:
    4.0.0

    com.lyy
    redis-test
    0.1-SNAPSHOT


        org.springframework.boot
        spring-boot-starter-parent
        2.1.1.RELEASE


            org.springframework.boot
            spring-boot-starter-web


            org.springframework.boot
            spring-boot-starter-data-redis
其中,spring-boot-starter-web包含springmvc。
2. 配置application.yml
application.yml文件如下:
server:
  port: 11011
  servlet:
    context-path: /api/v1

spring:
  redis:
    # Redis数据库索引(默认为0)
    database: 0
    # Redis服务器地址
    host: 127.0.0.1
    # Redis服务器连接端口
    port: 6379
#     Redis服务器连接密码(默认为空)
#    password: 123456
3. 通过配置类,设置redis
RedisConfig类如下:
package com.apollo.config;

import com.fasterxml.jackson.databind.ObjectMapper;
import org.springframework.beans.factory.annotation.Autowired;
import org.springframework.cache.annotation.EnableCaching;
import org.springframework.context.annotation.Bean;
import org.springframework.context.annotation.Configuration;
import org.springframework.data.redis.connection.RedisConnectionFactory;
import org.springframework.data.redis.core.RedisTemplate;
import org.springframework.data.redis.serializer.GenericJackson2JsonRedisSerializer;
import org.springframework.data.redis.serializer.Jackson2JsonRedisSerializer;
import org.springframework.data.redis.serializer.StringRedisSerializer;

/**
 * @author :apollo
 * @since :Created in 2019/2/22
 */
@Configuration
@EnableCaching
public class RedisConfig {

    @Autowired
    private ObjectMapper objectMapper;

    /**
     * 自定义springSessionDefaultRedisSerializer对象,将会替代默认的SESSION序列化对象。
     * 默认是JdkSerializationRedisSerializer,缺点是需要类实现Serializable接口。
     * 并且在反序列化时如果异常会抛出SerializationException异常,
     * 而SessionRepositoryFilter又没有处理异常,故如果序列化异常时就会导致请求异常
     */
    @Bean(name = "springSessionDefaultRedisSerializer")
    public GenericJackson2JsonRedisSerializer getGenericJackson2JsonRedisSerializer() {
        return new GenericJackson2JsonRedisSerializer();
    }

    /**
     * JacksonJsonRedisSerializer和GenericJackson2JsonRedisSerializer的区别:
     * GenericJackson2JsonRedisSerializer在json中加入@class属性,类的全路径包名,方便反系列化。
     * JacksonJsonRedisSerializer如果存放了List则在反系列化的时候,
     * 如果没指定TypeReference则会报错java.util.LinkedHashMap cannot be cast。
     */
    @Bean
    public RedisTemplate redisTemplate(RedisConnectionFactory connectionFactory) {
        RedisTemplate redisTemplate = new RedisTemplate<>();
        redisTemplate.setConnectionFactory(connectionFactory);

        // 使用Jackson2JsonRedisSerialize 替换默认序列化
        Jackson2JsonRedisSerializer jackson2JsonRedisSerializer =
                            new Jackson2JsonRedisSerializer(Object.class);

        jackson2JsonRedisSerializer.setObjectMapper(objectMapper);
        // 设置value的序列化规则和 key的序列化规则
        redisTemplate.setValueSerializer(jackson2JsonRedisSerializer);
        redisTemplate.setKeySerializer(new StringRedisSerializer());

        redisTemplate.setHashKeySerializer(jackson2JsonRedisSerializer);
        redisTemplate.setHashValueSerializer(jackson2JsonRedisSerializer);

        redisTemplate.setDefaultSerializer(jackson2JsonRedisSerializer);
        redisTemplate.setEnableDefaultSerializer(true);
        redisTemplate.afterPropertiesSet();
        return redisTemplate;
    }
}
二、逻辑代码
1. 程序入口
package com.apollo;

import org.springframework.boot.SpringApplication;
import org.springframework.boot.autoconfigure.SpringBootApplication;

/**
 * @author :apollo
 * @since :Created in 2019/2/22
 */
@SpringBootApplication
public class Application  {
    public static void main(String[] args) {
        SpringApplication.run(Application.class, args);
    }
}
2. 实体类
实体类Animal如下:
package com.apollo.bean;

/**
 * @author :apollo
 * @since :Created in 2019/2/22
 */
public class Animal {
    private Integer weight;
    private Integer height;
    private String name;

    public Animal(Integer weight, Integer height, String name) {
        this.weight = weight;
        this.height = height;
        this.name = name;
    }

    ……这里是get、set方法
}
3. 公共返回类
package com.apollo.common;

/**
 * @author :apollo
 * @since :Created in 2019/2/22
 */
public class ApiResult {
    public static final Integer STATUS_SUCCESS = 0;
    public static final Integer STATUS_FAILURE = -1;

    public static final String DESC_SUCCESS = "操作成功";
    public static final String DESC_FAILURE = "操作失败";

    private Integer status;
    private String desc;
    private Object result;

    private ApiResult() {}

    private ApiResult(Integer status, String desc, Object result) {
        this.status = status;
        this.desc = desc;
        this.result = result;
    }

    //这个方法和Builder设计模式二选一即可,功能是重复的
    public static ApiResult success(Object result) {
        return success(DESC_SUCCESS, result);
    }

    //同上
    public static ApiResult success(String desc, Object result) {
        return new ApiResult(STATUS_SUCCESS, desc, result);
    }

    //同上
    public static ApiResult failure(Integer status) {
        return failure(status, null);
    }

    //同上
    public static ApiResult failure(Integer status, String desc) {
        return failure(status, desc, null);
    }

    //同上
    public static ApiResult failure(Integer status, String desc, Object result) {
        return new ApiResult(status, desc, result);
    }

    public static Builder builder() {
        return new Builder();
    }

    //静态内部类,这里使用Builder设计模式
    public static class Builder {
        private Integer status;
        private String desc;
        private Object result;

        public Builder status(Integer status) {
            this.status = status;
            return this;
        }

        public Builder desc(String desc) {
            this.desc = desc;
            return this;
        }

        public Builder result(Object result) {
            this.result = result;
            return this;
        }

        public ApiResult build() {
            return new ApiResult(status, desc, result);
        }
    }

    ……这里是get、set方法,这里的方法一定不能少,否则返回时无法将对象序列化
}
4. 请求处理Controller
RedisController类如下:
package com.apollo.controller;

import com.apollo.bean.Animal;
import com.apollo.common.ApiResult;
import org.springframework.beans.factory.annotation.Autowired;
import org.springframework.data.redis.core.RedisTemplate;
import org.springframework.web.bind.annotation.*;

import java.util.HashMap;
import java.util.Map;

/**
 * @author :apollo
 * @since :Created in 2019/2/22
 */
@RestController
@RequestMapping(value = "/redis")
public class RedisController {

    @Autowired
    private RedisTemplate redisTemplate;

    /**
     * 测试向redis中添加数据
     * @param id
     * @return
     */
    @GetMapping(value = "/{id}")
    public ApiResult addData2Redis(@PathVariable("id") Integer id) {

        redisTemplate.opsForValue().set("first", id);
        redisTemplate.opsForValue().set("second", "hello world");
        redisTemplate.opsForValue().set("third",
                new Animal(100, 200, "二狗子"));

        return ApiResult.builder()
                        .status(ApiResult.STATUS_SUCCESS)
                        .desc("添加成功")
                        .build();
    }

    /**
     * 测试从redis中获取数据
     * @return
     */
    @GetMapping("/redis-data")
    public ApiResult getRedisData() {
        Map result = new HashMap<>();
        result.put("first", redisTemplate.opsForValue().get("first"));
        result.put("second", redisTemplate.opsForValue().get("second"));
        result.put("third", redisTemplate.opsForValue().get("third"));

        return ApiResult.builder()
                .status(ApiResult.STATUS_SUCCESS)
                .desc("获取成功")
                .result(result)
                .build();
    }
}
注意:这里是返回ApiResult对象,需要将返回的对象序列化,所以ApiResult中的get/set方法是必须的,否则会报错:HttpMessageNotWritableException: No converter found for return value of type: class com.apollo.common.ApiResult,找不到ApiResult类型的转换器。
三、测试
1. 测试添加
使用postman请求http://localhost:11011/api/v1/redis/5,返回结果:
{
    "status": 0,
    "desc": "添加成功",
    "result": null
}
登录到redis,使用命令dbsize查看存储的数据量:
数据量为3,对应我们上边程序中的3步操作。
2. 测试获取
使用postman请求http://localhost:11011/api/v1/redis/redis-data,返回结果:
{
    "status": 0,
    "desc": "获取成功",
    "result": {
        "third": {
            "weight": 100,
            "height": 200,
            "name": "二狗子"
        },
        "first": 5,
        "second": "hello world"
    }
}
与我们之前存入的数据对比,是正确的。
四、代码地址
github地址:https://github.com/myturn0/redis-test.git
到此这篇关于Springboot项目中使用redis的配置详解的文章就介绍到这了,更多相关Springboot redis配置内容请搜索脚本之家以前的文章或继续浏览下面的相关文章希望大家以后多多支持脚本之家!

