逆天了!SpringBoot原来如此简单!
文章目录
-
- 1. 第一个springboot程序
- 2. IDEA快速创建springboot项目
- 3. Springboot自动装配原理
-
- 3.1 启动器
- 3.2 主程序
- 4. yaml
-
- 4.1 yaml语法
- 4.2 给属性赋值的几种方式
- 5. JSR303数据校验
- 6. 多环境配置及配置文件位置
-
- 6.1 配置文件可以存在的位置
- 6.2 多套配置环境直接快速切换
- 7. 自动配置原理再理解
-
- 7.1 精髓
- 7.2 其他
- 8. SpringBoot Web开发
-
- 8.1 静态资源导入
- 8.2 首页订制
- 8.3 图标订制
- 8.4 模板引擎
- 8.5 Thymeleaf语法
- 8.6 扩展装配SpringMVC
- 9. 员工管理系统
-
- 9.1 首页配置
- 9.2 国际化
- 9.3 登录功能实现
- 9.4 登录拦截器
- 9.5 展示员工列表
- 9.6 404页面处理
- 10. 整合JDBC
- 11. 整合Druid数据源
- 12. 整合Mybatis
- 13. SpringSecurity(安全)
-
- 13.1 用户认证和授权
- 13.2 注销及权限控制
- 13.3 记住我及登录页定制
- 13.3 记住我及登录页定制
1. 第一个springboot程序
springboot:https://start.spring.io/
通过该网站进行项目搭建,下载压缩包,解压后导入IDEA
程序的主入口(该类本身就是spring的一个组件):
@SpringBootApplication
public class HelloworldApplication {


	public static void main(String[] args) {

		SpringApplication.run(HelloworldApplication.class, args);
	}
}
springboot可以直接运行,内置了tomcat
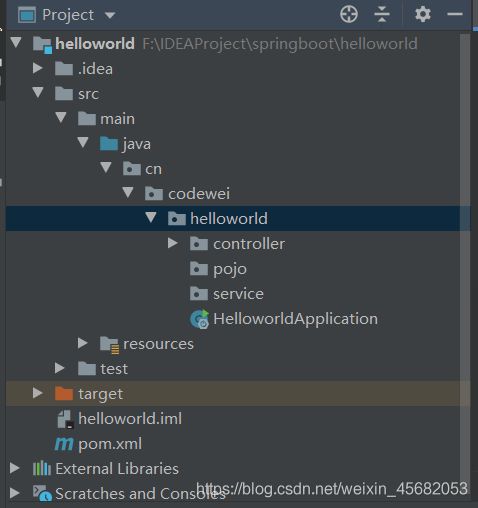
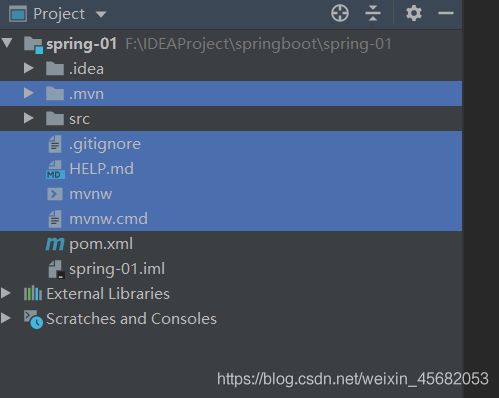
我们项目的目录要和程序的主入口类在同一目录下,如
写一个Controller,我们不需要任何配置,就可以直接访问
@RestController
public class TestController {


    @RequestMapping("/test")
    public String test(){

        return "hello springboot!";
    }
}

springboot核心原理:自动装配!!
springboot的核心依赖 pom.xml
<project xmlns="http://maven.apache.org/POM/4.0.0" xmlns:xsi="http://www.w3.org/2001/XMLSchema-instance"
	xsi:schemaLocation="http://maven.apache.org/POM/4.0.0 https://maven.apache.org/xsd/maven-4.0.0.xsd">
	<modelVersion>4.0.0modelVersion>

	<parent>
		<groupId>org.springframework.bootgroupId>
		<artifactId>spring-boot-starter-parentartifactId>
		<version>2.2.7.RELEASEversion>
		<relativePath/>
	parent>
	<groupId>cn.codeweigroupId>
	<artifactId>helloworldartifactId>
	<version>0.0.1-SNAPSHOTversion>
	<name>helloworldname>
	<description>Demo project for Spring Bootdescription>

	<properties>
		<java.version>1.8java.version>
	properties>

	<dependencies>


        <dependency>
            <groupId>org.springframework.bootgroupId>
            <artifactId>spring-boot-starterartifactId>
        dependency>


		<dependency>
			<groupId>org.springframework.bootgroupId>
			<artifactId>spring-boot-starter-webartifactId>
		dependency>


		<dependency>
			<groupId>org.springframework.bootgroupId>
			<artifactId>spring-boot-starter-testartifactId>
			<scope>testscope>
			<exclusions>
				<exclusion>
					<groupId>org.junit.vintagegroupId>
					<artifactId>junit-vintage-engineartifactId>
				exclusion>
			exclusions>
		dependency>
	dependencies>

	<build>
		<plugins>

			<plugin>
				<groupId>org.springframework.bootgroupId>
				<artifactId>spring-boot-maven-pluginartifactId>
			plugin>
		plugins>
	build>
project>
springboot所有的依赖都是使用spring-boot-starter开头的
使用tomcat作为默认的嵌入式容器
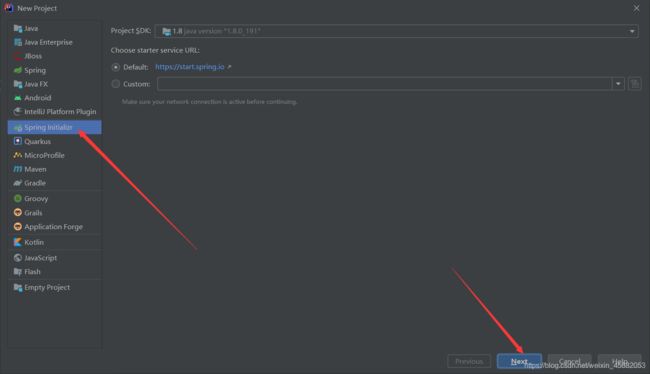
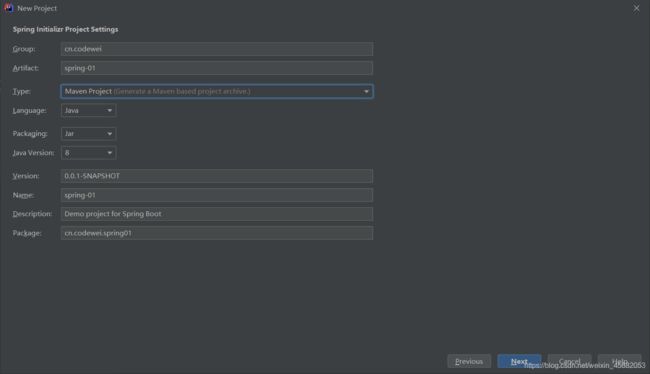
2. IDEA快速创建springboot项目
IDEA集成了springboot创建项目的网站,我们不再用去官网下载压缩包了
直接用idea创建一个springboot项目(开发一般直接在IDEA中创建)

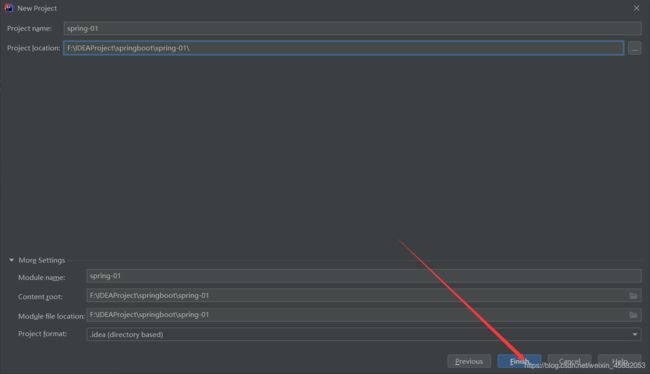
可以把多余的文件删除
可以在application.properties中修改配置
如,修改端口号
server.port=80
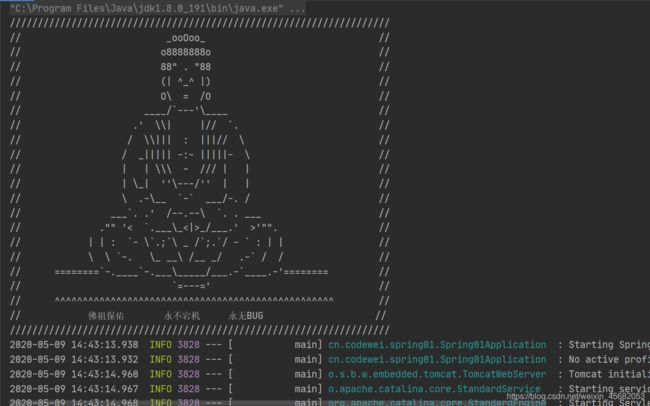
如,修改springboot banner
在resources目录下新建一个banner.txt,将从网上复制的banner粘贴进去
//                          _ooOoo_                               //
//                         o8888888o                              //
//                         88" . "88                              //
//                         (| ^_^ |)                              //
//                         O\  =  /O                              //
//                      ____/`---'\____                           //
//                    .'  \\|     |//  `.                         //
//                   /  \\|||  :  |||//  \                        //
//                  /  _||||| -:- |||||-  \                       //
//                  |   | \\\  -  /// |   |                       //
//                  | \_|  ''\---/''  |   |                       //
//                  \  .-\__  `-`  ___/-. /                       //
//                ___`. .'  /--.--\  `. . ___                     //
//              ."" '<  `.___\_<|>_/___.'  >'"".                  //
//            | | :  `- \`.;`\ _ /`;.`/ - ` : | |                 //
//            \  \ `-.   \_ __\ /__ _/   .-` /  /                 //
//      ========`-.____`-.___\_____/___.-`____.-'========         //
//                           `=---='                              //
//      ^^^^^^^^^^^^^^^^^^^^^^^^^^^^^^^^^^^^^^^^^^^^^^^^^^        //
//            佛祖保佑       永不宕机     永无BUG                    //
直接启动springboot项目就会看到springboot banner修改了
3. Springboot自动装配原理
pom.xml中
spring-boot-dependencies:核心依赖,在父工程中
springboot在父工程中也配置了解决资源过滤问题
我们在写或者引入springboot依赖的时候,不再需要指定版本,因为由这些版本仓库在父工程中
3.1 启动器
启动器
<dependency>
    <groupId>org.springframework.bootgroupId>
    <artifactId>spring-boot-starterartifactId>
dependency>
- 启动器:说白了就是springboot的启动场景(自认为启动器就是依赖jar包的集合)
- 比如:spring-boot-starter-web就会帮我们自动导入web环境所有的依赖
- springboot会将所有的功能场景,都变成一个个的启动器
- 我们要使用什么功能,就只需要找到对应的启动器就可以了
starter
3.2 主程序
@SpringBootApplication
public class HelloworldApplication {


	public static void main(String[] args) {

        // 将springboot应用启动
		SpringApplication.run(HelloworldApplication.class, args);
	}
}
-
注解
@SpringBootAppplication:标注这个类是一个SpringBoot应用:启动类下的所有资源被导入

@SpringBootConfiguration:springboot的配置
    @Configuration:spring配置类
    	@Component:说明这也是spring的一个组件
@EnableAutoConfiguration:自动配置
    @AutoConfigurationPackage:自动配置包
    	@Import(AutoConfigurationPackages.Registrar.class):自动配置包注册
    @Import(AutoConfigurationImportSelector.class):自动配置导入选择
//获取所有的配置(AutoConfigurationImportSelector类下)
List<String> configurations = getCandidateConfigurations(annotationMetadata, attributes);
获取候选的配置(AutoConfigurationImportSelector类下)
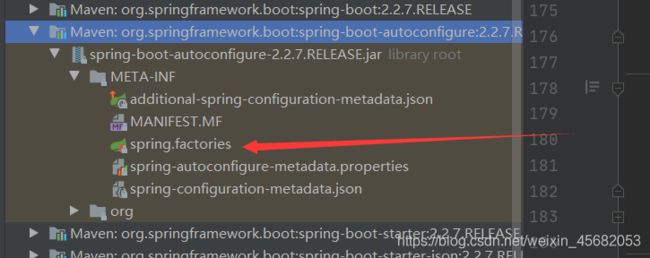
protected List<String> getCandidateConfigurations(AnnotationMetadata metadata, AnnotationAttributes attributes) {

    List<String> configurations = SpringFactoriesLoader.loadFactoryNames(getSpringFactoriesLoaderFactoryClass(),
                                                                         getBeanClassLoader());
    Assert.notEmpty(configurations, "No auto configuration classes found in META-INF/spring.factories. If you "
                    + "are using a custom packaging, make sure that file is correct.");
    return configurations;
}
META-INF/spring.factories:自动配置的核心文件
自动配置类中核心注解:@ConditionalOnxxx:如果这里的条件都满足,才会生效
…
结论:springboot所有的自动配置都在启动类中被扫描并加载:
spring.factories所有的自动配置类都在这里面,但是不一定生效,要判断条件是否成立,只要导入了对应的starter,就有对应的启动器了,有了启动器,我们自动装配就会生效,然后就配置成功了- springboot在启动的时候,从类路径下/META-INF/
spring.factories获取指定的值 - 将这些自动配置的类导入容器,自动配置就会生效,帮我进行自动配置
- 以前我们需要自动配置的东西,现在springboot帮我们做了
- 整合JAVAEE,解决方案和自动配置的东西都在spring-boot-autoconfigure-xxx.RELEASE.jar这个包下
- 它会把所有需要导入的组件,以类名的方式返回,这些组件就会被添加到容器
- 容器中也会存在非常多的xxxAutoConfiguration的文件(@Bean),就是这些类给容器中导入了这个场景需要的所有组件,并自动配置,@Configuration,JavaConfig!
- 有了自动配置类,免去了我们手动编写配置文件的工作
- springboot在启动的时候,从类路径下/META-INF/
-
SpringApplication.run(xxxApplication.class, args);
SpringApplication类
run方法
- SpringApplication这个类做了一下四件事情:
- 推断应用的类型是普通的项目还是web项目
- 查找并加载所有可用初始化容器,设置到initializers属性中
- 找出所有的应用程序监听器,设置到listeners属性中
- 推断并设置main方法定义类,找出运行的主类
- SpringApplication这个类做了一下四件事情:
4. yaml
springboot官方推荐yaml格式的配置文件,而不推荐使用properties文件
springboot使用一个全局的配置文件,配置文件名称是固定的
-
application.properties
语法:key=value
-
application.yaml
语法:key:空格 value
配置文件作用:修改SpringBoot自动配置的默认值,因为SpringBoot在底层都给我们配置好了
-
yaml中的语法,如
server: port:8080 -
xml中的语法,如
<server>
	<port>8080port>
server>
4.1 yaml语法
yaml语法对缩进(空格)要求极其严格!!
-
普通的key-value
name: codewei -
对象
student:
	name: codewei
	age: 12
对象的行内写法
student: { name: codewei,age: 12} -
数组
pets:
	- cat
	- dog
数组的行内写法
pets: [cat,dog]
4.2 给属性赋值的几种方式
yaml可以直接给实体类赋值,如:
-
实体类
@Component
public class Dog {

    private String name;
    private Integer age;
	...
    有参无参构造
    Getter Setter方法
}
@Component public class Person { private String name; private Integer age; private Boolean happy; private Date birth; private Map<String,Object> map; private List<Object> list; private Dog dog; ... 有参无参构造 Getter Setter方法 }曾经我们通过@Value(“xxx”)或@Autowired的方式给属性赋值,而现在我们可以使用yaml
-
yaml配置
person: name: 唐嫣 age: 36 happy: true birth: 1986/12/21 map: k1: v1 k2: v2 list: - l1 - l2 dog: name: 旺财 age: 12 -
在实体类上添加注解 @ConfigurationProperties(prefix=“xxx”) 注解中的值对应yaml中的对象名
@Component
@ConfigurationProperties(prefix="person")
public class Person {

    private String name;
    private Integer age;
    private Boolean happy;
    private Date birth;
    private Map<String,Object> map;
    private List<Object> list;
    private Dog dog;
    ...
}
注意:yaml中的键名要和实体类中的属性名一致,否则实体类对应属性的值为null
添加注解后,可能会出现一个红条,但是不影响程序正常运行

解决方法:
添加依赖
<dependency>
    <groupId>org.springframework.bootgroupId>
    <artifactId>spring-boot-configuration-processorartifactId>
    <optional>trueoptional>
dependency>
-
测试结果

也可以使用properties文件给实体类赋值
-
properties文件
name=唐嫣 age=23 -
在实体类上添加注解
通过注解@PropertySource(value=“classpath:xxx”) 加载指定properties配置文件
然后通过@Value进行一一赋值,通过SPEL表达式将配置文件中的值取出(SPEL和E表达式基本相同,${xxx})
@Component
@PropertySource(value = "classpath:application.properties")
public class Person {

    @Value("${name}")
    private String name;
    @Value("${age}")
    private Integer age;
    ...
}
测试结果,因为我们在配置文件中只给name和age赋值,所以后面的都为null
在yaml文件中,同样支持SPEL语法,如
person:
  name: 唐嫣${
     random.uuid}  #随机uuid
  age: 36${
     random.int}    #随机数
  happy: true
  birth: 1986/12/21
  map:
    k1: v1
    k2: v2
  list:
    - l1
    - l2
  dog:
    name: ${
     person.hello:hello}旺财  #如果persion.hello值不存在,则会为冒号后面的值,如果存在,则为这个值
    age: 12
测试结果
![]()
| @ConfigurationProperties | @Value | |
|---|---|---|
| 功能 | 批量注入配置文件中的属性 | 一个个指定 |
| 松散绑定(松散语法) | 支持 | 不支持 |
| SPEL | 不支持 | 支持 |
| JSR303数据校验 | 支持 | 不支持 |
| 复杂类型封装 | 支持 | 不支持 |
-
松散绑定:比如我的yaml中写的last-name,这个和lastName是一样的, - 后面跟着的字母默认是大写的,这就是松散绑定
-
JSR303数据校验:这个就是我们可以在字段是增加一层过滤验证,可以保证数据的合法性
-
复杂类型封装:yaml中可以封装对象,使用@Value就不支持
5. JSR303数据校验
注解@Validate添加到实体类上,如
@Component
@ConfigurationProperties(prefix = "person")
@Validated //数据校验
public class Person {


    @Email  // 指定email属性要符合邮箱格式,可以指定一些值,如@Email(message="邮箱格式错误")
    private String email;
    private String name;
    private Integer age;
    private Boolean happy;
    private Date birth;
    private Map<String,Object> map;
    private List<Object> list;
    private Dog dog;
    ...
}
person:
  email: xxx
  name: 唐嫣${
     random.uuid}  #随机uuid
  age: ${
     random.int}    #随机数
  happy: true
  birth: 1986/12/21
  ....
测试结果:

还有很多注解:(前提必须在实体类上写上了@Validated)
| Constraint | 详细信息 |
|---|---|
@Null |
被注释的元素必须为 null |
@NotNull |
被注释的元素必须不为 null |
@AssertTrue |
被注释的元素必须为 true |
@AssertFalse |
被注释的元素必须为 false |
@Min(value) |
被注释的元素必须是一个数字,其值必须大于等于指定的最小值 |
@Max(value) |
被注释的元素必须是一个数字,其值必须小于等于指定的最大值 |
@DecimalMin(value) |
被注释的元素必须是一个数字,其值必须大于等于指定的最小值 |
@DecimalMax(value) |
被注释的元素必须是一个数字,其值必须小于等于指定的最大值 |
@Size(max, min) |
被注释的元素的大小必须在指定的范围内 |
@Digits (integer, fraction) |
被注释的元素必须是一个数字,其值必须在可接受的范围内 |
@Past |
被注释的元素必须是一个过去的日期 |
@Future |
被注释的元素必须是一个将来的日期 |
@Pattern(value) |
被注释的元素必须符合指定的正则表达式 |
@Email |
被注释的元素必须是电子邮箱地址 |
@Length |
被注释的字符串的大小必须在指定的范围内 |
@NotEmpty |
被注释的字符串的必须非空 |
@Range |
被注释的元素必须在合适的范围内 |
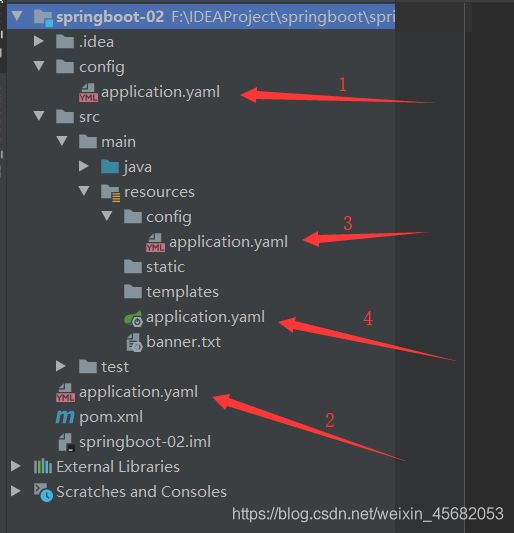
6. 多环境配置及配置文件位置
6.1 配置文件可以存在的位置
- 可以在项目根目录下建一个目录:config,和src目录同级,可以将配置文件放在config目录下
- 配置文件可以直接放在项目根目录下
- 配置文件可以放在main下的resources目录中
- 配置文件可以放在rescources目录下的config目录下
配置文件的优先级(从高到底):
- 项目目录下的config目录下的配置文件
- 项目目录下的配置文件
- main目录下的resources下的config目录下的配置文件
- resources下的配置文件
6.2 多套配置环境直接快速切换
方式一:在优先级高的地方新建配置文件,覆盖之前的配置文件
方式二:通过配置进行选择配置文件
我们可以在同意目录下拥有多套配置文件,如
application.yaml(默认)
application-test.yaml
application-dev.yaml
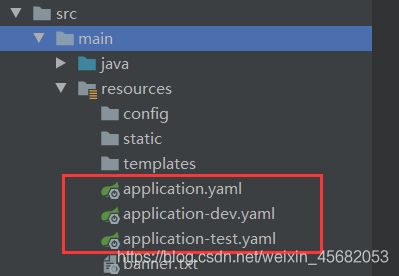
在没有更高优先级配置文件时,springboot会自动读取application.yaml配置文件,我们可以在application.yaml中进行一些配置来指定使用其他的配置文件,如
spring:
  profiles:
    active: test
这样就指定了使用application-test.yaml配置文件
使用该配置可以选择激活哪一个配置文件,值只写"-"后面的值就可以,如dev,test
方式三:
在yaml中,我们可以使用“—”来将一个yaml文件分隔成不同的模块,每一个模块相当于不同的配置文件
server:
  port: 8081
spring:
  profiles:
    active: test
---
server:
  port: 8082
spring:
  profiles: dev
---
server:
  port: 8083
spring:
  profiles: test
我们可以通过
spring:
	profiles: xxx
来给模块取名字,如果没有给模块取名字,springboot则会使用最上面没有取名字的模块,我们仍然可以通过
spring:
	profiles:
		active: xxx
来指定想要使用的模块
7. 自动配置原理再理解
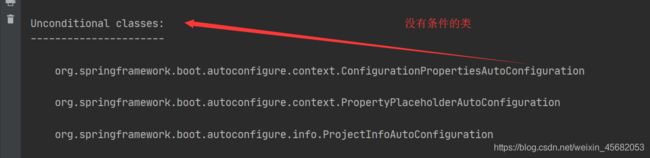
在application.yaml配置文件中到底能写什么----->spring.factories 这两个之间有一定的联系
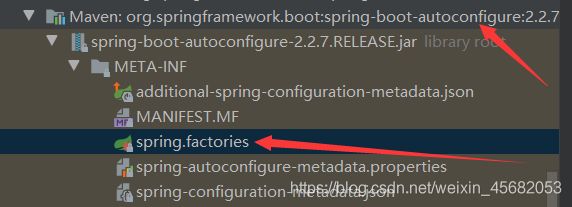
spring.factories中指定的一些类,点进去就可以看到它们都是一个个的配置类,他们通过@EnableConfigurationProperties(xxx.class)来加载一些类,读取配置文件,在这些被加载的类中的属性就是我们可以配置的,如
我们随便点进去一个类

我们可以看到该类加载读取了ProjectInfoProperties.class类(XxxProperties.class)

我们点进这个类
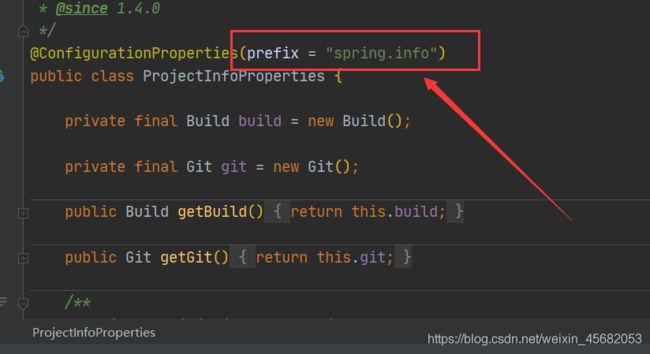
就可以看到该类可以通过yaml文件来对该类中的属性进行赋值配置,前缀是spring.info
所以我们就可以通过配置文件application.yaml来配置这些属性,如
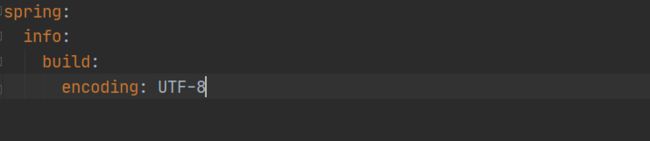
@ConditionalOnXxx
// 该注解是spring底层的注解,根据不用的条件,来判断当前配置或者是类是否生效,如
@ConditionalOnClass(CharacterEncodingFilter.class)
// 判断是否有CharacterEncodingFilter这个类,如果有这个类,当前配置才会生效,否则不生效
@Conditional扩展注解                 	 作用

 @ConditionalOnJava                     系统的java版本是否符合要求
 @ConditionalOnBean                     容器中存在指定Bean
 @ConditionalOnMissingBean          	容器中不存在指定Bean
 @ConditionalOnExpression             	满足SpEL表达式指定
 @ConditionalOnClass                    系统中有指定的类
 @ConditionalOnMissingClass          	系统中没有指定的类
 @ConditionalOnSingleCandidate     		容器中只有一个指定的Bean,或者这个Bean是首选Bean
 @ConditionalOnProperty                 系统中指定的属性是否有指定的值
 @ConditionalOnResource                 路径下是否存在指定资源文件
 @ConditionalOnWebApplication      		当前是web环境
 @ConditionalOnNotWebApplication		当前不是web环境
 @ConditionalOnJndi                     JNDI存在指定项
在我们配置文件中能配置的东西,都存在一个固有的规律:
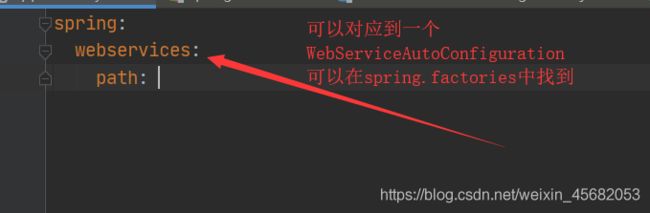
存在对应的xxxProperties文件,如
spring:
	webservices:
		path: xxx
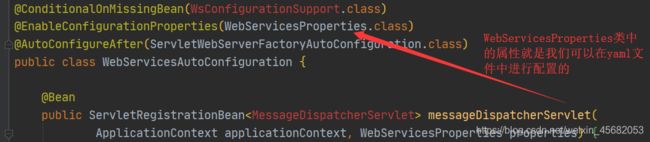
就对应着WebServicesProperties.class配置类
这个类一般又会配xxxAutoConfiguration装配,如
WebServicesAutoConfiguration就可以在spring.factories中找到

这样就在我们就找到了yaml文件和spring.factories文件之间存在的关系,这就是自动装配的原理
7.1 精髓
-
SpringBoot启动会加载大量的自动配置类
-
我们看我们需要的功能有没有在Springboot默认写好的自动配置类中
-
我们再来看这个自动配置类中到底配置了哪些组件(只要我们要用的组件存在其中,我们就不需要再手动配置了)
-
给容器中自动配置类添加组件的时候,会从properties类中读取某些属性,我们只需要再配置文件中指定这些属性的值即可
xxxAutoConfiguration:自动配置类
xxxProperties:封装配置文件中相关属性
7.2 其他
在配置文件中添加一行
debug: true
启动springboot程序,我们就可以看到哪些配置生效,哪些配置没有生效
测试结果


8. SpringBoot Web开发
要解决的问题:
- 导入静态资源
- 首页
- 模板引擎
- 装配扩展SpringMVC
- 增删改查
- 拦截器
- 国际化(中英文切换)
8.1 静态资源导入
在WebMvcConfiguration类中有相关配置
@Override
public void addResourceHandlers(ResourceHandlerRegistry registry) {

    if (!this.resourceProperties.isAddMappings()) {

        logger.debug("Default resource handling disabled");
        return;
    }
    Duration cachePeriod = this.resourceProperties.getCache().getPeriod();
    CacheControl cacheControl = this.resourceProperties.getCache().getCachecontrol().toHttpCacheControl();
    if (!registry.hasMappingForPattern("/webjars/**")) {

        customizeResourceHandlerRegistration(registry.addResourceHandler("/webjars/**")
                                             .addResourceLocations("classpath:/META-INF/resources/webjars/")
                                             .setCachePeriod(getSeconds(cachePeriod)).setCacheControl(cacheControl));
    }
    String staticPathPattern = this.mvcProperties.getStaticPathPattern();
    if (!registry.hasMappingForPattern(staticPathPattern)) {

        customizeResourceHandlerRegistration(registry.addResourceHandler(staticPathPattern)
                                             .addResourceLocations(getResourceLocations(this.resourceProperties.getStaticLocations()))
                                             .setCachePeriod(getSeconds(cachePeriod)).setCacheControl(cacheControl));
    }
}
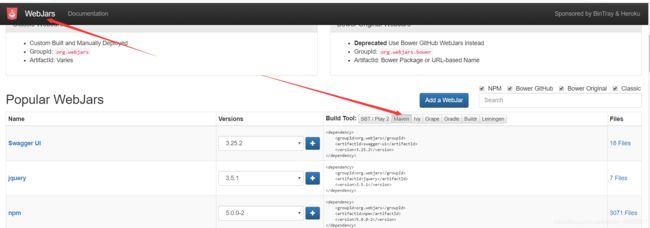
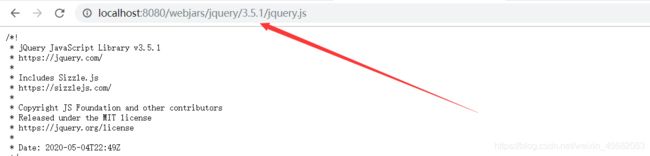
什么是webjars:
我们可以通过webjars网站找到需要的资源,然后通过maven导入

然后我们可以通过localhost:8080/webjars/xxx获取到刚才导入的资源,如
我们静态资源可以放在
classpath:(就相当于是resources目录) 很少使用webjars
classpath:/META-INF/resources/ 下,就是webjars
classpath:/resources/ 下
classpath:/static/ 下
classpath:/public/ 下
classpath:/ 下

静态资源放在这些文件夹下就可以通过localhost:8080/xxx直接访问到了(除了webjars)
优先级(从高到底):
- classpath:/resources/ 下 优先级最高 一般放上传的文件
- classpath:/static/ 下 优先级第二 一般放一些图片等
- classpath:/public/ 下 优先级第三 一般放一些公共资源,js等
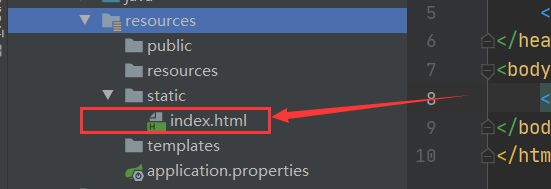
8.2 首页订制
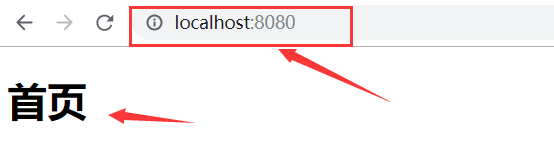
首页index.html可以放在静态资源目录下,resources下的resources中,或static中,或public中
访问localhost:8080/ 我们就可以直接访问到主页
8.3 图标订制
在springboot2.1.7前,可以进行图标订制
把ico图标放在public或resources或static下
然后在配置文件中关闭默认图标
spring:
	mvc:
		favicon:
			enabled: false
访问我们的网页就可以看到ico小图标了
8.4 模板引擎
之前我们用的jsp就是一种模板引擎
Thymeleaf官网:https://www.thymeleaf.org/
Thymeleaf的GitHub主页:https://github.com/thymeleaf/thymeleaf
springboot官网对应的starter:https://docs.spring.io/spring-boot/docs/2.2.7.RELEASE/reference/html/using-spring-boot.html#using-boot-starter

首先我们要导入依赖 启动器
<dependency>
    <groupId>org.thymeleafgroupId>
    <artifactId>thymeleaf-spring5artifactId>
dependency>
<dependency>
    <groupId>org.thymeleaf.extrasgroupId>
    <artifactId>thymeleaf-extras-java8timeartifactId>
dependency>
模板引擎的作用就是我们来写一个页面模板,比如有些值是动态的,我们写一些表达式,来获取从后台传过来的数据
这样我们在resources目录下的templates目录下写的html就可以通过controller来跳转访问了
templates目录下的资源像之前的/WEB-INF下的资源一样,不能够直接访问到,要通过controller跳转访问
public static final String DEFAULT_PREFIX = "classpath:/templates/";
public static final String DEFAULT_SUFFIX = ".html";
使用Thymeleaf
首先我们要导入约束
<html xmlns:th="http://www.thymeleaf.org">

8.5 Thymeleaf语法
所有的html元素都可以被thymeleaf替换接管,th:元素名,如
<div th:text="${msg}">div> // 这样就可以取出后台传过来的msg数据了
- 简单表达式:
- 变量表达式:
${...} - 选择变量表达式:
*{...} - 消息表达:
#{...} - 链接URL表达式:
@{...} - 片段表达式:
~{...}
- 变量表达式:

th:text th:utext
th:text 不转义
th:utext 转义
如果使用th:text,后台如果传",那么在页面上就会原样输出xxx
"
如果使用th:utext,就会对后台传入的数据进行转义,如传入xxx
的格式
<div th:utext="${msg}">div>
还有另外一种写法
<div>[[${msg}]]div>
通过这种写法也可以取出msg的值
th:each 遍历
<h3 th:each="user:${users}" th:text="${user}">h3>

8.6 扩展装配SpringMVC
要拓展SpringMVC,实现一些拦截器,格式化,视图解析器等,我们要自己定义一个类,然后添加注解@Configuration,实现接口WebMvcCongigurar,不能添加注解@EnableWebMvc,重写里面的方法来实现想要的功能,如
// 全面扩展SpringMVC
@Configuration
public class MyMvcConfig implements WebMvcConfigurer {

    @Override
    public void addInterceptors(InterceptorRegistry registry) {

		...
    }
    ...
}
如果想diy一些定制化的功能,只要写这个组件,然后将他交给springboot,springboot就会帮我们自动装配,如
@Configuration
public class MyMvcConfig implements WebMvcConfigurer {


    @Bean
    public ViewResolver myViewResolver(){

        return new MyViewResolver();
    }


    public static class MyViewResolver implements ViewResolver{

        @Override
        public View resolveViewName(String s, Locale locale) throws Exception {

            return null;
        }
    }
}
在springboot中,有很多的xxxConfiguration,会帮助我们进行扩展配置,只要看见了这个东西,我们就要注意了!
9. 员工管理系统
9.1 首页配置
注意点:所有页面静态资源都需要使用thymeleaf接管,@{},如
<link th:href="@{/css/bootstrap.min.css}" rel="stylesheet">

<link th:href="@{/css/signin.css}" rel="stylesheet">
首页放在了templates目录下,不能够直接被访问,我们可以配置,直接访问
@Configuration
public class MyMvcConfig implements WebMvcConfigurer {

    @Override
    public void addViewControllers(ViewControllerRegistry registry) {

        registry.addViewController("/").setViewName("index");
        registry.addViewController("/index.html").setViewName("index");
    }
}
可以通过localhost:8080/或localhost:8080/index.html直接访问
9.2 国际化
首先IDEA的fileencoding要全部改为UTF-8
在resources目录下建一个i18n(国际化单词的缩写)目录
在i18n目录下新建一个配置文件login.properties
再建一个配置文件login_zh_CN.properties,会发现两个配置晚间自动合并到了一个目录下

然后右键自动生成的目录,点加号,输入en_US,点击OK,就又添加了一个配置文件
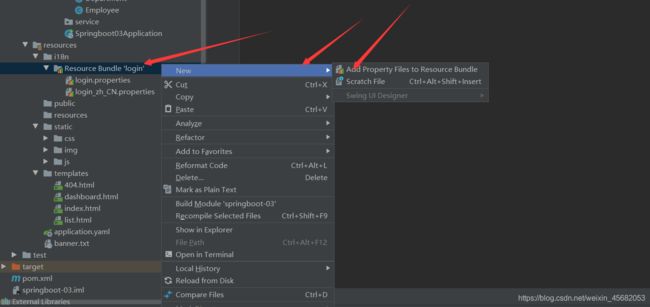

在idea中,在编写配置文件时,可以点击下面的Resource Bundle进行可视化配置

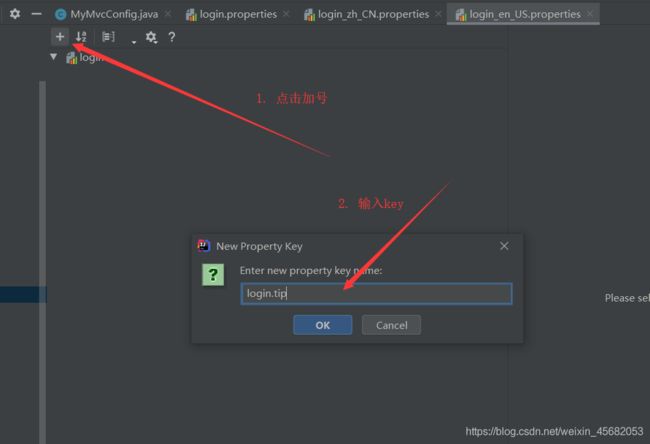
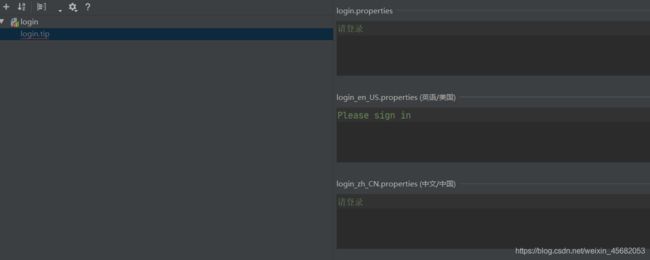
这样用可是化配置,在一个里面就可以配置三个配置文件
这样就会在login.properties配置文件中存在login.tip=请登录
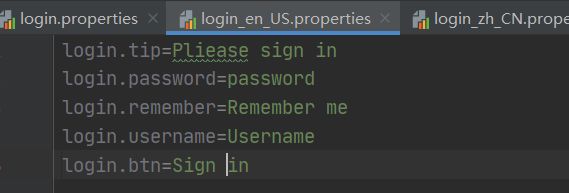
在login_en_US.properties配置文件中存在login.tip=Please sign in
在login_zh_CN.properties配置文件中存在login.tip=请登录


然后在application配置文件中进行配置(指定国际化自动生成的那个包),如
spring:
  messages:
    basename: i18n.login
thymeleaf中国际化的表达式为#{...}
然后在页面html中进行修改对应的值
那么怎么实现国际之间的切换呢??
如果实现了LocaleResolver接口,那么这个类就是一个国际化解析的类,如
public class MyLocaleResolver implements LocaleResolver {

    @Override
    public Locale resolveLocale(HttpServletRequest request) {

        // 获取请求中的语言参数
        String language = request.getParameter("l");
        Locale locale = Locale.getDefault(); // 如果没有就使用默认的
        // 如果请求的连接携带了国际化的参数
        if (!StringUtils.isEmpty(language)){

            // zh_CN  国家,地区
            String[] s = language.split("_");
            locale = new Locale(s[0], s[1]);
        }
        return locale;
    }

    @Override
    public void setLocale(HttpServletRequest request, HttpServletResponse response, Locale locale) {


    }
}
写完国际化类后,我们要将其放入IOC中,这样我们自定义的国际化组件就生效了
@Bean
public LocaleResolver localeResolver(){

    return new MyLocaleResolver();
}
由前端进行传递参数
<a class="btn btn-sm" th:href="@{/index.html(l='zh_CN')}">中文a>
<a class="btn btn-sm" th:href="@{/index.html(l='en_US')}">Englisha>
这样我们就实现了国际化的切换了
核心:
- 配置i18n文件
- 如果要实现点击按钮自动切换,我们就需要自定义一个国际化组件LocaleResolver
- 将自己写的国际化组件放入IOC中
- 前端传递参数
th:href="@{/index.html(xx='xxxx')}"
9.3 登录功能实现
在做提示信息回显是,在前端要判断回显的信息是否为空,如
<p style="color: red" th:if="${not #strings.isEmpty(msg)}" th:text="${msg}">p>
#strings.xxx是thymeleaf中封装的工具类,themeleaf中封装了很多的工具类
测试登录成功后,url会暴露出用户名和密码,如

解决这个问题,我们可以在配置类中添加视图映射,就是在视图解析器配置类中添加
registry.addViewController("/main.html").setViewName("dashboard");
在访问/main.html时,显示的是dashboard的页面
然后再我们的LoginController中,返回时重定向到main.html,这样显示的页面就为dashboard.html,且url为localhost:8080/mian.html

9.4 登录拦截器
首先写一个类,实现HandlerIntercepter接口,那么这个类,就称为了一个拦截器(和SpringMVC中一样)
public class LoginHandlerInterceptor implements HandlerInterceptor {

    @Override
    public boolean preHandle(HttpServletRequest request, HttpServletResponse response, Object handler) throws Exception {

        // 登录成功后,应该存在用户的session
        HttpSession session = request.getSession();
        String loginUser = (String)session.getAttribute("loginUser");
        System.out.println(loginUser);
        System.out.println(loginUser==null);
        System.out.println("".equals(loginUser));
        if (!StringUtils.isEmpty(loginUser)){

            return true;
        }else {

            request.setAttribute("msg","没有权限,请先登录");
            request.getRequestDispatcher("/index.html").forward(request,response);
            return false;
        }
    }
}
然后,在视图解析器配置类WebMvcConfiguter中将拦截器放入IOC中,并指定需要拦截的内容
@Override
    public void addInterceptors(InterceptorRegistry registry) {

        registry.addInterceptor(new LoginHandlerInterceptor())
                .addPathPatterns("/**").excludePathPatterns("/index.html","/","/user/login","/css/**","/js/**","/img/**");
    }
这样,我们的登录验证过滤器就实现了
9.5 展示员工列表
抽取页面的公共部分
一般我们会抽取出公共的组件放入commons.html中,然后在需要的地方进行引用
抽取公共部分:
<div th:fragment="topbar">
    ...
div>
在需要使用的地方,进行引用
<div th:insert="~{commons::topbar}">div>
使用th:insert和使用th:replace基本相同
<div th:replace="~{commons::topbar}">div>
为了实现点击时高亮的切换
在调用组件的时候传递一些参数
<div th:replace="~{commons::topbar(active='mian.html')}">div>
在commons.html中在需要参数的地方进行接收参数
运用了三元表达式,如果参数等于main.html,则显示样式一,否则显示样式二
在thymeleaf中,使用restful风格传递参数:
<a th:href="@{/toUpdate/{empId(empId=${employee.getId()})}">编辑a>
或
<a th:href="@{/toUpdate/}+${employee.getId()}">编辑a>
第二种方式,加号下面会出现红线,但是不影响正常运行
springboot中默认日期格式yyyy\MM\dd
如果我们要修改,在application.yaml中指定格式,如
spring:
	mvc:
		date-format: yyyy-MM-dd
9.6 404页面处理
在template目录下建立一个目录error,放一个404页面,就可以了
10. 整合JDBC
对于数据访问层,无论是SQL还是NOSQL,springboot底层都是用spring data的方式进行统一处理
Spring Data官网:https://spring.io/projects/spring-data
数据库相关的启动器:https://docs.spring.io/spring-boot/docs/2.2.7.RELEASE/reference/html/using-spring-boot.html#using-boot-starter
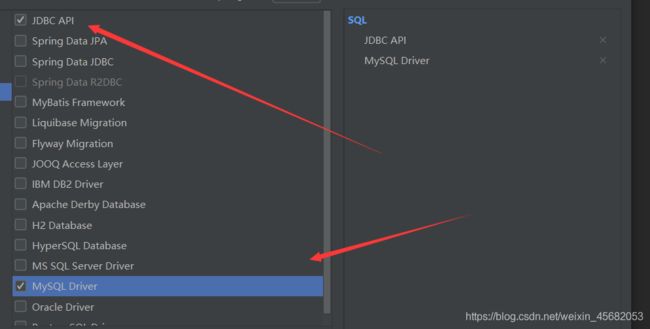
创建一个新项目,勾选JDBC Api 和MySQL Driver
首先,在yaml中进行配置
spring:
  datasource:
    username: root
    password: shw123zxc
    url: jdbc:mysql://localhost:3306/mybatis?useUnicode=true&characterEncoding=UTF-8&useSSL=true&serverTimezone=UTC
    driver-class-name: com.mysql.cj.jdbc.Driver
测试
只要maven中存在jdbc启动器和mysql驱动,那么就会存在一个对象DataSource
@Autowired
DataSource dataSource;

@Test
void contextLoads() throws SQLException {

    Connection connection = dataSource.getConnection();
    System.out.println(dataSource);
    connection.close();
}
在Springboot中有很多的xxxTemplate:SpringBoot已经配置好的模板Bean,拿来即用,如JdbcTemplate
@Autowired
private DataSource dataSource;

@Autowired
private JdbcTemplate jdbcTemplate;

@RequestMapping("/userList")
public List<Map<String,Object>> userList(){

    String sql = "select * from user";
    List<Map<String, Object>> maps = jdbcTemplate.queryForList(sql);
    return maps;
}
11. 整合Druid数据源
首先导入Druid的依赖
<dependency>
    <groupId>com.alibabagroupId>
    <artifactId>druidartifactId>
    <version>1.1.22version>
dependency>
在application.yaml中配置修改数据源(spring中默认的数据源是HikariCP)
spring:
  datasource:
    username: root
    password: shw123zxc
    url: jdbc:mysql://localhost:3306/mybatis?useUnicode=true&characterEncoding=UTF-8&useSSL=true&serverTimezone=UTC
    driver-class-name: com.mysql.cj.jdbc.Driver
    type: com.alibaba.druid.pool.DruidDataSource
另外在application.yaml中我们可以配置一些最大连接数,最大等待数,日志记录等。。
druid比其他数据源强势的一点在于:拥有监控功能,配置
filters: stat,wall,log4j
因为有log4j,所以我们要导入log4j的依赖
配置Druid的后台监控功能
@Configuration
public class DruidConfig {


    @Bean
    @ConfigurationProperties(prefix = "spring.datasource")
    public DataSource druidDataSource(){

        return new DruidDataSource();
    }

    // 后台监控功能
    @Bean
    public ServletRegistrationBean servletRegistrationBean(){

        ServletRegistrationBean<StatViewServlet> bean = new ServletRegistrationBean<>(new StatViewServlet(), "/druid/*");

        // 后台需要有人登录,账号密码配置
        HashMap<String, String> initParameters = new HashMap<>();
        // 增加配置
        initParameters.put("loginUsername","admin");  // 登录key是固定的 loginUsername loginPassword
        initParameters.put("loginPassword","123456");

        // 允许谁能访问
        // 值为空,代表所有人可以访问
        initParameters.put("allow","");

        // 禁止谁能访问
		// initParameters.put("codewei","192.168.1.1");  // 指定名字和ip
        bean.setInitParameters(initParameters);  // 设置初始化参数
        return bean;
    }
}
这样通过localhost:8080/druid就可以访问到后台页面了
配置filter
//filter
@Bean
public FilterRegistrationBean webStatFilter(){

    FilterRegistrationBean bean = new FilterRegistrationBean();
    bean.setFilter(new WebStatFilter());

    // 可以过滤哪些请求
    Map<String,String> initParameters = new HashMap<>();

    // 这些东西不进行统计
    initParameters.put("exclusions","*.js,*.css,/druid/");
    bean.setInitParameters(initParameters);
    return bean;
}
12. 整合Mybatis
首先导入依赖 mybatis-spring-boot-starter
然后进行配置数据源
spring:
  datasource:
    type: com.alibaba.druid.pool.DruidDataSource
    url: jdbc:mysql://localhost:3306?useSSL=true&useUnicode=true&characterEncoding=UTF-8&serverTimezone=UTC
    username: root
    password: shw123zxc
    driver-class-name: com.mysql.cj.jdbc.Driver
在Mapper接口上添加注解@Mapper,表示本类一个mybatis的接口
或者在启动类上添加注解@MapperScan("..."),开启包扫描,就是扫描该包下所有Mapper
然后要在接口上添加注解@Repository,让入IOC中
然后可以在application.yaml中整合mybatis,如
mybatis:
  type-aliases-package: cn.codewei.pojo   # 取别名,指定包
  mapper-locations: classpath:mybatis/mapper/*.xml   #指定mapper.xml路径
这样就和正常写mybatis一样了
13. SpringSecurity(安全)
在web开发中,安全第一位,过滤器,拦截器。。。
利用了AOP横切的思想,不用改动原来的代码
shiro和SpringSecurity很像,只是类不一样,名字不一样
功能:认证(账号密码)和授权(vip1,vip2…)
权限:
- 功能权限
- 访问权限
- 菜单权限
之前我们是用过滤器,拦截器
记住这几个类:
- WebSecurityConfigurerAdapter:自定义Security策略
- AuthenticationManagerBuilder:自定义认证策略
- @EnableWebSecurity:开启WebSecurity模式 @Enablexxxx 开启某个功能
Spring Security的两个主要目标是:“认证"和"授权”(访问控制)
认证:Authentication
授权:Authorization
这个概念是通用的,而不是只在Spring Security中存在
13.1 用户认证和授权
首先要导入security的启动器
然后我们要写一个类,继承WebSecurityConfigurerAdapter,并且在类上添加注解@EnableWebSecurity
@EnableWebSecurity
public class SecurityConfig extends WebSecurityConfigurerAdapter {


}
然后我们要重写里面的方法,如configure(HttpSecurity http)
然后我们比对这父类中重写的方法进行配置定义
@EnableWebSecurity
public class SecurityConfig extends WebSecurityConfigurerAdapter {

    // 链式编程
    // 定制授权规则
    @Override
    protected void configure(HttpSecurity http) throws Exception {

        // 首页所有人可以访问,功能页只有对应有权限的人才能访问
        // 请求授权的规则
        http.authorizeRequests()
                .antMatchers("/").permitAll()
                .antMatchers("/level1/**").hasRole("vip1")   // level1下的所有页面,vip1才能访问
                .antMatchers("/level2/**").hasRole("vip2")
                .antMatchers("/level3/**").hasRole("vip3");
        // 没有权限默认会到登录页面(Security自带的登录页),需要开启登录的页面
        http.formLogin();
    }


    // 定制认证规则
    @Override
    protected void configure(AuthenticationManagerBuilder auth) throws Exception {

        // 读源码,看方法应该这么重写
        // 数据正常从数据库中都,我们这里从内存中读取数据,进行模拟
        // 如果报错:PasswordEncoder mapped for the id "null"
        // 则是需要对密码进行加密,在Spring Security5.0+新增了很多加密方法,如BCryptPasswordEncoder
        auth.inMemoryAuthentication().passwordEncoder(new BCryptPasswordEncoder())
                .withUser("root").password(new BCryptPasswordEncoder().encode("shw123zxc")).roles("vip1","vip2","vip3")
                .and()
                .withUser("codewei").password(new BCryptPasswordEncoder().encode("shw123zxc")).roles("vip1","vip2")
                .and()
                .withUser("guest").password(new BCryptPasswordEncoder().encode("shw123zxc")).roles("vip1");


    }
}
13.2 注销及权限控制
注销
在刚才重写的方法中,写上http.logout();,开启注销功能
在前端页面中,注销访问的链接应为/logout
我们可以指定注销后跳转到哪个页面:http.logout().logouSuccesstUrl("/"),注销后跳转到主页
http.logout().logoutSuccessUrl("/");
权限控制
登录后,根据不同的权限展示出不同的内容,就需要thymeleaf与spring scurity整合
首先,我们要导入thymeleaf和spring scurity的整合包Thymeleaf Extras Springsecurity4
在页面中添加命名空间xmlns:sec="http://www.thymeleaf.org/thymeleaf-extras-springsecurity4"
springboot 2.0.9之前才支持thymeleaf与spring security整合,更高版本的springboot则不支持!!
<div sec:authorize="!isAuthenticated()">

    ...
div>

<div sec:authorize="isAuthenticated()">

    ...
div>


<div sec:authorize="isAuthenticated()">
       用户名:<span sec:authentication="name">span>
       角色:<span sec:authentication="principal.authorities">span>
div>
当我们点击注销时,可能会出现404,这是因为springboot默认帮我们开启了CSRF(跨站请求伪造),防止网站攻击的,我们需要关闭CSRF
http.csrf().disable();
根据不同的权限显示不同的内容,菜单的动态实现,如
<div sec:authorize="hasRole('vip1')">
    ...

div>
13.3 记住我及登录页定制
开启记住我功能
http.rememberMe();
定制登录页
http.formLogin().loginPage("/toLogin");  // 跳转到跳转自己的登录页面的controller
// 前端登录表单的提交action也要和这个路径相同
<form th:action="@{/toLogin}" method="post">
如果想前端表单提交的路径和指定的controller路径不一致,使用/login,可以进行指定
http.formLogin().loginPage("/toLogin").loginProcessingUrl("/login");
这样我们前端表单的action就可以写为/login了
<form th:action="@{/login}" method="post">
注意:
我们自己登录页面的表单属性名默认要和默认的属性名相同,username,password
如果我们写的属性参数名和默认的不同,如name,pwd
那么,我们可以进行自定义指定参数名,如
http.formLogin().usernameParameter("name").passwordParameter("pwd");
这样我们表单中的属性名就可以自定义了
在我们自己的登录页面中添加记住我功能
<input type="checkbox" name="remember"> 记住我
要自定义接收前端的参数
http.rememberMe().rememberMeParameter("remember");
eleaf-extras-springsecurity4"`
springboot 2.0.9之前才支持thymeleaf与spring security整合,更高版本的springboot则不支持!!
<div sec:authorize="!isAuthenticated()">

    ...
div>

<div sec:authorize="isAuthenticated()">

    ...
div>


<div sec:authorize="isAuthenticated()">
       用户名:<span sec:authentication="name">span>
       角色:<span sec:authentication="principal.authorities">span>
div>
当我们点击注销时,可能会出现404,这是因为springboot默认帮我们开启了CSRF(跨站请求伪造),防止网站攻击的,我们需要关闭CSRF
http.csrf().disable();
根据不同的权限显示不同的内容,菜单的动态实现,如
<div sec:authorize="hasRole('vip1')">
    ...

div>
13.3 记住我及登录页定制
开启记住我功能
http.rememberMe();
定制登录页
http.formLogin().loginPage("/toLogin");  // 跳转到跳转自己的登录页面的controller
// 前端登录表单的提交action也要和这个路径相同
<form th:action="@{/toLogin}" method="post">
如果想前端表单提交的路径和指定的controller路径不一致,使用/login,可以进行指定
http.formLogin().loginPage("/toLogin").loginProcessingUrl("/login");
这样我们前端表单的action就可以写为/login了
<form th:action="@{/login}" method="post">
注意:
我们自己登录页面的表单属性名默认要和默认的属性名相同,username,password
如果我们写的属性参数名和默认的不同,如name,pwd
那么,我们可以进行自定义指定参数名,如
http.formLogin().usernameParameter("name").passwordParameter("pwd");
这样我们表单中的属性名就可以自定义了
在我们自己的登录页面中添加记住我功能
<input type="checkbox" name="remember"> 记住我
要自定义接收前端的参数
http.rememberMe().rememberMeParameter("remember");