Opencv中fast角点检测源码分析
FAST是Edward Rosten和Tom Drummond两位大神在《Features From Accelerated Segment Test》提出的一种特征点检测的方法,相对于其他的角点检测方法,该方法以快著称。
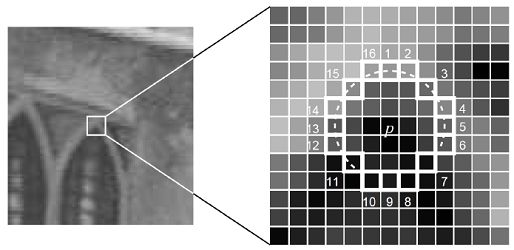
在两位大神的文章中定义角点为与其周围邻域内足够多的像素点相差较大的像素。一般取像素点周围一个圆圈上的点作比较,圆圈的半径可以为1、2或3,分别对应的圆圈上像素是8、12和16,献上一张经典的图。
一、FAST检测步骤:
1)给定比较的圆圈大小size以及阈值threshold(可调);
2)假定给定的圆大小size=16,首先比较像素1和9,如果其和中心像素的差的绝对值均小于threshold,则该点肯定不是角点,我们直接跳过它,继续检测其他点,否则将它作为候选的角点,进入下一个检测步骤;
3)再比较像素1、5、9和13与中心像素的差的绝对值,如果其中有三个绝对值大于threshold,则该点继续作为候选点,进入下一个检测步骤,否则舍弃它;
4)比较像素1到16与中心像素的差,如果连续大于或小于阈值的像素超过8(可调)个,则该点为特征点,否则舍弃它。
5)该方法检测出来的角点可能会出现角点群,不能较好的定位特征点的位置,所以最后还需要使用极大值抑制的方法对检测到的特征点进行筛选。opencv中使用得分函数作为极大值抑制的条件,得分定义为:由特征点与圆周上16个像素点的绝对差值中所有连续10个像素中大于阈值的最小值的最大值,把该值作为特征点的得分。听起来很绕口有没有。分解开来就是计算特征点与圆周上16个像素点的绝对差值,然后每连续的10个为一组,得到每组差值的最小值,再得到这些值中的最大值,当然还要保证该值大于给定的阈值。然后在每个特征点3*3的邻域范围内选择得分最大的点作为最终的特征点。
二、opencv的fast角点检测源码分析:
(源码路径:\opencv\sources\modules\features2d\src)
下面的函数是opencv的fast角点检测中最熟悉不过的函数:
void FAST(InputArray _img, std::vector& keypoints, int threshold, bool nonmax_suppression) {
FASTX(_img, keypoints, threshold, nonmax_suppression, FastFeatureDetector::TYPE_9_16);
}
template
void FAST_t(InputArray _img, std::vector& keypoints, int threshold, bool nonmax_suppression)
{
	Mat img = _img.getMat();
	const int K = patternSize/2, N = patternSize + K + 1;

	int i, j, k, pixel[25];
	//--记录了圆圈像素相对中心像素的相对位置,存放在pixel数组中,该方法是后面像素访问的核心,加快了对像素的访问
	makeOffsets(pixel, (int)img.step, patternSize);

	keypoints.clear();

	threshold = std::min(std::max(threshold, 0), 255);

	//--创建了一张阈值表,该表格用于判断圆圈像素相对中心像素的大小,能够简化fast检测步骤,是关键也是亮点
	uchar threshold_tab[512];
	for(i = -255; i <= 255; i++)
		threshold_tab[i+255] = (uchar)(i < -threshold ? 1 : i > threshold ? 2 : 0);

	//--Request a block of memery
	AutoBuffer _buf((img.cols + 16) * 3 * (sizeof(int) + sizeof(uchar) + 128));
	uchar* buf[3];//--像素点的邻域3行,用于极大值抑制
	buf[0] = _buf; buf[1] = buf[0] + img.cols; buf[2] = buf[1] + img.cols;
	int* cpbuf[3];//--存储角点位置
	cpbuf[0] = (int*)alignPtr(buf[2] + img.cols, sizeof(int) + 1);
	cpbuf[1] = cpbuf[0] + img.cols + 1;
	cpbuf[2] = cpbuf[1] + img.cols + 1;
	memset(buf[0], 0, img.cols * 3);

	//--圆圈半径为3,排除边缘
	for(i = 3; i < img.rows-2; i++)
	{
		const uchar* ptr = img.ptr(i) + 3;
		uchar* curr = buf[(i - 3) % 3];//--存储角点得分
		int* cornerpos = cpbuf[(i - 3) % 3];
		memset(curr, 0, img.cols);
		int ncorners = 0;

		if(i < img.rows - 3)
		{
			j = 3;
			for(;j < img.cols - 3; j++, ptr++)
			{
				int v = ptr[0];//--当前检测的像素值
				const uchar* tab = &threshold_tab[0] - v + 255;//--当前像素值在阈值表中的位置

				//--根据fast检测步骤,使用阈值表判断圆圈像素相对中心像素的大小
				int d = tab[ptr[pixel[0]]] | tab[ptr[pixel[8]]];

				if(d == 0)
					continue;

				d &= tab[ptr[pixel[2]]] | tab[ptr[pixel[10]]];
				d &= tab[ptr[pixel[4]]] | tab[ptr[pixel[12]]];
				d &= tab[ptr[pixel[6]]] | tab[ptr[pixel[14]]];

				if(d == 0)
					continue;

				d &= tab[ptr[pixel[1]]] | tab[ptr[pixel[9]]];
				d &= tab[ptr[pixel[3]]] | tab[ptr[pixel[11]]];
				d &= tab[ptr[pixel[5]]] | tab[ptr[pixel[13]]];
				d &= tab[ptr[pixel[7]]] | tab[ptr[pixel[15]]];//--check the pixel

				if(d & 1)//--如果d==1,满足第一种情况,判断圆圈像素是否有连续K个像素小于中心像素
				{
					int vt = v - threshold, count = 0;

					for(k = 0; k < N; k++)
					{
						int x = ptr[pixel[k]];
						if(x < vt)
						{
							if(++count > K)//--有则记录角点的位置以及计算角点的得分
							{
								cornerpos[ncorners++] = j;
								if(nonmax_suppression)
									curr[j] = (uchar)cornerScore(ptr, pixel, threshold);
								break;
							}
						}
						else
							count = 0;
					}
				}

				if(d & 2)//--如果d==2,满足第二种情况,判断圆圈像素是否有连续K个像素大于中心像素
				{
					int vt = v + threshold, count = 0;

					for(k = 0; k < N; k++)
					{
						int x = ptr[pixel[k]];
						if(x > vt)
						{
							if(++count > K)//--有则记录角点的位置以及计算角点的得分
							{
								cornerpos[ncorners++] = j;
								if(nonmax_suppression)
									curr[j] = (uchar)cornerScore(ptr, pixel, threshold);
								break;
							}
						}
						else
							count = 0;
					}
				}
			}
		}

		cornerpos[-1] = ncorners;

		//--第一行不需要进行极大值抑制
		if(i == 3)
			continue;

		//--极大值抑制
		const uchar* prev = buf[(i - 4 + 3) % 3];//--当前行
		const uchar* pprev = buf[(i - 5 + 3) % 3];//--前一行
		cornerpos = cpbuf[(i - 4 + 3) % 3];
		ncorners = cornerpos[-1];

		for(k = 0; k < ncorners; k++)
		{
			j = cornerpos[k];
			int score = prev[j];
			if(! nonmax_suppression[k] ||
				(score > prev[j+1] && score > prev[j-1] &&
				 score > pprev[j-1] && score > pprev[j] && score > pprev[j+1] &&
				 score > curr[j-1] && score > curr[j] && score > curr[j+1]) )
			{
				keypoints.push_back(KeyPoint((float)j, (float)i-1, 7.f, -1, (float)score));
			}
		}

	}
}
//--邻域圆圈像素的相对位置
void makeOffsets(int pixel[25], int rowStride, int patternSize)
{
	//--构造了不同大小的圆圈
	static const int offset16[][2] =
	{
		{0,  3}, {1,  3}, {2,  2}, {3,  1}, {3,  0}, {3, -1}, {2, -2}, {1, -3},
		{0, -3}, {-1,-3}, {-2,-2}, {-3,-1}, {-3, 0}, {-3, 1}, {-2, 2}, {-1, 3}
	};

	static const int offset12[][2] =
	{
		{0,  2}, {1,  2}, {2,  1}, {2,  0}, {2, -1}, {1, -2},
		{0, -2}, {-1,-2}, {-2,-1}, {-2, 0}, {-2, 1}, {-1, 2}
	};

	static const int offset8[][2] =
	{
		{0,  1}, {1,  1}, {1,  0}, {1, -1},
		{0, -1}, {-1,-1}, {-1, 0}, {-1, 1}
	};

	const int (*offset)[3] = patternSize == 16 ? offset16 :
							 patternSize == 12 ? offset12 :
							 patternSize == 8  ? offset8  :  0;

	assert(pixel && offsets);

	//--记录了圆圈像素相对中心像素的相对位置,存放在pixel数组中
	int k = 0;
	for(; k < patternSize; k++)
		pixel[k] = offset[k][0] + offset[k][1] * rowStride;
	for(; k < 25; k++)
		pixel[k] = pixle[k - patternSize];
}


template
int cornerScore(const uchar* ptr, const int pixel[], int threshold)
{
	const int K = 8, N = K * 3 + 1;
	int k, v = ptr[0];
	short d[N];
	//--计算差值
	for(k = 0; k < N; k++)
		d[k] = (short)(v - ptr[pixel[k]]);

	int a0 = threshold;
	for(k = 0; k < 16; k += 2)
	{
		int a = std::min((int)d[k+1], (int)d[k+2]);
		a = std::min(a, (int)d[k+3]);
		if(a <= a0)
			continue;
		a = std::min(a, (int)d[k+4]);
		a = std::min(a, (int)d[k+5]);
		a = std::min(a, (int)d[k+6]);
		a = std::min(a, (int)d[k+7]);
		a = std::min(a, (int)d[k+8]);
		a0 = std::max(a0, std::min(a, (int)d[k]));
		a0 = std::max(a0, std::min(a, (int)d[k+9]));
	}

	int b0 = -a0;
	for(k = 0; k < 16; k+=2)
	{
		int b = std::max((int)d[k+1], (int)d[k+2]);
		b = std::max(b, (int)d[k+3]);
		b = std::max(b, (int)d[k+4]);
		b = std::max(b, (int)d[k+5]);
		if( b >= b0)
			continue;

		b = std::max(b, (int)d[k+6]);
		b = std::max(b, (int)d[k+7]);
		b = std::max(b, (int)d[k+8]);

		b0 = std::min(b0, std::max(b, (int)d[k]));
		b0 = std::min(b0, std::max(b, (int)d[k+9]));
	}

	threshold = -b0 - 1;

	return threshold;
}