高级可视化神器Plotly玩转气泡图
可视化神器Plotly玩转气泡图
本文是可视化神器Plotly绘图的第6篇:将会重点讲解如何通过Plotly绘制气泡图,英文叫Bubble Charts。首先看一段Plotly官网中对气泡图的简介:
A bubble chart is a scatter plot in which a third dimension of the data is shown through the size of markers.
气泡图是也是一种散点图。这种散点图和普通散点图的不同之处在于:它会引入第三方维度,即标记markers的大小来进行展示。在Plotly中散点的大小是通过size参数来设置
往期精选
Plotly的文章会形成连载系列,前面5篇的Plotly可视化文章分别是:
- 酷炫!36张图爱上高级可视化神器Plotly_Express
- Plotly玩转散点图
- Plotly玩转饼图
- Plotly玩转漏斗图
- Plotly玩转柱状图
导入库
首先还是需要导入我们绘图需要的几个常用库
import pandas as pd
import numpy as np

# 两种接口
import plotly_express as px
import plotly.graph_objects as go
绘图的时候还是会基于两种方式来实现:
- plotly_express:px
- plotly.graph_objects:go
基于px实现
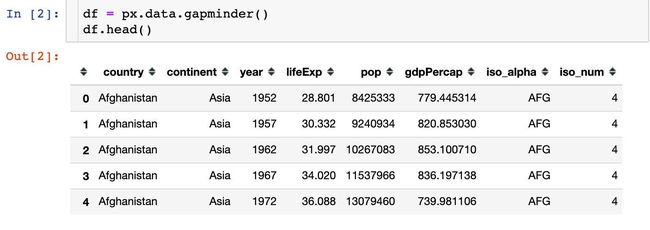
自带GDP数据集
fig = px.scatter(
    df.query("year==2007"),  # 选择绘图数据
    x="gdpPercap",  # x轴
    y="lifeExp",  # y轴
    size="pop",  # 点的大小
    color="continent",  # 颜色
    hover_name="country",  # 悬停信息
    log_x=True,   # 对数变换
    size_max=60  # 点的最大值
    )
fig.show()
添加播放按钮
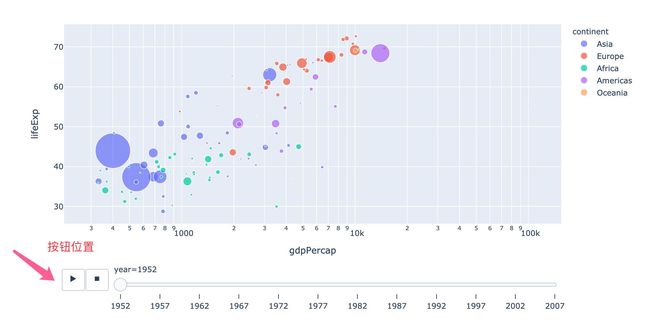
这是Plotly非常厉害的一个功能,能够实现自动播放功能,使用的参数是:animation_frame。我们对整个GDP数据集进行绘图:
fig = px.scatter(
    df,  # 全部数据集
    x="gdpPercap",
    y="lifeExp",
    size="pop",
    animation_frame="year",   # 将年份作为播放按钮
    color="continent",
    hover_name="country",  # 悬停信息
    log_x=True,
    size_max=60
    )
fig.show()
看下按钮的位置:
再看看播放的实际效果:
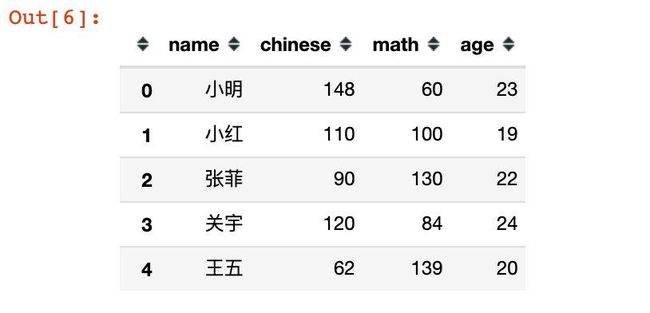
模拟数据
stu = pd.DataFrame({

    "name":["小明","小红","张菲","关宇","王五"],
    "chinese":[148,110,90,120,62],
    "math":[60,100,130,84,139],
    "age":[23,19,22,24,20]
})

stu
fig = px.scatter(
    stu,
    x="chinese",
    y="math",
    hover_data=["name","age"],   # 列表形式
    color="chinese",
    size="math",
    size_max=60
    )

fig.show()
[外链图片转存失败,源站可能有防盗链机制,建议将图片保存下来直接上传(img-dKBKEROs-1619093842892)(https://p3-juejin.byteimg.com/tos-cn-i-k3u1fbpfcp/63870a65c9bf4ca9ab06229a4adbc962~tplv-k3u1fbpfcp-zoom-1.image)]
显示文本信息
上面的图形中都是没有文本显示的,可以通过设置进行文本显示:
fig = px.scatter(
    stu,
    x="chinese",
    y="math",
    hover_data=["name"],   # 列表形式
    color="age",
    size="age",   # 散点大小
    size_max=60,
    text="name"   # 显示name属性中的数据信息
)

fig.show()
改变文本显示位置
文本显示位置主要顶部top、中间middle、底部bottom,加上左中右left、center、right的组合:
- top left
- top center
- top right
- middle left
- middle center
- middle right
- bottom left
- bottom center
- bottom right
# 改变文本显示位置

fig = px.scatter(
    stu,
    x="chinese",
    y="math",
    hover_data=["name"],   # 列表形式
    color="age",
    size="math",   # 散点大小
    size_max=60,
    text="name"
)

# 文本显示位置:['top left', 'top center', 'top right', 'middle left','middle center', 'middle right', 'bottom left', 'bottom center', 'bottom right']

fig.update_traces(textposition="bottom center")

fig.show()
看一个底部居中的例子:
自定义颜色
我们的颜色都是通过color参数的某个属性来设置,我们也可以自定义颜色:
# 改变颜色

fig = px.scatter(
    stu,
    x="chinese",
    y="math",
    hover_data=["name"],   # 列表形式
    color_discrete_sequence=px.colors.diverging.Tealrose_r,  # 自定义颜色
    size="math",   # 散点大小
    size_max=60,
    text="name"
)

fig.update_traces(textposition="middle center")

fig.show()
基于go实现
基础气泡图
import plotly.graph_objects as go

fig = go.Figure(data=[go.Scatter(
    x=[1, 2, 3, 4],  # 两个轴的数据
    y=[10, 11, 12, 13],
    mode='markers',    # 标记选择散点
    marker_size=[20, 40, 60, 90])   # 标记大小
])

fig.show()
使用颜色区间
import plotly.graph_objects as go

fig = go.Figure(data=[go.Scatter(
    x=[1, 3, 15, 7, 9, 11],
    y=[11, 3, 5, 7, 9, 4],
    mode='markers',
    marker=dict(
        color=[120, 125, 130, 135, 140, 145],  # 颜色取值区间
        size=[15, 30, 50, 70, 90, 130],  # 散点大小
        showscale=True
        )
)])

fig.show()
[外链图片转存失败,源站可能有防盗链机制,建议将图片保存下来直接上传(img-A9yaHECe-1619093842901)(https://p3-juejin.byteimg.com/tos-cn-i-k3u1fbpfcp/2b3011d8f35b429694f0afad22382ab2~tplv-k3u1fbpfcp-zoom-1.image)]
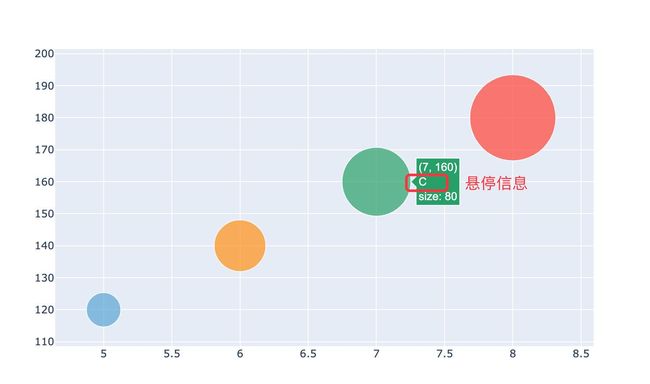
增加悬停信息及改变颜色
import plotly.graph_objects as go

fig = go.Figure(data=[go.Scatter(
    x=[5, 6, 7, 8],
    y=[120, 140, 160, 180],
    text=['A
size: 40',   # 1、悬停信息:可以使用html标签
表示空格
          'B
size: 60',
          'C
size: 80',
          'D
size: 100'],
    mode='markers',
    marker=dict(
        color=['blue',  # 2、自定义颜色    常见颜色英文
               'rgb(255, 144, 14)',  # 通过rgb来表示
               'rgb(44, 160, 101)',
               '#AFE918'],  # 6位字符串,#开头
        size=[40, 60, 80, 100],
    )
)])

fig.show()
什么是悬停信息??
气泡大小缩放Scaling the Size of Bubble Charts
有时候数据之间的大小差异较大,造成某些气泡过大,图形非常难看,需要对气泡的大小进行尺度缩放,Plotly官方有建议的公式和参数:
To scale the bubble size, use the attribute
sizeref. We recommend using the following formula to calculate asizerefvalue:
sizeref = 2. * max(array of size values) / (desired maximum marker size ** 2)
通过一个实际的例子来看看什么叫气泡的大小缩放:
1、某份数据不进行尺度缩放的效果
import plotly.graph_objects as go

fig = go.Figure(data=[go.Scatter(
    x=[5, 6, 7, 8],
    y=[120, 140, 160, 180],
    text=['A
size: 40',   # 1、悬停信息:可以使用html标签
表示空格
          'B
size: 60',
          'C
size: 80',
          'D
size: 100'],
    mode='markers',
    marker=dict(
        color=['blue',  # 2、自定义颜色    常见颜色英文
               'rgb(255, 144, 14)',  # 通过rgb来表示
               'rgb(44, 160, 101)',
               '#AFE918'],  # 6位字符串,#开头
        size=[40, 60, 80, 100],
    )
)])

fig.show()
主要是看看最大和最小气泡的区别:
2、进行大小尺度的缩放
# 标准化过程

import plotly.graph_objects as go

size = [20, 40, 60, 80, 100]
fig = go.Figure(data=[go.Scatter(
    x=[1, 2, 3, 4, 5],
    y=[11, 14, 18, 22, 28],
    mode='markers',
    marker=dict(
        size=size,
        color=['rgb(93, 164, 214)', 'rgb(255, 144, 14)',  'rgb(44, 160, 101)', 'rgb(255, 65, 154)','rgb(93, 164, 14)'],
        sizemode='area',
        sizeref=2.*max(size)/(60.**2),  # 尺度缩放
        sizemin=4
    )
)])

fig.show()
尤而小屋,一个温馨的小屋。小屋主人,一手代码谋求生存,一手掌勺享受生活,欢迎你的光临


