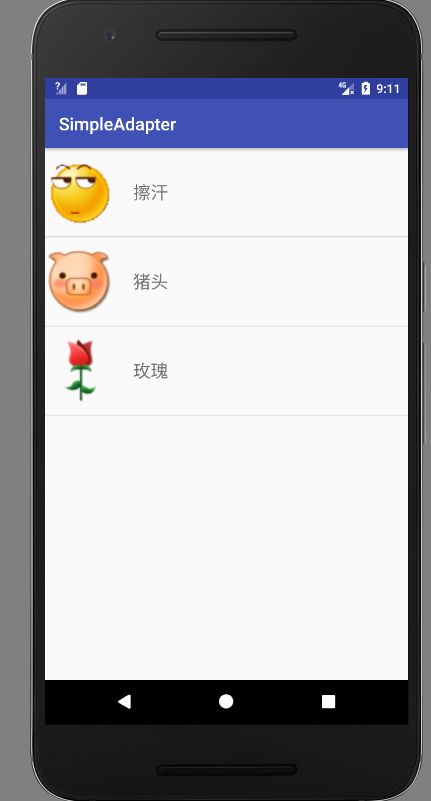
上一章讲了ListView的属性,用法,优化,这一章继续补上SimpleAdapter和SimpleCursorAdapter。
1. SimpleAdapter
1.1SimpleAdapter的构造方法
要了解SimpleAdapter, 就必须了解 它的构造方法 :
SimpleAdapter(Context context, List> data, int resource, String[] from, int[] to)
1.Context context:上下文,这个是每个组件都需要的,它指明了SimpleAdapter关联的View的运行环境,也就是我们当前的Activity。
2.List> data:这是一个由Map组成的List,在该List中的每个条目对应ListView的一行,每一个Map中包含的就是所有在from参数中指定的key。
3.int resource:定义列表项的布局文件的资源ID,该资源文件至少应该包含在to参数中定义的ID。
4.String[] from:将被添加到Map映射上的key。
5.int[] to:将绑定数据的视图的ID跟from参数对应。
1.2.SimpleAdapterde 的使用方法:
在了解了SimpleAdapter的构造方法之后,只需要满足SimpleAdapter的构造方法里面的参数
public class MainActivity extends AppCompatActivity {
private String[] items = new String[]{"擦汗", "猪头", "玫瑰"};
private int[] imgs = new int[]{R.mipmap.f006, R.mipmap.f007, R.mipmap.f008};
@Override
protected void onCreate(Bundle savedInstanceState) {
super.onCreate(savedInstanceState);
setContentView(R.layout.activity_main);
ListView listView= (ListView) findViewById(R.id.lv_list);
// 简易适配器
SimpleAdapter simpleAdapter = new SimpleAdapter(this, getData(), R.layout.layout_item, new String[]{"txt", "img"}, new int[]{R.id.tv, R.id.iv});
listView.setAdapter(simpleAdapter);
}
//将数据通过for循环放在map里面,然后将map撞到List中

private List> getData() {
List> list = new ArrayList>();
for (int i = 0; i < items.length; i++) {
Map map = new HashMap();
map.put("txt", items[i]);
map.put("img", imgs[i]);
list.add(map);
}
return list;
}
}
github地址: https://github.com/wangxin3119/github
2. SimpleCursorAdapter
在使用SQLite进行数据的操作的时候,Cursor这个游标应该不会陌生吧,在连接数据库和视图的时候,Android 提供了SimpleCursorAdapter这个适配器。
2.1 SimpleCursorAdapter的使用
1.执行数据库的增删查改操作,返回一个Cursor操作,将这个cursor放入SimpleCursorAdapter的构造函数。
2.setadapter 即可
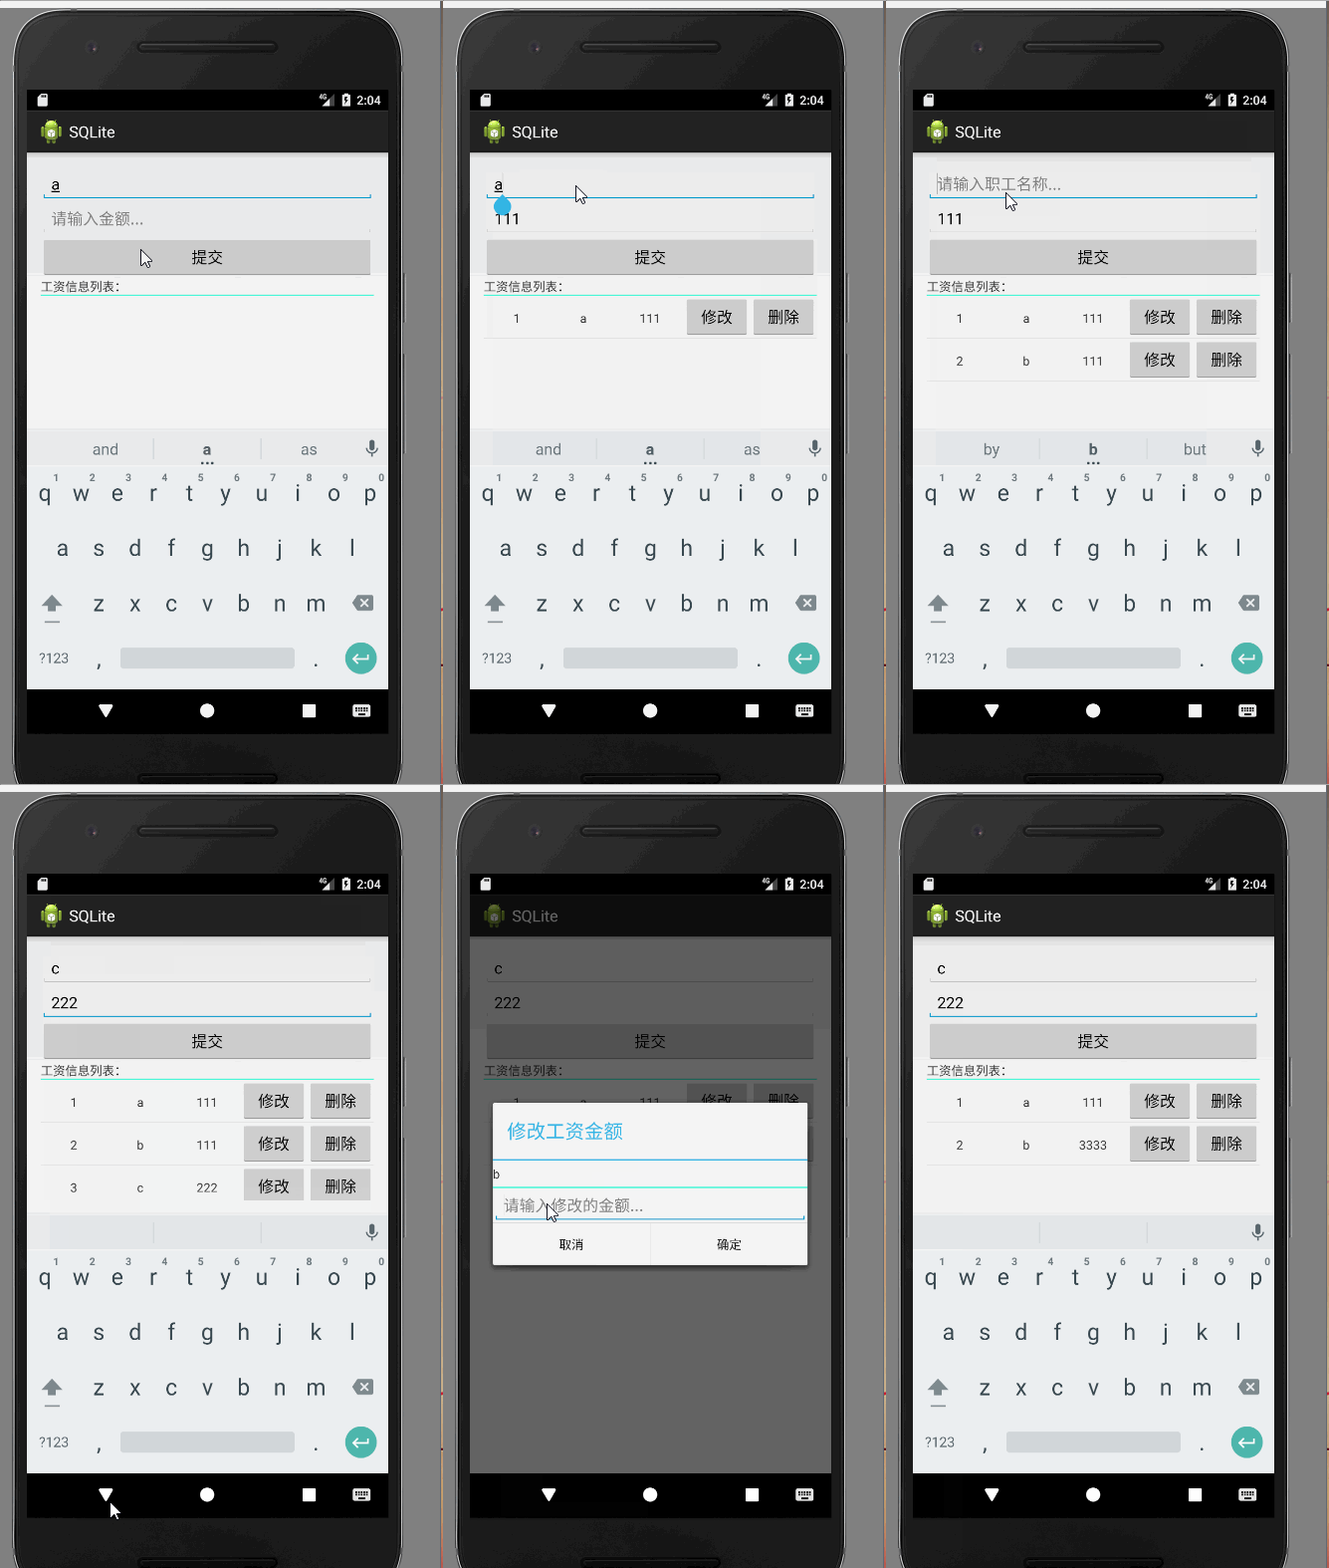
效果图:
1.创建一个工具类DBUtil.java,创建数据库,建表,进行数据库的增删查改操作。
ublic class DBUtils {

    private final SQLiteDatabase db;
    private String sql;
    private  Cursor c;
    private String name;
    private String salary;

    //创建或打开数据

    /**
     * 参数说明:
     * 1.创建或者打开数据库
     * 2.设置创建或打开数据库的模式为私有
     * 3.cursorfactory 工厂模式通常设置为null就够了
     */

    public DBUtils(Context context) {
        db = context.openOrCreateDatabase("android.db", context.MODE_PRIVATE, null);
       createTablePerson();
    }

    //创建Person表
    private void createTablePerson() {
        sql = "CREATE TABLE IF NOT EXISTS PERSON (id integer PRIMARY KEY AUTOINCREMENT ,name VARCHAR2(20) ,salary VARCHAR2(20))";
        db.execSQL(sql);
    }

    //数据库的操作
    //查询
    //1.查询语句
    //2.参数1:要执行的SQL语句
    //   参数2:SQL语句中对应的?的值
    public Cursor  query(){
        sql="SELECT id  _id,name,salary FROM person";
        c=db.rawQuery(sql,null);
        return  c;
    }

    //查询所有的人的信息

    public  Cursor  query2(){
       c=db.query("person" ,
               new String[]{"id,_id","name","salary"},
               null,
               null,//查询条件中所对应的值
               null,//分组
               null,//分组条件
               null//排序
               );
        return  c;
    }

    //保存数据
    //方法一:
    public  void insert1(String name,String salary){
        sql="INSERT INTO person(name,salary) VALUES(?,?)";
        db.execSQL(sql,new Object[]{name,salary});
    }
    //保存数据
    //方法二:
    public  void  insert2(String name,String salary){
        ContentValues values=new ContentValues();
        values.put("name",name);
        values.put("salary",salary);
        db.insert("person",null,values);
    }

    //删除数据  方法一:
    public  void   delete(String  id){
        sql="DELETE FROM person WHERE id=?";
        db.execSQL(sql,new String[]{id});
    }
    //删除数据 方法二:
    public  void  delete2(String id){
        db.delete("person","id=?",new String[]{id});
    }

    //修改数据方法一:
    public void update(String salary,String id){
        sql="UPDATE person SET salary=? WHERE id=?";
        db.execSQL(sql,new String[] {salary,id});
    }
    //修改数据方法二:
    public void update2(String id,String salary){
        ContentValues values=new ContentValues();
        values.put("salary",salary);
        db.update("person",values,"id=?",new String[]{id});
    }
}
2.自定义适配器,
public class MySimpleCursorDapater  extends SimpleCursorAdapter {

    private Button  btn01,btn02;
    private String  sql;
    private  DBUtils db;
    private  Cursor c;

    //构造方法,选择第二种,第一种已经废弃了
    /**
     *
     * @param context 上下文
     * @param layout 布局
     * @param c       游标对象
     * @param from   字符串数组
     * @param to    int数组 上面字段需要展示对应的控件的id
     * @param flags  标志
     */
    public MySimpleCursorDapater(Context context, int layout, Cursor c, String[] from, int[] to, int flags) {
        super(context, layout, c, from, to, flags);
        this.c=c;
        db=new DBUtils(context);
    }

    //和BaseAdapter 中的getView的方法类似,都是在展示每一个item的时候被调用
    @Override
    public void bindView(final View view, final Context context, Cursor cursor) {
        super.bindView(view, context, cursor);
        btn01= (Button) view.findViewById(R.id.button1);
        btn02= (Button) view.findViewById(R.id.button2);
        final TextView tv1=(TextView) view.findViewById(R.id.textView1);
        TextView tv2=(TextView) view.findViewById(R.id.textView2);
        final String id=tv1.getText().toString();
        final String name=tv2.getText().toString();
        //给删除按钮添加点击的监听事件

        btn02.setOnClickListener(new View.OnClickListener() {

            @Override
            public void onClick(View v) {
                TextView tv=(TextView) view.findViewById(R.id.textView1);
                String id=tv.getText().toString();
                Log.i("tag", "被点击的数据的id是:"+tv.getText());
                db.delete(id);
                //更新Cursor
                c=db.query();
                //新的Cursor对象替换旧的Cursor对象达到刷新的功能
                MySimpleCursorDapater.this.swapCursor(c);
            }
        });
        btn01.setOnClickListener(new View.OnClickListener() {

            @Override
            public void onClick(View v) {
                //弹出自定的对话框
                AlertDialog.Builder builder=new AlertDialog.Builder(context);
                //添加对话框的标题
                builder.setTitle("修改工资金额");
                //获取自定义布局对应的View对象
                View view=LayoutInflater.from(context).inflate(R.layout.custom_dialog_layout, null);
                TextView tv=(TextView) view.findViewById(R.id.textView1);
                final EditText et=(EditText) view.findViewById(R.id.editText1);
                tv.setText(name);
                //对话框加载自定义布局
                builder.setView(view);
                builder.setPositiveButton("确定", new DialogInterface.OnClickListener() {
                    /**
                     * 将修改的内容更新到数据库中
                     * 获取需要修改的数据
                     * 同步更新ListView中的数据
                     */
                    @Override
                    public void onClick(DialogInterface dialog, int which) {
                        //更新金额  首先获取金额
                        String salary=et.getText().toString();
                        db.update(salary, id);
                        c=db.query();
                        MySimpleCursorDapater.this.swapCursor(c);
                    }
                });
                builder.setNegativeButton("取消", new DialogInterface.OnClickListener() {

                    @Override
                    public void onClick(DialogInterface dialog, int which) {

                    }

                });
                builder.show();
            }
        });

    }
}
3.最后在Activity中,调用DBUtils和MySimpleCursorAdapter
public class MainActivity extends AppCompatActivity {

    public EditText  edit01,edit02;
    private ListView listView;
    private DBUtils dbUtils;
    private Cursor cursor;
    MySimpleCursorDapater adapter;
    private String salary;
    private String name;

    @Override
    protected void onCreate(Bundle savedInstanceState) {
        super.onCreate(savedInstanceState);
        setContentView(R.layout.activity_main);
        initView();
    }

    private void initView() {
        edit01= (EditText) findViewById(R.id.id_et1);
        edit02= (EditText) findViewById(R.id.id_et2);
        listView= (ListView) findViewById(R.id.id_listview);
        dbUtils=new DBUtils(this);
        //查询出所有的人信息获取Cursor对象
        cursor = dbUtils.query();
        String from []={"_id","name","salary"};
        int to[]={R.id.textView1,R.id.textView2,R.id.textView3};
        adapter=new MySimpleCursorDapater(this,
                R.layout.custom_item_layout,
                cursor,
                from,
                to,
                SimpleCursorAdapter.FLAG_REGISTER_CONTENT_OBSERVER);
        listView.setAdapter(adapter);
    }

    public  void  commitData(View v){
        name=edit01.getText().toString();
        salary=edit02.getText().toString();
        //将数据写入person表中
        dbUtils.insert1(name,salary);
        //重新查询数据更新Cursor对象
        cursor=dbUtils.query();
        //刷新
        adapter.swapCursor(cursor);
    }


}
github地址:https://github.com/wangxin3119/simpeCursorAdapter

