1. Line plots
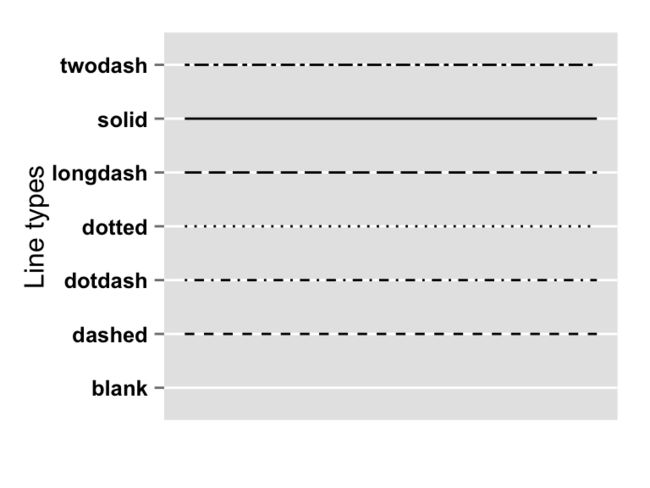
1.1 R软件可用的线型
R软件中可用的不同线型为“blank”, “solid”, “dashed”, “dotted”, “dotdash”, “longdash”, “twodash”.
1.2 语法
geom_path( mapping = NULL, data = NULL, stat = "identity", position = "identity", ..., lineend = "butt", linejoin = "round", linemitre = 10, arrow = NULL, na.rm = FALSE, show.legend = NA, inherit.aes = TRUE )
geom_line( mapping = NULL, data = NULL, stat = "identity", position = "identity", na.rm = FALSE, orientation = NA, show.legend = NA, inherit.aes = TRUE, ... )
1.3 基础线图
# 基本线图
df <- data.frame(time=c("breakfeast", "Lunch", "Dinner"),
                 bill=c(10, 30, 15))
head(df)

# 创建线图并更改线型
library(ggplot2)
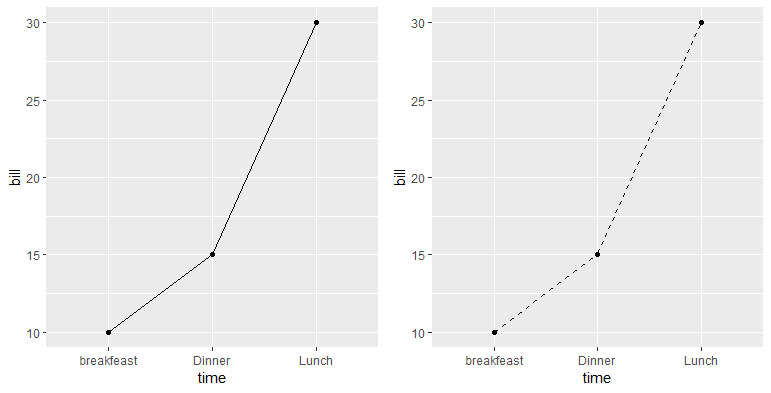
# 带点的基本线图
p1 <- ggplot(data=df, aes(x=time, y=bill, group=1)) +
  geom_line()+
  geom_point()
# 更改线型
p2 <- ggplot(data=df, aes(x=time, y=bill, group=1)) +
  geom_line(linetype = "dashed")+
  geom_point()
ggarrange(p1,p2)
2.4 多组折线图
# 多组折线图
df2 <- data.frame(sex = rep(c("Female", "Male"), each=3),
                  time=c("breakfeast", "Lunch", "Dinner"),
                  bill=c(10, 30, 15, 13, 40, 17) )
head(df2)

## 全局更改线条的外观
library(ggplot2)
# 多组折线图
p3 <- ggplot(data=df2, aes(x=time, y=bill, group=sex)) +
  geom_line()+
  geom_point()
# 更改线型
p4 <- ggplot(data=df2, aes(x=time, y=bill, group=sex)) +
  geom_line(linetype="dashed")+
  geom_point()
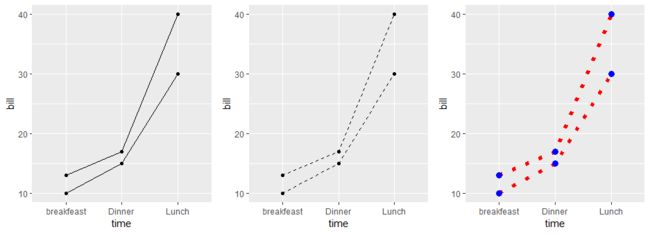
# 更改线条颜色和大小
p5 <- ggplot(data=df2, aes(x=time, y=bill, group=sex)) +
  geom_line(linetype="dotted", color="red", size=2)+
  geom_point(color="blue", size=3)
ggarrange(p3,p4,p5,nrow = 1)
## 按组自动更改线型
# 按组更改线型(性别)
p6 <- ggplot(df2, aes(x=time, y=bill, group=sex)) +
  geom_line(aes(linetype=sex))+
  geom_point()+
  theme(legend.position="top")
# 更改线型+颜色
p7 <- ggplot(df2, aes(x=time, y=bill, group=sex)) +
  geom_line(aes(linetype=sex, color=sex))+
  geom_point(aes(color=sex))+
  theme(legend.position="top")
ggarrange(p6,p7)
## 手动更改线条的外观
# 手动设置线型
p8 <- ggplot(df2, aes(x=time, y=bill, group=sex)) +
  geom_line(aes(linetype=sex))+
  geom_point()+
  scale_linetype_manual(values=c("twodash", "dotted"))+
  theme(legend.position="top")
# 更改线条颜色和大小
p9 <- ggplot(df2, aes(x=time, y=bill, group=sex)) +
  geom_line(aes(linetype=sex, color=sex, size=sex))+
  geom_point()+
  scale_linetype_manual(values=c("twodash", "dotted"))+
  scale_color_manual(values=c('#999999','#E69F00'))+
  scale_size_manual(values=c(1, 1.5))+
  theme(legend.position="top")
ggarrange(p8,p9)
2. Density plots.
2.1 语法
geom_density( mapping = NULL, data = NULL, stat = "density", position = "identity", ..., na.rm = FALSE, orientation = NA, show.legend = NA, inherit.aes = TRUE, outline.type = "upper" )
stat_density( mapping = NULL, data = NULL, geom = "area", position = "stack", ..., bw = "nrd0", adjust = 1, kernel = "gaussian", n = 512, trim = FALSE, na.rm = FALSE, orientation = NA, show.legend = NA, inherit.aes = TRUE )
2.2 基础密度图
# 准备数据
set.seed(1234)
df <- data.frame(
  sex=factor(rep(c("F", "M"), each=200)),
  weight=round(c(rnorm(200, mean=55, sd=5),
                 rnorm(200, mean=65, sd=5)))
)
head(df)
# 基础密度图
library(ggplot2)
# 基础密度图
p <- ggplot(df, aes(x=weight)) +
  geom_density()
p
# 添加平均线
p1 <- p + geom_vline(aes(xintercept=mean(weight)),
              color="blue", linetype="dashed", size=1)
ggarrange(p,p1)
2.3 修改线型及颜色
# 修改线型及颜色
# 修改轮廓色及填充色
p2 <- ggplot(df, aes(x=weight))+
  geom_density(color="darkblue", fill="lightblue")
# 修改线型
p3 <- ggplot(df, aes(x=weight))+
  geom_density(linetype="dashed")
ggarrange(p2,p3)
2.4 按组更改密度图颜色
# 按组更改密度图颜色
# 计算每组的平均值:
library(plyr)
mu <- ddply(df, "sex", summarise, grp.mean=mean(weight))
head(mu)
## 更改线条颜色
# Change density plot line colors by groups
p4 <- ggplot(df, aes(x=weight, color=sex)) +
  geom_density()
# Add mean lines
p5 <- ggplot(df, aes(x=weight, color=sex)) +
  geom_density()+
  geom_vline(data=mu, aes(xintercept=grp.mean, color=sex),
             linetype="dashed")
ggarrange(p4,p5)
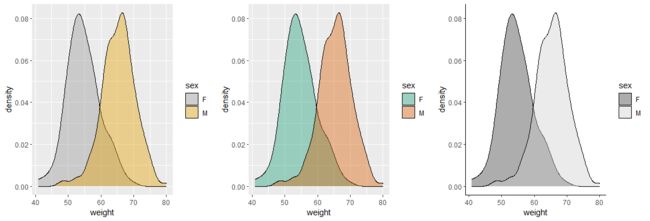
# 自定义调色板
p6 <- p5 + scale_color_manual(values=c("#999999", "#E69F00", "#56B4E9"))
# brewer调色板
p7 <- p5 + scale_color_brewer(palette="Dark2")
# 灰色
p8 <- p5 + scale_color_grey() + theme_classic()
ggarrange(p6,p7,p8,nrow = 1)
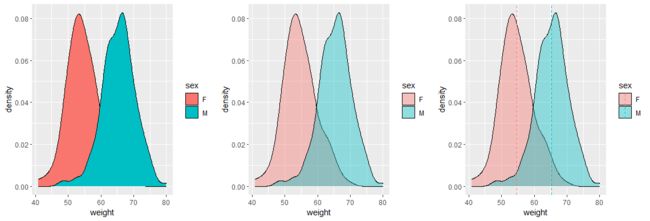
## 按组修改填充色
p9 <- ggplot(df, aes(x=weight, fill=sex)) +
  geom_density()
# 使用半透明填充
p10 <- ggplot(df, aes(x=weight, fill=sex)) +
  geom_density(alpha=0.4)
# 添加平均线
p11 <- p10 + geom_vline(data=mu, aes(xintercept=grp.mean, color=sex),
             linetype="dashed")
ggarrange(p9,p10,p11,nrow = 1)
# 自定义调色板
p12 <- p10 + scale_fill_manual(values=c("#999999", "#E69F00", "#56B4E9"))
# brewer调色板
p13 <- p10 + scale_fill_brewer(palette="Dark2")
# 灰色
p14 <- p10 + scale_fill_grey() + theme_classic()
ggarrange(p12,p13,p14,nrow = 1)
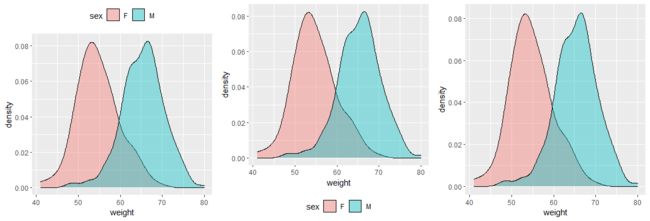
2.5 更改图例位置
# 更改图例位置
p15 <- p10 + theme(legend.position="top")
p16 <- p10 + theme(legend.position="bottom")
p17 <- p10 + theme(legend.position="none") # Remove legend
ggarrange(p15,p16,p17,nrow = 1)
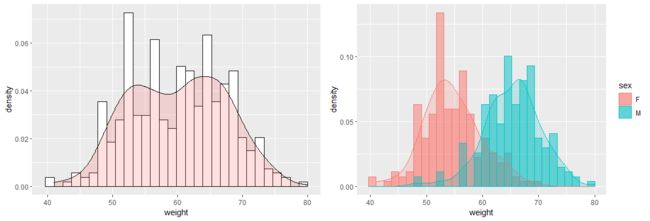
2.6 组合直方图和密度图
# Histogram with density plot
p18 <- ggplot(df, aes(x=weight)) +
  geom_histogram(aes(y=..density..), colour="black", fill="white")+
  geom_density(alpha=.2, fill="#FF6666")
# Color by groups
p19 <- ggplot(df, aes(x=weight, color=sex, fill=sex)) +
  geom_histogram(aes(y=..density..), alpha=0.5,
                 position="identity")+
  geom_density(alpha=.2)
ggarrange(p18,p19)
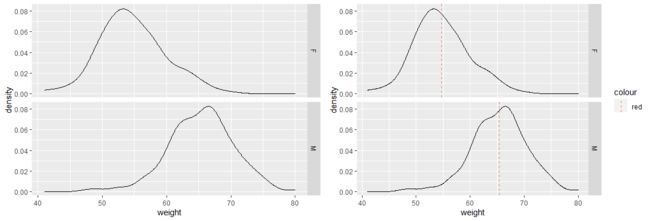
2.7 分面
p20 <- ggplot(df, aes(x=weight))+
  geom_density()+facet_grid(sex ~ .)
# Add mean lines
p21 <- p20 + geom_vline(data=mu, aes(xintercept=grp.mean, color="red"),
             linetype="dashed")
ggarrange(p20,p21)
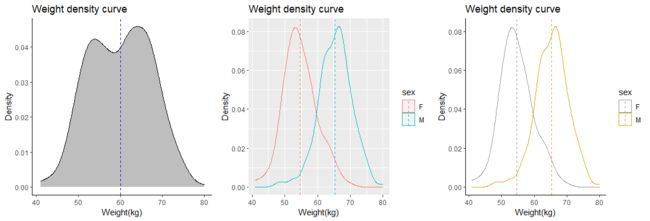
2.8 自定义密度图
# 自定义密度图
# 基础密度图
p22 <- ggplot(df, aes(x=weight, fill=sex)) +
  geom_density(fill="gray")+
  geom_vline(aes(xintercept=mean(weight)), color="blue",
             linetype="dashed")+
  labs(title="Weight density curve",x="Weight(kg)", y = "Density")+
  theme_classic()
# 按组修改颜色
p23 <- ggplot(df, aes(x=weight, color=sex)) +
  geom_density()+
  geom_vline(data=mu, aes(xintercept=grp.mean, color=sex),
             linetype="dashed")+
  labs(title="Weight density curve",x="Weight(kg)", y = "Density")

p24 <- p23 + scale_color_manual(values=c("#999999", "#E69F00", "#56B4E9"))+
  theme_classic()
ggarrange(p22,p23,p24,nrow = 1)
# 连续型颜色
p25 <- p23  + scale_color_brewer(palette="Paired") + theme_classic()
# 离散型颜色
p26 <- p23  + scale_color_brewer(palette="Dark2") + theme_minimal()
# 渐变色
p27 <- p23  + scale_color_brewer(palette="Accent") + theme_minimal()
ggarrange(p25,p26,p27,nrow=1)
3. QQ plots
3.1 语法
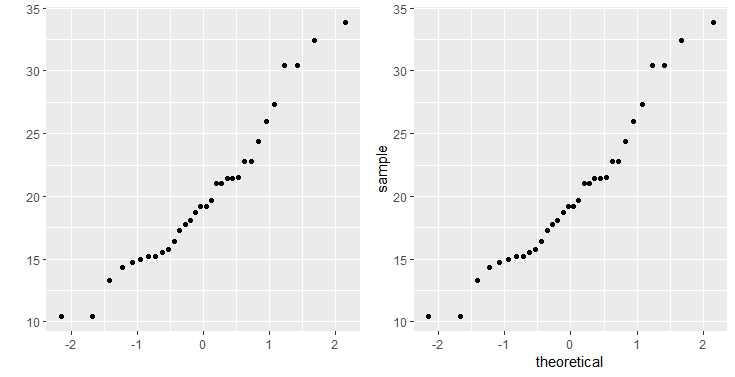
3.2 基础qq图
# qq图(或分位数图), QQ图用于检查给定数据是否遵循正态分布,stat_qq(),qplot()
# 将cyl从数字转换为因子变量
mtcars$cyl <- as.factor(mtcars$cyl)
head(mtcars)
# 基础qq图
library(ggplot2)
# Solution 1
p1 <- qplot(sample = mpg, data = mtcars)
# Solution 2
p2 <- ggplot(mtcars, aes(sample=mpg))+stat_qq()
ggarrange(p1,p2)
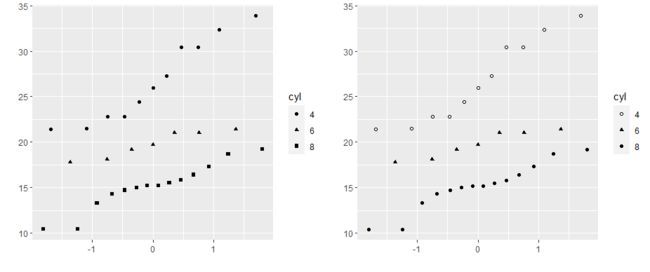
3.3 按组更改qq图点形状
# 按组更改qq图点形状
# 按组更改点形状
p3 <- qplot(sample = mpg, data = mtcars, shape=cyl)

# 手动更改点形状
p4 <- p3 + scale_shape_manual(values=c(1,17,19))
ggarrange(p3,p4)
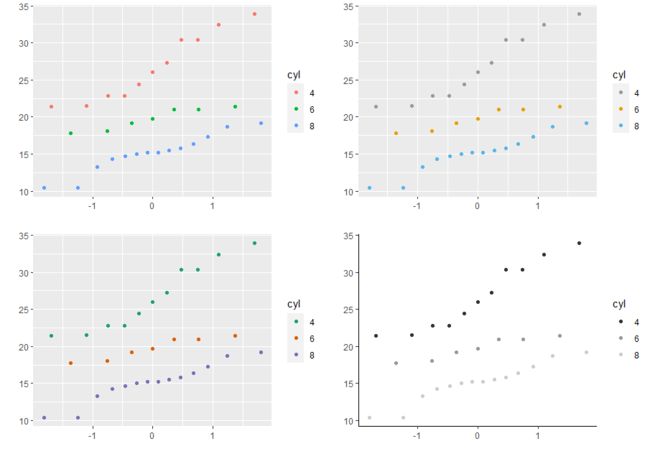
3.4 按组更改qq图颜色
# 按组更改qq图颜色
# 按组更改qq图颜色
p5 <- qplot(sample = mpg, data = mtcars, color=cyl)
# 自定义调色板
p6 <- p5 + scale_color_manual(values=c("#999999", "#E69F00", "#56B4E9"))
# brewer调色板
p7 <- p5 + scale_color_brewer(palette="Dark2")
# 灰色
p8 <- p5 + scale_color_grey() + theme_classic()
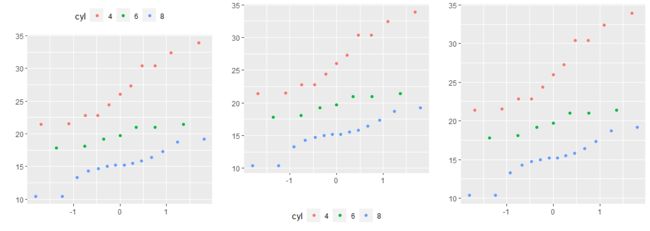
ggarrange(p5,p6,p7,p8,nrow = 2,ncol = 2)
3.5 更改图例位置
# 更改图例位置
p9 <- p5 + theme(legend.position="top")
p10 <- p5 + theme(legend.position="bottom")
p11 <- p5 + theme(legend.position="none") # Remove legend
ggarrange(p9,p10,p11,nrow = 1)
3.6 自定义qq图
# 基础qq图
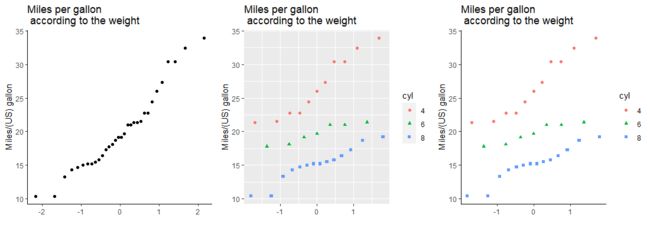
p12 <- qplot(sample = mpg, data = mtcars)+
  labs(title="Miles per gallon \n according to the weight",
       y = "Miles/(US) gallon")+
  theme_classic()
# Change color/shape by groups
p13 <- qplot(sample = mpg, data = mtcars, color=cyl, shape=cyl)+
  labs(title="Miles per gallon \n according to the weight",
       y = "Miles/(US) gallon")
p14 <- p13 + theme_classic()
ggarrange(p12,p13,p14,nrow = 1)
# 连续型颜色
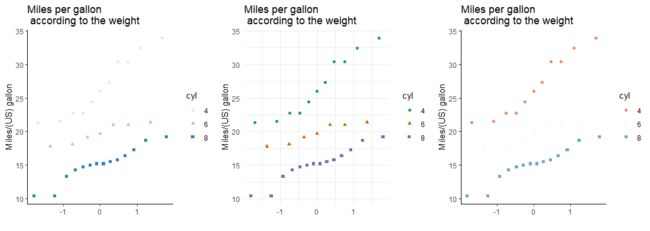
p15 <- p14 + scale_color_brewer(palette="Blues") + theme_classic()
# 离散型颜色
p16 <- p14 + scale_color_brewer(palette="Dark2") + theme_minimal()
# 渐变色
p17 <- p14 + scale_color_brewer(palette="RdBu")
ggarrange(p15,p16,p17,nrow = 1)
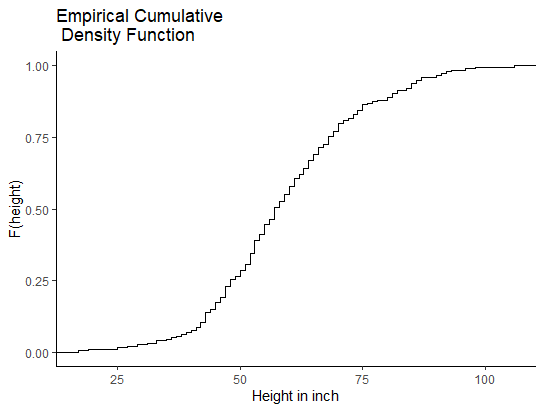
4. ECDF plots
# ECDF图,或经验累积密度函数),ECDF报告任何给定数字的低于该阈值的个体百分比
set.seed(1234)
df <- data.frame(height = round(rnorm(200, mean=60, sd=15)))
head(df)
library(ggplot2)
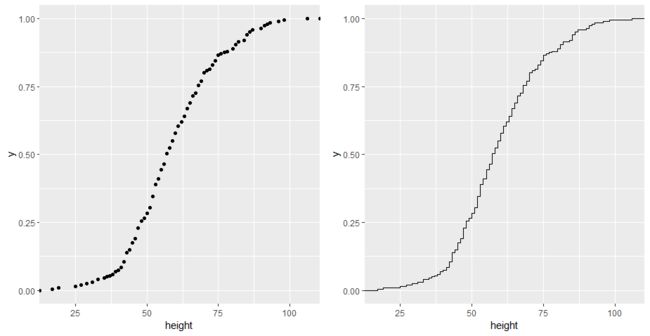
p1 <- ggplot(df, aes(height)) + stat_ecdf(geom = "point")
p2 <- ggplot(df, aes(height)) + stat_ecdf(geom = "step")
ggarrange(p1,p2)
# 自定义
# Basic ECDF plot
ggplot(df, aes(height)) + stat_ecdf(geom = "step")+
  labs(title="Empirical Cumulative \n Density Function",
       y = "F(height)", x="Height in inch")+
  theme_classic()
Reference
1.ggplot2 line types : How to change line types of a graph in R software?
2.ggplot2 density plot : Quick start guide - R software and data visualization
3.ggplot2 qq plot (quantile - quantile graph) : Quick start guide - R software and data visualization
4.ggplot2 ECDF plot : Quick start guide for Empirical Cumulative Density Function - R software and data visualization
