【Python8】requests库,百度人脸API,IPCamera
文章目录
- 1.requests库
- 2.百度人脸API
- 3.IPCamera
1.requests库
对WEB API接口测试(通常对服务端做的多),除了postman等工具还可以用python的requests库。

API接口消息就是业务逻辑处理如下。

测试用例书写:条件组合,边界值,错误猜测。requests程序抓包:要让requests发送请求使用代理,只需要如下参数设定即可。
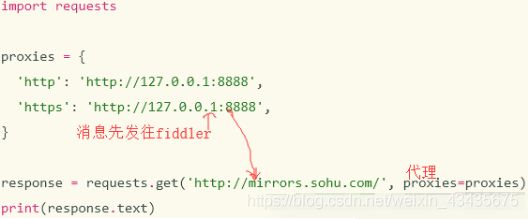


![]()


2.百度人脸API
https://ai.baidu.com/docs#/Auth/top,如下获取Access Token


# encoding:utf-8
import os
import base64
import json
import xlwt
import urllib.request,urllib.parse
request_url = "https://aip.baidubce.com/rest/2.0/face/v3/detect" # 在人脸识别API文档中人脸检测中
row = 0
col = 0
workbook = xlwt.Workbook('123.xls')
worksheet = workbook.add_sheet("gongzuobiao")
worksheet.write(row, col+0, "时间")
worksheet.write(row, col+1, "相机ID")
worksheet.write(row, col+2, "性别")
worksheet.write(row, col+3, "年龄")
worksheet.write(row, col+4, "种族")
worksheet.write(row, col+5, "表情")

for imgname in os.listdir("G:/img3"):
    print("imgname:",imgname)  # imgname:
    data = imgname.split('_')[0]
    print("data:", data)      # data:
    camera = imgname.split('_')[2].split(".")[0]
    print("camera:",camera)  # camera:

    imgpath = "G:/img3"+imgname
    f = open(imgpath, 'rb')
    img = base64.b64encode(f.read())
    params ={
     "image":img,
             "image_type":"BASE64",
             "face_field":"age,gender,race,emotion"}

    params = urllib.parse.urlencode(params).encode(encoding='UTF8')
    access_token = '24.0449cf2437689f550ca5f93dac53fce3.2592000.1574310334.282335-17084453'
    request_url = request_url + "?access_token=" + access_token
    request = urllib.request.Request(url=request_url, data=params)
    request.add_header('Content-Type', 'application/json')
    response = urllib.request.urlopen(request)
    content = response.read()
    print("content:",content)
    if content:
        str = content.decode()
        content = json.loads(str)
        results = content['result']
        if results:
            row += 1
            for item in results["face_list"]:
                    print("item:\n",item['gender']['type'])
                    worksheet.write(row, col + 0, data)
                    worksheet.write(row, col + 1, camera)
                    worksheet.write(row, col + 2, item['gender']['type'])
                    worksheet.write(row, col + 3, item['age'])
                    worksheet.write(row, col + 4, item['race']['type'])
                    worksheet.write(row, col + 5, item['emotion']['type'])
    workbook.save('123.xls')


3.IPCamera

1.登录
mysql -u root -p
2.显示所有数据库
show databases;
3.创建数据库
create database new_dbname;
4.使用数据库
use databasename;
5.显示当前选择数据库的所有表
show tables;
6.创建表
create table tablename(fieldname1 fieldtype1,fieldname2 fieldtype2,…);
create table camera(id int,store_id int,camera_code varchar(100),camera_ip varchar(30),camera_mac varchar(150),subnet_mask varchar(30),gateway varchar(30),day_exposure int,night_exposure int,resolution varchar(30),outofstock_search_status int,binding_status int,network_status int,error_status int,created_at datetime,updated_at datetime);
create table store(id int, customer_code varchar(100),store_code varchar(100),ssid varchar(100),password varchar(100),created_at datetime,update_at datetime);
7.删除表
drop table tablename;
8.修改字段名
ALTER TABLE 表名 CHANGE 旧字段名 新字段名 新数据类型;
alter table camera change outofstock_search_status outofstock_search_rate;
9.设置已有的字段为自增主键
alter table camera change id id int not null auto_increment primary key;
10.查询表中的数据
select * from user;
11.修改表中的数据
update user set password=‘666666’ where name=‘zhangshu’;
12.删除表中数据
delete from user where id=1;
13.增加一列到已经建好的表中
向已有的表中加入一列,这一列在表的最后一列位置
alter table 表名 add column 列名 varchar(20) not null;
添加addr列到user1这一列后面
alter table 表名 add column 列名 varchar(20) not null after user1;
想添加到第一列的话
alter table 表名 add column 列名 varchar(20) not null first;
14.插入一条数据
insert into shelf(camera_id,area_id,shelf_code,virtual_shelf_code,shelf_remark) values(1,1,‘walmart001’,‘walmart001_1’,‘remake’)
insert into shelf(camera_id,area_id,shelf_code,virtual_shelf_code,shelf_remark,created_at,update_at) values(2,1,‘walmart002’,‘walmart002_1’,‘remake’,‘2019-08-29 16:30:53’,‘2019-08-29 16:30:53’)

设置camera APP工作模式(拍摄照片模式 or 视频模式)
http://192.168.50.31/?custom=1&cmd=3001&par=0
par=0:PHOTO
par=1:MOVIE
par=2:PLAYBACK
设置camera曝光时间
http://192.168.1.254/?custom=1&cmd=2005&par=4
设置camera拍照的大小
http://192.168.1.254/?custom=1&cmd=1002&par=4
par=0:12M 4032 乘3024 (3.4M)
par=1:10M 3648 乘2736
par=2:8M 3264 乘2448
par=3:5M 2592 乘1944 (1.3M)
par=4:3M 720 乘480 (242.6K)
par=5:VGA 640 乘480
设置相机曝光率
http://192.168.1.254/?custom=1&cmd=2005&par=2
拍照
http://192.168.50.219/?custom=1&cmd=1001
连续拍照
http://10.88.29.16/?custom=1&cmd=8119&exp=20000&num=2
删除所有照片和视频(备注:必须在PHOTO模式才可以执行)
http://192.168.1.254/?custom=1&cmd=4004
删除某一张照片(备注:必须在PHOTO模式才可以执行)
http://192.168.1.254/?custom=1&cmd=4003&str=A:\CARDV\PHOTO\2014_0506_000000.0001.JPG
改变camera WIFI的名字和密码:
1)http://192.168.1.254/?custom=1&cmd=3003&str=LWP
2)http://192.168.1.254/?custom=1&cmd=3004&str=12345678
设置camera接入局域网的IP地址
1)http://192.168.1.254/?custom=1&cmd=3032&str=SMLWPA-02:siammakro.co.th
2)http://192.168.1.254/?custom=1&cmd=3033&par=1
http://192.168.1.254/?custom=1&cmd=3032&str=HS-Camera:12345678
重新连接WIFI
http://192.168.1.254/?custom=1&cmd=3018
在WIFI AP模式下,获得SSID和密码
http://192.168.1.254/?custom=1&cmd=3029
获得相机的版本号
http://http://10.82.230.66/?custom=1&cmd=3012
设置相机广播目标地址IP
http://192.168.8.108/?custom=1&cmd=8117&str=192.168.8.112
设置相机日期和时间
http://10.82.230.86/?custom=1&cmd=3005&str=2019-07-08
http://10.82.230.86/?custom=1&cmd=3006&str=19:59:10
微信公众号:码农编程录
