近来在做关于Google、Twitter、Facebook登录和注册的相关项目中遇到不少坑,下面就简单记录一下操作和相关代码
首先我们需要导入对应的三房库
- 1 Google
登录
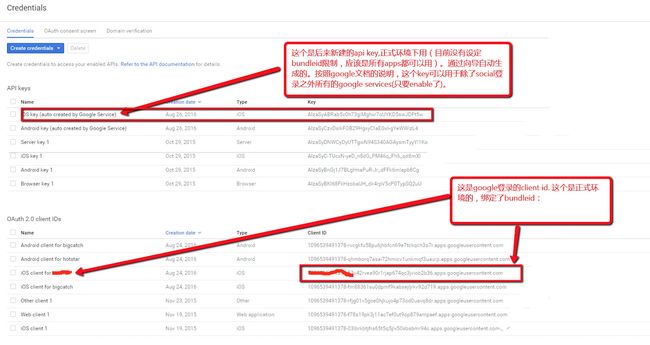
注册获取key和id
下面是我们注册好的
在注册完成后,我们将GoogleService-Info.plist文件下载下来,然后倒入工程,检查是不是和我们申请的key和id保持一致
现在我们差不多配置好了所需要的key和id
下面我们之间上代码
Google登录
#import
#import
#import
#import
...

//需和plit文件中的id保持一致
static NSString *const kGoogleId = @"1096539491378-53v42rvea90r1rjap674qc3jviob2b36.apps.googleusercontent.com";
static NSString *const kGooglesecret = @"";//此处秘钥如果你的id是web client则需要 否则可以不填

@interface LoginViewController ()
{
    GPPSignIn *             _signin;
    UINavigationController *    _googleLoginNavigationController;
}
#pragma mark == GPPSignInDelegate
//定义以下方法,在视图控制器中实施 GPPSignInDelegate 以处理登录流程。
- (void)finishedWithAuth: (GTMOAuth2Authentication *)auth
                   error: (NSError *) error
{
//根据google回调的信息  进行自己服务器的登录

    GTLQueryPlus *query = [GTLQueryPlus queryForPeopleGetWithUserId:@"me"];
    NSLog(@"email %@ ", [NSString stringWithFormat:@"Email: %@",[GPPSignIn sharedInstance].authentication.userEmail]);
    NSLog(@"Received error %@ and auth object %@",error, auth);
    // 1. Create a |GTLServicePlus| instance to send a request to Google+.
    GTLServicePlus* plusService = [[GTLServicePlus alloc] init] ;
    plusService.retryEnabled = YES;
    // 2. Set a valid |GTMOAuth2Authentication| object as the authorizer.
    [plusService setAuthorizer:[GPPSignIn sharedInstance].authentication];
    // 3. Use the "v1" version of the Google+ API.*
    plusService.apiVersion = @"v1";

    __weak typeof(self)weakSelf = self;


    [plusService executeQuery:query
            completionHandler:^(GTLServiceTicket *ticket,
                                GTLPlusPerson *person,
                                NSError *error) {
                __strong __typeof(weakSelf)strongSelf = weakSelf;

                if (error) {
                    //Handle Error
                } else {
                    NSLog(@"Email= %@", [GPPSignIn sharedInstance].authentication.userEmail);
                    NSLog(@"GoogleID=%@", person.identifier);
                    NSLog(@"User Name=%@", [person.name.givenName stringByAppendingFormat:@" %@", person.name.familyName]);
                    NSLog(@"Gender=%@", person.gender);
                }
            }];
}

- (void)googleLogin
{
    void (^handler)(id, id, id) =
    ^(GTMOAuth2ViewControllerTouch *viewController,
      GTMOAuth2Authentication *auth,
      NSError *error) {
        [self dismissViewControllerAnimated:YES completion:^{


        }];
        if (error) {
            NSLog(@"%@", error);
            return;
        } else {
            BOOL signedIn = [[GPPSignIn sharedInstance] trySilentAuthentication];
            if(!signedIn) {
                NSLog(@"Sign In failed");
            }
        }
    };

    GTMOAuth2ViewControllerTouch *authViewController;
    authViewController = [GTMOAuth2ViewControllerTouch
                      controllerWithScope:kGTLAuthScopePlusLogin
                      clientID:[GPPSignIn sharedInstance].clientID
                      clientSecret:kGooglesecret
                      keychainItemName:[GPPSignIn sharedInstance].keychainName
                      completionHandler:handler];

    authViewController.initialHTMLString = @"Are entering Google login page...";

    UINavigationController *navigationController = [[UINavigationController alloc] initWithRootViewController:authViewController];
    navigationController.modalTransitionStyle = UIModalTransitionStyleCoverVertical;

    _googleLoginNavigationController = navigationController;

    [self.navigationController presentViewController:navigationController animated:YES completion:nil];

    dispatch_after(dispatch_time(DISPATCH_TIME_NOW, (int64_t)(0.1f * NSEC_PER_SEC)), dispatch_get_main_queue(), ^{
        UIBarButtonItem *cancelButton = [[UIBarButtonItem alloc] initWithTitle:NSLocalizedString(@"Cancel", nil)
                                                                         style:UIBarButtonItemStylePlain
                                                                        target:self
                                                                        action:@selector(didCanceledAuthorization)];
        authViewController.navigationItem.rightBarButtonItem = nil;
        authViewController.navigationItem.leftBarButtonItem = cancelButton;
        authViewController.navigationItem.title = @"Google Login";
    });

}

- (void)didCanceledAuthorization
{
    [_googleLoginNavigationController dismissModalController];
}
12月16补充说明:最近之前的google登录方式不行了。在官网上找到最新代码,贴在此处以供大家享用
//这个和之前的唯一不同的是需要在info.plist文件中 在 URL Schemes中添加 googlesevice.plist中的 REVERSED_CLIENT_ID的值
- (void)viewDidLoad {
    [super viewDidLoad];

    [GIDSignIn sharedInstance].shouldFetchBasicProfile = YES;
    [GIDSignIn sharedInstance].delegate = self;//设置代理,这个是结果回调
    [GIDSignIn sharedInstance].uiDelegate = self;//设置代理,这个是调用授权登录页面的
    [[GIDSignIn sharedInstance] signOut];//注销之前的登录状态
}

- (void)googleLogin
{
    //调用google登录API
    [[GIDSignIn sharedInstance] signIn];
}
#pragma mark - GIDSignInDelegate

- (void)signIn:(GIDSignIn *)signIn
didSignInForUser:(GIDGoogleUser *)user
     withError:(NSError *)error {
    if (error) {
//        _signInAuthStatus.text = [NSString stringWithFormat:@"Status: Authentication error: %@", error];
        return;
    }
//    [self reportAuthStatus];
//    [self updateButtons];

    //下面为登录后获取的相关信息
    NSString *email = [GIDSignIn sharedInstance].currentUser.profile.email;
    NSString *givename = [GIDSignIn sharedInstance].currentUser.profile.givenName;
    NSString *familyName = [GIDSignIn sharedInstance].currentUser.profile.familyName;

}

- (void)signIn:(GIDSignIn *)signIn
didDisconnectWithUser:(GIDGoogleUser *)user
     withError:(NSError *)error {
    if (error) {
//        _signInAuthStatus.text = [NSString stringWithFormat:@"Status: Failed to disconnect: %@", error];
    } else {
//        _signInAuthStatus.text = [NSString stringWithFormat:@"Status: Disconnected"];
    }
//    [self reportAuthStatus];
//    [self updateButtons];
    NSString *email = [GIDSignIn sharedInstance].currentUser.profile.email;
    NSString *givename = [GIDSignIn sharedInstance].currentUser.profile.givenName;
    NSString *familyName = [GIDSignIn sharedInstance].currentUser.profile.familyName;
}

- (void)presentSignInViewController:(UIViewController *)viewController {
    [[self navigationController] pushViewController:viewController animated:YES];
}
GoogleMaps
首先可以用cocoapods导入库
pod 'GoogleMaps', '~> 1.13.2'
然后在AppDelegate加入以下代码
- (BOOL)application:(UIApplication *)application didFinishLaunchingWithOptions:(NSDictionary *)launchOptions
{
    //地图  key和plist文件中的是一样的如上图中的 A....oUYKD5swJDFt5w

    [GMSServices provideAPIKey:GOOGLE_MAP_APIKEY];
    services_ = [GMSServices sharedServices];
}
关于地图具体怎么用,这里就不在详细说明了
- 2 Facebook
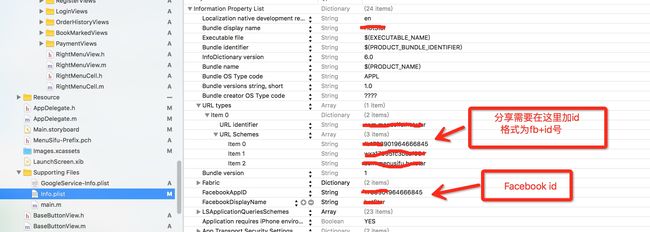
先在plist文件中设置
然后在AppDelegate加入以下代码
- (BOOL)application:(UIApplication *)application didFinishLaunchingWithOptions:(NSDictionary *)launchOptions
{
    //facebook
    [[FBSDKApplicationDelegate sharedInstance] application:application
                             didFinishLaunchingWithOptions:launchOptions];

return YES;
}
在要分享的地方 导入头文件 并执行以下代码
#import
....
- (void)ShareFacebook
{
    FBSDKShareLinkContent *content = [[FBSDKShareLinkContent alloc] init];
        content.contentURL = [NSURL URLWithString:@"http://www.baidu.com"];
        content.contentTitle = @"分享标题";
        content.contentDescription = @"Is a good restaurant";
        content.imageURL = [NSURL URLWithString:@"分享图片"];
        [FBSDKShareDialog showFromViewController:self withContent:content delegate:(id)self];
}
//分享回调代理
#pragma mark == facebook shareDelegate
- (void)sharer:(id)sharer didCompleteWithResults:(NSDictionary *)results
{
//分享成功
}

- (void)sharer:(id)sharer didFailWithError:(NSError *)error
{
 //失败
}

- (void)sharerDidCancel:(id)sharer
{
//取消
}
在登录的地方 导入头文件
#import
#import
登录的时候 执行以下函数
- (void)facebookLogin
{
__weak typeof(self)weakSelf = self;
//已经登录过
    if ([FBSDKAccessToken currentAccessToken])
    {
        FBSDKLoginManager *login = [[FBSDKLoginManager alloc] init];
        [login logOut];
    }
    else
    {
        //@"publish_actions"
        FBSDKLoginManager *login = [[FBSDKLoginManager alloc] init];

        //获取对应的信息 email 等
        [login logInWithReadPermissions:@[@"public_profile",@"email",@"user_friends"]
                     fromViewController:self
                                handler:^(FBSDKLoginManagerLoginResult *result, NSError *error) {
                                    if (error) {
                                        return;
                                    }

            if ([FBSDKAccessToken currentAccessToken] &&
                [[FBSDKAccessToken currentAccessToken].permissions containsObject:@"public_profile"]) {

//登录成功 获取信息
                [weakSelf getFacebookUserinfo];

                NSLog(@" 打印信息:%@",[FBSDKAccessToken currentAccessToken].tokenString);

                return;
            }
        }];
    }
}

- (void)getFacebookUserinfo
{
    NSMutableDictionary* parameters = [NSMutableDictionary dictionary];
    [parameters setValue:@"id,name,email" forKey:@"fields"];

    FBSDKGraphRequest *graphRequest = [[FBSDKGraphRequest alloc]initWithGraphPath:@"me" parameters:parameters];
    [graphRequest startWithCompletionHandler:^(FBSDKGraphRequestConnection *connection, id loginresult, NSError *error) {

        if (error) {
            return ;
        }
        else
        {
            NSDictionary *faceLoginDic = (NSDictionary *)loginresult;

            NSLog(@" 打印信息facebook_email:%@",faceLoginDic);
            //服务器登录
        }
    }];
}
- 3 Twitter
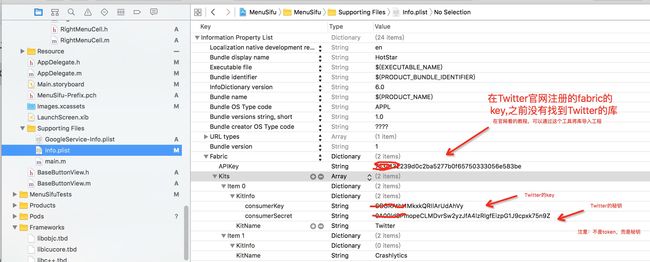
先去官网注册账号,并且通过Twitter的fabric导入库
    //twitter
- (BOOL)application:(UIApplication *)application didFinishLaunchingWithOptions:(NSDictionary *)launchOptions
{
    [TwitterKit startWithConsumerKey:@"Twitter-key"

                                    consumerSecret:@"Twitter 秘钥"];
    [Fabric with:@[TwitterKit]];//通过这个集成Twitter  应该是
  //CrashlyticsKit这是一个可以手机崩溃信息的
}
下面是登录和分享,Twitter的分享好像是要先进行登录,所以这里就弄成一起
先导入头文件
#import
#import
然后在分享的时候 执行下面的函数
- (void)TwitterShare
{
        NSURL *imageUrlString = [NSURL URLWithString:self.restaurantListData.img];
        NSData *imageData = [NSData dataWithContentsOfURL:imageUrlString];

        UIImage *image = [UIImage imageWithData:imageData];

        [[Twitter sharedInstance] logInWithCompletion:^(TWTRSession *session, NSError *error) {
            if (session) {
                //登录成功
                TWTRComposer *composer = [[TWTRComposer alloc] init];

                [composer setText:self.restaurantListData.restaurantname];
                [composer setImage:image];


                [composer showWithCompletion:^(TWTRComposerResult result) {
                    if (result == TWTRComposerResultCancelled) {
                        NSLog(@"Tweet composition cancelled");
                    }
                    else {

                    }
                }];

                NSLog(@"signed in as %@", [session userName]);
            } else {
                NSLog(@"error: %@", [error localizedDescription]);
            }
        }];
}
以上就是关于这些的一个坑,地图这块没写,等有空了就写一个,现在要准备面试了,明天还要面试。有什么不对的,还请多多指教,大家一起共同进步 -.


