Tutorial:Create Spring 3 MVC Hibernate 3 Example using Maven in Eclipse
Let us make a complete end-to-end application using Spring 3.0 MVC as front end technology and Hibernate as backend ORM technology. For this application we will also use Maven for build and dependency management and MySQL as database to persist the data.
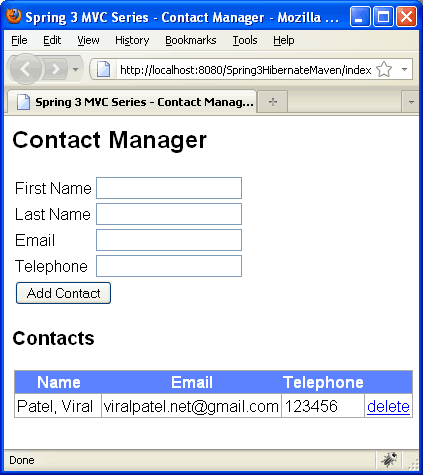
The application will be a simple Contact Manager app which will allow user to add new contacts. The list of contacts will be displayed and user will be able to delete existing contacts.
Spring 3.0 MVC Series
- Part 1: Introduction to Spring 3.0 MVC framework
- Part 2: Create Hello World Application in Spring 3.0 MVC
- Part 3: Handling Forms in Spring 3.0 MVC
- Part 4: Spring 3 MVC Tiles Plugin Tutorial with Example in Eclipse
- Part 5: Spring 3 MVC Internationalization & Localization Tutorial with Example in Eclipse
- Part 6: Spring 3 MVC Themes in Spring-Tutorial with Example
- Part 7: Create Spring 3 MVC Hibernate 3 Example using Maven in Eclipse
Our Goal
As describe above, our goal is to create a contact manager application which will allow the user to add a contact or remove it. The basic requirement of the Contact Manager app will be:
- Add new contact in the contact list.
- Display all contacts from contact list.
- Delete a contact from contact list.
Following is the screenshot of end application.
Application Architecture
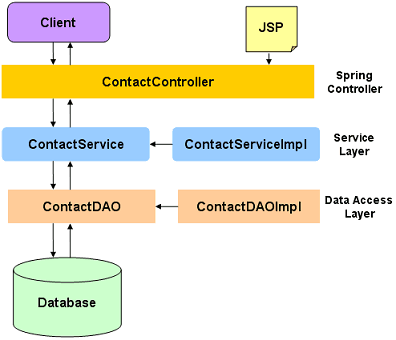
We will have a layered architecture for our demo application. The database will be accessed by a Data Access layer popularly called as DAO Layer. This layer will use Hibernate API to interact with database. The DAO layer will be invoked by a service layer. In our application we will have a Service interface called ContactService.
Getting Started
For our Contact Manager example, we will use MySQL database. Create a table contacts in any MySQL database. This is very preliminary example and thus we have minimum columns to represent a contact. Feel free to extend this example and create a more complex application.
|
1
2
3
4
5
6
7
8
9
|
CREATE
TABLE
CONTACTS
(
id
INT
PRIMARY
KEY
AUTO_INCREMENT,
firstname
VARCHAR
(30),
lastname
VARCHAR
(30),
telephone
VARCHAR
(15),
email
VARCHAR
(30),
created
TIMESTAMP
DEFAULT
NOW()
);
|
Creating Project in Eclipse
The contact manager application will use Maven for build and dependency management. For this we will use the Maven Dynamic Web Project in Eclipse as the base architecture of our application.
Download the below source code:
Maven Dynamic Web Project (6.7 KB)
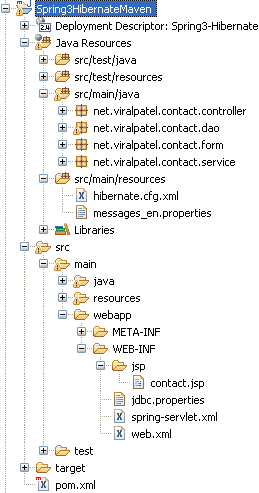
 Unzip the source code to your hard drive and import the project in Eclipse. Once the project is imported in Eclipse, we will create package structure for Java source. Create following packages under src/main/java folder.
- net.viralpatel.contact.controller – This package will contain Spring Controller classes for Contact Manager application.
- net.viralpatel.contact.form – This package will contain form object for Contact manager application. Contact form will be a simple POJO class with different attributes such as firstname, lastname etc.
- net.viralpatel.contact.service – This package will contain code for service layer for our Contact manager application. The service layer will have one ContactService interface and its corresponding implementation class
- net.viralpatel.contact.dao – This is the DAO layer of Contact manager application. It consists of ContactDAO interface and its corresponding implementation class. The DAO layer will use Hibernate API to interact with database.
Entity Class – The Hibernate domain class
Let us start with the coding of Contact manager application. First we will create a form object or hibernate POJO class to store contact information. Also this class will be an Entity class and will be linked with CONTACTS table in database.
Create a java class Contact.java under net.viralpatel.contact.form package and copy following code into it.
File: src/main/java/net/viralpatel/contact/form/Contact.java
|
01
02
03
04
05
06
07
08
09
10
11
12
13
14
15
16
17
18
19
20
21
22
23
24
25
26
27
28
29
30
31
32
33
34
35
36
37
38
39
40
41
42
43
44
45
46
47
48
49
50
51
52
53
54
55
56
57
58
59
60
|
package
net.viralpatel.contact.form;
import
javax.persistence.Column;
import
javax.persistence.Entity;
import
javax.persistence.GeneratedValue;
import
javax.persistence.Id;
import
javax.persistence.Table;
@Entity
@Table
(name=
"CONTACTS"
)
public
class
Contact {
@Id
@Column
(name=
"ID"
)
@GeneratedValue
private
Integer id;
@Column
(name=
"FIRSTNAME"
)
private
String firstname;
@Column
(name=
"LASTNAME"
)
private
String lastname;
@Column
(name=
"EMAIL"
)
private
String email;
@Column
(name=
"TELEPHONE"
)
private
String telephone;
public
String getEmail() {
return
email;
}
public
String getTelephone() {
return
telephone;
}
public
void
setEmail(String email) {
this
.email = email;
}
public
void
setTelephone(String telephone) {
this
.telephone = telephone;
}
public
String getFirstname() {
return
firstname;
}
public
String getLastname() {
return
lastname;
}
public
void
setFirstname(String firstname) {
this
.firstname = firstname;
}
public
void
setLastname(String lastname) {
this
.lastname = lastname;
}
public
Integer getId() {
return
id;
}
public
void
setId(Integer id) {
this
.id = id;
}
}
|
The first thing you’ll notice is that the import statements import from javax.persistence rather than a Hibernate or Spring package. Using Hibernate with Spring, the standard JPA annotations work just as well and that’s what I’m using here.
- First we’ve annotated the class with
@Entitywhich tells Hibernate that this class represents an object that we can persist. - The
@Table(name = "CONTACTS")annotation tells Hibernate which table to map properties in this class to. The first property in this class on line 16 is our object ID which will be unique for all events persisted. This is why we’ve annotated it with@Id. - The
@GeneratedValueannotation says that this value will be determined by the datasource, not by the code. - The
@Column(name = "FIRSTNAME")annotation is used to map this property to the FIRSTNAME column in the CONTACTS table.
The Data Access (DAO) Layer
The DAO layer of Contact Manager application consist of an interface ContactDAO and its corresponding implementation class ContactDAOImpl. Create following Java files in net.viralpatel.contact.daopackage.
File: src/main/java/net/viralpatel/contact/dao/ContactDAO.java
|
01
02
03
04
05
06
07
08
09
10
11
12
|
package
net.viralpatel.contact.dao;
import
java.util.List;
import
net.viralpatel.contact.form.Contact;
public
interface
ContactDAO {
public
void
addContact(Contact contact);
public
List<Contact> listContact();
public
void
removeContact(Integer id);
}
|
File: src/main/java/net/viralpatel/contact/dao/ContactDAOImpl.java
|
01
02
03
04
05
06
07
08
09
10
11
12
13
14
15
16
17
18
19
20
21
22
23
24
25
26
27
28
29
30
31
32
33
34
35
|
package
net.viralpatel.contact.dao;
import
java.util.List;
import
net.viralpatel.contact.form.Contact;
import
org.hibernate.SessionFactory;
import
org.springframework.beans.factory.annotation.Autowired;
import
org.springframework.stereotype.Repository;
@Repository
public
class
ContactDAOImpl
implements
ContactDAO {
@Autowired
private
SessionFactory sessionFactory;
public
void
addContact(Contact contact) {
sessionFactory.getCurrentSession().save(contact);
}
public
List<Contact> listContact() {
return
sessionFactory.getCurrentSession().createQuery(
"from Contact"
)
.list();
}
public
void
removeContact(Integer id) {
Contact contact = (Contact) sessionFactory.getCurrentSession().load(
Contact.
class
, id);
if
(
null
!= contact) {
sessionFactory.getCurrentSession().delete(contact);
}
}
}
|
The DAO class in above code ContactDAOImpl implements the data access interface ContactDAO which defines methods such as listContact(), addContact() etc to access data from database.
Note that we have used two Spring annotations @Repository and @Autowired.
Classes marked with annotations are candidates for auto-detection by Spring when using annotation-based configuration and classpath scanning. The @Component annotation is the main stereotype that indicates that an annotated class is a “component”.
The @Repository annotation is yet another stereotype that was introduced in Spring 2.0. This annotation is used to indicate that a class functions as a repository and needs to have exception translation applied transparently on it. The benefit of exception translation is that the service layer only has to deal with exceptions from Spring’s DataAccessException hierarchy, even when using plain JPA in the DAO classes.
Another annotation used in ContactDAOImpl is @Autowired. This is used to autowire the dependency of the ContactDAOImpl on the SessionFactory.
The Service Layer
The Service layer of Contact Manager application consist of an interface ContactService and its corresponding implementation class ContactServiceImpl. Create following Java files innet.viralpatel.contact.service package.
File: src/main/java/net/viralpatel/contact/service/ContactService.java
|
01
02
03
04
05
06
07
08
09
10
11
12
|
package
net.viralpatel.contact.service;
import
java.util.List;
import
net.viralpatel.contact.form.Contact;
public
interface
ContactService {
public
void
addContact(Contact contact);
public
List<Contact> listContact();
public
void
removeContact(Integer id);
}
|
File: src/main/java/net/viralpatel/contact/service/ContactServiceImpl.java
|
01
02
03
04
05
06
07
08
09
10
11
12
13
14
15
16
17
18
19
20
21
22
23
24
25
26
27
28
29
30
31
32
33
|
package
net.viralpatel.contact.service;
import
java.util.List;
import
org.springframework.beans.factory.annotation.Autowired;
import
org.springframework.stereotype.Service;
import
org.springframework.transaction.annotation.Transactional;
import
net.viralpatel.contact.dao.ContactDAO;
import
net.viralpatel.contact.form.Contact;
@Service
public
class
ContactServiceImpl
implements
ContactService {
@Autowired
private
ContactDAO contactDAO;
@Transactional
public
void
addContact(Contact contact) {
contactDAO.addContact(contact);
}
@Transactional
public
List<Contact> listContact() {
return
contactDAO.listContact();
}
@Transactional
public
void
removeContact(Integer id) {
contactDAO.removeContact(id);
}
}
|
In above service layer code, we have created an interface ContactService and implemented it in classContactServiceImpl. Note that we used few Spring annotations such as @Service, @Autowired and@Transactional in our code. These annotations are called Spring stereotype annotations.
The @Service stereotype annotation used to decorate the ContactServiceImpl class is a specialized form of the @Component annotation. It is appropriate to annotate the service-layer classes with @Service to facilitate processing by tools or anticipating any future service-specific capabilities that may be added to this annotation.
Adding Spring MVC Support
Let us add Spring MVC support to our web application.
Update the web.xml file and add servlet mapping for org.springframework.web.servlet.DispatcherServlet. Also note that we have mapped url / with springServlet so all the request are handled by spring.
File: /src/webapp/WEB-INF/web.xml
|
01
02
03
04
05
06
07
08
09
10
11
12
13
14
15
16
17
18
19
20
21
22
|
<?
xml
version
=
"1.0"
encoding
=
"UTF-8"
?>
<
web-app
xmlns:xsi
=
"http://www.w3.org/2001/XMLSchema-instance"
xmlns
=
"http://java.sun.com/xml/ns/javaee"
xmlns:web
=
"http://java.sun.com/xml/ns/javaee/web-app_2_5.xsd"
xsi:schemaLocation
=
"http://java.sun.com/xml/ns/javaee http://java.sun.com/xml/ns/javaee/web-app_2_5.xsd"
id
=
"WebApp_ID"
version
=
"2.5"
>
<
display-name
>Spring3-Hibernate</
display-name
>
<
welcome-file-list
>
<
welcome-file
>list.html</
welcome-file
>
</
welcome-file-list
>
<
servlet
>
<
servlet-name
>spring</
servlet-name
>
<
servlet-class
>
org.springframework.web.servlet.DispatcherServlet
</
servlet-class
>
<
load-on-startup
>1</
load-on-startup
>
</
servlet
>
<
servlet-mapping
>
<
servlet-name
>spring</
servlet-name
>
<
url-pattern
>/</
url-pattern
>
</
servlet-mapping
>
</
web-app
>
|
Once the web.xml is configured, let us add spring-servlet.xml and jdbc.properties files in /src/main/webapp/WEB-INF folder.
File: /src/main/webapp/WEB-INF/jdbc.properties
|
1
2
3
4
5
|
jdbc.driverClassName= com.mysql.jdbc.Driver
jdbc.dialect=org.hibernate.dialect.MySQLDialect
jdbc.databaseurl=jdbc:mysql://localhost:3306/ContactManager
jdbc.username=root
jdbc.password=testpass
|
The jdbc.properties file contains database connection information such as database url, username, password, driver class. You may want to edit the driverclass and dialect to other DB if you are not using MySQL.
File: /src/main/webapp/WEB-INF/spring-servlet.xml
|
01
02
03
04
05
06
07
08
09
10
11
12
13
14
15
16
17
18
19
20
21
22
23
24
25
26
27
28
29
30
31
32
33
34
35
36
37
38
39
40
41
42
43
44
45
46
47
48
49
50
51
52
53
54
55
56
57
58
59
60
61
62
63
64
|