MyBatis关联查询,怎么关联两张表或者三张表甚至更多张表呢?(要用到association标签)
MyBatis关联查询。其实不难,不要慌,虽然说我自己做不出来也是挺慌的,看官网看博客各种研究,后来发现挺简单的。但是发现和QueryRunner相比,没有后者好用,但是后者只能用在JSP上,不能用在HTML页面上,比较鸡肋。
Mybatis连表查询具体怎么使用呢,跟着我一步步来:
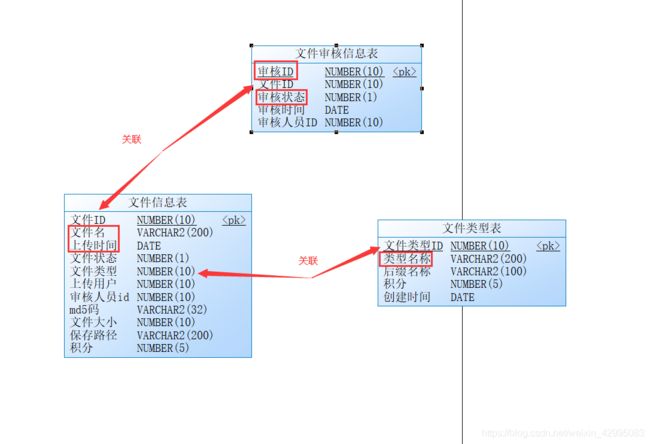
1.需求:因为我做的是文档审核界面,需要 (B表的文件名称,B表的上传时间,C表的文件类型,A表的状态) 这四个字段,关联三张表,我这边先不做动态查询,后面有空再整理,我还没有用到spring等框架,所以写法比较古老一些。
我写业务习惯于从后往前写到页面,最后页面直接去调。
2.bean,
3.FileCheckInfoMapper接口(相当于以前的dao接口),
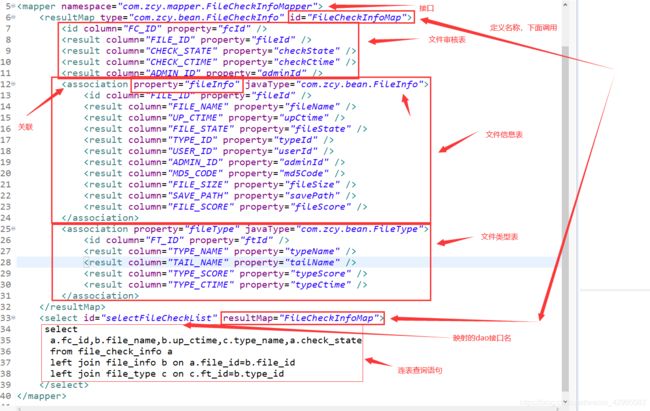
4.FileCheckInfoMapper.xml(相当于dao实现类),
5.在配置连接数据库参数的配置文件中配置FileCheckInfoMapper.xml实现类,
6.FileCheckInfoService服务层接口,
7.FileCheckInfoServiceImpl服务层实现类,
8.FileCheckInfoServlet去调服务层,返回数据给HTML,
9.在web.xml中注册该FileCheckInfoServlet,
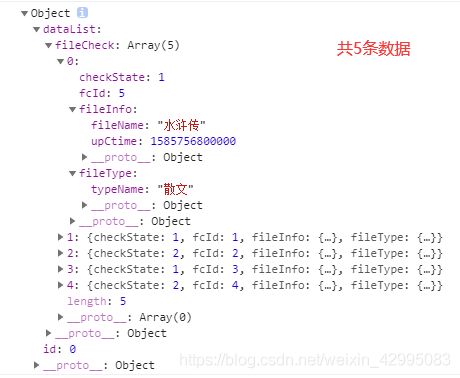
10.页面访问该servlet,打印数据,
11.把数据拼接在页面上,这步我就不写了,因为我还没做。
(有谁会像我这么热心,大部分人还不是藏着掖着,觉得好的,点个赞啊)

1.需求: 需要 (B表的文件名称,B表的上传时间,C表的文件类型,A表的状态) 这四个字段
2.建bean有点繁琐,不知道后面能不能研究出比较简单的方法(使用QueryRunner用Map去做,比较简单,使我念念不忘)
bean都要get和set,前三个bean是上面三个表,最后一个bean是把三个表合在一起。
public class FileCheck {
	private Long fcId;
	private Long fileId;
	private Long checkState;
	private Date checkCtime;
	private Long adminId;

	public FileCheck(Long fcId, Long fileId, Long checkState, Date checkCtime, Long adminId) {
		super();
		this.fcId = fcId;
		this.fileId = fileId;
		this.checkState = checkState;
		this.checkCtime = checkCtime;
		this.adminId = adminId;
	}

}
public class FileInfo {
private Long fileId;
private String fileName;
private Date upCtime;
private Long fileState;
private Long typeId;
private Long userId;
private Long adminId;
private String md5Code;
private Long fileSize;
private String savePath;
private Long fileScore;
public FileInfo(Long fileId, String fileName, Date upCtime, Long fileState, Long typeId, Long userId, Long adminId,
String md5Code, Long fileSize, String savePath, Long fileScore) {
super();
this.fileId = fileId;
this.fileName = fileName;
this.upCtime = upCtime;
this.fileState = fileState;
this.typeId = typeId;
this.userId = userId;
this.adminId = adminId;
this.md5Code = md5Code;
this.fileSize = fileSize;
this.savePath = savePath;
this.fileScore = fileScore;
}
}public class FileType {
private Long ftId;
private String typeName;
private String tailName;
private Long typeScore;
private Date typeCtime;
public FileType(Long ftId, String typeName, String tailName, Long typeScore, Date typeCtime) {
super();
this.ftId = ftId;
this.typeName = typeName;
this.tailName = tailName;
this.typeScore = typeScore;
this.typeCtime = typeCtime;
}
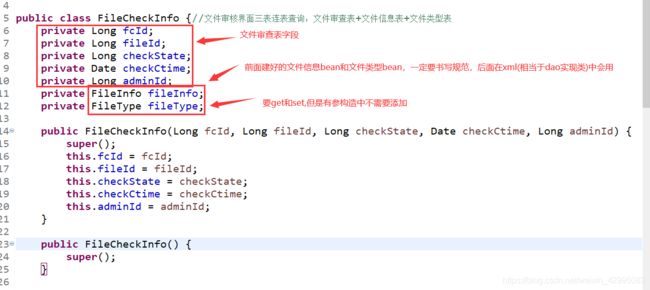
}连表查询所需的bean:解释一下,以免看不懂
public class FileCheckInfo {//文件审核界面三表连表查询:文件审查表+文件信息表+文件类型表
	private Long fcId;
	private Long fileId;
	private Long checkState;
	private Date checkCtime;
	private Long adminId;
	private FileInfo fileInfo;
	private FileType fileType;

	public FileCheckInfo(Long fcId, Long fileId, Long checkState, Date checkCtime, Long adminId) {
		super();
		this.fcId = fcId;
		this.fileId = fileId;
		this.checkState = checkState;
		this.checkCtime = checkCtime;
		this.adminId = adminId;
	}

}
3.FileCheckInfoMapper接口:
上面为以前的包名和下面为现在的包名
![]()
public interface FileCheckInfoMapper {
   List selectFileCheckList();//前面不需要加public,因为自动会有
} 4.FileCheckInfoMapper.xml(相当于dao实现类):解释一下,以免看不懂
5.在配置连接数据库参数的配置文件中配置FileCheckInfoMapper.xml实现类,如果这个xml中没写代码的话,就不要配置在这边,会报错,之前我遇到过,有提过。
接下来就简单了:
6.FileCheckInfoService服务层接口:
public interface FileCheckInfoService {
	//查询所有的文件审核
	List selectFileCheckList();
}
7.FileCheckInfoServiceImpl服务层实现类:
public class FileCheckInfoServiceImpl implements FileCheckInfoService {

	@Override
	public List selectFileCheckList() {
		SqlSession session= SqlSessionUtil.getSqlSession();
		FileCheckInfoMapper mapper=session.getMapper(FileCheckInfoMapper.class);
		List fileCheckInfo=mapper.selectFileCheckList();
		session.close();
		return fileCheckInfo;
	}

}
8.FileCheckInfoServlet去调服务层,返回数据给HTML:
这边定义了一个JSonMessage类,返回的集合是HashMap类型,get和set不要忘
public class JsonMessage {
	private int id;
	private String msg;
	private String location;
	private Map dataList = new HashMap();

	public JsonMessage(int id, String msg, String location, Map dataList) {
		super();
		this.id = id;
		this.msg = msg;
		this.location = location;
		this.dataList = dataList;
	}

	public JsonMessage() {
		super();
	}

}
protected void doPost(HttpServletRequest request, HttpServletResponse response) throws ServletException, IOException {
request.setCharacterEncoding("UTF-8");
response.setCharacterEncoding("UTF-8");
FileCheckInfoServiceImpl impl=new FileCheckInfoServiceImpl();
List fileCheck=impl.selectFileCheckList();
JsonMessage msg=new JsonMessage();
//HashMap
msg.getDataList().put("fileCheck", fileCheck);
response.getWriter().println(JSONObject.toJSONString(msg));
} 9.在web.xml中注册该FileCheckInfoServlet:
    fileCheckInfo
    com.zcy.servlet.FileCheckInfoServlet


    fileCheckInfo
    /fileCheckInfo.act
10.页面访问该servlet,打印数据,写得比较简单:
11.把数据拼接在页面上,这步我就不写了,因为我还没做。
12.没想到写这篇博客要这么久,感觉有用要给我点赞哦,别光收藏哦!