基于python的opencv的学习和实战
一,安装opencv
版本说明:
这里使用的python版本是3.8.3,opencv版本4.4.0,opencv-contrib-python版本是4.5.1.48(都是高版本,所以会踩坑,虽然LZ会踩坑,但总会把问题解决掉的)
pip命令直接安装
pip install opencv-python
检验方法(这里的版本是4.4.0)
import cv2
print(cv2.__version__)
还需要安装配套使用的opencv-contrib-python(最好版本一致)
pip install opencv-contrib-python
二,操作图像的基础操作
1,图像读取
cv2.IMREAD_COLOR:彩色图像
cv2.IMREAD_GRAYSCALE:灰度图像
img = cv2.imread('D:\\tempFiles\\resources\\3.jpg',cv2.IMREAD_GRAYSCALE)
# 图像的显示
cv2.imshow("image",img)
# 等待时间 毫秒级 0表示任意键终止
cv2.waitKey(0)
cv2.destroyAllWindows()
print(img.shape)
print(type(img))
print(img.size)
print(img.dtype)
(1422, 800)

1137600
uint8
然后会弹出图像的框展示图像
查看图像的类型
print(img.shape)
(1422, 800, 3)
宽像素,高像素,3个通道
2,数据读取-视频
cv2.VideoCapture可以捕获摄像头,用数字来控制不同的设备,例如0,1.
如果是视频文件,直接指定好路径即可
def spdq():
    vc = cv2.VideoCapture('D:\\tempFiles\\resources\\hs.mp4') # 读取视频
  # 检查是否打开正确
    if vc.isOpened():
        open,frame = vc.read() # open:返回是否打开正确   frame:返回的每一帧图像
    else:
        open=False
    while open: # 打开正确时执行
        ret,frame = vc.read()
        if frame is None:
            break
        if ret == True:
            gray = cv2.cvtColor(frame,cv2.COLOR_BGR2GRAY) # 把每一帧处理成灰度图像
            cv2.imshow("result",gray) # 弹框展示视频
            if cv2.waitKey(10)&0xFF == 27: # 每一帧切换的速度是10
                break
    vc.release()
    cv2.destroyAllWindows()

if __name__ == "__main__":
    spdq()
3,截取部分图像数据
img = cv2.imread('cat.jpg')
cat = img[0:50,0:200]   # 高,宽
4,颜色通道提取
可以从一张图中分别得到三个通道的值
b,g,r = cv2.split(img)
print(b)
对三个通道的值分别处理之后还可以将三个通道的值汇总到同一张图中
img = cv2.merge((b,g,r))
print(img.shape)
5,图像融合
图像融合就是把两个图像合成为同一个图像,但是前提是形状得相同,比如,都必须是(400,500,3)这种的,如果不相同则需要提前resize转换为相同的。
# 图像融合
def txrh():
    tz_img = cv2.imread('D:\\tempFiles\\resources\\tz.jpg', cv2.IMREAD_COLOR)
    print(tz_img.shape) # (682, 1023, 3)
    jm = cv2.imread('D:\\tempFiles\\resources\\jm.jpg', cv2.IMREAD_COLOR)
    jm_img = cv2.resize(jm,(1023,682)) # 图像融合前提是形状得相同,不同就转换为相同的
    print(jm_img.shape)  # (682, 1023, 3)
    # 开始融合
    newImg = cv2.addWeighted(tz_img,0.5,jm_img,0.6,0)
    cv2.imshow("image", newImg)
    # 等待时间 毫秒级 0表示任意键终止
    cv2.waitKey(0)
if __name__ == "__main__":
    txrh()
融合的效果如下
融合方法的解释:
newImg = cv2.addWeighted(tz_img,0.5,jm_img,0.6,0)
0.5是第一个图像的权重,0.6是第二个图像的权重,最后的0是偏移量,权重可以理解为,数字越大,图像越明显。
还有一个改变图像shape值的方法,就是按照比例放大缩小
tz = cv2.imread('D:\\tempFiles\\resources\\tz.jpg', cv2.IMREAD_COLOR)
tz_img = cv2.resize(tz,(0,0),fx=1.5,fy=1.5)
二,阈值与平滑处理
1,阈值
ret,dst = cv2.threshold(src,thresh,maxval,type)
- src:输入图,只能输入单通道图像,也就是灰度图
- dst:输出图
- thresh:阈值
- maxval:当像素值超过了阈值(或者小于阈值,根据type来定),所赋予的值
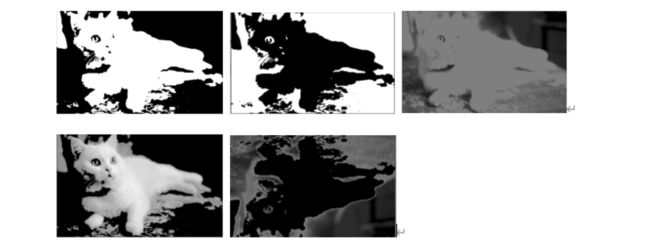
- type:二值化操作的类型,包含以下5种类型
- cv2.THRESH_BINARY 超过阈值部分取maxval(最大值),否则取0
- cv2.THRESH_BINARY_INV THRESH_BINARY的反转
- cv2.THRESH_TRUNC 大于阈值部分设为阈值,否则不变
- cv2.THRESH_TOZERO 大于阈值部分不改变,否则设为0
- cv2.THRESH_TOZERO_INV cv2.THRESH_TOZERO的反转
# 阈值
def yz():
    tz_img = cv2.imread('D:\\tempFiles\\resources\\mm.png', cv2.IMREAD_GRAYSCALE)
    ret,thresh1 = cv2.threshold(tz_img,127,255,cv2.THRESH_BINARY)
    cv2.imshow("image",thresh1)
    cv2.waitKey(0)
if __name__ == "__main__":
    yz()
上面的五种二值化操作类型执行结果分别如下(按照顺序)
2,图像平滑
均值滤波
# 均值滤波
# 简单的平均卷积操作
blur = cv2.blur(img,(3,3))
cv2.imshow("image",blur)
方框滤波
# 基本和均值一样,可以选择归一化
box = cv2.boxFilter(img,-1,(3,3),normalize=True)
cv2.imshow("image",box)
# 基本和均值一样,可以选择归一化,容易越界
box = cv2.boxFilter(img,-1,(3,3),normalize=False)
cv2.imshow("image",box)
高斯滤波
# 高斯模糊的卷积核里的数值是满足高斯分布,相当于更重视中间的数值
auss = cv2.GaussianBlur(img,(5,5),1)
cv2.imshow("image",auss)
中值滤波
# 相当于用中值代替
median = cv2.medianBlur(img,5)
cv2.imshow("image",median)
三,图像形态学处理
1,形态学-腐蚀操作
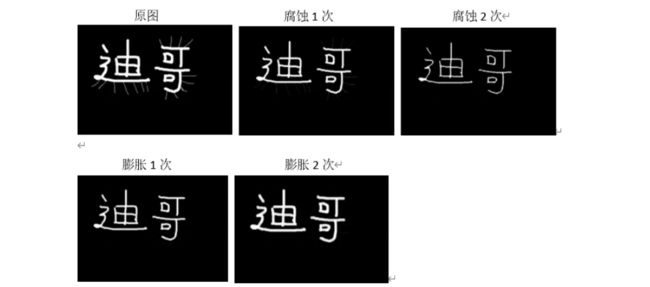
下面的示例可以看出腐蚀操作到底是干嘛的!
原图是有多余的线条存在的,这样腐蚀和膨胀的操作可以去掉线条!
# 腐蚀操作
def fscz():
    dg = cv2.imread('D:\\tempFiles\\resources\\dige.png')
    # cv2.imshow("image",dg)
    kenel = np.ones((3,3),np.uint8)
    result = cv2.erode(dg,kenel,iterations=1) # iterations指定腐蚀次数
    cv2.imshow("image",result)
    cv2.waitKey(0)
2,形态学-膨胀操作
上面的图腐蚀之后变细了,现在再进行膨胀操作
# 腐蚀操作
def fscz():
    dg = cv2.imread('D:\\tempFiles\\resources\\dige2.png')
    # cv2.imshow("image",dg)
    kenel = np.ones((3,3),np.uint8)
    result = cv2.erode(dg,kenel,iterations=2) # 腐蚀之后的结果,线条没了,但是字变细了,现在再变粗
    # 膨胀操作
    result2 = cv2.dilate(result,kenel,iterations=2)

    cv2.imshow("image",result2)
    cv2.waitKey(0)
3,开运算和闭运算
开运算其实就是上面的操作,只是合到一块了,开运算就是先腐蚀后膨胀,而闭运算则是先膨胀后腐蚀。
# 开运算和闭运算
def kyshbys():
    dg = cv2.imread('D:\\tempFiles\\resources\\dige2.png')
    kenel = np.ones((5, 5), np.uint8)
    opening = cv2.morphologyEx(dg,cv2.MORPH_OPEN,kenel) # MORPH_OPEN:开运算  MORPH_CLOSED 闭操作
    cv2.imshow("image",opening)
    cv2.waitKey(0)
4,梯度运算
梯度运算的作用:可以得到一个图型的轮廓
result3 = cv2.morphologyEx(dg,cv2.MORPH_GRADIENT,kenel)
MORPH_GRADIENT为梯度运算
# 梯度运算
# 梯度 = 膨胀 - 腐蚀
def tdys():
    dg = cv2.imread('D:\\tempFiles\\resources\\dige2.png')
    kenel = np.ones((5, 5), np.uint8)
    # 膨胀的结果
    result = cv2.dilate(dg, kenel, iterations=2)
    # 腐蚀的结果
    result2 = cv2.erode(dg, kenel, iterations=2)
    res = np.hstack((result,result2))
    cv2.imshow("image",res)
    cv2.waitKey(0)
if __name__ == "__main__":
    tdys()
 	dg = cv2.imread('D:\\tempFiles\\resources\\dige2.png')
    kenel = np.ones((5, 5), np.uint8)
    result3 = cv2.morphologyEx(dg,cv2.MORPH_GRADIENT,kenel)
    cv2.imshow("image", result3)
    cv2.waitKey(0)
5,礼帽与黑帽
- 礼帽 = 原始输入 - 开运算结果
- 黑帽 = 闭运算 - 原始输入
result3 = cv2.morphologyEx(dg,cv2.MORPH_TOPHAT,kenel)
MORPH_TOPHAT为礼貌操作
MORPH_BLACKHAT为黑帽操作
四,图像梯度处理
利用X方向与Y方向分别实现一阶微分,求取振幅,实现图像梯度效果。
简单来说,就是来得到图像的轮廓。
具体作用和效果参考:https://www.jianshu.com/p/0bff5bc12d64
1,图像梯度-Sobel算子
dst = cv2.Sobel(src,ddepth,dx,dy,ksize)
- ddepth:图像的深度,通常为 -1
- dx和dy分别表示水平和竖直方向
- ksize是Sobel算子的大小
# 梯度Sobel算子
def sobel():
    dg = cv2.imread('D:\\tempFiles\\resources\\dige.png')
    # 参数(图像,得出的结果保存负数的形式【否则会被截断为0】,横向计算,竖向不计算,方阵大小为3x3)
    new_dg = cv2.Sobel(dg,cv2.CV_64F,1,0,ksize=3)
    cv2.imshow("image",new_dg)
    cv2.waitKey(0)
由于上面存在负数的情况,这里把负数取绝对值
# 梯度Sobel算子
def sobel():
    dg = cv2.imread('D:\\tempFiles\\resources\\dige.png')
    # 参数(图像,得出的结果保存负数的形式【否则会被截断为0】,横向计算,竖向不计算,方阵大小为3x3)
    new_dg = cv2.Sobel(dg,cv2.CV_64F,1,0,ksize=3)
    # 负数取绝对值
    abs = cv2.convertScaleAbs(new_dg)
    cv2.imshow("image",abs)
    cv2.waitKey(0)
求出x的值和y的值后,要把x和y进行相加
x = cv2.Sobel(dg,cv2.CV_64F,1,0,ksize=3)
y = cv2.Sobel(dg,cv2.CV_64F,0,1,ksize=3)
result = cv2.addWeighted(x,0.5,y,0.5,0)
cv2.imshow("image",result)
cv2.waitKey(0)
五,Canny边缘检测
- 使用高斯滤波器,以平滑图像,滤除噪声
- 计算图像中每个像素点的梯度强度和方向
- 应用非极大值抑制,以消除边缘检测带来的杂散响应
- 应用双阈值检测来确定真实的和潜在的边缘
- 通过抑制孤立的弱边缘最终完成边缘检测
dg = cv2.imread('D:\\tempFiles\\resources\\dige.png',cv2.IMREAD_GRAYSCALE)
# 参数:50 下限 100上限
result = cv2.Canny(dg,50,100)
(下限越小,上限越大,条件越宽松,边缘内容越丰富)
下图明显的说明了区别(左图范围比较小,右图范围比较大)
六,图像金字塔与轮廓检测
1,图像金字塔
其实就是将图像以相同的比例放大或缩小n倍。
    dg = cv2.imread('D:\\tempFiles\\resources\\mm.png')
    down = cv2.pyrDown(dg) # 向下采样(变小)
    up = cv2.pyrUp(dg)  # 向上采样(变大)
    cv2.imshow("image", up)
    cv2.waitKey(0)
2,图像轮廓
cv2.findContours(img,mode,method)
- mode:轮廓检索模式
- RETR_EXTERNAL:只检索最外面的轮廓
- RETR_LIST:检索所有的轮廓,并将其保存到一条链表当中
- RETR_CCOMP:检索所有的轮廓,并将他们组织为两层,顶层是各部分的外部边界,第二层是空洞的边界
- RETR_TREE:检索所有的轮廓,并重构嵌套轮廓的整个层次
- method:轮廓逼近方法
- CHAIN_APPROX_NONE:以freeman链码的方式输出轮廓,所有其他方法输出多边形(顶点的序列)
- CHAIN_APPROX_SIMPLE:压缩水平的、垂直的和斜的部分,也就是,函数只保留他们的终点部分
为了更好的准确率,使用二值图像进行绘画轮廓!
# 绘画轮廓
def hhlk():
    # 拿到原图
    dg = cv2.imread('D:\\tempFiles\\resources\\mm.png')
    # 转为灰度图
    gray = cv2.cvtColor(dg,cv2.COLOR_BGR2GRAY)
    # 灰度图转为二值化图
    ret,thresh = cv2.threshold(gray,127,255,cv2.THRESH_BINARY)
    # 得到轮廓对象
    contours,hierarchy = cv2.findContours(thresh,cv2.RETR_TREE,cv2.CHAIN_APPROX_NONE)
    # 把轮廓对象画出来
    drwo_dg = gray.copy()
    # 参数:传入图像,轮廓,轮廓索引(-1为画出全部轮廓),颜色,线条厚度
    res = cv2.drawContours(drwo_dg,contours,-1,(0,0,255),2)
    cv2.imshow("contours",res)
    cv2.waitKey(0)
    print("轮廓特征:\n",contours[1])
    print("轮廓面积:\n",cv2.contourArea(contours[1]))
    print("轮廓周长:\n",cv2.arcLength(contours[1],True)) # true代表闭合的轮廓
3,模板匹配
模板匹配和卷积原理很像,模板在原图像上从原点开始滑动,计算模板与(图像被模板覆盖的地方)的差别程度,这个差别计算程度的方法在opencv里有6种,然后将每次计算的j结果放入一个矩阵里,作为结果输出。
- TM_SQDIFF:计算平方不同,计算出来的值越小,越相关
- TM_CCORR:计算相关性,计算出来的值越大,越相关
- TM_CCOEFF:计算相关系数,计算出来的值越大,越相关
- TM_SQDIFF_NORMED:计算归一化平方不同,计算出来的值越接近于0,越相关
- TM_CCORR_NORMED:计算归一化相关性,计算出来的值越接近于1,越相关
- TM_CCOEFF_NORMED:计算归一化相关系数,计算出来的值越接近于1,越相关
# 引入大图和模板图(都是灰度图)
img = cv2.imread('test.jpg')
template = cv2.imread('test1.jpg')
# 模板匹配
res = cv2.matchTemplate(img,template,cv2.TM_SQDIFF)
min_val,max_val,min_loc,max_loc = cv2.minMaxLoc(res)
print(min_val) # 39168.0
print(max_val) # 74416589.0
print(min_loc) # (107,89) 匹配到的位置坐标(匹配方框的左上角)
上面可以拿到匹配到的位置坐标(匹配方框的左上角),再加上模板的宽高,那么就可以把匹配到的模板位置画出来(人脸识别框)
# 画矩形
cv2.rectangle(img,min_loc,max_loc,255,2)
功能:画出矩行框
参数:img:原图
(x,y):矩阵的左上点坐标
(x+w,y+h):矩阵的右下点坐标
(0,255,0):画线对应的rgb颜色
2:所画的线的宽度
七,项目实战-信用卡数字识别
思路:
先准备一个模板图,用左边的模板图的1到9与信用卡图像的数字进行模板匹配!
前提:模板图的数字的长相一定要和信用卡图像的数字要非常像才行,否则匹配不准确。
- 第一步,对模板的数字进行轮廓检测,得到数字的外轮廓
- 第二步,得到模板数字的外阶矩形,然后通过resize和信用卡每个数字的外阶矩形的大小保持一致(然后才可以模板匹配)
- 1.处理模板,进行轮廓检测(检测外轮廓)
- 2.得到当前轮廓的外接矩形,并将模板中的外接矩形切割出来,得到0-9对应的模板图片,并resize
- 3.使用形态学操作对信用卡图片进行处理,得到轮廓
- 4.根据矩形轮廓的长宽比挑选出信用卡的数字矩形框,并resize
- 5.使用for循环依次检测
1,ocr_template_match.py
# 导入工具包
from imutils import contours
import numpy as np
import argparse
import cv2
from opencv_python.compat.my_test import sort_contours,resize

# 指定信用卡类型
FIRST_NUMBER = {

    "3": "American Express",
    "4": "Visa",
    "5": "MasterCard",
    "6": "Discover Card"
}
# 绘图展示
def cv_show(name,img):
    cv2.imshow(name,img)
    cv2.waitKey(0)
    cv2.destroyAllWindows()
# 读取一个模板图像
img = cv2.imread('D:\\tempFiles\\resources\\template.png')
cv_show('模板图',img)
# 灰度图
ref = cv2.cvtColor(img, cv2.COLOR_BGR2GRAY)
cv_show('模板图转为灰度图',ref)
# 二值图像
ref = cv2.threshold(ref, 10, 255, cv2.THRESH_BINARY_INV)[1]
cv_show('灰度图转为二值图像',ref)

# 计算轮廓
#cv2.findContours()函数接受的参数为二值图,即黑白的(不是灰度图),cv2.RETR_EXTERNAL只检测外轮廓,cv2.CHAIN_APPROX_SIMPLE只保留终点坐标
#返回的list中每个元素都是图像中的一个轮廓

refCnts, hierarchy = cv2.findContours(ref.copy(), cv2.RETR_EXTERNAL,cv2.CHAIN_APPROX_SIMPLE)

cv2.drawContours(img,refCnts,-1,(0,0,255),3)
cv_show('画出的轮廓',img)
print (np.array(refCnts,dtype=object).shape)
refCnts = sort_contours(refCnts, method="left-to-right")[0] #排序,从左到右,从上到下
digits = {
     }

# 遍历每一个轮廓 i 索引  c 每个轮廓
for (i, c) in enumerate(refCnts):
    # 计算外接矩形并且resize成合适大小
    (x, y, w, h) = cv2.boundingRect(c) # 得到外阶矩形
    roi = ref[y:y + h, x:x + w]
    roi = cv2.resize(roi, (57, 88))# 因为图像太小,resize一下,变大(数字随意,合适即可)

    # 每一个数字对应每一个模板
    digits[i] = roi

# 初始化卷积核
rectKernel = cv2.getStructuringElement(cv2.MORPH_RECT, (9, 3))
sqKernel = cv2.getStructuringElement(cv2.MORPH_RECT, (5, 5))

#读取输入图像,预处理
image = cv2.imread('D:\\tempFiles\\resources\\card.png')
cv_show('信用卡图像原图',image)
image = resize(image, width=300)
gray = cv2.cvtColor(image, cv2.COLOR_BGR2GRAY)
cv_show('信用卡灰度图',gray)

#礼帽操作,突出更明亮的区域
tophat = cv2.morphologyEx(gray, cv2.MORPH_TOPHAT, rectKernel)
cv_show('tophat',tophat)
#
gradX = cv2.Sobel(tophat, ddepth=cv2.CV_32F, dx=1, dy=0, #ksize=-1相当于用3*3的
    ksize=-1)


gradX = np.absolute(gradX)
(minVal, maxVal) = (np.min(gradX), np.max(gradX))
gradX = (255 * ((gradX - minVal) / (maxVal - minVal)))
gradX = gradX.astype("uint8")

print (np.array(gradX).shape)
cv_show('gradX',gradX)

#通过闭操作(先膨胀,再腐蚀)将数字连在一起
gradX = cv2.morphologyEx(gradX, cv2.MORPH_CLOSE, rectKernel)
cv_show('gradX',gradX)
#THRESH_OTSU会自动寻找合适的阈值,适合双峰,需把阈值参数设置为0
thresh = cv2.threshold(gradX, 0, 255,
    cv2.THRESH_BINARY | cv2.THRESH_OTSU)[1]
cv_show('thresh',thresh)

#再来一个闭操作

thresh = cv2.morphologyEx(thresh, cv2.MORPH_CLOSE, sqKernel) #再来一个闭操作
cv_show('thresh',thresh)

# 计算轮廓

threshCnts, hierarchy = cv2.findContours(thresh.copy(), cv2.RETR_EXTERNAL,
    cv2.CHAIN_APPROX_SIMPLE)

cnts = threshCnts
cur_img = image.copy()
cv2.drawContours(cur_img,cnts,-1,(0,0,255),3)
cv_show('img',cur_img)
locs = []

# 遍历轮廓
for (i, c) in enumerate(cnts):
    # 计算矩形
    (x, y, w, h) = cv2.boundingRect(c)
    ar = w / float(h)

    # 选择合适的区域,根据实际任务来,这里的基本都是四个数字一组
    if ar > 2.5 and ar < 4.0:

        if (w > 40 and w < 55) and (h > 10 and h < 20):
            #符合的留下来
            locs.append((x, y, w, h))

# 将符合的轮廓从左到右排序
locs = sorted(locs, key=lambda x:x[0])
output = []

# 遍历每一个轮廓中的数字
for (i, (gX, gY, gW, gH)) in enumerate(locs):
    # initialize the list of group digits
    groupOutput = []

    # 根据坐标提取每一个组
    group = gray[gY - 5:gY + gH + 5, gX - 5:gX + gW + 5]
    cv_show('group',group)
    # 预处理
    group = cv2.threshold(group, 0, 255,
        cv2.THRESH_BINARY | cv2.THRESH_OTSU)[1]
    cv_show('group',group)
    # 计算每一组的轮廓
    digitCnts,hierarchy = cv2.findContours(group.copy(), cv2.RETR_EXTERNAL,
        cv2.CHAIN_APPROX_SIMPLE)
    digitCnts = contours.sort_contours(digitCnts,
        method="left-to-right")[0]

    # 计算每一组中的每一个数值
    for c in digitCnts:
        # 找到当前数值的轮廓,resize成合适的的大小
        (x, y, w, h) = cv2.boundingRect(c)
        roi = group[y:y + h, x:x + w]
        roi = cv2.resize(roi, (57, 88))
        cv_show('roi',roi)

        # 计算匹配得分
        scores = []

        # 在模板中计算每一个得分
        for (digit, digitROI) in digits.items():
            # 模板匹配
            result = cv2.matchTemplate(roi, digitROI,
                cv2.TM_CCOEFF)
            (_, score, _, _) = cv2.minMaxLoc(result)
            scores.append(score)

        # 得到最合适的数字
        groupOutput.append(str(np.argmax(scores)))

    # 画出来
    cv2.rectangle(image, (gX - 5, gY - 5),
        (gX + gW + 5, gY + gH + 5), (0, 0, 255), 1)
    cv2.putText(image, "".join(groupOutput), (gX, gY - 15),
        cv2.FONT_HERSHEY_SIMPLEX, 0.65, (0, 0, 255), 2)

    # 得到结果
    output.extend(groupOutput)

# 打印结果
print("Credit Card Type: {}".format(FIRST_NUMBER[output[0]]))
print("Credit Card #: {}".format("".join(output)))
cv2.imshow("Image", image)
cv2.waitKey(0)
2,my_test.py
import cv2
def sort_contours(cnts, method="left-to-right"):
    reverse = False
    i = 0

    if method == "right-to-left" or method == "bottom-to-top":
        reverse = True

    if method == "top-to-bottom" or method == "bottom-to-top":
        i = 1
    boundingBoxes = [cv2.boundingRect(c) for c in cnts]  # 用一个最小的矩形,把找到的形状包起来x,y,h,w
    (cnts, boundingBoxes) = zip(*sorted(zip(cnts, boundingBoxes),
                                        key=lambda b: b[1][i], reverse=reverse))

    return cnts, boundingBoxes


def resize(image, width=None, height=None, inter=cv2.INTER_AREA):
    dim = None
    (h, w) = image.shape[:2]
    if width is None and height is None:
        return image
    if width is None:
        r = height / float(h)
        dim = (int(w * r), height)
    else:
        r = width / float(w)
        dim = (width, int(h * r))
    resized = cv2.resize(image, dim, interpolation=inter)
    return resized
3,识别效果
(10,)
(189, 300)
Credit Card Type: Visa
Credit Card #: 4000123456789010Process finished with exit code 0
八,项目实战-文档扫描OCR识别
思路:
- 边缘检测
- 获得轮廓
- 透视变换
这里只是上面三个操作,至于OCR识别就没有搞,交给你们了,可以参考
https://blog.csdn.net/sinat_29950703/article/details/107978687
https://blog.csdn.net/weixin_44823151/article/details/100599851
import cv2
from imutils.perspective import four_point_transform
import pytesseract
import os
from PIL import Image
import argparse
import matplotlib as plt
import numpy as np

def order_points(pts):
	# 初始化4个坐标点的矩阵
	rect = np.zeros((4, 2), dtype = "float32")

	# 按顺序找到对应坐标0123分别是 左上,右上,右下,左下
	# 计算左上,右下
	print("pts :\n ",pts)
	s = pts.sum(axis = 1)		# 沿着指定轴计算第N维的总和
	print("s : \n",s)
	rect[0] = pts[np.argmin(s)]	# 即pts[1]
	rect[2] = pts[np.argmax(s)]	# 即pts[3]
	print("第一次rect : \n",rect)
	# 计算右上和左下
	diff = np.diff(pts, axis = 1)	# 沿着指定轴计算第N维的离散差值
	print("diff : \n",diff)
	rect[1] = pts[np.argmin(diff)]	# 即pts[0]
	rect[3] = pts[np.argmax(diff)]	# 即pts[2]
	print("第二次rect :\n ",rect)
	return rect

def four_point_transform(image, pts):
	# 获取输入坐标点
	rect = order_points(pts)
	(A, B, C, D) = rect
	# (tl, tr, br, bl) = rect

	# 计算输入的w和h值
	w1 = np.sqrt(((C[0] - D[0]) ** 2) + ((C[1] - D[1]) ** 2))
	w2 = np.sqrt(((B[0] - A[0]) ** 2) + ((B[1] - A[1]) ** 2))
	w = max(int(w1), int(w2))

	h1 = np.sqrt(((B[0] - C[0]) ** 2) + ((B[1] - C[1]) ** 2))
	h2 = np.sqrt(((A[0] - D[0]) ** 2) + ((A[1] - D[1]) ** 2))
	h = max(int(h1), int(h2))

	# 变换后对应坐标位置
	dst = np.array([	# 目标点
		[0, 0],
		[w - 1, 0],	# 防止出错,-1
		[w - 1, h - 1],
		[0, h - 1]], dtype = "float32")

	# 计算变换矩阵	(平移+旋转+翻转),其中
	M = cv2.getPerspectiveTransform(rect, dst)	# (原坐标,目标坐标)
	print(M,M.shape)
	warped = cv2.warpPerspective(image, M, (w, h))

	# 返回变换后结果
	return warped


# 绘图展示
def cv_show(name,img):
    cv2.imshow(name,img)
    cv2.waitKey(0)
    cv2.destroyAllWindows()

# 读取文档图像
image = cv2.imread("D:\\tempFiles\\resources\\doc.jpg")
# resize 坐标也会相同变化
ratio = image.shape[0] / 500.0
cv_show("原图", ratio)
orig = image.copy()
image=cv2.resize(orig,None,fx=0.2,fy=0.2)
	# 同比例变化:h指定500,w也会跟着变化
# 预处理
# 灰度图
gray = cv2.cvtColor(image, cv2.COLOR_BGR2GRAY)
# 去噪声
gray = cv2.GaussianBlur(gray, (5, 5), 0)
# 边缘检测
edged = cv2.Canny(gray, 75, 200)
cv_show("边缘检测",edged)
# 轮廓检测
cnts = cv2.findContours(edged.copy(), cv2.RETR_LIST, cv2.CHAIN_APPROX_SIMPLE)[0]
# cnts中可检测到许多个轮廓,取前5个最大面积的轮廓
cnts = sorted(cnts, key = cv2.contourArea, reverse = True)[:5]
# 遍历轮廓
for c in cnts:	# C表示输入的点集
	# 计算轮廓近似
	peri = cv2.arcLength(c, True)
	# epsilon表示从原始轮廓到近似轮廓的最大距离,它是一个准确度参数
	# True表示封闭的
	approx = cv2.approxPolyDP(c, 0.02 * peri, True)
	print(approx,approx.shape)
	# 4个点的时候就拿出来,screenCnt是这4个点的坐标
	if len(approx) == 4:	# 近似轮廓得到4个点,意味着可能得到的是矩形
		screenCnt = approx	# 并且最大的那个轮廓是很有可能图像的最大外围
		break
# 画轮廓
cv2.drawContours(image, [screenCnt], -1, (0, 255, 0), 2)
cv_show("画轮廓",image)

# 透视变换
# 4个点的坐标 即4个(x,y),故reshape(4,2)
# 坐标是在变换后的图上得到,要还原到原始的原图上,需要用到ratio
print(screenCnt.shape)
warped = four_point_transform(orig, screenCnt.reshape(4, 2) * ratio)
wraped=cv2.cvtColor(warped,cv2.COLOR_BGR2GRAY)
ref=cv2.threshold(wraped,100,255,cv2.THRESH_BINARY)[1]
ref=cv2.resize(ref,None,fx=0.3,fy=0.3)
cv_show("test",ref)
九,图像特征-harris角点检测
cv2.cornerHarris()
- img:数据类型为float32的入图像
- blockSize:角点检测中指定区域的大小
- ksize:Sobel求导中使用的窗口大小
- k:取值参数为[0.04,0.06]
def doc():
    img = cv2.imread("D:\\tempFiles\\resources\\doc.jpg")
    two = cv2.resize(img.copy(),(500,700))
    gray = cv2.cvtColor(two,cv2.COLOR_BGR2GRAY)
    cv_show("two",two)
    # 角点检测
    dst = cv2.cornerHarris(gray,2,3,0.04)
    two[dst>0.01*dst.max()] = [0,0,255]
    cv_show("result",two)
效果:会把角点检测出来,用红线画出。
十,图像特征-sift
1,图像尺度空间
在一定的范围内,无论物体是大还是小,人眼都可以分辨出来,然而计算机要有相同的能力却很难,所以要让机器能够对物体在不同尺度下有一个统一的认知,就需要考虑图像在不同的尺度下都存在的特点。
尺度空间的获取通常使用高斯模糊来实现!
2,opencv-sift函数
由于这个函数高版本已经没有了,所以这里暂且不说!
十一,背景建模
1,帧差法
由于场景中的目标在运动,目标的影像在不同图像帧中的位置不同,该类算法对时间上连续的两帧图像进行差分运算,不同帧对应的像素点相减,判断灰度差的绝对值,当绝对值超过一定阈值时,即可判断为运动目标,从而实现目标的检测功能。
def bjjm():
    cap = cv2.VideoCapture('D:\\tempFiles\\resources\\hs.mp4')  # 读取视频
    # 形态学操作需要使用
    kernel = cv2.getStructuringElement(cv2.MORPH_ELLIPSE,(3,3))
    # 创建混合高斯模型用于建模
    fgbg = cv2.createBackgroundSubtractorMOG2()
    while(True):
        ret,frame = cap.read()
        fgmask = fgbg.apply(frame)
        # 形态学开运算去噪点
        fgmask = cv2.morphologyEx(fgmask,cv2.MORPH_OPEN,kernel)
        # 寻找视频中的轮廓
        contours,hierarchy = cv2.findContours(fgmask,cv2.RETR_EXTERNAL,cv2.CHAIN_APPROX_SIMPLE)
        for c in contours:
            # 计算各轮廓的周长
            perimeter = cv2.arcLength(c,True)
            if perimeter>188:
                # 找到一个直矩形(不会旋转)
                x,y,w,h = cv2.boundingRect(c)
                # 画出这个矩形
                cv2.rectangle(frame,(x,y),(x+w,y+h),(0,255,0),2)
        cv2.imshow("frame",frame)
        cv2.imshow("fgmask",fgmask)
        k=cv2.waitKey(150) & 0xff
        if k==27:
            break
    cap.release()
    cv2.destroyAllWindows()
if __name__ == "__main__":
    bjjm()
效果
十二,光流估计
光流是空间运动物体在观测成像平面上的像素运动的“瞬时速度”,根据各个像素点的速度矢量特征,可以对图像进行动态分析,例如目标跟踪。
cv2.calcOpticalFlowPyrLK()
参数:
- prevImage:前一帧图像
- nextImage:当前帧图像
- prevPts:待跟踪的特征点向量
- winSize:搜索窗口的大小
- maxLevel:最大的金字塔层数
返回:
- nextPts:输出跟踪特征点向量
- status:特征点是否找到,找到状态为1,否则为0
python的opencv学习暂时到此结束!


