以下创建过程的前提,电脑已经安装cocoaPods,已经配置好react native环境,以下终端命令我都是在项目根目录下进行。
第一步,Xcode传建一个原生项目。
第二步,添加RN需要的配置文件
在项目的根目录下创建一个package.json文件
touch package.json
把以下内容复制进去:
{
  "name" : "RNDemo",
  "version" : "0.0.1",
  "private" : true,
  "scripts" : {
    "start" : "node node_modules/react-native/local-cli/cli.js start",
    "test" : "jest"
  },
  "dependencies" : {
    "react" : "16.0.0-alpha.6",
    "react-native" : "0.44.3"
  }
}
react和react-native的版本根据自己的需要进行设定,但要注意二者版本匹配。然后,在项目根目录下执行:
npm install
第三步,添加cocoaPods需要的配置文件
在项目的根目录下创建一个Podfile文件
vim Podfile
把以下内容复制进去:
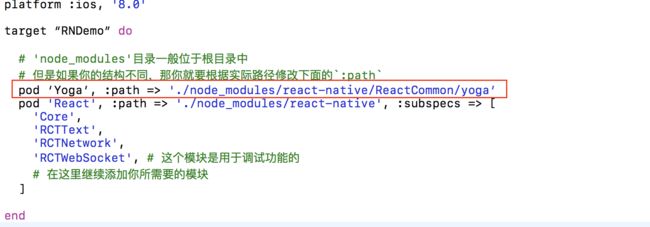
platform :ios, '8.0'
target “RNDemo” do
  # 'node_modules'目录一般位于根目录中
  # 但是如果你的结构不同,那你就要根据实际路径修改下面的`:path`
  pod ‘Yoga’, :path => './node_modules/react-native/ReactCommon/yoga’
  pod 'React', :path => './node_modules/react-native', :subspecs => [
    'Core',
    'RCTText',
    'RCTNetwork',
    'RCTWebSocket', # 这个模块是用于调试功能的
    # 在这里继续添加你所需要的模块
  ]
end
依赖的库名是React, 根据项目的需要添加不同的subspecs进来。如要使用Text那么加进来RCTText, Image就加RCTImage等等。可用的subspecs列表可以查阅
node_modules/react-native/React.podspec文件。然后执行:
pod install
注意执行pod install 时可能会发生以下错误
1、路径错误
[!] No podspec found for `React` in`./ReactComponent/node_modules/react-native`

[!] Your Podfile has had smart quotes sanitised. To avoid issues in the future, you should not use TextEdit for editing it. If you are not using TextEdit, you should turn off smart quotes in your editor of choice.
解决办法是查看path中路径是否正确,修改成却路径即可。
2、路径指定正确后,可能会提示下面这个错误:

如果copy我的Podfile文件里的全部内容,不会出现此问题,此问题是由于Yoga的路径问题。
第四步,创建index.ios.js
在项目根目录下:
touch index.ios.js
'use strict'

import React, { Component } from 'react';
import {
  AppRegistry,
  StyleSheet,
  Text,
  View
} from 'react-native';

export default class NativeAPP extends Component {
  render() {
    return (


          Welcome to React Native!


          To get started, edit index.ios.js


          Press Cmd+R to reload,{'\n'}
          Cmd+D or shake for dev menu


    );
  }
}

const styles = StyleSheet.create({
  container: {
    flex: 1,
    justifyContent: 'center',
    alignItems: 'center',
    backgroundColor: '#F5FCFF',
  },
  welcome: {
    fontSize: 20,
    textAlign: 'center',
    margin: 10,
  },
  instructions: {
    textAlign: 'center',
    color: '#333333',
    marginBottom: 5,
  },
});

AppRegistry.registerComponent('NativeAPP', () => NativeAPP);
第五步,用Xcode打开app
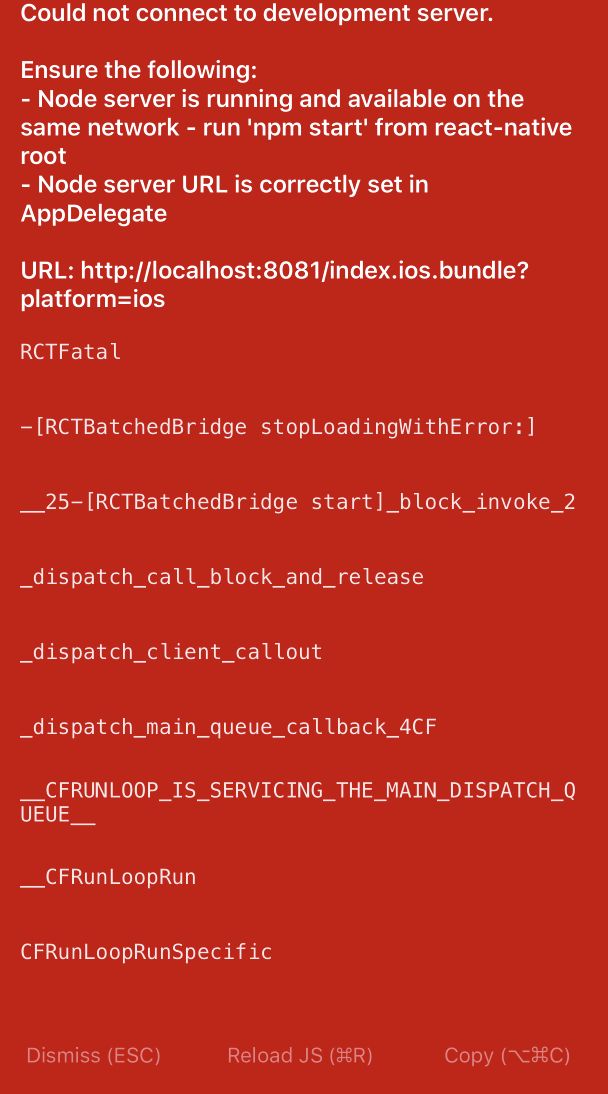
1、配置下info.plist文件配置HTTP请求白名单,在iOS 9以上的系统中,需要配置白名单,否则应用无法通过http协议连接到localhost主机。 如果不这样做,在尝试通过http连接到服务器时,会遭遇这个错误 - Could not connect to development server. 添加
NSAppTransportSecurity

  NSExceptionDomains

      localhost

          NSTemporaryExceptionAllowsInsecureHTTPLoads
不配置报错信息:
2、运行工程之前我们需要先将service服务运行起来,执行
npm start
3、代码里引入头文件:
#import "RCTRootView.h"
按钮点击事件:
NSURL *jsCodeLocation = [NSURL URLWithString:@"http://localhost:8081/index.ios.bundle?platform=ios"];
    RCTRootView *rootView = [[RCTRootView alloc]
                             initWithBundleURL : jsCodeLocation
                             moduleName : @"NativeAPP"
                             initialProperties: nil
                             launchOptions : nil];
    UIViewController *vc = [[UIViewController alloc] init];
    vc.view = rootView;
    [self presentViewController:vc animated:YES completion:nil];