Spring之初探AOP
AOP
- 一、代理模式
-
- 代理模式的分类
-
- 1、静态代理
- 2、动态代理
- 二、AOP
-
- 2.1、AOP是什么
- 2.2、AOP在Spring中的作用
- 三、使用Spring实现Aop
-
- 3.1、通过Spring的API实现
- 3.2、通过自定义类来实现
- 3.3、通过注解实现
- 四、Spring整合Mybatis
-
- 4.1、导入相关jar包
- 4.2、整合Mybatis方式一【重点理解】
- 4.2、整合Mybatis方式二
- 五、Spring声明式事务
一、代理模式
代理模式的分类
1、静态代理
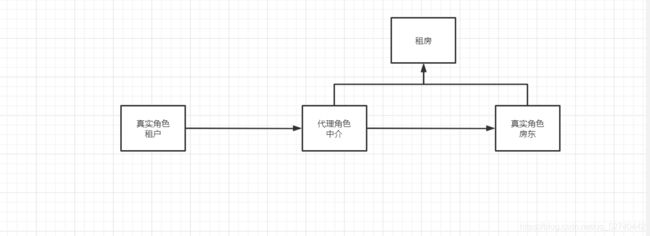
- 角色分析
- 抽象角色:一般会使用接口或者抽象类解决
- 真实角色:被代理的角色
- 代理角色:代理真实角色,代理真实角色后,我们一般会做一些附属操作
- 客户:访问代理对象的人
- 1、中介和房东需要实现共同的接口- - -租房的接口 (抽象接口)
/**
 * @description: 租房
 */
public interface Rent {

    //租房
    public void rent();
}
- 2、房东出租房子
/**
 * @description: 房东
 */
public class Host implements Rent {


    @Override
    public void rent() {

        System.out.println("房东想把房子租出去");
    }
}
- 3、中介
/**
 * @description: 代理类中介
 */
public class Proxy implements Rent {

    private Host host;

    public Proxy() {

    }

    public Proxy(Host host) {

        this.host = host;
    }

    @Override
    public void rent() {

        seeHouse();
        host.rent();
        hetong();
        fare();
    }
    //看房
    public void seeHouse(){

        System.out.println("中介带你看房");
    }
    //签合同
    public void hetong(){

        System.out.println("签合同");
    }
    //收中介费
    public void fare(){

        System.out.println("收中介费");
    }
}
- 4、租户
/**
 * @description: 租户
 */
public class Client {


    public static void main(String[] args) {

        //房东要出租房子
        Host host = new Host();
        //代理,中介替房东出租房子,并且,中介一般会有一些附属操作
        Proxy proxy = new Proxy(host);
        //中介去找房东商量租房事宜,你直接找中介租房子
        proxy.rent();
    }
}
中介带你看房
房东想把房子租出去
签合同
收中介费
代理模式的好处
1、可以使真实角色的操作更加纯粹!不用去关注一些公共的业务
2、公共的业务就交给了代理角色,实现了业务的分工
3、公共业务发生扩展的时候,方便集中管理
缺点:
1、一个真实的角色就会产生一个代理角色,代码量会翻倍,开发效率大大降低
2、动态代理
- 角色分析
- 抽象角色:一般会使用接口或者抽象类解决
- 真实角色:被代理的角色
- 代理角色:代理真实角色,代理真实角色后,我们一般会做一些附属操作
- 客户:访问代理对象的人
1、动态代理和静态代理角色一样
2、动态代理的代理类是动态生成的,不是我们直接写的
3、动态代理分为两大类:基于接口的动态代理,基于类的动态代理
-
基于接口实现- - -JDK动态代理
-
1、租房接口
/**
 * @description: 租房
 */
public interface Rent {

    //租房
    public void rent();
}
-2 、房东出租房子
/**
 * @description: 房东
 */
public class Host implements Rent {


    @Override
    public void rent() {

        System.out.println("房东想把房子租出去");
    }
}
-3 、中介代理类
/**
 * @description:当前类会自动生成代理类
 */

public class ProxyInvocationHandler implements InvocationHandler {

    //被代理的接口
    private Rent rent;

    public void setRent(Rent rent) {

        this.rent = rent;
    }

    //生成得到代理类
    public Object getProxy(){

        return Proxy.newProxyInstance(this.getClass().getClassLoader(), rent.getClass().getInterfaces(),this);
    }
    //处理代理实例并返回结果
    @Override
    public Object invoke(Object proxy, Method method, Object[] args) throws Throwable {

//        动态代理的本质,就是使用反射机制实现
        seeHouse();
        Object result = method.invoke(rent, args);
        fare();
        return result;
    }
    public void seeHouse(){

        System.out.println("看房子");
    }
    public void fare(){

        System.out.println("收中介费");
    }

}
- 4、客户
public class Client {

    public static void main(String[] args) {

        //真实角色
        Host host=new Host();
        //代理角色
        ProxyInvocationHandler pih = new ProxyInvocationHandler();
        //通过调用程序处理角色来处理我们要调用的接口对象
        pih.setRent(host);
        Rent proxy = (Rent) pih.getProxy();
        proxy.rent();
    }
}
看房子
房东想把房子租出去
收中介费
- 万能的代理类
public class ProxyInvocationHandler implements InvocationHandler {

    //被代理的接口
    private Object target;

    public void setRent(Object target) {

        this.target = target;
    }

    //生成得到代理类
    public Object getProxy(){

        return Proxy.newProxyInstance(this.getClass().getClassLoader(), target.getClass().getInterfaces(),this);
    }
    //处理代理实例并返回结果
    @Override
    public Object invoke(Object proxy, Method method, Object[] args) throws Throwable {

//        动态代理的本质,就是使用反射机制实现
        Object result = method.invoke(target, args);
        return result;
    }

}
二、AOP
2.1、AOP是什么
AOP(Aspect Oriented Programming)意为:面向切面编程,通过预编译方式和运行期动态代理实现程序功能的统一维护的一种技术。AOP是OOP的延续,是软件开发中的一个热点,也是Spring框架中的一个重要内容,是函数式编程的一种衍生范型。利用AOP可以对业务逻辑的各个部分进行隔离,从而使得业务逻辑各部分之间的耦合度降低,提高程序的可重用性,同时提高了开发的效率。
2.2、AOP在Spring中的作用
- 提供声明式事务
- 允许用户自定义切面
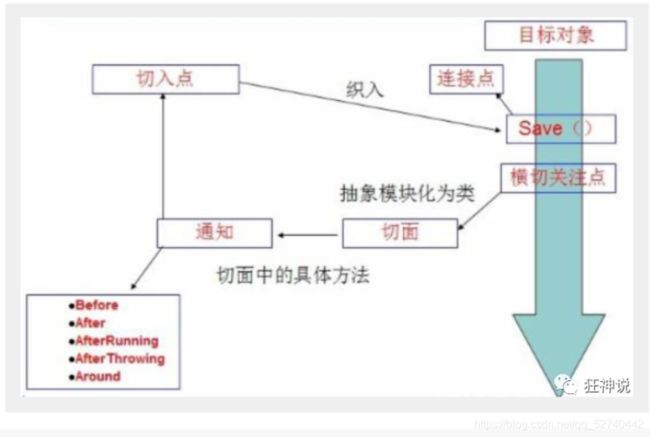
1、横切关注点:跨越应用程序多个模块的方法或功能。即是,与我们业务逻辑无关的,但是我们需要关注的部分,就是横切关注点。如日志 , 安全 , 缓存 , 事务等等 …
2、切面(ASPECT):横切关注点 被模块化 的特殊对象。即,它是一个类。3、通知(Advice):切面必须要完成的工作。即,它是类中的一个方法。
4、目标(Target):被通知对象。
5、代理(Proxy):向目标对象应用通知之后创建的对象。
6、切入点(PointCut):切面通知 执行的 “地点”的定义。
7、连接点(JointPoint):与切入点匹配的执行点。
SpringAOP中,通过Advice定义横切逻辑,Spring中支持5种类型的Advice:

即 Aop 在 不改变原有代码的情况下 , 去增加新的功能 .
三、使用Spring实现Aop
- 在使用Spring之前,先需要导入一个依赖包!
<dependency>
    <groupId>org.aspectjgroupId>
    <artifactId>aspectjweaverartifactId>
    <version>1.9.4version>
dependency>
3.1、通过Spring的API实现
- 编写我们的业务接口和实现类
public interface UserService {

    void add();
    void delete();
    void update();
    void query();
}
public class UserServiceImpl implements UserService{

    @Override
    public void add() {

        System.out.println("增加一个用户");
    }

    @Override
    public void delete() {

        System.out.println("删除一个用户");
    }

    @Override
    public void update() {

        System.out.println("修改一个用户");
    }

    @Override
    public void query() {

        System.out.println("查找一个用户");
    }
}
- 编写增强类
public class Log implements MethodBeforeAdvice {

    //method:要执行的目标对象的方法
    //target:目标对象
    @Override
    public void before(Method method, Object[] args, Object target) throws Throwable {

        System.out.println(target.getClass().getName()+"的"+method.getName()+"被执行了");
    }
}
public class AfterLog implements AfterReturningAdvice {

    @Override
    public void afterReturning(Object returnValue, Method method, Object[] args, Object target) throws Throwable {

        System.out.println("执行了"+method.getName()+"返回的结果"+returnValue);
    }
}
- 最后去spring的文件中注册 , 并实现aop切入实现 , 注意导入约束
<beans xmlns="http://www.springframework.org/schema/beans"
       xmlns:xsi="http://www.w3.org/2001/XMLSchema-instance"
       xmlns:aop="http://www.springframework.org/schema/aop"
       xsi:schemaLocation="http://www.springframework.org/schema/beans
        https://www.springframework.org/schema/beans/spring-beans.xsd
        http://www.springframework.org/schema/aop
        https://www.springframework.org/schema/aop/spring-aop.xsd">

    <bean id="userService" class="com.aop.service.UserServiceImpl"/>
    <bean id="Log" class="com.aop.log.Log"/>
    <bean id="afterLog" class="com.aop.log.AfterLog"/>

    <aop:config>

        <aop:pointcut id="pointcut" expression="execution(* com.aop.service.UserServiceImpl.*(..))"/>

        <aop:advisor advice-ref="Log" pointcut-ref="pointcut"/>
        <aop:advisor advice-ref="afterLog" pointcut-ref="pointcut"/>
    aop:config>
beans>
- 测试
    @Test
    public void add() {

        ApplicationContext context = new ClassPathXmlApplicationContext("applicationContext.xml");
        UserService userService = (UserService)context.getBean("userService");
        userService.add();
    }
- 控制台输出
com.aop.service.UserServiceImpl的add被执行了
增加一个用户
执行了add返回的结果null
Spring的Aop就是将公共的业务 (日志 , 安全等) 和领域业务结合起来 , 当执行领域业务时 , 将会把公共业务加进来 . 实现公共业务的重复利用 . 领域业务更纯粹 , 程序猿专注领域业务 , 其本质还是动态代理 .
3.2、通过自定义类来实现
- 自定义切入类
public class DiyPointCut {

    public void before(){

        System.out.println("方法执行前");
    }
    public void after(){

        System.out.println("方法执行后");
    }
}
- 配置Spring
    <bean id="diy" class="com.aop.service.DiyPointCut"/>
    <aop:config>
        <aop:aspect ref="diy">

            <aop:pointcut id="point" expression="execution(* com.aop.service.UserServiceImpl.*(..))"/>

            <aop:before method="before" pointcut-ref="point"/>
            <aop:after method="after" pointcut-ref="point"/>
        aop:aspect>
    aop:config>
- 测试
    @Test
    public void add() {

        ApplicationContext context = new ClassPathXmlApplicationContext("applicationContext.xml");
        UserService userService = (UserService)context.getBean("userService");
        userService.add();
    }
- 控制台输出
方法执行前
增加一个用户
方法执行后
3.3、通过注解实现
- 编写增强类
//标注这个类是一个切面
@Aspect
public class AnnotationPointCut {

    @Before("execution(* com.aop.service.UserServiceImpl.*(..))")
    public void before(){

        System.out.println("方法执行前");
    }
    @After("execution(* com.aop.service.UserServiceImpl.*(..))")
    public void after(){

    System.out.println("---------方法执行后---------");
    }


}
- 配置Spring
    <bean id="apc" class="com.aop.service.AnnotationPointCut"/>

    <aop:aspectj-autoproxy/>
- 测试
    @Test
    public void add() {

        ApplicationContext context = new ClassPathXmlApplicationContext("applicationContext.xml");
        UserService userService = (UserService)context.getBean("userService");
        userService.add();
    }
- 控制台输出
方法执行前
增加一个用户
---------方法执行后---------
1、通过aop命名空间的< aop:aspectj-autoproxy />声明自动为spring容器中那些配置@aspectJ切面的bean创建代理,织入切面。当然,spring 在内部依旧采用AnnotationAwareAspectJAutoProxyCreator进行自动代理的创建工作,但具体实现的细节已经被< aop:aspectj-autoproxy />隐藏起来了
2、< aop:aspectj-autoproxy/>有一个proxy-target-class属性,默认为false,表示使用jdk动态代理植入增强,当配为< aop:aspectj-autoproxy poxy-target-class=“true”/>时,表示使用CGLib动态代理技术植入增强。不过即使proxy-target-class设置为false,如果目标类没有声明接口,则spring将自动使用CGLib动态代理。
四、Spring整合Mybatis
4.1、导入相关jar包
<project xmlns="http://maven.apache.org/POM/4.0.0"
         xmlns:xsi="http://www.w3.org/2001/XMLSchema-instance"
         xsi:schemaLocation="http://maven.apache.org/POM/4.0.0 http://maven.apache.org/xsd/maven-4.0.0.xsd">
    <parent>
        <artifactId>SSMartifactId>
        <groupId>org.examplegroupId>
        <version>1.0-SNAPSHOTversion>
    parent>
    <modelVersion>4.0.0modelVersion>

    <artifactId>Spring-MybatisartifactId>

    <properties>
        <maven.compiler.source>8maven.compiler.source>
        <maven.compiler.target>8maven.compiler.target>
    properties>
    <dependencies>

        <dependency>
            <groupId>junitgroupId>
            <artifactId>junitartifactId>
            <version>4.12version>
        dependency>

        <dependency>
            <groupId>org.mybatisgroupId>
            <artifactId>mybatisartifactId>
            <version>3.5.6version>
        dependency>

        <dependency>
            <groupId>mysqlgroupId>
            <artifactId>mysql-connector-javaartifactId>
            <version>5.1.47version>
        dependency>

        <dependency>
            <groupId>org.springframeworkgroupId>
            <artifactId>spring-webmvcartifactId>
            <version>5.3.5version>
        dependency>
        <dependency>
            <groupId>org.springframeworkgroupId>
            <artifactId>spring-jdbcartifactId>
            <version>5.3.5version>
        dependency>


        <dependency>
            <groupId>org.aspectjgroupId>
            <artifactId>aspectjweaverartifactId>
            <version>1.9.4version>
        dependency>

        <dependency>
            <groupId>org.mybatisgroupId>
            <artifactId>mybatis-springartifactId>
            <version>2.0.2version>
        dependency>
        <dependency>
            <groupId>org.projectlombokgroupId>
            <artifactId>lombokartifactId>
            <version>1.18.12version>
        dependency>
    dependencies>

    <build>
        <resources>
            <resource>
                <directory>src/main/resourcesdirectory>
                <includes>
                    <include>**/*.propertiesinclude>
                    <include>**/*.xmlinclude>
                includes>
            resource>
            <resource>
                <directory>src/main/javadirectory>
                <includes>
                    <include>**/*.propertiesinclude>
                    <include>**/*.xmlinclude>
                includes>
            resource>
        resources>
    build>
project>
4.2、整合Mybatis方式一【重点理解】
- 1、引入Spring配置文件applicationContext.xml
<beans xmlns="http://www.springframework.org/schema/beans"
       xmlns:xsi="http://www.w3.org/2001/XMLSchema-instance"
       xmlns:aop="http://www.springframework.org/schema/aop"
       xsi:schemaLocation="http://www.springframework.org/schema/beans
        https://www.springframework.org/schema/beans/spring-beans.xsd
        http://www.springframework.org/schema/aop
        https://www.springframework.org/schema/aop/spring-aop.xsd">
beans>
- 2、配置数据源替换mybaits的数据源
        <bean id="dataSource" class="org.springframework.jdbc.datasource.DriverManagerDataSource">
            <property name="driverClassName" value="com.mysql.jdbc.Driver">property>
            <property name="url" value="jdbc:mysql://localhost:3306/mybatis?useSSL=true&useUnicode=true&characterEncoding=utf8">property>
            <property name="username" value="root">property>
            <property name="password" value="xbh123">property>
        bean>
注意:SqlSessionFactory需要一个 DataSource(数据源)。这可以是任意的 DataSource,只需要和配置其它 Spring 数据库连接一样配置它就可以了。数据源有非常多,可以使用第三方的,也可使使用Spring的
- 3、配置SqlSessionFactory,关联MyBatis,使用 SqlSessionFactoryBean 来创建SqlSessionFactory
    <bean id="sqlSessionFactory" class="org.mybatis.spring.SqlSessionFactoryBean">
        <property name="dataSource" ref="dataSource">property>

        <property name="configLocation" value="classpath:mybatis-config.xml">property>
    bean>
1、SqlSessionFactory有一个唯一的必要属性:用于 JDBC 的 DataSource。这可以是任意的 DataSource 对象,它的配置方法和其它 Spring 数据库连接是一样的。
2、一个常用的属性是 configLocation,它用来指定 MyBatis 的 XML 配置文件路径。它在需要修改 MyBatis的基础配置非常有用。通常,基础配置指的是 < settings> 或 < typeAliases>元素。
- Mybatis创建 SqlSessionFactory
String resource = "mybatis-config.xml";
    InputStream inputStream = Resources.getResourceAsStream(resource);
    SqlSessionFactory sqlSessionFactory = new SqlSessionFactoryBuilder().build(inputStream);
    SqlSession sqlSession = sqlSessionFactory.openSession();
1、在基础的 MyBatis 用法中,是通过 SqlSessionFactoryBuilder 来创建 SqlSessionFactory 的。而在 MyBatis-Spring 中,则使用 SqlSessionFactoryBean 来创建。
- 4、注册sqlSessionTemplate,关联sqlSessionFactory
    <bean id="sqlSession" class="org.mybatis.spring.SqlSessionTemplate">

        <constructor-arg index="0" ref="sqlSessionFactory"/>
    bean>
只能使用构造器注入sqlSessionFactory,因为他没有set方法
- 5、增加Mapper接口的实现类;私有化sqlSessionTemplate
public class UserMapperImpl implements UserMapper{

//    在原来的mybatis操作中,都使用sqlSession来执行,现在在Spring中,现在都使用sqlSessionTemplate
    private SqlSessionTemplate sqlSession;

    public void setSqlSession(SqlSessionTemplate sqlSession) {

        this.sqlSession = sqlSession;
    }

    @Override
    public List<User> selectUser() {

        UserMapper mapper = sqlSession.getMapper(UserMapper.class);
        return mapper.selectUser();
    }
}
- 6、注册bean实现
    <bean id="userMapper" class="com.xbh.pojo.UserMapperImpl">
        <property name="sqlSession" ref="sqlSession"/>
    bean>
- 7、测试
    @Test
    public void selectUser() {

        ApplicationContext context = new ClassPathXmlApplicationContext("applicationContext.xml");
        UserMapper userMapper = context.getBean("userMapper", UserMapper.class);
        for (User user : userMapper.selectUser()) {

            System.out.println(user);

        }
    }
- 控制台输出
User(id=3, name=王五, pwd=123456)
User(id=4, name=赵七, pwd=123456)
User(id=8, name=孙九, pwd=123456)
User(id=18, name=飞飞, pwd=123456)
4.2、整合Mybatis方式二
继承SqlSessionDaoSupport类 , 直接利用 getSqlSession() 获得 , 然后直接注入SqlSessionFactory . 比起方式1, 不需要管理SqlSessionTemplate , 而且对事务的支持更加友好 .
public class UserMapperImpl2 extends SqlSessionDaoSupport implements UserMapper{


    @Override
    public List<User> selectUser() {

        SqlSession sqlSession = getSqlSession();

        UserMapper mapper = sqlSession.getMapper(UserMapper.class);
        return mapper.selectUser();
    }
}
- 注册bean实现
    <bean id="userMapper2" class="com.xbh.pojo.UserMapperImpl2">
        <property name="sqlSessionFactory" ref="sqlSessionFactory"/>
    bean>
- 测试
    @Test
    public void selectUser() {


        ApplicationContext context = new ClassPathXmlApplicationContext("applicationContext.xml");
        UserMapper userMapper = context.getBean("userMapper2", UserMapper.class);
        for (User user : userMapper.selectUser()) {

            System.out.println(user);

        }
    }
- 控制台输出
User(id=3, name=王五, pwd=123456)
User(id=4, name=赵七, pwd=123456)
User(id=8, name=孙九, pwd=123456)
User(id=18, name=飞飞, pwd=123456)
- 可以把公共的地方抽取出来
- 创建spring-dao.xml
<beans xmlns="http://www.springframework.org/schema/beans"
       xmlns:xsi="http://www.w3.org/2001/XMLSchema-instance"
       xmlns:aop="http://www.springframework.org/schema/aop"
       xsi:schemaLocation="http://www.springframework.org/schema/beans
        https://www.springframework.org/schema/beans/spring-beans.xsd
        http://www.springframework.org/schema/aop
        https://www.springframework.org/schema/aop/spring-aop.xsd">


    <bean id="dataSource" class="org.springframework.jdbc.datasource.DriverManagerDataSource">
        <property name="driverClassName" value="com.mysql.jdbc.Driver">property>
        <property name="url" value="jdbc:mysql://localhost:3306/mybatis?useSSL=true&useUnicode=true&characterEncoding=utf8">property>
        <property name="username" value="root">property>
        <property name="password" value="xbh123">property>
    bean>

    <bean id="sqlSessionFactory" class="org.mybatis.spring.SqlSessionFactoryBean">
        <property name="dataSource" ref="dataSource">property>

        <property name="configLocation" value="classpath:mybatis-config.xml">property>
    bean>

    <bean id="sqlSession" class="org.mybatis.spring.SqlSessionTemplate">

        <constructor-arg index="0" ref="sqlSessionFactory"/>
    bean>
beans>
- 创建一个总的applicationContext.xml,通过import把spring-dao.xml引入
<beans xmlns="http://www.springframework.org/schema/beans"
       xmlns:xsi="http://www.w3.org/2001/XMLSchema-instance"
       xmlns:aop="http://www.springframework.org/schema/aop"
       xsi:schemaLocation="http://www.springframework.org/schema/beans
        https://www.springframework.org/schema/beans/spring-beans.xsd
        http://www.springframework.org/schema/aop
        https://www.springframework.org/schema/aop/spring-aop.xsd">

        <import resource="spring-dao.xml"/>

    <bean id="userMapper" class="com.xbh.pojo.UserMapperImpl">
        <property name="sqlSession" ref="sqlSession"/>
    bean>
    <bean id="userMapper2" class="com.xbh.pojo.UserMapperImpl2">
        <property name="sqlSessionFactory" ref="sqlSessionFactory"/>
    bean>
beans>
五、Spring声明式事务
事务:
1、把一组业务逻辑当成一个业务来做,要么都成功,要么都失败
2、事务在项目开发中,十分的重要,涉及到数据的一致性问题,不能马虎
3、确保完整性和一致性
    <bean id="transactionManager" class="org.springframework.jdbc.datasource.DataSourceTransactionManager">
        <property name="dataSource" ref="dataSource"/>
    bean>


    <tx:advice id="txAdvice" transaction-manager="transactionManager">


        <tx:attributes>
            <tx:method name="add" />
            <tx:method name="delete"/>
            <tx:method name="update"/>

            <tx:method name="*"/>
        tx:attributes>
    tx:advice>

    <aop:config>
        <aop:pointcut id="txPointcut" expression="execution(* com.xbh.pojo.*.*(..))"/>
        <aop:advisor advice-ref="txAdvice" pointcut-ref="txPointcut"/>
    aop:config>
1、如果不配置事务,可能存在数据提交不一致的情况
2、如果我们不在spring中配置事务,就需要在代码中手动配置事务
3、事务在项目的开发中十分重要,涉及到数据的一致性和完整性
参考秦疆老师的笔记

