Web 基础——Nginx
Web 基础——Nginx
- 一、Nginx 简介
-
- 1.Nginx 应用场景
- 2.I/O 模型介绍
-
- 1)同步/异步 与 阻塞/非阻塞
- 2)信号驱动型(异步半阻塞)Apache
- 3)异步 IO(异步非阻塞)Nginx
- 3.Nginx 高并发原理
- 4.CPU 亲和
- 5.零拷贝
- 二、部署 Nginx 网站服务
-
- 1.编译安装 Nginx
- 2.安装后优化调整
- 3.编写 Nginx 的启动脚本
- 三、Nginx 优化
-
- 1.配置 CPU 亲和
- 2.Nginx 常见问题
-
- 1)Server 优先级
- 2)Location 优先级
- 3)Try_Files 的使用
- 4)Alias 与 Root 区别
- 3.获取用户真实 IP
一、Nginx 简介
Nginx 是一款开源的高性能 HTTP 服务器和反向代理服务器,同时支持 IMAP/POP3/SMTP 代理服务,其性能优势着为显著,官网上称:单台 Nginx 服务器可以处理 50000 并发。
- 特点:高性能、稳定、消耗硬件资小、能够处理大并发,主要用于静态的解析,动静页面的分离。
1.Nginx 应用场景
- 静态处理:对静态页面的处理,不管是 Apache 还是 Nginx 默认只能处理静态页面。
- 反向代理:不直接处理客户端请求,而是将请求转交给其它服务器。
- 负载均衡:长跟反向代理相结合,负责将客户端的请求转交给其它压力较小的服务器。
- 资源缓存:对客户端经常访问的数据进行缓存,从而加快客户端的访问速度。
- 安全防护:Nginx 对自己本身有一定的防护措施。
- 访问限制:有点类似于 Apache 的
Order deny,allow。 - 访问认证:对所访问网站,进行添加用户名和密码。
2.I/O 模型介绍
每次 I/O 时,都要经过两个阶段:
- 第一阶段:将数据从磁盘文件加载至内核空间(缓冲区),等待数据准备完成,时间较长。
- 第二阶段:将数据从内核缓冲区复制到用户空间的进程的内存中,时间较短。
1)同步/异步 与 阻塞/非阻塞
2)信号驱动型(异步半阻塞)Apache
- 用户进程建立 SIGIO 的信号处理程序,复制数据从磁盘到内核空间,等处理完递交给 SIGIO 告知用户进程,这个过程是不阻塞的状态。
- 用户进程从内核空间复制到用户应用空间,这个过程是阻塞的。
- 信息驱动并未完全解决问题,只是做到了一部分不阻塞,一部分阻塞。
3)异步 IO(异步非阻塞)Nginx
- 用户进程不受阻塞,所有的请求,拿到数据拷贝到应用空间都由内核完成,用户进程可以接收更多的用户请求。
3.Nginx 高并发原理
- Nginx 高并发使用的是
epoll的方式,提供给用户访问,复制数据的一些操作交由内核完成; - 自身做的事情越少接待的用户请求就越多。
epoll 在 Linux 2.6 中增加了内存拷贝 mmap 机制,加速与内核空间的消息传递,即内存映射。
- 内存映射机制:硬盘中有数据,数据有对应的
inode,在内存中映射一个相同的inode,大小也相同,下次拿数据不需要遍历inode,分析路径了。这样提高了效率。
4.CPU 亲和
- 将 CPU 核心和 Nginx 工作进程绑定,把每个 Worker 进程固定在一个 CPU 上执行,减少切换 CPU 的
cache miss,获得更好的性能。
5.零拷贝
零拷贝 (SendFile) 文件传输是在内核中操作完成的,函数直接在两个文件描述符之间传输数据,从而避免了内核缓冲区数据和用户缓冲区数据之间的拷贝,操作效率很高。
执行过程:
- 系统调用 SendFile 函数通过 DMA 把硬盘数据拷贝到 Kernel Buffer (内核缓冲区) 中。
- 数据被 Kernel 直接拷贝到另外一个与 Socket 相关的 Kernel Buffer (内核缓冲区) 中。
- DMA 把数据从 Kernel Buffer (内核缓冲区) 中直接拷贝给协议栈。
- 这里没有用户空间和内核空间之间的切换,在内核中直接完成了一个 Buffer (缓冲区) 到另一个 Buffer (缓冲区) 的拷贝。
二、部署 Nginx 网站服务
准备工作
| 主机名 | 操作系统 | IP 地址 | 版本号 |
|---|---|---|---|
| Nginx | CentOS 7.4 | 192.168.1.1 | nginx-1.18.0.tar.gz |
1.编译安装 Nginx
- Nginx 官方:
http://nginx.org/
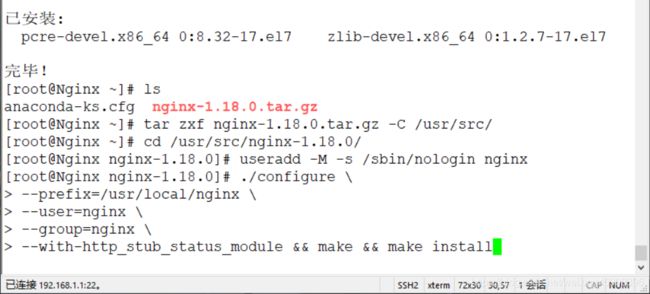
[root@Nginx ~]# wget http://www.nginx.org/download/nginx-1.18.0.tar.gz
[root@Nginx ~]# yum -y install pcre-devel zlib-devel
[root@Nginx ~]# ls
anaconda-ks.cfg  nginx-1.18.0.tar.gz
[root@Nginx ~]# tar zxf nginx-1.18.0.tar.gz -C /usr/src/
[root@Nginx ~]# cd /usr/src/nginx-1.18.0/
[root@Nginx nginx-1.18.0]# useradd -M -s /sbin/nologin nginx
[root@Nginx nginx-1.18.0]# ./configure \
--prefix=/usr/local/nginx \
--user=nginx \
--group=nginx \
--with-http_stub_status_module && make && make install
2.安装后优化调整
[root@Nginx nginx-1.18.0]# ln -s /usr/local/nginx/sbin/nginx /usr/local/sbin/					#创建软链接优化执行路径
[root@Nginx nginx-1.18.0]# cd
[root@Nginx ~]# nginx -v																		#查看版本
[root@Nginx ~]# nginx																			#启动Nginx
[root@Nginx ~]# netstat -anpt | grep nginx														#查看网络连接状态
3.编写 Nginx 的启动脚本
[root@Nginx ~]# vim /usr/lib/systemd/system/nginx.service
[Unit]
Description=nginx
After=network.target

[Service]
Type=forking
PIDFile=/usr/local/nginx/logs/nginx.pid
ExecStart=/usr/local/nginx/sbin/nginx
ExecReload=/usr/local/nginx/sbin/nginx -s reload
ExecStop=/usr/local/nginx/sbin/nginx -s stop
PrivateTmp=true

[Install]
WantedBy=multi-user.target
[root@Nginx ~]# nginx -s stop
[root@Nginx ~]# netstat -anpt | grep 80
[root@Nginx ~]# systemctl start nginx
[root@Nginx ~]# netstat -anpt | grep 80
三、Nginx 优化
1.配置 CPU 亲和
- 配置 CPU 亲和能够减少进程之间不断频繁迁移,减少性能损耗。
1)查看当前 CPU 物理状态
[root@Nginx ~]# lscpu | grep "CPU(s)"
2)将 Nginx Worker 进程绑到不同的核心上
- 指定 CPU 核心来进行绑定:
worker_processes 6;
worker_cpu_affinity 000001 000010 000100 001000 010000 100000;
- 最佳绑定方式:
worker_processes auto;
worker_cpu_affinity auto;
3)查看 Nginx Worker 进程绑定至对应 CPU
[root@Nginx ~]# ps -eo pid,args,psr | grep [n]ginx
2.Nginx 常见问题
1)Server 优先级
[root@Nginx ~]# mkdir -p /zhangsan/Coco{
1..3}
[root@Nginx ~]# for A in {
1..3};do echo "Coco $A
" > /zhangsan/Coco"$A"/index.html;done
[root@Nginx ~]# vim /usr/local/nginx/conf/nginx.conf
http {
include mime.types;
default_type application/octet-stream;
sendfile on;
keepalive_timeout 65;
server {
listen 80;
server_name 192.168.1.1;
location / {
root /zhangsan/Coco1;
index index.html;
}
}
server {
listen 80;
server_name 192.168.1.1;
location / {
root /zhangsan/Coco2;
index index.html;
}
}
server {
listen 80;
server_name 192.168.1.1;
location / {
root /zhangsan/Coco3;
index index.html;
}
}
}
[root@Nginx ~]# nginx -t #检查配置文件是否正确
[root@Nginx ~]# systemctl restart nginx #重启Nginx服务
[root@Nginx ~]# curl http://192.168.1.1
- 注意:当多个
server_name一样时,访问的优先级是从上到下。
2)Location 优先级
一个 Server 出现多个 location
| 常用的正则匹配 | 作用 |
|---|---|
= |
进行普通字符精确匹配,完全匹配 |
^~ |
进行普通字符匹配,使用前缀匹配 |
~ |
区分大小写匹配 |
~* |
不区分大小写匹配 |
- 优先级为:
=^~~~*
[root@Nginx ~]# vim /usr/local/nginx/conf/nginx.conf
http {

    include       mime.types;
    default_type  application/octet-stream;
    sendfile        on;
    keepalive_timeout  65;
    server {

        listen       80;
        server_name  192.168.1.1;
        root /zhangsan;
        index index.html;
        location = /Coco1/ {

        rewrite ^(.*)$ /Coco1/index.html break;
        }
        location ~ /Coco* {

        rewrite ^(.*)$ /Coco3/index.html break;
        }
        location ^~ /Coco {

        rewrite ^(.*)$ /Coco2/index.html break;
        }
    }
}
[root@Nginx ~]# systemctl restart nginx
[root@Nginx ~]# curl http://192.168.1.1/Coco1/
<h1>Coco 1</h1>
[root@Nginx ~]# curl http://192.168.1.1/Cocooo
<h1>Coco 2</h1>
[root@Nginx ~]# curl http://192.168.1.1/Coc
<h1>Coco 3</h1>
- 注意:完全匹配是必须要完全一样才可以,使用前缀匹配是只要前面一样即可。
3)Try_Files 的使用
- Nginx 的 Try_Files 能够按顺序检查文件是否存在。
[root@Nginx ~]# vim /usr/local/nginx/conf/nginx.conf
http {

    include       mime.types;
    default_type  application/octet-stream;
    sendfile        on;
    keepalive_timeout  65;
    server {

        listen       80;
        server_name  192.168.1.1;
        root /zhangsan;
        index index.html;
        location / {

        try_files $uri $uri/ /Coco3/index.html;
        }
    }
}
[root@Nginx ~]# systemctl restart nginx
[root@Nginx ~]# curl http://192.168.1.1/Coco1/
<h1>Coco 1</h1>
[root@Nginx ~]# curl http://192.168.1.1/Docker/
<h1>Coco 3</h1>
执行过程:
- 首先会检查用户请求的
uri内容是否存在本地,存在则解析; - 如果不存在的话就会根据
/Coco3/index.html指定路径来解析。
4)Alias 与 Root 区别
Root 路径配置:
[root@Nginx ~]# vim /usr/local/nginx/conf/nginx.conf
http {

    include       mime.types;
    default_type  application/octet-stream;
    sendfile        on;
    keepalive_timeout  65;
    server {

        listen       80;
        server_name  192.168.1.1;
        location /Coco1 {

        root /zhangsan;
        index index.html;
        }
    }
}
[root@Nginx ~]# systemctl restart nginx
[root@Nginx ~]# curl http://192.168.1.1/Coco1/
<h1>Coco 1</h1>
- 实际请求本地路径为:
root路径 + location路径也就是/zhangsan/Coco1/
Alias 路径配置:
[root@Nginx ~]# vim /usr/local/nginx/conf/nginx.conf
http {

    include       mime.types;
    default_type  application/octet-stream;
    sendfile        on;
    keepalive_timeout  65;
    server {

        listen       80;
        server_name  192.168.1.1;
        location /Docker {

        alias /zhangsan/Coco1;
        index index.html;
        }
    }
}
[root@Nginx ~]# systemctl restart nginx
[root@Nginx ~]# curl http://192.168.1.1/Docker/
<h1>Coco 1</h1>
- 注意:当配置完
alias路径时,它会把原有的location路径代替,但是只能使用location配置的路径来访问。
总结:root 是用来设置根目录的,而 alias 是用来重置当前文件的目录(也就是 location /目录)
3.获取用户真实 IP
- 添加一台机器名为
BeiDaiLi并安装 Nginx,IP地址为:192.168.1.2
[root@BeiDaiLi ~]# vim /usr/local/nginx/conf/nginx.conf
21 log_format main '$remote_addr - $remote_user [$time_local] "$request" '
22 '$status $body_bytes_sent "$http_referer" '
23 '"$http_user_agent" "$http_x_forwarded_for"';
24
25 access_log logs/access.log main;
[root@BeiDaiLi ~]# echo "192.168.1.2
" > /usr/local/nginx/html/index.html
[root@BeiDaiLi ~]# systemctl restart nginx
配置 Nginx 主机
[root@Nginx ~]# vim /usr/local/nginx/conf/nginx.conf
http {
include mime.types;
default_type application/octet-stream;
sendfile on;
keepalive_timeout 65;
server {
listen 80;
server_name 192.168.1.1;
location / {
root html;
index index.html;
proxy_pass http://192.168.1.2;
proxy_set_header X-Forwarded-For $proxy_add_x_forwarded_for;
}
}
}
[root@Nginx ~]# echo "192.168.1.1
" > /usr/local/nginx/html/index.html
[root@Nginx ~]# systemctl restart nginx
访问 http://192.168.1.1 验证:

查看日志:
[root@BeiDaiLi ~]# tail /usr/local/nginx/logs/access.log


