晚上被AFImageHelper这个开源库给深深吸引了,早在去年自己刚学习iOS开发时候就做过图片的模糊模板处理,当时用的是UIVisualEffectView处理的,效果很不好。但是今天看到这个库,只想惊叹一声,牛逼了我的哥,基本上把和UIImage相关的扩展都添加了,仔细看了一下代码,不是很难懂,代码量也不是很多,所以阅读起来一定没啥问题,所以我就简单地阅读了一下,主要是想借鉴下别人的实现思路,来补充自己的知识吧。
从 Image from a URL 说起
// Fetches an image from a URL. If caching is set, it will be cached by NSCache for future queries. The cached image is returned if available, otherise the placeholder is set. When the image is returned, the closure gets called.
func imageFromURL(url: String, placeholder: UIImage, fadeIn: Bool = true, closure: ((image: UIImage?)
// 参数url: 表示图片url地址
// 参数placeholder: 占位图
// 参数fadeIn: 表示是否以fade形式展示,具体实现用了 CATransition
// 参数clourse: 网络端获取的图片
该方法的具体实现。该方法是对UIImageView的扩展,该方法主要实现了在有placeholder存在且web image还未加载完成的之前(网络加载需要时间),先显示placeholder图片,点进去会发现它实际上调用了UIImage下面的这个方法:
class func image(fromURL url: String, placeholder: UIImage, shouldCacheImage: Bool = true, closure: @escaping (_ image: UIImage?) -> ()) -> UIImage?
该类方法是UIImage的一个扩展,目的是从网络端获取一张图片,并提供了placeholder 和 cache 选项,获取的图片放在了 closure 里面,返回的图片放在return里面,具体的实现看下面:
 class func image(fromURL url: String, placeholder: UIImage, shouldCacheImage: Bool = true, closure: @escaping (_ image: UIImage?) -> ()) -> UIImage? {
        // From Cache
        if shouldCacheImage {
            // 这里可能需要注意下UIImage.shared...
            // 很巧妙的单例设计,不过也有问题
            if let image = UIImage.shared.object(forKey: url as AnyObject) as? UIImage {
                closure(nil)
                return image
            }
        }
        // Fetch Image
        let session = URLSession(configuration: URLSessionConfiguration.default)
        if let nsURL = URL(string: url) {
            session.dataTask(with: nsURL, completionHandler: { (data, response, error) -> Void in
                if (error != nil) {
                    DispatchQueue.main.async {
                        closure(nil)
                    }
                }
                if let data = data, let image = UIImage(data: data) {
                    if shouldCacheImage {
                        UIImage.shared.setObject(image, forKey: url as AnyObject)
                    }
                    DispatchQueue.main.async {
                        closure(image)
                    }
                }
                session.finishTasksAndInvalidate()
            }).resume()
        }
        return placeholder
    }
用了 SDWebImage 加载 placeHolder 图片的方式。将 placeholder 放在返回图片里,webImage(异步) 放在闭包里。通过 UIImageView 的扩展方法轻松实现 placeholder 到 webImage 的切换。
下面是那个巧妙的单例设计,说它巧妙是因为我可能第一次见这种写法,不过也有一定问题,谁能猜到这个 UIImage.shared 实际上是一个 NSCache 实例呢???不知道为什么这么写。至少我觉得用 sharedCache 也比这个好点吧。
 /**
A singleton shared NSURL cache used for images from URL
*/
extension UIImage {
    static var shared: NSCache! {
        struct StaticSharedCache {
            static var shared: NSCache? = NSCache()
        }
        return StaticSharedCache.shared!
    }
}
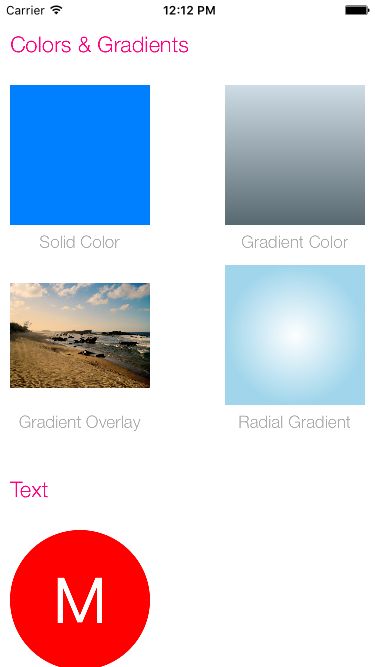
如何实现 UIImage With Colors
创建只带一种颜色的 image (a solid color)
- 创建一个特定
size的ImageContext - 获取该
context - 给该
context指定fillColor - 获取该
image - 关闭该
context
 convenience init?(color: UIColor, size: CGSize = CGSize(width: 10, height: 10)) {
        let rect = CGRect(x: 0, y: 0, width: size.width, height: size.height)
        UIGraphicsBeginImageContextWithOptions(rect.size, false, 0)

        let context = UIGraphicsGetCurrentContext()
        context?.setFillColor(color.cgColor)
        context?.fill(rect)

        self.init(cgImage:(UIGraphicsGetImageFromCurrentImageContext()?.cgImage!)!)
        UIGraphicsEndImageContext()
    }
不过我觉得这个另一种简易可行的方式就是直接设置 UIView 的 backgroundColor 就OK吧。
创建一种带梯度的颜色背景图片 (a gradient color)
设置方式代码和上面设置 a solid color 一样,只不过多了一条context.drawLinearGradient 设置。
 convenience init?(gradientColors:[UIColor], size:CGSize = CGSize(width: 10, height: 10), locations: [Float] = [] )
    {
        UIGraphicsBeginImageContextWithOptions(size, false, 0)
        let context = UIGraphicsGetCurrentContext()

        let colorSpace = CGColorSpaceCreateDeviceRGB()
        let colors = gradientColors.map {(color: UIColor) -> AnyObject! in return color.cgColor as AnyObject! } as NSArray
        let gradient: CGGradient
        if locations.count > 0 {
          // 在这里使用map做了转换,将 Float 转换成 CGFloat
          let cgLocations = locations.map { CGFloat($0) }
          gradient = CGGradient(colorsSpace: colorSpace, colors: colors, locations: cgLocations)!
        } else {
          gradient = CGGradient(colorsSpace: colorSpace, colors: colors, locations: nil)!
        }
        context!.drawLinearGradient(gradient, start: CGPoint(x: 0, y: 0), end: CGPoint(x: 0, y: size.height), options: CGGradientDrawingOptions(rawValue: 0))
        self.init(cgImage:(UIGraphicsGetImageFromCurrentImageContext()?.cgImage!)!)
        UIGraphicsEndImageContext()
    }
给已有图片添加一层梯度模板 (Applies gradient color overlay to an image.)
这个和上面的a gradient color实现方式很像,上面那条只是创建一个梯度模板的图片,而这里给已有图片添加梯度模板,所以这里相比于上面那个实现就多了将context绘制在image上步骤,当然别忘了clip操作,不然获取的图片大小size可能不和原来一样。该段代码的具体实现在这里,为了节省篇幅就不将代码贴出来了。
不过我还是觉得原作者这么写是不严密的,原因如下:
self.cgImage可能返回NULL的情况,具体情况请看官方文档 If the UIImage object was initialized using a CIImage object, the value of the property is NULL., 这个时候就没必要进行下面的操作了。
创建一个带Label的图片(Creates a text label image.)
这个实现还是比较好理解的,步骤如下:具体实现在这里
- 创建一个UILabel
- 将UILabel转换成UIImage
- 将UIImage以convenience形式初始化出来
可能难点在于步骤2, 具体实现如下:
    convenience init?(fromView view: UIView) {
        UIGraphicsBeginImageContextWithOptions(view.bounds.size, false, 0)
        view.layer.render(in: UIGraphicsGetCurrentContext()!) // 将view的layer绘制在imageContext上
        self.init(cgImage:(UIGraphicsGetImageFromCurrentImageContext()?.cgImage!)!)
        UIGraphicsEndImageContext()
    }
创建放射状的 UIImage (Image with Radial Gradient)
一开始我以为实现这个是很难的,但是在看完该代码之后,瞬间觉得很简单,直接使用UIGraphicsGetCurrentContext()?.drawRadialGradient(...)方法完美解决。该方法参数比较多,不过都是那种我们一下子就能看懂意思的,在这里就不细说了,具体实现在这里,实现步骤如下:
- 初始化
drawRadialGradient方法需要的参数,
这里需要注意创建 CGGradient 的时候使用 public init?(colorSpace space: CGColorSpace, colorComponents components: UnsafePointer, locations: UnsafePointer ?, count: Int) 这个初始化方法。 - 实行绘制操作
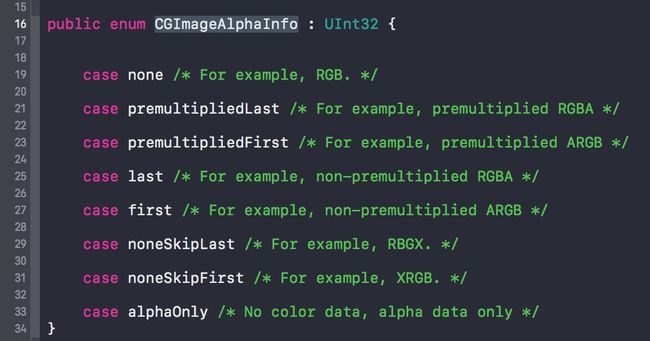
检测图片是否包含Alpha
实现如下:
 var hasAlpha: Bool {
    let alpha: CGImageAlphaInfo = self.cgImage!.alphaInfo
    switch alpha {
    case .first, .last, .premultipliedFirst,    .premultipliedLast:
        return true
    default:
        return false
    }
}
至于CGImageAlphaInfo,贴张图:根据这个很容易就知道为什么作者在这里使用了
case .first, .last, .premultipliedFirst
关于图片剪裁(image crop)
func crop(bounds: CGRect) -> UIImage?
直接使用了系统CGImage提供的方法cropping:, 指定其bounds,scale 和 orientation 参数即可。
具体代码如下:
func crop(bounds: CGRect) -> UIImage? {
    return UIImage(cgImage: (self.cgImage?.cropping(to: bounds)!)!, scale: 0.0, orientation: self.imageOrientation)
}
func cropToSquare() -> UIImage?
该方法从名字就可以看出来, 这是为了获取到Square形状的剪裁图片,但是假如一张图片原图就不是Square的,那么获取的时候就需要剪裁了,作者在这里只是选择了长和宽中短的那个作为最后的边长,而确定了边长,位置也取了中间位置。
具体代码如下:
func cropToSquare() -> UIImage? {
    let size = CGSize(width: self.size.width * self.scale, height: self.size.height * self.scale)
    let shortest = min(size.width, size.height)

    let left: CGFloat = (size.width > shortest) ? (size.width - shortest) / 2 : 0
    let top: CGFloat = (size.height > shortest) ? (size.height - shortest) / 2 : 0

    let rect = CGRect(x: 0, y: 0, width: size.width, height: size.height)
    let insetRect = rect.insetBy(dx: left, dy: top)

    return crop(bounds: insetRect)
}
关于图片Resize
顾名思义,resize image表示改变image的size,也就是长和宽。要是不看源码,让我去猜测怎么实现的话,我一定会猜到Quartz 2D绘制。没错,作者在这里也就是使用了这个。具体步骤如下:
- 根据你需要的contentMode计算出需要改变的比例
- 创建CGContext, 包含了一些配置相关的,具体可以去看Apple官方的描述
- 将该图片绘制在context上,具体使用了
func draw(_ image: CGImage, in rect: CGRect, byTiling: Bool = default)方法。rect可以来控制size大小
相关代码实现如下:
func resize(toSize: CGSize, contentMode: UIImageContentMode = .scaleToFill) -> UIImage? {
    let horizontalRatio = size.width / self.size.width;
    let verticalRatio = size.height / self.size.height;
    var ratio: CGFloat!

    switch contentMode {
        case .scaleToFill:
            ratio = 1
        case .scaleAspectFill:
            ratio = max(horizontalRatio, verticalRatio)
        case .scaleAspectFit:
            ratio = min(horizontalRatio, verticalRatio)
    }

    let rect = CGRect(x: 0, y: 0, width: size.width * ratio, height: size.height * ratio)

    // Fix for a colorspace / transparency issue that affects some types of
    // images. See here: http://vocaro.com/trevor/blog/2009/10/12/resize-a-uiimage-the-right-way/comment-page-2/#comment-39951

    let colorSpace = CGColorSpaceCreateDeviceRGB()
    let context = CGContext(data: nil, width: Int(rect.size.width), height: Int(rect.size.height), bitsPerComponent: 8, bytesPerRow: 0, space: colorSpace, bitmapInfo: bitmapInfo.rawValue)
    let bitmapInfo = CGBitmapInfo(rawValue: CGImageAlphaInfo.premultipliedLast.rawValue)

    let transform = CGAffineTransform.identity

    // Rotate and/or flip the image if required by its orientation
        context?.concatenate(transform);
    // Set the quality level to use when rescaling
    context!.interpolationQuality = CGInterpolationQuality(rawValue: 3)!

    //CGContextSetInterpolationQuality(context, CGInterpolationQuality(kCGInterpolationHigh.value))

    // Draw into the context; this scales the image
    guard let image = cgImage else {
        return nil
    }
    context?.draw(image, in: rect)

        // Get the resized image from the context and a UIImage
    if let _cgImage = context?.makeImage() {
        return UIImage(cgImage: _cgImage, scale: self.scale, orientation: self.imageOrientation)
    }
    return nil
}
给图片(非view)添加Corner Radius
我之前还真没想到过给image添加Corner Radius,每回都是直接给view添加Corner Radius。不过我觉得肯定和Quartz 2D绘制有关。作者在这里提供了四种不同情况,在这里只解释第一种,其他三种也是基于这一种的,直接看步骤吧。
- 准备bitmap context相关的参数
- 创建bitmap context, 在这里创建的context需要用到bitmapInfo参数,具体bitmapInfo是干什么用的呢?或者还有bitmap图片是什么呢?如果明白了这些就知道了作者为啥在这个方法之前先调用了
applyAlpha()方法。 - 创建相关绘制路径,然后获取图片并返回
CGBitmapInfo:Component information for a bitmap image.
BitmapImage: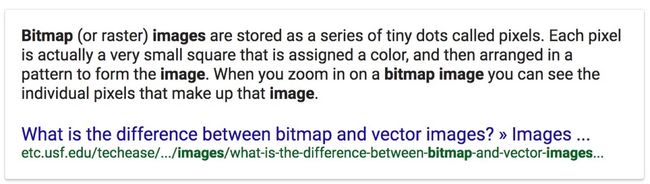
具体代码如下:(实现起来也不是很复杂,如果自己真的写不出来,也是一种学习的思路)
func roundCorners(cornerRadius: CGFloat) -> UIImage? {
        // If the image does not have an alpha layer, add one
        guard let imageWithAlpha = applyAlpha() else {
            return nil
        }
        guard let _cgImage = imageWithAlpha.cgImage else {
            return nil
        }
        UIGraphicsBeginImageContextWithOptions(size, false, 0)
        let width = _cgImage.width
        let height = _cgImage.height
        let bits = _cgImage.bitsPerComponent
        guard let colorSpace = _cgImage.colorSpace else {
            return nil
        }
        let bitmapInfo = _cgImage.bitmapInfo

        let context = CGContext(data: nil, width: width, height: height, bitsPerComponent: bits, bytesPerRow: 0, space: colorSpace, bitmapInfo: bitmapInfo.rawValue)
        let rect = CGRect(x: 0, y: 0, width: CGFloat(width)*scale, height: CGFloat(height)*scale)

        context?.beginPath()
        if (cornerRadius == 0) {
            context?.addRect(rect)
        } else {
            context?.saveGState()
            context?.translateBy(x: rect.minX, y: rect.minY)
            context?.scaleBy(x: cornerRadius, y: cornerRadius)
            let fw = rect.size.width / cornerRadius
            let fh = rect.size.height / cornerRadius
            context?.move(to: CGPoint(x: fw, y: fh/2))
            context?.addArc(tangent1End: CGPoint(x: fw, y: fh), tangent2End: CGPoint(x: fw/2, y: fh), radius: 1)
            context?.addArc(tangent1End: CGPoint(x: 0, y: fh), tangent2End: CGPoint(x: 0, y: fh/2), radius: 1)
            context?.addArc(tangent1End: CGPoint(x: 0, y: 0), tangent2End: CGPoint(x: fw/2, y: 0), radius: 1)
            context?.addArc(tangent1End: CGPoint(x: fw, y: 0), tangent2End: CGPoint(x: fw, y: fh/2), radius: 1)
            context?.restoreGState()
        }
        context?.closePath()
        context?.clip()

        context?.draw(_cgImage, in: rect)
        if let image = context?.makeImage() {
            UIGraphicsEndImageContext()
            return UIImage(cgImage: image, scale:scale, orientation: .up)
        }
        UIGraphicsEndImageContext()
        return nil
    }
如何给图片添加Border
这个真的是很常用的,我们经常看到一些比如头像的话有一个边框,那么这个开源库提供的方法就可以轻易为我们的图片添加边框,而免去了让设计师作图了。
来看下具体实现吧:
- 准备参数,创建CGContext
- 设置border相关
- 将border应用到image上,主要是通过添加inset和strokeEllipse(in: inset)来做。
具体代码如下:(代码比较长)
func apply(border: CGFloat, color: UIColor) -> UIImage? {
    UIGraphicsBeginImageContextWithOptions(size, false, 0)
    guard let _cgImage = cgImage else {
        return nil
    }
    let width = _cgImage.width
    let height = _cgImage.height
    let bits = _cgImage.bitsPerComponent
    guard let colorSpace = _cgImage.colorSpace else {
        return nil
    }
    let bitmapInfo = _cgImage.bitmapInfo
    let context = CGContext(data: nil, width: width, height: height, bitsPerComponent: bits, bytesPerRow: 0, space: colorSpace, bitmapInfo: bitmapInfo.rawValue)
    var red: CGFloat = 0, green: CGFloat = 0, blue: CGFloat = 0, alpha: CGFloat = 0
    color.getRed(&red, green: &green, blue: &blue, alpha: &alpha)

    context?.setStrokeColor(red: red, green: green, blue: blue, alpha: alpha)
    context?.setLineWidth(border)

    let rect = CGRect(x: 0, y: 0, width: size.width*scale, height: size.height*scale)
    let inset = rect.insetBy(dx: border*scale, dy: border*scale)

    context?.strokeEllipse(in: inset)
    context?.draw(_cgImage, in: inset)
    if let image = context?.makeImage() {
        UIGraphicsEndImageContext()
        return UIImage(cgImage: image)
    }
    UIGraphicsEndImageContext()
    return nil
}
添加Image Effects效果
虽然iOS 7系统以后也提供了Effects效果,不过那个往往实现的和设计师的总是有点偏差。作者在这里提供了五种添加Image Effects方法,一种实现方法,四种不同默认实现方法。来看看他做了什么吧。
参考:https://github.com/melvitax/ImageHelper
原文地址:https://vsccw.com/2017/01/15/afimagehelper-01/