python timm库
python timm库
- 什么是timm库?
- 模型
-
- 使用现成模型
- 微调模型
- 使用脚本训练模型
- 特征提取
-
- 倒数第二层特征 (Pre-Classifier Features)
- 多尺度特征 (Feature Pyramid)
- 动态的全局池化方式选择:
- Schedulers:
- Optimizer:
- 训练trick
禁止任何形式的转载!!
什么是timm库?
PyTorch Image Models (timm)是一个图像模型(models)、层(layers)、实用程序(utilities)、优化器(optimizers)、调度器(schedulers)、数据加载/增强(data-loaders / augmentations)和参考训练/验证脚本(reference training / validation scripts)的集合,目的是将各种SOTA模型组合在一起,从而能够重现ImageNet的训练结果。
timm库链接:https://github.com/rwightman/pytorch-image-models#introduction.
模型
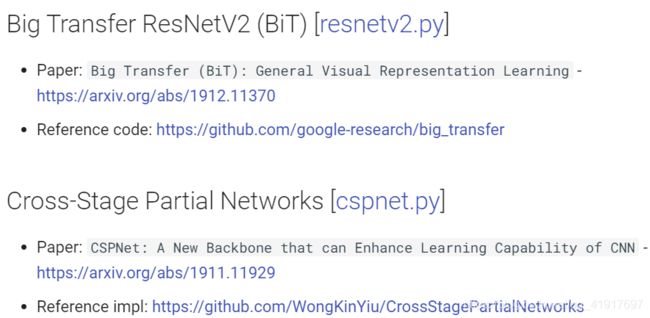
所包含的模型架构来自多种来源。下面列出了来源,包括论文,重写/改编的原始实现代码以及直接利用的PyTorch代码https://rwightman.github.io/pytorch-image-models/models/。

大多数包含的模型都给大家提供了预训练模型权重。权重来自于:
- 从他们的原始来源
- 作者从其原始不同的框架(例如Tensorflow模型)中移植而来
- 使用随附的训练脚本从头开始训练
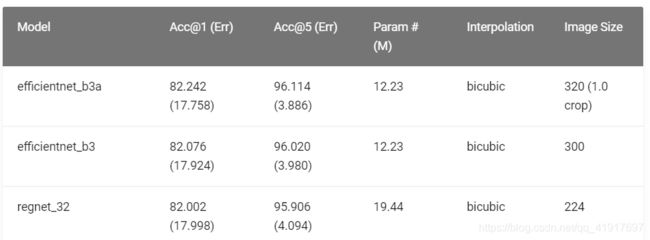
这里给出了模型的预训练权重和结果:https://rwightman.github.io/pytorch-image-models/results/.
ps:还可以找到你想看的论文,hhh


这里列出一下他们目前提供的模型(截至到2021/03):
Big Transfer ResNetV2 (BiT)
Cross-Stage Partial Networks
DenseNet
DLA
Dual-Path Networks
GPU-Efficient Networks
HRNet
Inception-V3
Inception-V4
Inception-ResNet-V2
NASNet-A
PNasNet-5
EfficientNet
MobileNet-V3
RegNet
RepVGG
ResNet, ResNeXt
Res2Net
ResNeSt
ReXNet
Selective-Kernel Networks
SelecSLS
Squeeze-and-Excitation Networks
TResNet
VGG
Vision Transformer
VovNet V2 and V1
Xception
Xception (Modified Aligned, Gluon)
Xception (Modified Aligned, TF)
使用现成模型
- 加载预训练模型
import timm
model = timm.create_model('gluon_resnext101_32x4d', pretrained=True)
model.eval()
- 加载图片
import urllib
from PIL import Image
from timm.data import resolve_data_config
from timm.data.transforms_factory import create_transform

config = resolve_data_config({
     }, model=model)
transform = create_transform(**config)
url, filename = ("https://github.com/pytorch/hub/raw/master/images/dog.jpg", "dog.jpg")
urllib.request.urlretrieve(url, filename)
img = Image.open(filename).convert('RGB')
tensor = transform(img).unsqueeze(0) # transform and add batch dimension
- 预测
import torch
with torch.no_grad():
    out = model(tensor)
probabilities = torch.nn.functional.softmax(out[0], dim=0)
print(probabilities.shape)
微调模型
您可以通过更改分类器(最后一层)来调整任何预先训练过的模型:
model = timm.create_model('gluon_resnext101_32x4d', pretrained=True, num_classes=NUM_FINETUNE_CLASSES)
这里有一个可用于训练的脚本,一个精简且易于修改的ImageNet训练脚本,它倾向于规范的PyTorch和标准的Python风格,而不是试图“做所有的事情”,你觉得合适就改用吧。
使用脚本训练模型
在github上的代码 ,根目录下有训练、验证、推理和保存模型的简洁脚本,不过目前使用pip安装timm包的话还不能用。
- Training Script
./distributed_train.sh 4 /data/imagenet --model seresnet34 --sched cosine --epochs 150 --warmup-epochs 5 --lr 0.4 --reprob 0.5 --remode pixel --batch-size 256 --amp -j 4
- Validation / Inference Scripts
python validate.py /imagenet/validation/ --model seresnext26_32x4d --pretrained
python inference.py /imagenet/validation/ --model mobilenetv3_large_100 --checkpoint ./output/train/model_best.pth.tar
这里给个例子:
EfficientNet-B2 with RandAugment - ->80.4 top-1, 95.1 top-5
These params are for dual Titan RTX cards with NVIDIA Apex installed:
./distributed_train.sh 2 /imagenet/ --model efficientnet_b2 -b 128 --sched step --epochs 450 --decay-epochs 2.4 \
--decay-rate .97 --opt rmsproptf --opt-eps .001 -j 8 --warmup-lr 1e-6 --weight-decay 1e-5 --drop 0.3 --drop-connect 0.2 \
--model-ema --model-ema-decay 0.9999 --aa rand-m9-mstd0.5 --remode pixel --reprob 0.2 --amp --lr .016
特征提取
timm除了分类之外,所有模型都具有一致的机制,可以从模型中为任务获取各种类型的特征。
倒数第二层特征 (Pre-Classifier Features)
1)获取未池化的特征(三种方法):
- 不用修改网络,使用model.forward_features(input)直接获得:
m = timm.create_model('xception41', pretrained=True)
outfeatures = m.forward_features(picture) ##直接提取网络分类层之前还未池化的特征
- 创建一个没有池化和分类层的模型:
m = timm.create_model('resnet50', pretrained=True, num_classes=0, global_pool='')
- 通过移除层来获得:
m = timm.create_model('densenet121', pretrained=True)
m.reset_classifier(0, '')
2)获取池化后的特征(两种方法):
- 创建没有分类层的模型
m = timm.create_model('resnet50', pretrained=True, num_classes=0)
- 移除分类层
m = timm.create_model('ese_vovnet19b_dw', pretrained=True)
m.reset_classifier(0)
多尺度特征 (Feature Pyramid)
目标检测,分割,关键点和各种密集像素任务需要从骨干网络以多个比例访问特征图。这通常是通过修改原始分类网络来完成的。由于每个网络在结构上都有很大的不同,所以在任何给定的目标检测或分割库中只支持少数骨干并不罕见。
可以通过将参数添加features_only=True到任何create_model调用来创建功能主干。默认情况下,大多数模型(并非全部都有)将输出5个步幅,第一个从2开始(有些从1或4开始)。
创建特征图提取模型:
m = timm.create_model('resnest26d', features_only=True, pretrained=True)
o = m(torch.randn(2, 3, 224, 224))
for x in o:
  print(x.shape)
输出:
torch.Size([2, 64, 112, 112])
torch.Size([2, 256, 56, 56])
torch.Size([2, 512, 28, 28])
torch.Size([2, 1024, 14, 14])
torch.Size([2, 2048, 7, 7])
.feature_info.channels可以查询特征图维度信息:
m = timm.create_model('regnety_032', features_only=True, pretrained=True)
print(f'Feature channels: {m.feature_info.channels()}')
输出:
Feature channels: [32, 72, 216, 576, 1512]
可以选择特定的特征图级别(out_indices)或限制步幅(output_stride):
out_indices:选择输出哪个索引。指定返回哪个feature maps to return, 从0开始,out_indices[i]对应着 C(i + 1) feature level。
output_stride:限制网络的特征输出步幅(也适用于分类模式)。通过dilated convolutions控制网络的output stride。大多数网络默认 stride 32 。
m = timm.create_model('ecaresnet101d', features_only=True, output_stride=8, out_indices=(2, 4), pretrained=True)
print(f'Feature channels: {m.feature_info.channels()}')
print(f'Feature reduction: {m.feature_info.reduction()}')
输出:
Feature channels: [512, 2048]
Feature reduction: [8, 8]
从上面的一些使用方法,可以看出一些通用的API:
获取或者更改分类层 - get_classifier() reset_classifier()
只对features做前向传播获取特征 - forward_features()
所有模型都支持多尺度特征提取 (feature pyramids) (通过create_model函数):
create_model(name, features_only=True, out_indices=…, output_stride=…)
动态的全局池化方式选择:
average pooling, max pooling, average + max, or concat([average, max]),默认是adaptive average。
Schedulers:
Schedulers 包括step,cosine w/ restarts,tanh w/ restarts,plateau 。https://arxiv.org/abs/1608.03983
Optimizer:
rmsprop_tf .
radam by Liyuan Liu.
novograd by Masashi Kimura.
lookahead adapted from impl by Liam.
fused optimizers by name with NVIDIA Apex installed.
adamp and sgdp by Naver ClovAI.
adafactor adapted fromFAIRSeq impl.
adahessian byDavid Samuel.
训练trick
-Random Erasing
-Mixup
-CutMix
-AutoAugment and RandAugment ImageNet configurations modeled after impl for EfficientNet training
-AugMix w/ JSD loss, JSD w/ clean + augmented mixing support works with AutoAugment and RandAugment as well
-SplitBachNorm - allows splitting batch norm layers between clean and augmented (auxiliary batch norm) data
-DropPath aka “Stochastic Depth”
-DropBlock
-Efficient Channel Attention - ECA
-Blur Pooling
-Space-to-Depth
-Adaptive Gradient Clipping
禁止任何形式的转载!!