fer2013+pycharm+pyqt5+keras实现人脸表情分类识别(卷积神经网络、CNN)
一、 fer2013
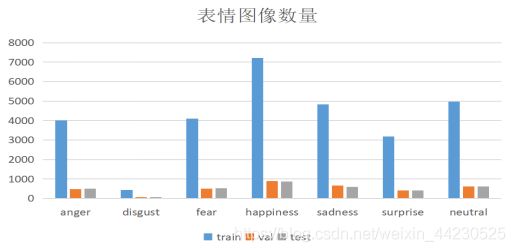
Fer2013人脸表情数据集共包括35887张人脸表情图像,
其中测试(Training)图像28709张,
测试(Test)和验证(Val)图像各有3589张。
Fer2013 是2013年Kaggle举办的表情识别挑战赛规定使用的 人脸表情数据集。
每张图片都是48*48的灰度图像,给出相应的标签对应含:
	0-生气(anger),1-厌恶(disgust),2-恐惧(fear),3-开心(happiness),
    4-伤心(sadness),5-惊讶(surprise),6-中性(neutral)。
1.1 fer2013存储格式及表情占比
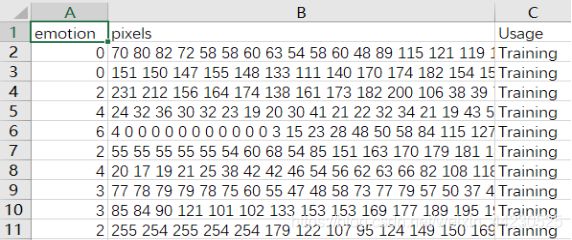
Fer2013人脸数据集以CSV格式存储人脸表情图像,用Excel打开如图所示,
emotion为人脸表情的标签,pixels为人脸图片数据,Usage代表用途(Training、Test、Val)。
二、 代码实现
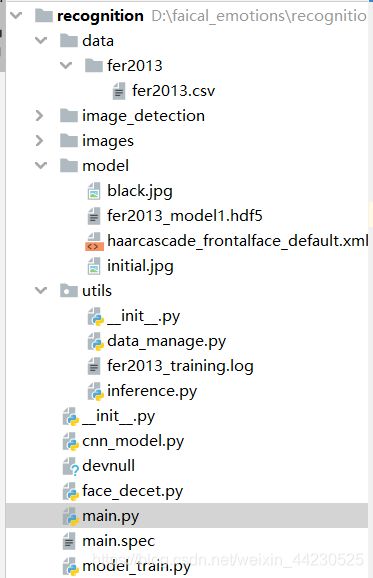
2.1 文件结构
2.2 代码实现
data_manage.py
class DataManager(object):   #数据类定义
    def __init__(self, dataset_name='', dataset_path=None, image_size=(48, 48)):
        self.dataset_name = dataset_name
        self.dataset_path = dataset_path
        self.image_size = image_size
        if self.dataset_path is not None:
            self.dataset_path = dataset_path
        elif self.dataset_name == 'fer2013':  #确定文件名为fer2013
            self.dataset_path = './data/fer2013/fer2013.csv'  #设置文件路径
        else:
            raise Exception('Incorrect dataset name, please input fer2013')

    def get_data(self):  #获取数据
        if self.dataset_name == 'fer2013':
            data = self._load_fer2013()
        return data

    def _load_fer2013(self):  #载入fer2013文件,放入内存
        data = pd.read_csv(self.dataset_path)  #使用CSV读取方式读取dataset——path路径下的CSV文件
        pixels = data['pixels'].tolist()  #pixes是fer2013的人脸数据,为48*48的像素点,转为列表
        width, height = 48, 48
        faces = []
        for pixel_sequence in pixels:
            face = [int(pixel) for pixel in pixel_sequence.split(' ')]
            face = np.asarray(face).reshape(width, height) #将数组转换为48*48的二维矩阵
            face = cv2.resize(face.astype('uint8'), self.image_size)#根据需求缩放
            faces.append(face.astype('float32')) #转化数据类型,添加在数组后边
        faces = np.asarray(faces)  #转化为数组
        faces = np.expand_dims(faces, -1)#扩展最后一个参数
        emotions = pd.get_dummies(data['emotion']).values#获得情感的值
        return faces, emotions

def get_labels(dataset_name):  #获取文件标签
    if dataset_name == 'fer2013':
        return {
     0: 'angry', 1: 'disgust', 2: 'fear', 3: 'happy',
                4: 'sad', 5: 'surprise', 6: 'neutral'}
    else:
        raise Exception('Invalid dataset name')

def split_data(x, y, validation_split=0.2):  #分离训练集与验证集,validation为分出的验证比例
    num_samples = len(x)  #x的长度
    num_train_samples = int((1 - validation_split)*num_samples)
    train_x = x[:num_train_samples]
    train_y = y[:num_train_samples]
    val_x = x[num_train_samples:]
    val_y = y[num_train_samples:]
    train_data = (train_x, train_y)
    val_data = (val_x, val_y)
    return train_data, val_data

def preprocess_input(x, v2=True):  #数据归一化
    x = x.astype('float32')
    x = x / 255.0
    if v2:
        x = x - 0.5
        x = x * 2.0
    return x
inference.py
import cv2
import matplotlib.pyplot as plt
import numpy as np
from keras.preprocessing import image

def load_image(image_path, grayscale=False, target_size=None):
    #载入图像,图像路径,灰度化,塑形
    pil_image = image.load_img(image_path, grayscale, target_size)
    return image.img_to_array(pil_image)#图片转化为数组

def load_detection_model(model_path):
    #检测模型,opencv自带的人脸识别模块
    detection_model = cv2.CascadeClassifier(model_path) #级联分类器
    return detection_model

def detect_faces(detection_model, gray_image_array):
    #检测人脸,探测模型,图像灰度数组,指定每个图像比例下图像大小减少的参数,指定每个候选矩形必须保留多少个邻居。
    #在输入图像中检测不同大小的对象。检测到的对象作为矩形列表返回。
    return detection_model.detectMultiScale(gray_image_array, 1.3, 5)

def draw_bounding_box(face_coordinates, image_array, color):
    #绘画,输入人脸坐标,图像数组,颜色
    x, y, w, h = face_coordinates
    #绘画矩形,图像,(左,上),(右,下),颜色
    cv2.rectangle(image_array, (x, y), (x + w, y + h), color, 2)

def apply_offsets(face_coordinates, offsets):
    x, y, width, height = face_coordinates #人脸坐标
    x_off, y_off = offsets  #扩充
    return (x - x_off, x + width + x_off, y - y_off, y + height + y_off)

def draw_text(coordinates, image_array, text, color, x_offset=0, y_offset=0,
                                                font_scale=2, thickness=2):
    #绘画文字
    x, y = coordinates[:2] #坐标第一项到第二项
    #图像,文本内容,(起点坐标),字体,字体大小,颜色,线宽,线类型
    cv2.putText(image_array, text, (x + x_offset, y + y_offset),
                cv2.FONT_HERSHEY_SIMPLEX,
                font_scale, color, thickness, cv2.LINE_AA)

def get_colors(num_classes):
    #获取颜色
    colors = plt.cm.hsv(np.linspace(0, 1, num_classes)).tolist()
    #返回列表,cm.hsv是图像的一种格式
    #linespace 在start和stop之间返回num_classes个均匀间隔的数据
    colors = np.asarray(colors) * 255 #转化为数组
    return colors
cnn_model.py(mini_xception)
from keras.layers import Activation, Convolution2D, Dropout, Conv2D
from keras.layers import AveragePooling2D, BatchNormalization
from keras.layers import GlobalAveragePooling2D
from keras.models import Sequential
from keras.layers import Flatten
from keras.models import Model
from keras.layers import Input
from keras.layers import MaxPooling2D
from keras.layers import SeparableConv2D
from keras import layers
from keras.regularizers import l2

def model1(shape, num_classes, l2_regularization=0.01):
    #输入图像的形状、分类个数、正则化参数
    regularization = l2(l2_regularization) #正则化参数

    # 基础设置
    img = Input(shape)
    x = Conv2D(8, (3, 3), strides=(1, 1), use_bias=False,kernel_regularizer=regularization)(img)
    # kernel_regularization对该层中的权值进行正则化,亦即对权值进行限制,使其不至于过大。use_bias不使用偏置
    x = BatchNormalization()(x)
    #对输入激活函数的数据进行归一化,解决输入数据发生偏移和增大的影响。
    x = Activation('relu')(x)
    #激活函数层,采用Relu函数
    x = Conv2D(8, (3, 3), strides=(1, 1),use_bias=False,kernel_regularizer=regularization)(x)
    x = BatchNormalization()(x)
    x = Activation('relu')(x)

    # module1
    residual = Conv2D(16, (1, 1), strides=(2, 2),padding='same', use_bias=False)(x)
    residual = BatchNormalization()(residual)

    x = SeparableConv2D(16, (3, 3), padding='same',kernel_regularizer=regularization,use_bias=False)(x)
    #深度可分离2D卷积,边缘补充像素,保证输出像素与输入相同
    x = BatchNormalization()(x)
    x = Activation('relu')(x)
    x = SeparableConv2D(16, (3, 3), padding='same',kernel_regularizer=regularization, use_bias=False)(x)
    x = BatchNormalization()(x)
    #最大池化
    x = MaxPooling2D((3, 3), strides=(2, 2), padding='same')(x)
    x = layers.add([x, residual])
    #返回x+residual

    # module2
    residual = Conv2D(32, (1, 1), strides=(2, 2), padding='same', use_bias=False)(x)
    residual = BatchNormalization()(residual)

    x = SeparableConv2D(32, (3, 3), padding='same', kernel_regularizer=regularization,use_bias=False)(x)
    x = BatchNormalization()(x)
    x = Activation('relu')(x)
    x = SeparableConv2D(32, (3, 3), padding='same',kernel_regularizer=regularization,use_bias=False)(x)
    x = BatchNormalization()(x)

    x = MaxPooling2D((3, 3), strides=(2, 2), padding='same')(x)
    x = layers.add([x, residual])

    # module3
    residual = Conv2D(64, (1, 1), strides=(2, 2),padding='same', use_bias=False)(x)
    residual = BatchNormalization()(residual)

    x = SeparableConv2D(64, (3, 3), padding='same', kernel_regularizer=regularization, use_bias=False)(x)
    x = BatchNormalization()(x)
    x = Activation('relu')(x)
    x = SeparableConv2D(64, (3, 3), padding='same',kernel_regularizer=regularization,use_bias=False)(x)
    x = BatchNormalization()(x)

    x = MaxPooling2D((3, 3), strides=(2, 2), padding='same')(x)
    x = layers.add([x, residual])

    # module4
    residual = Conv2D(128, (1, 1), strides=(2, 2), padding='same', use_bias=False)(x)
    residual = BatchNormalization()(residual)

    x = SeparableConv2D(128, (3, 3), padding='same', kernel_regularizer=regularization,use_bias=False)(x)
    x = BatchNormalization()(x)
    x = Activation('relu')(x)
    x = SeparableConv2D(128, (3, 3), padding='same', kernel_regularizer=regularization,use_bias=False)(x)
    x = BatchNormalization()(x)

    x = MaxPooling2D((3, 3), strides=(2, 2), padding='same')(x)
    x = layers.add([x, residual])

    x = Conv2D(num_classes, (3, 3),padding='same')(x)
    #增加一个全局平均池化层
    x = GlobalAveragePooling2D()(x)
    output = Activation('softmax', name='predictions')(x)

    model = Model(img, output)
    return model

if __name__ == "__main__":
    input_shape = (64, 64, 1)
    num_classes = 7
    model = model1(input_shape, num_classes)
    model.summary()
model_train.py
from keras.callbacks import CSVLogger, ModelCheckpoint, EarlyStopping
from keras.callbacks import ReduceLROnPlateau
from keras.preprocessing.image import ImageDataGenerator

from cnn_model import model1
from utils.data_manage import DataManager
from utils.data_manage import split_data
from utils.data_manage import preprocess_input

# 参数设置
batch_size = 32  #批训练个数
num_epochs =1000  #训练轮数
input_shape = (48, 48, 1) #输入图像的像素
validation_split =0.2
verbose = 1
num_classes = 7  #类别个数
patience = 50
base_path = './utils/'  #根目录

# 用于生成一个batch的图像数据,支持实时数据提升
data_generator = ImageDataGenerator(
                        featurewise_center=False,#布尔值,使图片去中心化(均值为0),按feature执行
                        featurewise_std_normalization=False,#布尔值,将输入除以数据集的标准差以完成标准化, 按feature执行
                        rotation_range=10,  #数据提升时图片随机转动的角度,整数
                        width_shift_range=0.1,#图片宽度的某个比例,数据提升时图片水平偏移的幅度,浮点数
                        height_shift_range=0.1,#图片高度的某个比例,数据提升时图片竖直偏移的幅度,浮点数
                        zoom_range=0.1,       #随机缩放幅度
                        horizontal_flip=True)   #随机水平翻转


model = model1(input_shape, num_classes)  #模型定义(输入形状,分类个数)
#定义优化器,loss function,训练过程中计算准确率,二次代价函数改为categorical_crossentropy交叉熵函数
model.compile(optimizer='adam', loss='categorical_crossentropy', metrics=['accuracy'])
model.summary()   #模型保存


dataset_name = 'fer2013'  #训练集名称
print('Training data_name:', dataset_name)

# callbacks,回调
log_file_path = base_path + dataset_name + '_training.log'  # utils+fer2013
csv_logger = CSVLogger(log_file_path, append=False)
#把训练轮结果数据流到CSV文件的回调函数 append:true文件存在则增加,false覆盖存在的文件
early_stop = EarlyStopping('val_loss', patience=patience)
#当被检测的数量不再提升,则停止训练,val_loss被监测的数据,patience没有进步的训练轮数
reduce_lr = ReduceLROnPlateau('val_loss', factor=0.1,patience=int(patience/4), verbose=1)
#当标准评估停止提升时,降低学习率,val_loss被监测的数据,factor学习速率降低因素,verbose 0:安静,1:更新信息
trained_models_path = base_path + dataset_name + 'model1'
# utils+fer2013
model_names = trained_models_path + '.{epoch:02d}-{val_acc:.2f}.hdf5'
#utils+fer2013+训练轮数+验证集准确率  权值文件名
model_checkpoint = ModelCheckpoint(model_names, 'val_loss', verbose=1,save_best_only=True)
#每个训练周期后保存模型,models_names保存路径,val_loss监测数据,verbose详细信息模式,save_best_only最佳模型不覆盖
callbacks = [model_checkpoint, csv_logger, early_stop, reduce_lr]
#

# 载入数据设置
data_loader = DataManager(dataset_name, image_size=input_shape[:2])  #定义
faces_data, emotions_labels = data_loader.get_data()  #获取数据
faces_data = preprocess_input(faces_data)  #数据归一化
num_samples, num_classes = emotions_labels.shape
train_data, val_data = split_data(faces_data, emotions_labels, validation_split) #设定训练集、验证集
train_faces, train_emotions = train_data  #train_x,train_y
model.fit_generator(data_generator.flow(train_faces, train_emotions,batch_size),
                    steps_per_epoch=len(train_faces) / batch_size,
                    epochs=num_epochs, verbose=1, callbacks=callbacks,
                    validation_data=val_data)
#接收numpy数组和标签为参数,生成经过数据提升或标准化后的batch数据,并在一个无限循环中不断的返回batch数据
#train_faces样本数据,train_emotions标签,batch_size批处理个数,epoch轮数,verbose 1:输出进度条记录
main.py
from PyQt5.QtGui import QFont, QPixmap, QBrush, QColor, QImage
from PyQt5.QtWidgets import QTabWidget, QWidget, QLabel, QVBoxLayout, QPushButton, QHBoxLayout, QTableWidget
from PyQt5.QtWidgets import QHeaderView, QFileDialog, QTableWidgetItem, QApplication
import sys

from keras.models import load_model
from utils.data_manage import *
from utils.inference import *


emotion_labels = get_labels('fer2013') #获取情感标签
emotion_offsets = (0, 0)


detection_model_path = './model/haarcascade_frontalface_default.xml' #检测文件
emotion_model_path = 'model/fer2013_model1.hdf5'  #权重文件

# 载入模型
face_detection = load_detection_model(detection_model_path)       #返回检测模型,初始化
emotion_classifier = load_model(emotion_model_path, compile=False) #加载权值模型文件
emotion_target_size = emotion_classifier.input_shape[1:3]  #获得输入模型形状


class VideoBox(QTabWidget): #封装类
    def __init__(self): #初始化
        QWidget.__init__(self)
        self.frame=None
        self.line_point={
     }
        self.frame_played=0
        self.emotion_map_init = {
     'angry': 0, 'disgust': 0,'fear':0, 'happy': 0, 'sad': 0,
                                 'surprise': 0, 'neutral':0}
        self.emotion_map = ''
        self.crop_num=0

        self.font =QFont()
        self.font.setFamily("Arial")  # 括号里可以设置成自己想要的其它字体
        self.font.setPointSize(21)    #字体的字号

        self.tab1 = QWidget()   #添加
        self.addTab(self.tab1, "情感分析")
        self.tab1UI()  #窗口设置
        self.resize(960,650)

    def tab1UI(self):   #设置
        self.title=QLabel(' 人脸情感分析')  #标题名
        self.title.setFixedSize(550, 50)    #设置窗口大小
        self.title.setFont(self.font)     #字体
        # 组件展示
        self.pictureLabel = QLabel()
        self.pictureLabel.setFixedSize(550,550)
        self.pictureLabel.setScaledContents(True)  #将图像大小适应窗口
        self.pictureLabel.setPixmap(QPixmap('./model/initial.jpg'))

        left = QVBoxLayout()#垂直布局
        left.addWidget(self.title) #添加标题
        left.addStretch(1) #伸缩填充
        left.addWidget(self.pictureLabel) #添加图片显示

        self.pic_choose_Button = QPushButton('选择图片') #选择图片按钮
        self.pic_choose_Button.setFixedSize(100, 30) #大小
        self.pic_choose_Button.clicked.connect(self.choose_pic) #事件

        self.camera_crop_Button = QPushButton('拍摄图片') #拍摄照片
        self.camera_crop_Button.setFixedSize(100, 30)#大小
        self.camera_crop_Button.clicked.connect(self.crop_pic)#事件

        top = QHBoxLayout() #水平布局
        top.addStretch(1) #自适应填充
        top.addWidget(self.pic_choose_Button) #添加按钮
        top.addStretch(1)
        top.addWidget(self.camera_crop_Button)
        top.addStretch(1)

        self.tableWidget = QTableWidget()  #
        self.tableWidget.setFixedSize(300, 450)
        self.tableWidget.setRowCount(7) #7行
        self.tableWidget.setColumnCount(1) #1列
        self.tableWidget.setHorizontalHeaderLabels(['所占比例']) #水平标签
        self.tableWidget.setVerticalHeaderLabels( #垂直标签
            ['angry', 'disgust','fear', 'happiness', 'sadness','surprise', 'neutral'])
        self.tableWidget.horizontalHeader().setSectionResizeMode(QHeaderView.Stretch)
        #设置自适应伸缩
        self.tableWidget.verticalHeader().setSectionResizeMode(QHeaderView.Stretch)

        right= QVBoxLayout()#垂直布局
        right.addStretch(1)
        right.addLayout(top)
        right.addStretch(1)
        right.addWidget(self.tableWidget)
        right.addStretch(1)

        #组合
        all=QHBoxLayout()  #水平布局
        all.addLayout(left)
        all.addStretch(1)
        all.addLayout(right)
        self.tab1.setLayout(all)

    def choose_pic(self):  #选择图片函数
        self.pic_choose_Button.setEnabled(True)
        self.imagename, _ = QFileDialog.getOpenFileName(self, 'Choose photo', './images/', "Image files (*.jpg *.gif)")
                                                        #文本框标题,打开路径,过滤文件
        self.pictureLabel.setPixmap(QPixmap(self.imagename))
        self.predict(self.imagename)

    def predict(self,image_path):  #预测函数预处理图片
        rgb_image = cv2.imread(image_path)
        gray_image = load_image(image_path, grayscale=True)
        gray_image = np.squeeze(gray_image)
        gray_image = gray_image.astype('uint8')
        self.predict_image(rgb_image,gray_image)

    def predict_image(self,rgb_image,gray_image): #预测及输出结果

        faces = detect_faces(face_detection, gray_image) #检测人脸的存在
        for face_coordinates in faces:
            x1, x2, y1, y2 = apply_offsets(face_coordinates, emotion_offsets)#扩充
            gray_face = gray_image[y1:y2, x1:x2]#灰度化
            try:
                gray_face = cv2.resize(gray_face, (emotion_target_size))#重新塑形
            except:
                continue
            gray_face = preprocess_input(gray_face, True)#数据归一化
            gray_face = np.expand_dims(gray_face, 0)#扩展列
            gray_face = np.expand_dims(gray_face, -1)#扩展最后一个参数
            out=emotion_classifier.predict(gray_face)[0]#预测,概率
            index = out.argmax()#返回延轴最大概率的索引值
            for i, percent in enumerate(out):#组合索引序列
                b = str(round(percent * 100, 3)) + '%'
                newItem = QTableWidgetItem(str(b))#设置
                if i == index:
                    newItem.setForeground(QBrush(QColor(255, 0, 0)))#设置画笔
                self.tableWidget.setItem(i, 0, newItem)#插入到指定行列
            emotion_text = emotion_labels[index]#标签
            color = (255, 0, 0)
            draw_bounding_box(face_coordinates, rgb_image, color)#绘画
            draw_text(face_coordinates, rgb_image, emotion_text, color, 0, -20, 1, 2)#标注
        height, width = rgb_image.shape[:2]
        if rgb_image.ndim == 3:#数组维度
            rgb_image = cv2.cvtColor(rgb_image, cv2.COLOR_BGR2RGB)#颜色空间转换,RGB
        elif rgb_image.ndim == 2:
            rgb_image = cv2.cvtColor(rgb_image, cv2.COLOR_GRAY2BGR)

        temp_image = QImage(rgb_image.flatten(), width, height, 3 * width, QImage.Format_RGB888)#构造图像
        temp_pixmap = QPixmap.fromImage(temp_image)#填充
        self.pictureLabel.setPixmap(temp_pixmap)#显示

    def crop_pic(self):  #拍照
        self.camera_crop_Button.setEnabled(True)
        self.crop_num=self.crop_num+1
        camera = cv2.VideoCapture(0)
        cv2.namedWindow('MyCamera')
        while True :
            if self.crop_num%3==1:
                success, self.frame = camera.read()
                cv2.imshow('MyCamera', self.frame)#显示
                if cv2.waitKey(1) & 0xff == ord('A'):#防止bug
                    break
            elif self.crop_num%3==2 :
                cv2.destroyWindow('MyCamera')#销毁
                camera.release()#释放
                gray_image= cv2.cvtColor(self.frame, cv2.COLOR_BGR2GRAY)#转化
                gray_image = np.squeeze(gray_image)
                gray_image = gray_image.astype('uint8')#转换数据类型
                self.predict_image(self.frame, gray_image)#预测
                self.crop_num=self.crop_num+1
                break
            elif self.crop_num % 3 == 0:
                break

if __name__ == "__main__":
   app = QApplication(sys.argv)
   box = VideoBox()
   box.show()
   sys.exit(app.exec_())
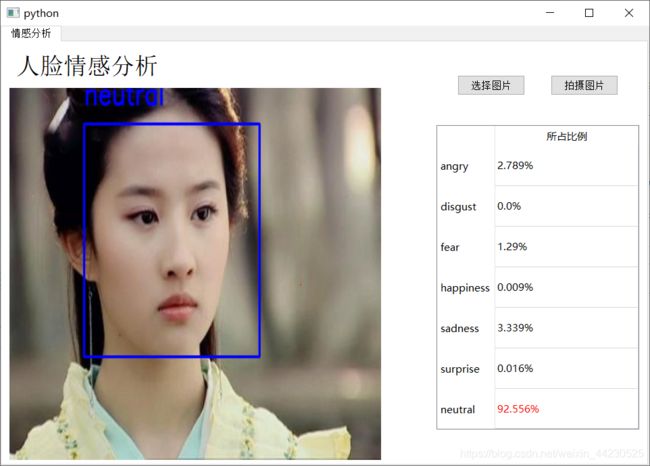
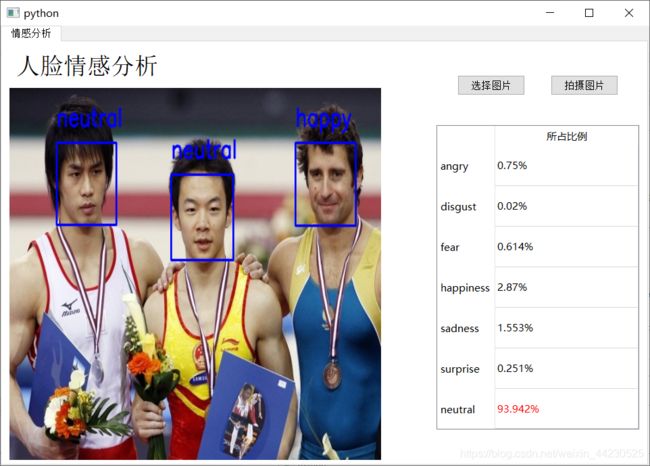
三、 界面
环境+代码自取:
复制这段内容后打开百度网盘手机App,操作更方便哦 链接:https://pan.baidu.com/s/1kzWHt7NKgra0pLaldwDzVA 提取码:hysi
