如何高效学习Handler?
高效学习模型
- what-->why-->how 模型
- 是什么?-->为什么使用?-->如何使用?-->实现原理-->总结分享(学以致用)
一.Handler是什么?
- Handler是Android提供的一种线程间通信的机制
二.为什么使用Handler?
1.UI线程模型(理解):
当启动一个应用时,Android系统会开启一个线程来执行这个应用,该线程即为主线程(Main Thread),
该线程是唯一的,负责处理所有的界面显示及用户操作的响应任务,即负责android.widget和android.view包中所有控件的使用,
由于它负责所有的UI处理工作,故称为UI线程;
如果UI线程中加入了耗时操作,就会阻塞UI线程,给用户带来"死机"的感觉,故耗时操作必须新开线程执行,
但Android规定:非UI线程不能访问UI,故而引入了Hanler来进行线程间通信;
2.该模型中Android做了以下两点规定:
1).不能阻塞UI线程大于5s,否则会报ANR错误;
2).不能让非UI线程访问UI,否则会直接报错;
3.Android是使用大量的消息驱动方式来进行交互的,比如四大组件Activity,Service,Broadcast,ContentProvider的启动过程的交互,都离不开消息机制,
消息机制涉及Handler/Looper/MessageQueue/Message等4个类;
4.UI线程是非线程安全的,为何不设计为线程安全的?
1).UI具有可变性,甚至是高频可变性(如游戏);
2).UI对响应时间的敏感性要求UI操作必须高效;
3).UI组件必须批量来绘制来保证效率;
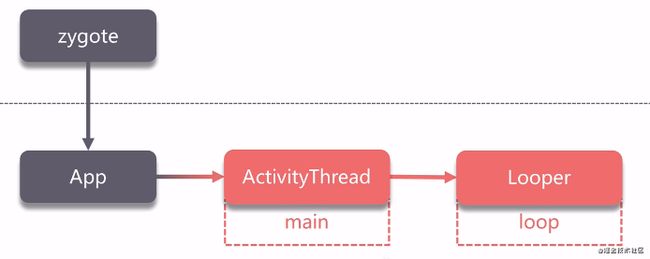
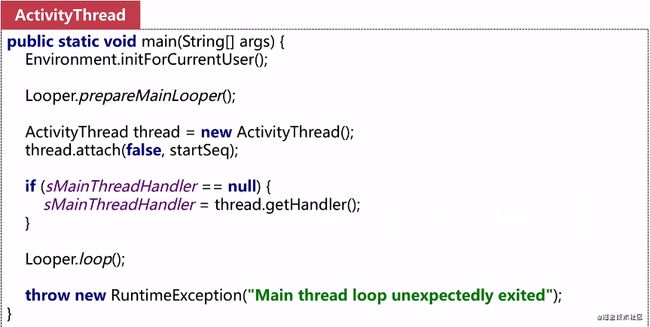
主线程创建及简要代码说明图:
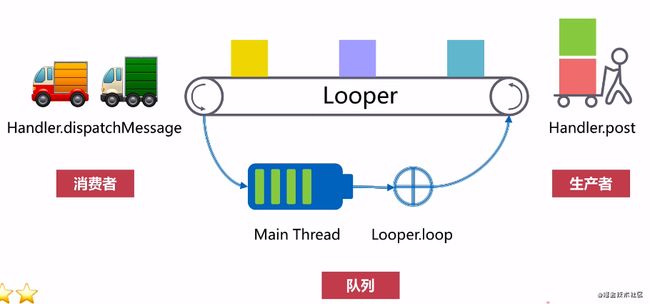
生产消费模型理解UI线程工作原理图:
三.如何使用Handler?
Handler handler = new Handler(){
@Override
public void handleMessage(final Message msg) {
//这里接受并处理消息
}};
//发送消息
handler.sendMessage(message);
handler.post(runnable);
实例化一个Handler并重写 handleMessage方法, 然后在使用的地方调用它的send以及 post系列方法就可以了, 简单易用,并支持延时消息。
四.实现原理
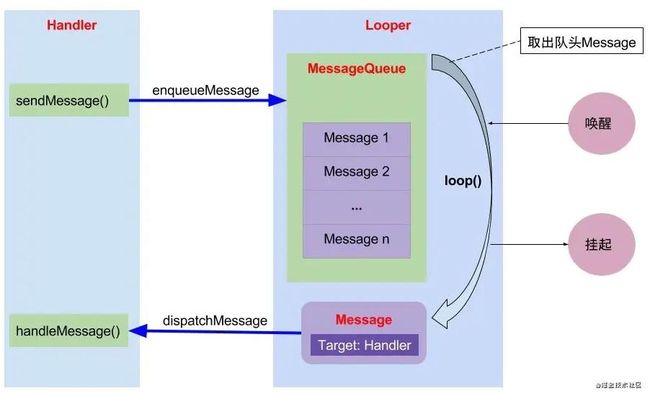
图解原理:
代码实现原理:
1.创建Handler, 将Handler与Looper关联起来:
  public Handler(Callback callback, boolean async) {
    //检查当前的线程是否有 Looper
    mLooper = Looper.myLooper();
    if (mLooper == null) {
        throw new RuntimeException(
            "Can't create handler inside thread that has not called Looper.prepare()");
    }
    //Looper 持有一个 MessageQueue
   mQueue = mLooper.mQueue;
  }
实现说明:
1).将Handler与Looper关联起来,创建Handler之前一定要先创建Looper,否则会报错;
由于ActivityThread(主线程)在main()方法中已通过Looper.prepareMainLooper()创建了Looper对象,
故能通过Looper.myLooper()获取Looper对象;
2).Looper会持有一个MessageQueue;
3).一个完成的Handler应该如下:
  class LooperThread extends Thread {
    public Handler mHandler;
    public void run() {
    Looper.prepare();
    mHandler = new Handler() {
        public void handleMessage(Message msg) {
            // process incoming messages here
        }
    };
    Looper.loop();
   }
  }
Looper提供了Looper.prepare()方法来创建Looper,
并会借助ThreadLocal来实现与当前线程的绑定功能;
Looper.loop()则会开始不断尝试从MessageQueue中获取 Message,并分发给对应的Handler;
即Handler跟线程的关联是靠 Looper 来实现的。
2.通过send及post系列方法发送Message, 然后将Message添加进入MessageQueue
通过send及post系列方法发送消息,最终会走到 MessageQueue.enqueueMessage(Message,long)方法。
1).Message:
Message是线程间通信的信息载体,包含一些特定的描述和任意的附加数据;
Message具有setData()和getData()方法,它们分别可获取和添加用Bundle对象封装的数据,
这些数据就是线程之间相互传递的数据;
Message对象不建议使用new Message()来获取,可通过Messa.obtain()或Handler的obtainMassage()方法获取;
obtain()可从全局的Message Pool(消息池)中返回一个Message对象;
Message Pool(消息池):是android系统专门用来管理消息的一种机制,
主要是为了避免Message对象频繁的创建销毁带来的开销, 故使用消息池来维护这些对象,
对象使用后可重新放到池中被重新使用,它的大小是10;
2).MessageQueue:
MessageQueue是一个由Message组成的队列,是一个偏底层的类,
它包含的Message由Looper对象分发出去;
Message并不是直接添加进消息队列的, 而是通过与Looper相关的MessageQueue.IdleHandler对象添加;
可使用Looper.myQueue()方法取回当前线程的消息队列;
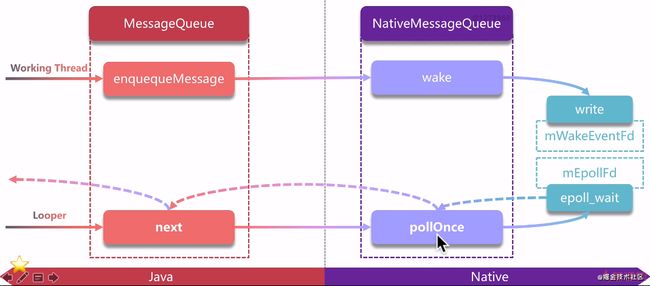
MessageQueue是通过next()方法获取Message的;
 //MessageQueue
 Message next() {
 //
 for (;;) {
    nativePollOnce(ptr, nextPollTimeoutMillis);
    synchronized (this) {
     //
       Message msg = mMessages;
        //
        if (msg != null) {
            if (now < msg.when) {
                nextPollTimeoutMillis = (int) Math.min(msg.when - now, Integer.MAX_VALUE);
            } else {
                //
                return msg;
            }
        }
    //
  }
}
图解MessageQueue处理Message:
3.通过Looper.loop()死循环对Message进行获取和分发
Looper:是线程用来运行消息循环的,线程本身无消息循环,
需要调用Looper.prepare()创建Looper对象,然后调用Looper.loop()去处理消息;
Android中系统在启动主线程时会自动为之建立一个Looper对象;
Looper对象通过消息队列来存放消息和事件,一个线程只能有一个Looper,对应一个消息队列;
默认情况下,Handler会与其定义时所在的线程的Looper绑定,如在UI线程中定义,则与UI线程的Looper绑定;
//Looper.loop()源码解读:

public static void loop() {
 final Looper me = myLooper();
 if (me == null) {
    throw new RuntimeException("No Looper; Looper.prepare() wasn't called on this thread.");
 }
 final MessageQueue queue = me.mQueue;
 //...
 for (;;) {
   // 不断从MessageQueue 获取消息
    Message msg = queue.next(); // might block
    //退出Looper
    if (msg == null) {
        // No message indicates that the message queue is quitting.
        return;
    }
    //...
    try {
        msg.target.dispatchMessage(msg);
        end = (slowDispatchThresholdMs == 0) ? 0 : SystemClock.uptimeMillis();
    } finally {
        //...
    }
    msg.recycleUnchecked();
 }
}
//Handler处理消息
public void dispatchMessage(Message msg) {
 if (msg.callback != null) {
    handleCallback(msg);
 } else {
   if (mCallback != null) {
     if (mCallback.handleMessage(msg)) {
      return;
     }
   }
  //回调到 Handler 的 handleMessage 方法
  handleMessage(msg);
 }
}
简要说明:
1).通过myLooper()获取Looper对象,因Looper持有MessageQueue,进而获取MessageQueue对象;
2).死循环中通过调用queue.next()不断的获取消息;
3).死循环中通过调用msg.target.dispatchMessage(msg)分发消息消息,
msg.target即为发送消息的Handler;
4).dispatchMessage()中调用handleMessage回到UI线程中处理消息;
五.总结分享
核心调用栈流程:
new Handler-->sendMessage()-->enqueueMessage()-->Looper.loop()
-->queue.next()-->msg.target.dispatchMessage()-->handleMessage()
1.创建Handler,通过Looper.myLooper()获取Looper对象,因Looper中持有MessageQueue从而获取到MessageQueue;
2.通过send及post系列方法发送消息, 调用enqueueMessage()将消息添加进MessageQueue;
3.通过Looper.loop()死循环获取和分发消息;
4.通过Hander.handleMessage处理消息;
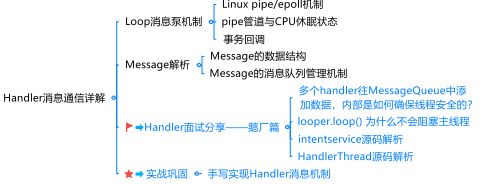
Handler通信机制详解学习路线
相关的学习笔记可以点击获得Handler通信机制通道
