使用pytorch搭建ResNet网络
参考:https://www.cnblogs.com/jiyou/p/11272650.html
https://zhuanlan.zhihu.com/p/77899090
导入需要使用的包
import torch.nn as nn
import torch.utils.model_zoo as model_zoo

# 每一种架构下都有训练好的可以用的参数文件
# 默认的resnet网络,已预训练
model_urls = {
    'resnet18': 'https://download.pytorch.org/models/resnet18-5c106cde.pth',
    'resnet34': 'https://download.pytorch.org/models/resnet34-333f7ec4.pth',
    'resnet50': 'https://download.pytorch.org/models/resnet50-19c8e357.pth',
    'resnet101': 'https://download.pytorch.org/models/resnet101-5d3b4d8f.pth',
    'resnet152': 'https://download.pytorch.org/models/resnet152-b121ed2d.pth',
}
1.model.py
import torch.nn as nn
import torch

#基础块 两个3x3
class BasicBlock(nn.Module):#resnet 18\34 层
    expansion = 1

    # downsample 对应有没有虚线的结构
    def __init__(self, in_channel, out_channel, stride=1, downsample=None):
        super(BasicBlock, self).__init__()
        self.conv1 = nn.Conv2d(in_channels=in_channel, out_channels=out_channel,
                               kernel_size=3, stride=stride, padding=1, bias=False)
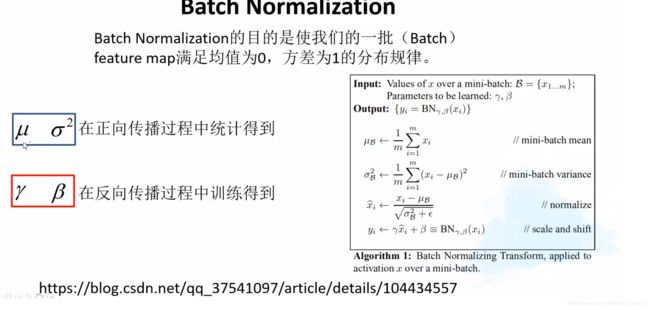
        self.bn1 = nn.BatchNorm2d(out_channel) # 输出特征矩阵的深度
        self.relu = nn.ReLU(inplace=True)
        self.conv2 = nn.Conv2d(in_channels=out_channel, out_channels=out_channel,
                               kernel_size=3, stride=1, padding=1, bias=False)
        self.bn2 = nn.BatchNorm2d(out_channel)
        self.downsample = downsample # 传递下采样方法# 这个是shortcut的操作

    def forward(self, x): # 定义正向传播过程
        identity = x # 捷径连接
        if self.downsample is not None:
            identity = self.downsample(x)
        # 我们将上一层的输出x输入进这个downsample所拥有一些操作(卷积等),将结果赋给identity
        # 简单说,这个目的就是为了应对上下层输出输入深度不一致问题
        out = self.conv1(x)
        out = self.bn1(out)
        out = self.relu(out)

        out = self.conv2(out)
        with torch.no_grad():
            out = self.bn2(out) # 这一步没有relu激活函数,是因为将输出加上捷径分支再relu

        out += identity
        out = self.relu(out)

        return out

# 瓶颈块,有三个卷积层分别是1x1,3x3,1x1,分别用来降低维度,卷积处理,升高维度
# 引入Bottleneck的目的是,减少参数的数目,Bottleneck相比较BasicBlock在参数的数目上少了许多,
# 但是精度上却差不多。减少参数同时还会减少计算量,使模型更快的收敛。

class Bottleneck(nn.Module):#resnet 50\101\152
    expansion = 4 #每个layer的第3层卷积核个数为第1,2层的4倍(eg.64 64 256)

    def __init__(self, in_channel, out_channel, stride=1, downsample=None):
        super(Bottleneck, self).__init__()
        self.conv1 = nn.Conv2d(in_channels=in_channel, out_channels=out_channel,
                               kernel_size=1, stride=1, bias=False)  # squeeze channels
        self.bn1 = nn.BatchNorm2d(out_channel)
        # -----------------------------------------
        self.conv2 = nn.Conv2d(in_channels=out_channel, out_channels=out_channel,
                               kernel_size=3, stride=stride, bias=False, padding=1)
        self.bn2 = nn.BatchNorm2d(out_channel)
        # -----------------------------------------
        self.conv3 = nn.Conv2d(in_channels=out_channel, out_channels=out_channel*self.expansion,
                               kernel_size=1, stride=1, bias=False)  # unsqueeze channels
        self.bn3 = nn.BatchNorm2d(out_channel*self.expansion)
        self.relu = nn.ReLU(inplace=True)#对从上层网络Conv2d中传递下来的tensor直接进行修改,这样能够节省运算内存,不用多存储其他变量
        self.downsample = downsample # 传递下采样方法

    def forward(self, x): # 定义正向传播过程
        identity = x # 捷径连接
        if self.downsample is not None:
            identity = self.downsample(x)

        out = self.conv1(x)
        out = self.bn1(out)
        out = self.relu(out)

        out = self.conv2(out)
        out = self.bn2(out)
        out = self.relu(out)

        out = self.conv3(out)
        out = self.bn3(out) # 这一步没有relu激活函数,是因为将输出加上捷径分支再relu

        out += identity
        out = self.relu(out)

        return out


class ResNet(nn.Module):# 网络结构
#init中 block包括BasicBlock和Bottleneck,blocks_num表示所使用残差列表的数目,每个大layer中的block个数
#num_classes训练集分类个数,include_top为了在以后ResNet基础上搭建更复杂的网络()
#include_top->lets you select if you want the final dense layers or not.
    def __init__(self, block, blocks_num, num_classes=1000, include_top=True):
        super(ResNet, self).__init__()
        self.include_top = include_top
        self.in_channel = 64

        self.conv1 = nn.Conv2d(3, self.in_channel, kernel_size=7, stride=2,
                               padding=3, bias=False)
        # 输入深度为3(正好是彩色图片的3个通道),输出深度为64,滤波器为7*7,步长为2,填充3层,特征图缩小1/2
        self.bn1 = nn.BatchNorm2d(self.in_channel)
        self.relu = nn.ReLU(inplace=True)
        self.maxpool = nn.MaxPool2d(kernel_size=3, stride=2, padding=1)# 最大池化,滤波器为3*3,步长为2,填充1层,特征图又缩小1/2
        # 此时,特征图的尺寸已成为输入的1/4
        self.layer1 = self._make_layer(block, 64, blocks_num[0])  # conv2_x
        self.layer2 = self._make_layer(block, 128, blocks_num[1], stride=2)  # conv3_x
        self.layer3 = self._make_layer(block, 256, blocks_num[2], stride=2)  # conv4_x
        self.layer4 = self._make_layer(block, 512, blocks_num[3], stride=2)  # conv5_x
        if self.include_top: #AdaptiveAvgPool2d自适应平均池化
            self.avgpool = nn.AdaptiveAvgPool2d((1, 1))  # output size = (1, 1)
            self.fc = nn.Linear(512 * block.expansion, num_classes)

        # 这里进行的是网络的参数初始化,可以看出卷积层和批标准化层的初始化方法是不一样的
        for m in self.modules():
            # self.modules()采取深度优先遍历的方式,存储了网络的所有模块,包括本身和儿子
            if isinstance(m, nn.Conv2d):  # isinstance()判断一个对象是否是一个已知的类型
                nn.init.kaiming_normal_(m.weight, mode='fan_out', nonlinearity='relu')
            # 9. kaiming_normal 初始化 (这里是nn.init初始化函数的源码,有好几种初始化方法)
            # torch.nn.init.kaiming_normal_(tensor, a=0, mode='fan_in', nonlinearity='leaky_relu')
            # nn.init.kaiming_normal_(w, mode='fan_out', nonlinearity='relu')
            # tensor([[ 0.2530, -0.4382,  1.5995],
            #         [ 0.0544,  1.6392, -2.0752]])
            elif isinstance(m, nn.BatchNorm2d):
                nn.init.constant_(m.weight, 1)
                nn.init.constant_(m.bias, 0)
                # 3. 常数 - 固定值 val
                # torch.nn.init.constant_(tensor, val)
                # nn.init.constant_(w, 0.3)
                # tensor([[ 0.3000,  0.3000,  0.3000],
                #         [ 0.3000,  0.3000,  0.3000]])

#_make_layer(block(2个),channel残差结构卷积层使用个数,大layer中该层包括多少个残差结构,s=1)
    def _make_layer(self, block, channel, block_num, stride=1):
        downsample = None
        if stride != 1 or self.in_channel != channel * block.expansion:
            # 判断步长是否为1,判断当前块的输入深度和当前块卷积层深度乘于残差块的扩张
            downsample = nn.Sequential(
                nn.Conv2d(self.in_channel, channel * block.expansion, kernel_size=1, stride=stride, bias=False),
                nn.BatchNorm2d(channel * block.expansion))
        # 一旦判断条件成立,那么给downsample赋予一层1*1卷积层和一层批标准化层。并且这一步将伴随这特征图缩小1/2
        # 而为何要在shortcut中再进行卷积操作?是因为在残差块之间,比如当要从64深度的3*3卷积层阶段过渡到128深度的3*3卷积层阶段,主分支为64深度的输入已经通过128深度的3*3卷积层变成了128深度的输出,而shortcut分支中x的深度仍为64,而主分支和shortcut分支相加的时候,深度不一致会报错。这就需要进行升维操作,使得shortcut分支中的x从64深度升到128深度。
        # 而且需要这样操作的其实只是在基础块BasicBlock中,在瓶颈块Bottleneck中主分支中自己就存在升维操作,那么Bottleneck还在shortcut中引入卷积层的目的是什么?能带来什么帮助?
        layers = []
        layers.append(block(self.in_channel, channel, downsample=downsample, stride=stride))
        self.in_channel = channel * block.expansion
        # 一定要注意,out_channels一直都是3*3卷积层的深度
        for _ in range(1, block_num):
            layers.append(block(self.in_channel, channel))

        return nn.Sequential(*layers)# 这里表示将layers中的所有block按顺序接在一起

    def forward(self, x):
        x = self.conv1(x)
        x = self.bn1(x)
        x = self.relu(x)
        x = self.maxpool(x)

        x = self.layer1(x)
        x = self.layer2(x)
        x = self.layer3(x)
        with torch.no_grad():
            x = self.layer4(x)

        if self.include_top:
            x = self.avgpool(x)
            x = torch.flatten(x, 1)#out = out.view(out.size(0),-1) # 将原有的多维输出拉回一维
            x = self.fc(x)

        return x # 得到整个网络框架


def resnet34(num_classes=1000, include_top=True):
    return ResNet(BasicBlock, [3, 4, 6, 3], num_classes=num_classes, include_top=include_top)


def resnet101(num_classes=1000, include_top=True):
    return ResNet(Bottleneck, [3, 4, 23, 3], num_classes=num_classes, include_top=include_top)

# resnet18和resnet34只用到了简单的BasicBlock,resnet50、resnet101和resnet152用的是Bottleneck。
# Bottleneck相比较BasicBlock在参数量上减少了16.94倍。
# resnet50、resnet101和resnet152三个网络输入输出大小都一样,只是中间的参数个数不一样。
# resnet网络中第一个残差块的输入深度都为64,其他的为残差块中3*3卷积层的深度乘以block.expansion。
# 从每一个layer阶段到下一个layer阶段都伴随着特征图缩小1/2,特征图深度加深1/2。这发生在除第一个layer外的每个layer中的第一个残差块中。
# resnet网络的四个layer前后的操作都是一样,因此resnet网络输入的图片尺寸固定为224*224(还不确定)。
# 在理解网络的时候最好结合resnet18、resnet50的结构图。
2.train.py
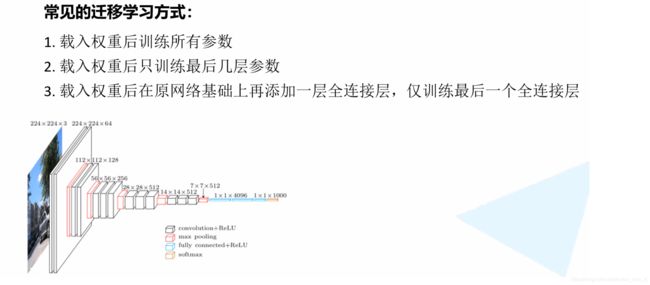
载入预训练模型方法有两种,一种直接在net = resnet34()中添加num_class参数如net = resnet34(num_class=5),
另外一种使用默认num_class再另外添加一个全连接层net.fc = nn.Linear(inchannel, 5)
from tkinter import Variable

import torch
import torch.nn as nn
from torchvision import transforms, datasets
import json
import matplotlib.pyplot as plt
import os
import torch.optim as optim
from model import resnet34, resnet101 #下载预训练模型,迁移学习
import os
os.environ["CUDA_VISIBLE_DEVICES"] = "0,2,3"
device = torch.device("cuda:0" if torch.cuda.is_available() else "cpu")
print(device)

#注意这里的Normalize的参数跟前几个模型不一样
data_transform = {
    "train": transforms.Compose([transforms.RandomResizedCrop(224),
                                 transforms.RandomHorizontalFlip(),
                                 transforms.ToTensor(),
                                 transforms.Normalize([0.485, 0.456, 0.406], [0.229, 0.224, 0.225])]),
    "val": transforms.Compose([transforms.Resize(256), #将最小边进行缩放
                               transforms.CenterCrop(224),
                               transforms.ToTensor(),
                               transforms.Normalize([0.485, 0.456, 0.406], [0.229, 0.224, 0.225])])}


data_root = os.path.abspath(os.path.join(os.getcwd(), "../.."))  # get data root path
image_path = data_root + "/data_set/flower_data/"  # flower data set path

train_dataset = datasets.ImageFolder(root=image_path+"train",
                                     transform=data_transform["train"])
train_num = len(train_dataset)

# {'daisy':0, 'dandelion':1, 'roses':2, 'sunflower':3, 'tulips':4}
flower_list = train_dataset.class_to_idx
cla_dict = dict((val, key) for key, val in flower_list.items())
# write dict into json file
json_str = json.dumps(cla_dict, indent=4)
with open('class_indices.json', 'w') as json_file:
    json_file.write(json_str)

batch_size = 16
#shuffle=ture随机打乱
train_loader = torch.utils.data.DataLoader(train_dataset,
                                           batch_size=batch_size, shuffle=True,
                                           num_workers=0)

validate_dataset = datasets.ImageFolder(root=image_path + "val",
                                        transform=data_transform["val"])
val_num = len(validate_dataset)
validate_loader = torch.utils.data.DataLoader(validate_dataset,
                                              batch_size=batch_size, shuffle=False,
                                              num_workers=0)


try:
    net = resnet34()#实例化,没有传参?
    # net.load_state_dict(torch.load(model_weight_path), strict=False) 载入模型的另外一种方法
except RuntimeError as exception:
    if "out of memory" in str(exception):
        print("WARNING: out of memory")
        if hasattr(torch.cuda, 'empty_cache'):
            torch.cuda.empty_cache()
    else:
        raise exception
# load pretrain weights
model_weight_path = "./resnet34-pre.pth"  #保存权重路径
missing_keys, unexpected_keys = net.load_state_dict(torch.load(model_weight_path), strict=False)  #载入模型权重
# for param in net.parameters():
#     param.requires_grad = False
# change fc layer structure
inchannel = net.fc.in_features  #输入特征矩阵的深度
net.fc = nn.Linear(inchannel, 5)
net.to(device)

loss_function = nn.CrossEntropyLoss()
optimizer = optim.Adam(net.parameters(), lr=0.0001)

best_acc = 0.0
save_path = './resNet34.pth'
for epoch in range(3):
    # train
    net.train()
    running_loss = 0.0
    for step, data in enumerate(train_loader, start=0):
        images, labels = data
        optimizer.zero_grad()
        if hasattr(torch.cuda, 'empty_cache'):
            torch.cuda.empty_cache()


        logits = net(images.to(device))
        loss = loss_function(logits, labels.to(device))

        loss.backward()
        optimizer.step()

        # print statistics
        running_loss += loss.item()
        # print train process
        rate = (step+1)/len(train_loader)
        a = "*" * int(rate * 50)
        b = "." * int((1 - rate) * 50)
        print("\rtrain loss: {:^3.0f}%[{}->{}]{:.4f}".format(int(rate*100), a, b, loss), end="")
    print()
    with torch.no_grad():
    # validate
        net.eval()
    acc = 0.0  # accumulate accurate number / epoch
    with torch.no_grad():
        for val_data in validate_loader:
            val_images, val_labels = val_data
            outputs = net(val_images.to(device))  # eval model only have last output layer
            # loss = loss_function(outputs, test_labels)
            predict_y = torch.max(outputs, dim=1)[1]
            acc += (predict_y == val_labels.to(device)).sum().item()
        val_accurate = acc / val_num
        if val_accurate > best_acc:
            best_acc = val_accurate
            torch.save(net.state_dict(), save_path)
        print('[epoch %d] train_loss: %.3f  test_accuracy: %.3f' %
              (epoch + 1, running_loss / step, val_accurate))

print('Finished Training')
结果:
D:\anaconda3\python.exe D:/deep-learning-for-image-processing-master/pytorch_classification/Test5_resnet/train.py
cpu
train loss: 100%[**************************************************->]0.8273
[epoch 1] train_loss: 0.502 test_accuracy: 0.896
train loss: 100%[**************************************************->]0.4640
[epoch 2] train_loss: 0.350 test_accuracy: 0.918
train loss: 100%[**************************************************->]0.1510
[epoch 3] train_loss: 0.296 test_accuracy: 0.926
Finished TrainingProcess finished with exit code 0
3.predict.py
import torch
from model import resnet34
from PIL import Image
from torchvision import transforms
import matplotlib.pyplot as plt
import json
import os
os.environ["CUDA_VISIBLE_DEVICES"] = "0"
device = torch.device("cuda:0" if torch.cuda.is_available() else "cpu")

data_transform = transforms.Compose(
    [transforms.Resize(256),
     transforms.CenterCrop(224),
     transforms.ToTensor(),
     transforms.Normalize([0.485, 0.456, 0.406], [0.229, 0.224, 0.225])])

# load image
img = Image.open("../tulip.jpg")
plt.imshow(img)
# [N, C, H, W]
img = data_transform(img)
# expand batch dimension
img = torch.unsqueeze(img, dim=0)

# read class_indict
try:
    json_file = open('./class_indices.json', 'r')
    class_indict = json.load(json_file)
except Exception as e:
    print(e)
    exit(-1)

try: # create model
    model = resnet34(num_classes=5)
except RuntimeError as exception:
    if "out of memory" in str(exception):
        print("WARNING: out of memory")
        if hasattr(torch.cuda, 'empty_cache'):
            torch.cuda.empty_cache()
    else:
        raise exception

# load model weights
model_weight_path = "./resNet34.pth"
model.load_state_dict(torch.load(model_weight_path, map_location=device))
model.eval()
with torch.no_grad():
    # predict class
    output = torch.squeeze(model(img))
    predict = torch.softmax(output, dim=0)
    predict_cla = torch.argmax(predict).numpy()
print(class_indict[str(predict_cla)], predict[predict_cla].numpy())
plt.show()
结果:
D:\anaconda3\python.exe D:/deep-learning-for-image-processing-master/pytorch_classification/Test5_resnet/predict.py
tulips 0.98700213Process finished with exit code 0


