信息收集之:主动信息收集——端口扫描
信息收集之:主动信息收集——端口扫描
- 2 端口扫描
-
- 2.1 UDP 端口扫描
-
- 2.1.1 SCAPY
- 2.1.2 NMAP
- 2.2 TCP 端口扫描
-
- 2.2.1 僵尸扫描
- 2.2.2 隐蔽扫描
-
- 2.2.2.1 SCAPY
- 2.2.2.2 NMAP
- 2.2.2.3 hping
- 2.2.3 全连接扫描
-
- 2.2.3.1 SCAPY
- 2.2.3.2 NMAP
- 2.2.3.3 NC
- 2.2.3.4 dmitry(了解)
郑重声明:
本笔记编写目的只用于安全知识提升,并与更多人共享安全知识,切勿使用笔记中的技术进行违法活动,利用笔记中的技术造成的后果与作者本人无关。倡导维护网络安全人人有责,共同维护网络文明和谐。
2 端口扫描
2.1 UDP 端口扫描
-
原理
- 端口关闭:ICMP port-unreachable 响应,目标系统不响应 ICMP port-unreachable 时,可能产生误判(认为端口是开放的)
- 端口开放:没有回包
-
完整的UDP应用层请求
- 准确性高
- 耗时巨大
2.1.1 SCAPY
#!/usr/bin/python
# description: print the udp port number if the host open the port,otherwise continue

import logging

logging.getLogger("scapy.runtime").setLevel(logging.ERROR)
from scapy.all import *
import time
import sys

if len(sys.argv) != 4:
    print("./udp_scan.py [target ip] [first port] [last port]")
    print("example ./udp_scan.py 10.0.0.5 1 100")
    print("example will UDP port scan ports 1 to 100 on 10.0.0.5")

ip = sys.argv[1]
start = int(sys.argv[2])
end = int(sys.argv[3])

for port in range(start, end):
    a = sr1(IP(dst=ip) / UDP(dport=port), timeout=5, verbose=0)
    time.sleep(1)
    if a == None:
        print(port)
    else:
        pass
2.1.2 NMAP
# UDP 扫描
nmap -sU 172.30.26.130 --open
nmap -sU -p68 172.30.26.130
nmap -sU -p 1-200 -iL iplist.txt --open
2.2 TCP 端口扫描
基于链接的协议,三次握手。所有的TCP扫描方式都是基于三次握手的变化来判断目标端口状态
扫描方式有:
- 僵尸扫描
- 隐蔽扫描
- 全连接扫描
2.2.1 僵尸扫描
僵尸扫描特点:
- 极其隐蔽
- 实施条件苛刻
- 扫描发起方可以地址伪造
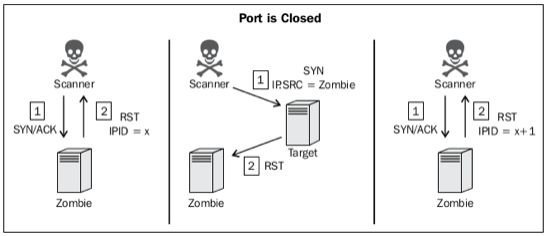
- 必须要有僵尸机(机器闲置,但不被控制,操作系统 IPID 递增,在 IP 包头里的 ID 字段,现在的 linux 与 windows 系统的 ID 随机产生,早期的 windows 系统是顺序产生的[如:XP])
过程解析:
- 由扫描者向僵尸机发送 SYN/ACK 包,,然后Zombie(假设此时系统产生的 IPID 为 x )会回个主机一个 RST,主机将会得到 Zombie 的 IPID
- 扫描者向目标服务器发送 SYN 包,并将发送时 IP 伪造为僵尸机
- 如果目标服务器端口开放,会向僵尸机发送 SYN/ACK 包 , 由于僵尸机并没有发送任何的包,僵尸机会向目标主机发送 RST 包,且僵尸机 IPID 将会增加1(x+1)
- 如果目标服务器端口未开放,将返回给僵尸机 RST 包,僵尸机收到 RST 包后不会有任何反应,所以IPID不会改变(依旧是x)
>>> ip=IP()
>>> tcp=TCP()
>>> rz=(i/t)
>>> rt=(i/t)

# 向僵尸机发送 SYN,ACK 包
>>> rz[IP].dst=IPz
>>> rz[TCP].dport=445
>>> rz[TCP].flags="SA"

# 向目标服务器发送 SYN 包,发送时 IP 伪造为僵尸机
>>> rt[IP].src=IPz
>>> rt[IP].dst=IPt
>>> rt[TCP].dport=25
>>> rt[TCP].flags="S"

# 确定当前僵尸机 IP ID 序列数
>>> az1=sr1(rz)
# 伪造为僵尸机 IP 扫描目标主机端口
>>> at=sr1(rt)
# 确认扫描后的僵尸机的 IP ID 序列数 是否比 az1 大 2.
>>> az2=sr1(rz)

>>> az1.display()
>>> az2.display()
探测网络中的僵尸机
nmap -p 445 192.168.1.133 --script=ipidseq.nse
扫描目标僵尸机
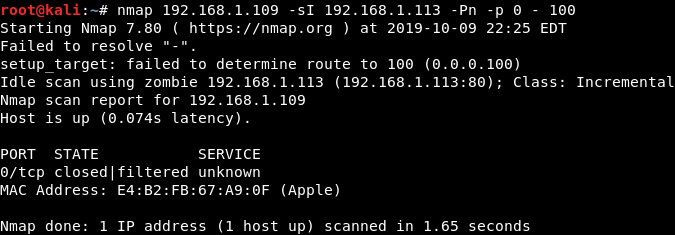
nmap 172.16.36.135 -sI 172.16.36.134 -Pn -p 0-100 # -sI 利用僵尸机扫描目标主机 172.16.36.135
python 脚本实现僵尸扫描
#!/usr/bin/python

import logging

logging.getLogger("scapy.runtime").setLevel(logging.ERROR)
from scapy.all import *


def ipid(zombie):
    reply1 = sr1(IP(dst=zombie) / TCP(flags="SA"), timeout=2, verbose=0)
    send(IP(dst=zombie) / TCP(flags="SA"), verbose=0)
    reply2 = sr1(IP(dst=zombie) / TCP(flags="SA"), timeout=2, verbose=0)
    if reply2[IP].id == (reply1[IP].id + 2):
        print("IPID secquence is incremental and target appears to be idle,ZOMBIE LOCATED")
        response = input("Do you want to use this zombie to perform a scan?(Y or N):")
        if response == "Y":
            target = input("Enter the IP address of the target system:")
            zombiescan(target, zombie)
    else:
        print("Either the IPID secquence is not incremental or the target if not idle. NOT A Good zombie")


def zombiescan(target, zombie):
    print("\nScanning target" + target + "with zombie" + zombie)
    print("\n-------Open Ports On Target-----\n")
    for port in range(1, 100):
        try:
            start_val = sr1(IP(dst=zombie) / TCP(flags="SA", dport=port), timeout=2, verbose=0)
            send(IP(src=zombie, dst=target) / TCP(flags="S", dport=port), verbose=0)
            end_val = sr1(IP(dst=zombie) / TCP(flags="SA"), timeout=2, verbose=0)
            if end_val[IP].id == (start_val[IP].id + 2):
                print(port)
        except:
            pass


print("------Zombie Scan Suite------\n")
print("1.----Identity Zombie Host\n")
print("2.----Preform Zombie Scan\n")
aws = input("Select an Option (1 or 2):")
if aws == "1":
    zombie = input("Enter IP address to test IPID sequence:")
    ipid(zombie)
else:
    if aws == "2":
        zombie = input("Enter IP address for zombie System:\n")
        target = input("Enter IP address for Scan Target:\n")
        zombiescan(target, zombie)

# 使用脚本:
# 如果脚本是从windows移过来的:
# vi xxx.py
# :set fileformat=unix
# :wq
# chmod u+x xxx.py
# ./xxx.py
2.2.2 隐蔽扫描
隐蔽扫描特点:
-
不建立完整链接,只发送SYS包,返回SYS/ACK包则开放,扫描者的机器因为没有建立完整的 TCP 链接,会自动回复 RST 包断开与目标主机的链接,可抓包查看:
>>> sr1(IP(dst='192.168.2.1')/TCP(flags='S',dport=80),timeout=1,verbose=1) -
若目标主机回复的是一个RST/ACK,则表示该机器存在,但当前扫描的端口是没有开放的
>>> sr1(IP(dst='192.168.2.125')/TCP(flags='S',dport=1234),timeout=1,verbose=1) -
还有一个情况是不回复任何的数据,也表示该机器存在,但当前扫描的端口是没有开放
>>> sr1(IP(dst='192.168.2.1')/TCP(flags='S',dport=1234),timeout=1,verbose=1) -
应用层日志不会记录,网络层日志可能记录
2.2.2.1 SCAPY
通过 python 脚本批量扫描开放端口
#!/usr/bin/python
import logging

logging.getLogger("scapy.runtime").setLevel(logging.ERROR)
from scapy.all import *
import time
import sys

if len(sys.argv) != 4:
    print("./syn_scan.py [target ip] [first port] [last port]")
    print("example ./udp_scan.py 10.0.0.5 1 100")
    print("example will TCP SYN scan ports 1 to 100 on 10.0.0.5")
    sys.exit()

ip = sys.argv[1]
start = int(sys.argv[2])
end = int(sys.argv[3])

for port in range(start, end):
    a = sr1(IP(dst=ip) / TCP(dport=port), timeout=1, verbose=0)
    time.sleep(1)
    if a is None:
        pass
    else:
        if int(a[TCP].flags) == 18:
            print(port)
        else:
            pass

# 注:为什么 flags==18 ?
# 抓包发现 SYN 和 ACK 分别是 2 和 2 的 4 次方即为 16,加在一起恰好为18
2.2.2.2 NMAP
# Nmap默认扫描从1到1024再加上nmap-services列出的端口
nmap -sS 192.168.2.125 --open

# 全端口扫描
nmap -sS 192.168.2.125 -p- --open
nmap -sS 192.168.2.125 -p1-65535 --open
nmap -sS -iL iplist.txt -p 80,21,22,23 --open
2.2.2.3 hping
# 使用 -8 扫描模式,配合 -S TCP Syn 包进行端口扫描,速度最快
hping3 -8 80,22 -S 192.168.2.125

# 全端口扫描
hping3 -8 1-65535 -S 192.168.2.125

# -c 100 发送一百个包,和 -p ++1 组合,意味对端口 1-100 分别发送 SYN 包,
# -S(spoof)参数用于伪造源 IP 地址,伪造后本机无法查看扫描结果,只有登陆伪造的 192.168.2.122 主机器才可以查看结果。
# 这种方式特点:
# 	优点:非常隐蔽,基本不会被发现,在目标看来是另外一个机器发送的探测数据包
# 	缺点:麻烦,需要能登陆伪造的主机
hping3 -c 100 -S -p ++1 -a 192.168.2.122 192.168.2.125
2.2.3 全连接扫描
2.2.3.1 SCAPY
SCAPY 扫描不需要再返回原始数据包(raw packets),但全连接扫描对 SCAPY 来说比较困难:
- 若使用 SCAPY 构造了一个 SYN 包发送到目标服务器,目标服务器返回给我一个 SYN/ACK,此时我的操作系统内核会认为 SYN/ACK 是非法包,会直接先发 RST 包中断连接。原因在于:
- 扫描主机发使用SCAPY发送 SYN 包时,自己机器并不知情,当目标服务器返回 SYN/ACK 包时,扫描主机看来这个包是非法的,当收到一个非法的 SYN/ACK 包时,扫描主机会返回一个 RST 包。
- 当扫描主机返回 RST 包后,连接终结,这时扫描主机通过 SCAPY 再向目标服务器发送 ACK 确认包时,目标服务器突然收到一个 ACK 不能理解,就会返回一个 RST 包,这时端口情况就扫描不出来了。
使用 python 脚本实现 SCAPY 全连接扫描:01
#!/usr/bin/python
import logging

logging.getLogger("scapy.runtime").setLevel(logging.ERROR)
from scapy.all import *

response = sr1(IP(dst="192.168.22.129") / TCP(dport=80, flags="S"))
reply = sr1(IP(dst="192.168.22.129") / TCP(dport=80, flags="A", ack=(response[TCP].seq + 1)))
由结果可知:这里并不是正确的一个三次握手的过程,因为操作系统内核的自动中断连接。
- 前两个包正常发送接收;
- 第三个 RST 包是 扫描机 Linux 内核自动发送的 RST 用于中断连接。
- 第四个包:强行发送 ACK 建立连接,最后一个包直接回 RST 因为要拒绝非法的连接
通过在扫描主机上配置防火墙将去往目标机的带有 RST flags 的包丢弃:
iptables -A OUTPUT -p tcp --tcp-flags RST RST -d 192.168.2.125 -j DROP
使用 python 脚本实现 SCAPY 全连接扫描:02
同样需要在扫描主机上配置防火墙将去往目标机的带有 RST flags 的包丢弃
iptables -A OUTPUT -p tcp --tcp-flags RST RST -d 192.168.2.125 -j DROP
#!/usr/bin/python
import logging

logging.getLogger("scapy.runtime").setLevel(logging.ERROR)
from scapy.all import *

SYN = sr1(IP(dst="192.168.2.125") / TCP(dport=80, flags="S"))

print("- -SENT- -")
SYN.display()

print("\n\n- -RECEIVE- -")
response = sr1(SYN, timeout=1, verbose=0)
response.display()

if int(response[TCP].flags) == 18:
    print("\n\n- -SENT- -")
    A = sr1(IP(dst="192.168.2.125") / TCP(dport=80, flags="A", ack=(response[TCP].seq + 1)))
    A.display()
    print("\n\n- -RECEIVE- -")
    response2 = sr1(A, timeout=1, verbose=0)
    response2.display()
else:
    print("SYN-ACK NOT RETURNED")
2.2.3.2 NMAP
# 全端口全连接扫描
nmap -sT -p- 192.168.2.125 --open

# 多端口全连接扫描
nmap -sT -p 80 192.168.2.125
nmap -sT -p 22,80 192.168.2.125 --open
nmap -sT -p 22-80 192.168.2.125 --open
2.2.3.3 NC
# -n 仅 IP 形式;-w 请求超时时间;-z 扫描模式
nc -nv -w 1 -z 192.168.2.125 1-100

# 由 shell 脚本执行范围扫描
for x in $(seq 20 30); do nc -nv -w 1 -z 192.168.2.125 $x; done
2.2.3.4 dmitry(了解)
默认 150 个最常用的端口。
dmitry -p 1-100 192.168.2.125 -o full_tcp_scan.txt


