Compose搭档 — ViewModel、LiveData
文章目录
- Compose如虎添翼 -- 搭配ViewModel、LiveData!!!
-
- 一、需求一览
- 二、架构、流程
- 三、Compose UI开发
-
- 3.1、搜索框
- 3.2、折线图
- 四、ViewModel 业务开发
- 五、Compose和ViewModel建立关系
- 六、总结
Compose如虎添翼 – 搭配ViewModel、LiveData!!!
Compose系列文章,请点原文阅读。原文:是时候学习Compose了!
单纯的使用Compose来进行UI的展示,相信我们已经运用自如了,接下来的文章我们一起搭配其他Jetpack组件,例如LiveData,ViewModel、Room等来了解下Compose在现代化的开发上是多么的简单、舒适!
一、需求一览
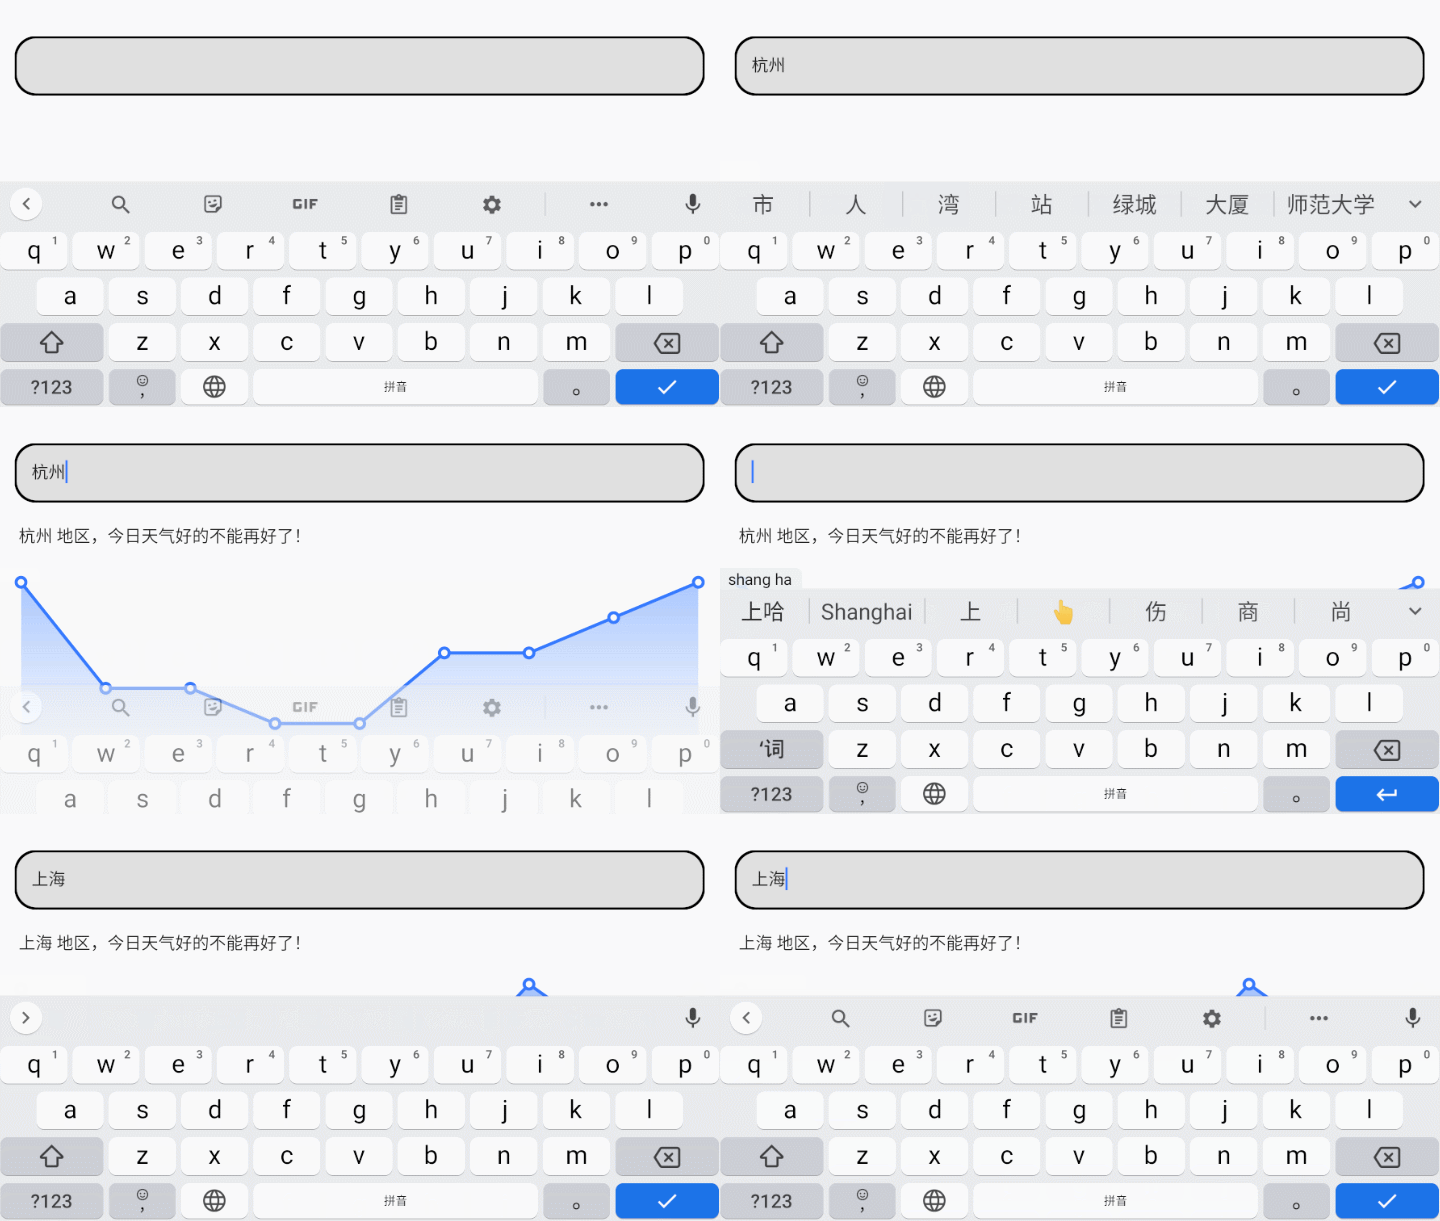
我们一起来完成一个需求:首先我们需要一个搜索框,在搜索框中输入城市名,点击键盘回车按钮后请求网络接口获取到该城市的天气信息 – 今日天气,9日天气,并展示在页面上。
二、架构、流程
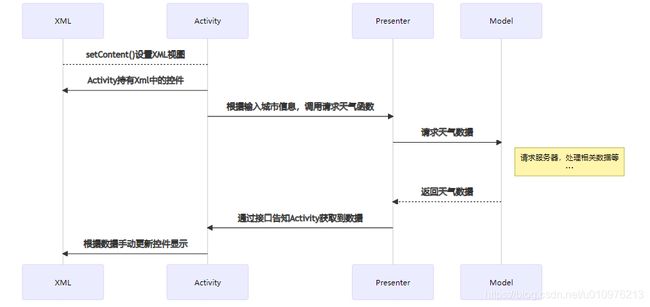
假如使用之前 View + MVP架构 的模式,整体的流程图应该是如下所示:
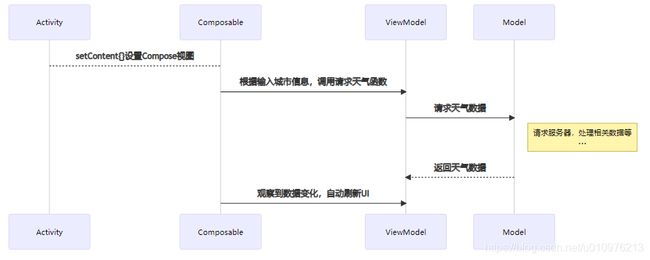
那么在 Compose + MVVM架构 中的话,流程图会有什么变化呢?(其实想使用MVI架构,但是又需要加入一定的解释成本,所以后续文章再专门结合MVI做示例吧)
如上所示,很明显的Activity和Compose在这里只要一个 setContent{} 的关系,后续都是Compose直接和ViewModel之间的交互,Presenter和Model、ViewModel和Model这两层类似,不做赘述。
三、Compose UI开发
接下来我们先使用Compose编写UI,根据需求,我们需要一个搜索框用来输入数据,然后搜索到数据后需要展示今日天气数据、9日天气数据。那么简洁一点,我们就把今日数据用一行文字表示出来,9日温度数据用一个自定义折线图表示出来。
3.1、搜索框
首先是输入框(搜索框),我们使用TextField来完成搜索框功能,通过设置colors相关参数来隐藏其默认自带的下划线指示器,通过shape和modifier参数来控制其圆角边框样式。通过配置keyboardOptions和keyboardActions来获取点击键盘的回车键时触发的事件。 还需要注意一点,这里我们为了在点击回车键后隐藏键盘使用了还在实验阶段的API – LocalSoftwareKeyboardController。整体搜索框代码如下所示:
@ExperimentalComposeUiApi
@Composable
fun SearchView(
    onClick: (city: String) -> Unit
) {

    val input = remember {

        mutableStateOf("")
    }

    //键盘控制器,可控制键盘的展示和隐藏
    val keyboardController = LocalSoftwareKeyboardController.current

    //输入框圆角设置
    val corner = 20.dp

    TextField(
        value = input.value,
        onValueChange = {

            input.value = it
        },
        colors = TextFieldDefaults.textFieldColors(
            //输入框下部的指示线
            focusedIndicatorColor = Color.Transparent,
            unfocusedIndicatorColor = Color.Transparent,
        ),

        //外观配置
        modifier = Modifier
            .fillMaxWidth()
            .border(
                width = 2.dp,
                color = Color.Black,
                shape = RoundedCornerShape(corner)
            ),
        shape = RoundedCornerShape(corner),

        //键盘配置,输入完毕后隐藏键盘
        keyboardOptions = KeyboardOptions(imeAction = ImeAction.Done),
        keyboardActions = KeyboardActions(
            onDone = {

                keyboardController?.hide()
                onClick(input.value)
            }
        )
    )
}
3.2、折线图
接下来是自定义温度折线图,首先我们来分析下9天的数据,那么需要9个点,也就是屏幕需要8等分,然后分别绘制线段和端点就可以了。整体关于Canvas绘制的请查看之前的文章,这里我们需要注意一点就是:绘制的端点是有半径的,我们绘制区域的时候,x轴前后需要留出来这个半径能把首尾的端点全部展示出来,否则首尾的端点只能显示半个。代码如下:
@Composable
fun TempLineChart(
    modifier: Modifier,
    weatherDaily: List<WeatherDaily>
) {


    if (weatherDaily.isEmpty()) {

        return
    }

    val days = weatherDaily.size

    Canvas(
        modifier = modifier
    ) {


        //圆点的集合
        val points: ArrayList<Offset> = ArrayList()

        //温度的差值(最大温度的差值)
        val tempMax = weatherDaily.maxOf {

            it.tempMax.toInt()
        }
        val tempMin = weatherDaily.minOf {

            it.tempMax.toInt()
        }
        val diff = tempMax - tempMin


        //绘制的直线的宽度
        val lineStrokeWidth = 8f

        //绘制的最大圆点的直径,注意是半径,绘制时候需要乘以2
        val pointStrokeWidth = 16f

        val path = Path()

        //起点位置
        val startX = pointStrokeWidth
        val startY = size.height

        //平均每天的步长,需剔除圆点的宽度
        val xOffset = (size.width - pointStrokeWidth * 2) / (days - 1)

        val endX = size.width - pointStrokeWidth


        path.moveTo(startX, startY)

        var lastOffset: Offset? = null

        for ((index, weatherDailyBean) in weatherDaily.withIndex()) {


            val x = startX + xOffset * index

            val y =
                startY - (size.height / (diff + 2) * ((weatherDailyBean.tempMax.toInt() - tempMin) + 1))

            val offset = Offset(x, y)
            points.add(offset)

            //路径
            path.lineTo(x, y)

            //绘制直线
            if (lastOffset != null) {

                drawLine(
                    color = Color(0xFF357AFF),
                    start = lastOffset,
                    end = offset,
                    strokeWidth = lineStrokeWidth,
                )
            }

            lastOffset = offset
        }


        path.lineTo(endX, startY)
        path.close()

        //绘制路径
        drawPath(
            path = path,
            brush = Brush.verticalGradient(
                colors = arrayListOf(Color(0x80357AFF), Color(0x00000000))
            ),
        )

        //绘制蓝色圆点
        drawPoints(
            pointMode = PointMode.Points,
            color = Color(0xFF357AFF),
            strokeWidth = pointStrokeWidth * 2,
            points = points,
            cap = StrokeCap.Round,
        )

        //绘制白色圆点
        drawPoints(
            pointMode = PointMode.Points,
            color = Color.White,
            strokeWidth = pointStrokeWidth,
            points = points,
            cap = StrokeCap.Round,
        )

    }
}
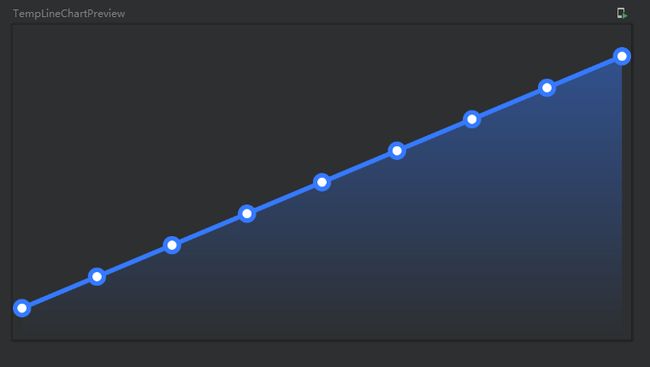
OK,然后造几条伪数据,我们使用@Preview来预览下显示效果:
@Preview
@Composable
fun TempLineChartPreview() {


    val weatherDailyList = ArrayList<WeatherDaily>()
    for (i in 1..9) {

        weatherDailyList.add(WeatherDaily(tempMax = i.toString()))
    }

    TempLineChart(
        modifier = Modifier
            .height(200.dp)
            .fillMaxWidth(),
        weatherDailyList
    )
}
四、ViewModel 业务开发
至此,我们单独的UI已经编写完毕了,接下来是ViewModel的部分,网络请求这块无疑是Retrofit套餐,但是Retrofit和Compose没有任何关系,所以这里我们暂时不花篇幅讲解其使用方式,直接使用伪数据来代替网络请求结果,后续文章我们会结合Hilt来示例Retrofit、Room等相关知识。ViewModel相关代码如下:
class MainViewModel : ViewModel() {


    /**
     * 城市名
     */
    private val _cityName = MutableLiveData<String>()

    /**
     * 对外单独暴漏修改城市名方法
     */
    fun updateCityName(name: String) {

        _cityName.value = name
    }

    /**
     * 当日天气【当_cityName值变更的时候,这里会响应】
     */
    val weatherNow: LiveData<String> = Transformations.switchMap(_cityName) {

        MutableLiveData(" ${
       _cityName.value} 地区,今日天气好的不能再好了!")
    }

    /**
     * n天天气【当_cityName值变更的时候,这里会响应】
     */
    val weatherDays: LiveData<List<WeatherDaily>> = Transformations.switchMap(_cityName) {

        val weatherDailyList = ArrayList<WeatherDaily>()
        for (i in 1..9) {

            val temp = (15..20).random()
            weatherDailyList.add(WeatherDaily(tempMax = temp.toString()))
        }
        MutableLiveData(weatherDailyList)
    }
}
注意:我们使用了Transformations类,当_cityName的值变化的时候, switchMap( _cityName ) 会响应,我们处理过后返回一个新的LiveData的值,weatherNow和weatherDays这两个变量就会被赋值。
【其实这里的代码设计方式再深入想一下,好像又能感受到一丝 MVI Intent的思想。】
五、Compose和ViewModel建立关系
Compose UI和ViewModel都搞定了,那么他们之间如何像上文流程图中表示的那样可以建立联系呢?其实官方给我们提供了一个库:androidx.lifecycle:lifecycle-viewmodel-compose:$latestVersion,该库提供了一个**viewModel()**函数,可以直接在@Composable 函数中访问到相关ViewModel的实例,例如:
@ExperimentalComposeUiApi
@Composable
fun MainScreen(viewModel: MainViewModel = viewModel()) {


    val weatherNow = viewModel.weatherNow.observeAsState()
    val weatherDays = viewModel.weatherDays.observeAsState(arrayListOf())

}
如上,我们在参数中直接使用viewModel()来获取MainViewModel实例,而在MainScreen()函数中我们还使用到了一个 observeAsState() 函数,使用该函数也需要引用一个扩展库:androidx.compose.runtime:runtime-livedata:$latestVersion,该函数的作用就是将ViewModel提供的LiveData数据转换为Compose需要的State数据。
当LiveData数据更新后,LiveData转换为State,而Compose会根据State数据来自行刷新,所以将之前的UI控件组合起来,再将State数据设置进去,相关代码如下所示:
@ExperimentalComposeUiApi
@Composable
fun MainScreen(viewModel: MainViewModel = viewModel()) {


    val weatherNow = viewModel.weatherNow.observeAsState()
    val weatherDays = viewModel.weatherDays.observeAsState(arrayListOf())

    Column(
        modifier = Modifier
            .fillMaxSize()
            .padding(16.dp)
    ) {


        Spacer(modifier = Modifier.height(20.dp))
        SearchView(
            onClick = {

                viewModel.updateCityName(it)
            })
        Spacer(modifier = Modifier.height(20.dp))

        Text(
            text = weatherNow.value ?: ""
        )

        TempLineChart(
            modifier = Modifier
                .height(200.dp)
                .fillMaxWidth(),
            weatherDaily = weatherDays.value
        )
    }
}
OK,至此整体就大功告成了,运行下代码试试吧,能不能达到如下效果呢?

六、总结
整体的话,重点在于Compose和ViewModel的结合、以及LiveData和State的使用。这其中我们还要注意Compose的架构思想:
- 事件向上传递,例如搜索框的回车事件,暴漏出来给上层处理;
- 状态向下传递,例如网络请求结果数据等向UI层传递显示,可以封装成网络请求中、请求成功、请求失败等状态向UI传递;
还有一个也比较重要:
- 单一信任源,上文中没有明显的示例,但是你可以观察到TextField中输入的数据是根据 input 的值来进行变化的。举个View中的例子,比如CheckBox,当你点击的时候,状态会立即进行改变,此时如果网络请求失败了,我们还需要把CheckBox的显示状态重置。但是在Compose中,CheckBox的显示状态改变和TextField一样,只有input的值变化了,它才变化。也就是说CheckBox需要订阅一个变量,你只有请求网络成功后或者失败后更改此变量,CheckBox才会根据此变量更改显示状态。


