编程中免不了要写配置文件,今天我们继续Python网络编程,学习一个比 JSON 更简洁和强大的语言————YAML 。本文老胡简单介绍 YAML 的语法和用法,以及 YAML 在机器学习项目中的应用实例。欢迎大家一起学习,也欢迎点赞、在看、分享!
前篇:我开始学Python网络编程了
YAML
YAML 是 "YAML Ain't a Markup Language"(YAML 不是一种标记语言)的递归缩写。YAML 的语法和其他高级语言类似,并且可以简单表达清单、散列表,标量等数据形态。它使用空白符号缩进和大量依赖外观的特色,特别适合用来表达或编辑数据结构、各种配置文件、倾印调试内容、文件大纲。YAML 的配置文件后缀为 .yaml
YAML 它的基本语法规则如下:
- 大小写敏感
- 使用缩进表示层级关系
- 缩进时不允许使用Tab键,只允许使用空格。
- 缩进的空格数目不重要,只要相同层级的元素左侧对齐即可
-
号 表示注释
YAML 支持的数据结构有三种:
- 对象:键值对的集合,对象键值对使用冒号结构表示 key: value,冒号后面要加一个空格。
- 数组:一组按次序排列的值,又称为序列/ 列表,用 - 表示。
- 纯量(scalars):单个的、不可再分的值
YAML 用法
安装
pip install pyyaml
yaml 文件格式很简单,比如:
# categories.yaml file

sports: #注意,冒号后面要加空格

  - soccer # 数组
  - football
  - basketball
  - cricket
  - hockey
  - table tennis

countries:

  - Pakistan
  - USA
  - India
  - China
  - Germany
  - France
  - Spain
python 读取 yaml 文件
# read_categories.py file

import yaml

with open(r'categories.yaml') as file:
    documents = yaml.full_load(file)

    for item, doc in documents.items():
        print(item, ":", doc)
运行结果:
sports : ['soccer', 'football', 'basketball', 'cricket', 'hockey', 'table tennis']
countries : ['Pakistan', 'USA', 'India', 'China', 'Germany', 'France', 'Spain']
以上便是 YAML 最基础的应用了,可能大家还是有点一头雾水,咱们更进一步,看看在机器学习项目中如何写 YAML 配置文件。
YAML & Machine Learning
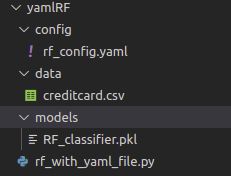
我们直接改写100天搞定机器学习|Day62 随机森林调参实战中的代码。
写配置文件rf_config.yaml
#INITIAL SETTINGS
data_directory: ./data/
data_name: creditcard.csv
target_name: Class
test_size: 0.3
model_directory: ./models/
model_name: RF_classifier.pkl


#RF parameters
n_estimators: 50
max_depth: 6
min_samples_split: 5
oob_score: True
random_state: 666
n_jobs: 2
完整代码,可以对比源代码看看区别:
# rf_with_yaml_file.py
import os
import yaml
import joblib
import numpy as np
import pandas as pd
from sklearn.model_selection import train_test_split
from sklearn.ensemble import RandomForestClassifier
from sklearn.metrics import roc_auc_score

CONFIG_PATH = "./config/"


def load_config(config_name):
    with open(os.path.join(CONFIG_PATH, config_name)) as file:
        config = yaml.safe_load(file)

    return config


config = load_config("rf_config.yaml")

df = pd.read_csv(os.path.join(config["data_directory"], config["data_name"]))
data = df.iloc[:, 1:31]


X = data.loc[:, data.columns != config["target_name"]]
y = data.loc[:, data.columns == config["target_name"]]

number_records_fraud = len(data[data.Class == 1])
fraud_indices = np.array(data[data.Class == 1].index)
normal_indices = data[data.Class == 0].index
random_normal_indices = np.random.choice(
    normal_indices, number_records_fraud, replace=False)
random_normal_indices = np.array(random_normal_indices)
under_sample_indices = np.concatenate(
    [fraud_indices, random_normal_indices])
under_sample_data = data.iloc[under_sample_indices, :]
X_undersample = under_sample_data.loc[:,
                                      under_sample_data.columns != config["target_name"]]
y_undersample = under_sample_data.loc[:,
                                      under_sample_data.columns == config["target_name"]]

X_train, X_test, y_train, y_test = train_test_split(
    X, y, test_size=config["test_size"], random_state=42
)


rf1 = RandomForestClassifier(
    n_estimators=config["n_estimators"],
    max_depth=config["max_depth"],
    min_samples_split=config["min_samples_split"],
    oob_score=config["oob_score"],
    random_state=config["random_state"],
    n_jobs=config["n_jobs"]
)

rf1.fit(X_train, y_train)
print(rf1.oob_score_)
y_predprob1 = rf1.predict_proba(X_test)[:, 1]
print("AUC Score (Train): %f" % roc_auc_score(y_test, y_predprob1))

joblib.dump(rf1, os.path.join(config["model_directory"], config["model_name"]))
reference
https://www.runoob.com/w3cnote/yaml-intro.html
https://www.ruanyifeng.com/blog/2016/07/yaml.html
