Environment
3 VM Ubuntu 16.04.1 GUI
1 master and 2 slaves
Install Hosts
Create 3 virtual machines. As we need 1 master and 2 slaves, please name the computers as “master-id”, “slave1-id” and “slave2-id”, such as “master-123456”,” slave1-123456”and” slave2-123456”. The image is “Ubuntu 16.04-GUI”.
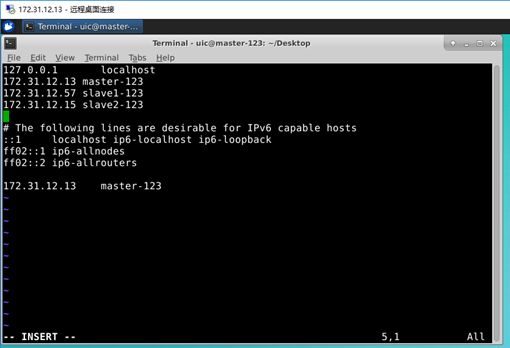
Edit domain name files.
Check your own IP and host name .
Open Terminal on the master host.
$ sudo vi /etc/hosts
Input password ‘’ and press ‘Enter’.
Then press the “Insert” button on your keyboard to edit the domain name file.
Modify the 3 IP addresses and corresponding names of your hosts into the file. Note that the names set in the hosts file should be the same as host names, otherwise unexpected errors will occur.
When finished, press on “Esc” on your keyboard.
Input “:wq!” then “Enter” to save and exit.
Remember this operation for vim or vi editing. “w” means “write”, “q” means “quit”, “!” means “ obligatory”. If you just want to read and exit, just input “:q” then press “Enter”.
Then do the same operations on two slave hosts.(Do not forget this step!!!)
Install JDK
- Install JDK
$sudo apt install openjdk-8-jdk
Input “Y” and press “Enter”.
- Modify the system path file
$ sudo vim /etc/profile
Set the environment variables (operation mentioned above -- Insert, Esc, :wq!, Enter)
export JAVA_HOME=/usr/lib/jvm/java-8-openjdk-amd64/
export PATH=JAVA_HOME/bin
- Put the environment variable into effect immediately
$ source /etc/profile
- Verify
$ java -version
It is okay.
Then install JDK on the two slave hosts.
Set non - password login
Why and how to set ssh non-password login:
http://www.linuxidc.com/Linux/2015-03/114709.htm
1. Generate the public key of SSH.
$ ssh-keygen –t rsa –P ‘ ’ –f ~/.ssh/id_rsa
2. Copy and send files
$ ssh-copy-id slave1-123456
$ ssh-copy-id slave2-123456
Do not forget connect the master self
$ ssh-copy-id localhost
Then do the same operations on the two slave hosts.
On slave1-123456:
$ ssh-keygen –t rsa –P ‘’ –f ~/.ssh/id_rsa
$ ssh-copy-id master-123456
$ ssh-copy-id slave2-123456
On slave2-123456:
$ ssh-keygen –t rsa –P ‘’ –f ~/.ssh/id_rsa
$ ssh-copy-id master-123456
$ ssh-copy-id slave1-123456
3. Test the ssh connection from master to slaves.
On master:
$ ssh slave1-123456
$ ssh slave2-123456
It is okay.
Hadoop Settings
1. Download
$ wget https://mirrors.tuna.tsinghua.edu.cn/apache/hadoop/common/stable/hadoop-3.2.1.tar.gz
2. Unzip the file
We put it in the default directory (/home/uic/hadoop-3.2.1)
$ tar -zxvf hadoop-3.2.1.tar.gz
Set Hadoop configuration files
Set the environment variables
$ cd ~/hadoop-3.2.1/etc/hadoop
$ sudo vim /etc/profile
export HADOOP_HOME=/home/uic/hadoop-3.2.1
export JAVA_HOME=/usr/lib/jvm/java-8-openjdk-amd64/
export PATH=JAVA_HOME/bin:HADOOP_HOME/sbin
1. Configure hadoop-env.sh and yarn-env.sh
$ cd ~/hadoop-3.2.1/etc/hadoop
$ sudo vim hadoop-env.sh
export JAVA_HOME=/usr/lib/jvm/java-8-openjdk-amd64
$ sudo vim yarn-env.sh
export JAVA_HOME=/usr/lib/jvm/java-8-openjdk-amd64
Note: we need create the following folders for the following configuration:
~/hadoop-3.2.1/tmp
~/hadoop-3.2.1/hdfs/name
~/hadoop-3.2.1/hdfs/data
mkdir tmp
mkdir –p hdfs/data
2. core-site.xml
$ cd ~/hadoop-3.2.1/etc/hadoop
$ sudo vim core-site.xml
3. mapred-site.xml
$ sudo vim mapred-site.xml
4. hdfs-site.xml
$ sudo vim hdfs-site.xml
5. yarn-site.xml
$ sudo vim yarn-site.xml
6. Set slave nodesw
$sudo vim workers
slave1-123456
slave2-123456
7. Copy files to slaves
scp -r /home/uic/hadoop-3.2.1/ uic@slave2-123456:~
Test Hadoop
1. Format distributed file system
hdfs namenode –format
2. Start
$ start-all.sh
3. Verify if it is successful
On master host, there should be: NameNode, SecondaryNameNode, Jps and ResourceManager
$ jps
On slave hosts, there should be: Jps, DataNode and NodeManager.
It is successful.
4. Stop
$ stop-all.sh
Note:
If perform “hdfs namenode –format” more than one time, you may encounter the problem that DataNode cannot start.
Try the following command: $ rm –rf /home/uic/hadoop-3.2.1/hdfs/* and then perform the format operation again.
5. test hdfs commands
$ hdfs dfs –mkdir –p /user/uic/hadoop/
Create the directories under HDFS
$ hdfs dfs -put ~/Desktop/test1.txt /user/uic/hadoop/test2.txt
Upload a file to a specified directory and rename it.
$ hdfs dfs –cat /user/uic/hadoop/test2.txt
View the contents of the in directory on HDFS.
$ hdfs dfs -ls /user/uic/hadoop/
List the files under HDFS.
$ hdfs dfs -get /user/uic/hadoop/test2.txt ~/Desktop
Get the file from HDFS
Like put, you can manipulate files and directories.
$ hdfs dfs -rm /user/uic/hadoop/test2.txt
Delete the specified file from HDFS.
$ hdfs dfsadmin –report
View basic statistics for HDFS.
6. Web interface
Once the Hadoop cluster is up and running check the web-ui of the components as described below:
To check the namenode information: http://master-123456:9870
To check the resource manager information: http://master-123456:8088